

If you are a blogger and want to build your own website, having a custom domain is a must. A domain is like a unique address for your blog on the internet. With a custom domain, your blog will have its own identity and it will be easier for your audience to find and remember your website.
There are several platforms where you can publish your blogs, such as WordPress, Hashnode, and Medium. While these platforms provide you with a subdomain (for example, “yourblogname.hashnode.dev”), having a custom domain is important if you want to take your blogging experience to the next level.
Setting up a custom domain is easy and simple. The first step is to purchase a domain from a domain registrar. There are many websites where you can buy a domain, such as GoDaddy, Namecheap, and Google Domains. Make sure to choose a domain name that is related to your blog’s topics and aligns with your goals.
Once you have your own domain, you need to host your website. There are many hosting platforms available, such as Bluehost, SiteGround, and HostGator. Choose a hosting provider that suits your needs and sign up for an account. After signing up, you will receive the necessary details like CNAME and DNS settings.
Now it’s time to set up your custom domain. Log in to your domain registrar’s website, find the DNS settings, and add the CNAME provided by your hosting provider. This will link your domain with your hosting account. Keep in mind that DNS changes may take some time to propagate, so don’t worry if your website doesn’t show up immediately.
Once your custom domain is set up, you can start building your website. If you are using a platform like WordPress, you can install a WordPress theme and start customizing your website’s design. If you are using a platform like Hashnode, you can create a new temple and start populating it with your articles.
In conclusion, having a custom domain is essential if you want to stand out as a blogger. It gives your blog a professional touch and makes it easier for your audience to find you. Follow the steps mentioned above, and you’ll be on your way to creating your own blog domain.
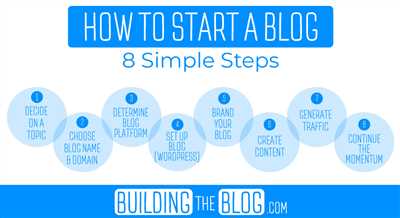
How to Start a Blog
Starting a blog is an exciting journey into the world of blogging. Whether you want to share your thoughts, showcase your expertise, or build an online presence for your business, a blog can be the perfect platform to achieve your goals.
Here is a step-by-step guide on how to start a blog:
- Choose a blogging platform: There are many platforms to choose from when it comes to blogging. WordPress is a popular choice because of its flexibility and ease of use. Other platforms like Blogger and Hashnode are also great options.
- Decide on a domain: Your domain is the web address of your blog. It is like your own piece of online real estate. You can either start with a subdomain like “yourblog.wordpress.com” or choose a custom domain like “yourblog.com”. If you want to build a brand and have more control over your blog, a custom domain is the way to go.
- Set up your hosting: If you choose to go with a custom domain, you will need to set up hosting. There are many hosting providers out there, so make sure to do your research and choose the one that best fits your needs. Some popular hosting providers include Bluehost, SiteGround, and DreamHost.
- Install WordPress: Once you have your domain and hosting set up, you can install WordPress. Most hosting providers offer a one-click installation process, making it easy to get started. If you’re not familiar with WordPress, don’t worry – there are plenty of resources and tutorials available to help you navigate the platform.
- Choose a theme: Your blog’s theme determines its appearance and layout. WordPress offers a wide range of free and paid themes to choose from. Pick a theme that aligns with your blog’s goals and reflects your personal style.
- Start creating content: With your blog all set up, it’s time to start publishing articles. Your blog is a blank canvas, waiting to be filled with your ideas and insights. Write about things you’re passionate about, and don’t be afraid to experiment with different types of content like text, images, and videos.
- Promote your blog: Publishing articles is just the first step. To get your blog noticed, you need to promote it. Use social media, guest posting, and other marketing strategies to get your blog in front of your target audience.
Starting a blog is a simple process that anyone can do. Whether you’re a seasoned blogger or a beginner, these steps will guide you through the process of setting up your own blog and getting started on your blogging journey.
Reason 1: You can host your Hashnode blog on your own domain
If you’re a blogger, one of your goals may be to start a blog on a platform where you have full control over your content and its presentation. That’s where hosting your Hashnode blog on your own domain comes in.
Hashnode is a blogging platform where you can publish your articles and share your experiences with a like-minded community. However, by default, your blog is hosted on a subdomain like yourname.hashnode.dev. While this is a great way to get started and build an audience, having your own domain gives you more freedom and flexibility in the long run.
Here’s an example to illustrate the point: let’s say you have a blog on WordPress.com, which is a popular blogging platform. In order to have your own domain, you need to upgrade to a paid plan and go through a series of steps to set it up. It can sometimes be a complex process.
With Hashnode, hosting your blog on your own domain is a simple and straightforward process. You just need to follow a few steps:
- Buy a domain: Pick a domain registrar (a website that sells domains) and purchase a domain of your choice. Make sure it aligns with your blog’s goals and is easy to remember.
- Point the domain to Hashnode: Once you have your domain, you need to connect it to your Hashnode blog. Hashnode provides easy-to-follow instructions on how to do this. It usually involves setting up a CNAME record or updating your domain’s DNS settings.
- Set up custom domain in Hashnode: After you’ve made the necessary changes in your domain settings, you need to go to your Hashnode dashboard and configure your custom domain. Hashnode will walk you through the process and make sure your blog is now accessible via your own domain.
Once you have your blog hosted on your own domain, you can start populating it with your articles, media, and more. You have full control over the design and layout, allowing you to create a unique and personalized blogging experience.
Hosting your Hashnode blog on your own domain is a big step towards building a professional online presence. It not only gives you more control over your content, but it also helps establish your brand and credibility in your chosen field.
So if you’re serious about blogging and want to take things to the next level, consider hosting your Hashnode blog on your own domain. It’s a simple yet powerful way to make sure your blog stands out from the crowd and has the impact you desire.
What it is like blogging with a custom domain
When it comes to creating a website or a blog, there are various platforms to choose from. Whether it’s Hashnode, Blogger, WordPress, or any other blogging platform, one of the first steps is to set up your own domain. This can be done by purchasing a domain name, hosting it on a platform, and configuring it to work with your chosen blogging platform.
Having a custom domain gives your blog a professional and personalized touch. It allows you to have a unique web address related specifically to your blog or website, making it easier for your audience to find and remember. Additionally, a custom domain allows you to have full control over your website and its content, without the limitations that come with using a subdomain or a platform-provided domain.
One of the main reasons to have a custom domain is that it helps to establish your online presence. It shows that you are serious about your blog or website and that you have long-term goals for it. It also allows you to build your brand and promote yourself or your business effectively.
Once you have your domain set up, the next step is to populate it with your content. This can include blog articles, images, videos, and any other media you deem necessary for your blog. Depending on the hosting platform you choose, this process can be simple or more complex.
For example, if you are using WordPress, you can easily set up your domain and start publishing your articles within minutes. On the other hand, if you opt for a self-hosted solution, you may need to configure your blog using a cPanel or other administrative tools.
Regardless of the platform you choose, it’s important to make sure that your website is easy to navigate and visually appealing. This includes having a user-friendly layout, clear menus, and an attractive design. You want your visitors to stay on your website for a longer time and engage with your content.
Blogging with a custom domain also gives you the flexibility to integrate your blog with other websites or social media platforms. For example, you can link your blog to your social media accounts, making it easy for your followers to find and share your articles.
In conclusion, blogging with a custom domain is a top priority for many bloggers. It allows you to build your brand, establish your online presence, and have full control over your content. With a custom domain, you can create a website that reflects your goals and aspirations, while also providing a great user experience for your visitors.
Top Related Articles
| Once you have set up your own blog domain, you’re ready to start publishing articles on your website. However, before you dive into how to build a blog, it’s important to know what your goals are and what kind of blogging experience you want to have. In this article, we will guide you through the step-by-step process of setting up your own custom domain in WordPress, where you can publish articles on your blog. |
| If you’re new to blogging, it’s a good idea to start with a simple platform like WordPress. They have a user-friendly interface and offer features that make it easy to publish articles and populate your blog with media. Once you have signed up for a WordPress account, you can click on the “My Sites” tab and choose “Domains” to set up a custom domain for your blog. |
| If you already have a domain and hosting, you can set up a custom subdomain for your blog. For example, if your domain is www.example.com, you can create a subdomain called blog.example.com. To do this, you will need to go to your hosting CPanel and look for the “Domains” section. From there, you can click on “Subdomains” and follow the prompts to set up your blog subdomain. |
| One reason many bloggers choose to have their own custom domain is to have more control over their branding and website design. With a custom domain, you can choose a domain name that reflects your blog’s niche and overall theme. This helps visitors easily identify what your blog is about and establishes your blog as a credible source of information. |
| When it comes to blogging, content is key. It’s important to have a strategy in place for creating and publishing articles on your blog. Make sure your articles are well-written, informative, and engaging. Having a consistent flow of high-quality content will help attract readers and keep them coming back for more. |
| In addition to writing articles, it’s also important to promote your blog and engage with your audience on social media. Sometimes, bloggers overlook the power of social media in driving traffic to their website. Platforms like Twitter, Facebook, and Instagram can be great tools for sharing your articles, connecting with your readers, and building a community around your blog. |
| Another important aspect of blogging is search engine optimization (SEO). Make sure you optimize your articles for search engines by using relevant keywords, creating informative meta descriptions, and optimizing your website’s loading speed. SEO can help increase your blog’s visibility in search engine results and drive more organic traffic to your website. |
| If you want to monetize your blog, there are several options available. You can join affiliate marketing programs, display ads on your website, or even create and sell your own products or services. It’s important to choose monetization strategies that align with your blog’s niche and your audience’s interests. |
| Finally, it’s important to keep learning and improving your blogging skills. There are many resources available online that can help you become a better blogger, such as blogging courses, webinars, and online communities like Hashnode. Surrounding yourself with other bloggers and learning from their experiences can greatly contribute to the growth and success of your blog. |
Setting up a custom domain in cPanel
If you’re starting a blog or website, one of the first things you’ll need is a domain. While many blogging platforms like WordPress or Hashnode offer their own subdomains for you to start publishing your articles and building your brand, there may be a time when you want to have your own custom domain.
Setting up a custom domain in cPanel is a simple process that can be done with just a few clicks. Here’s how you can do it:
- First, make sure you have a hosting account that comes with cPanel. Many hosting providers offer cPanel as their hosting control panel because of its user-friendly interface and robust features.
- Once you have your hosting account set up and your domain registered, log into your cPanel account.
- On the cPanel dashboard, look for the “Domains” section and click on the “Domains” icon.
- In the “Domains” section, you’ll find the option to add a new domain or subdomain. Click on “Addon Domains” if you want to set up a custom domain for your blog or website.
- Enter your domain name in the “New Domain Name” field. You can also specify a document root if you want the files for your custom domain to be stored in a specific directory.
- Click on the “Add Domain” button to set up your custom domain.
- Once your domain is set up, you’ll need to configure the DNS settings with your domain registrar. Most domain registrars allow you to manage your DNS settings through their platform.
- Set up a CNAME record to connect your custom domain to your blog or website. For example, if you have a blog on Hashnode, you would create a CNAME record that points your custom domain to your Hashnode subdomain.
Setting up a custom domain in cPanel is an important step if you want to have full control over your blog or website. It allows you to create a unique online presence and build your brand the way you want it. Make sure to follow the steps above to ensure a seamless experience.


