

If you’re wondering why you should create a group email in Gmail, the answer is simple: efficiency. By organizing your contacts into groups, you can save time and streamline the process of sending emails to multiple recipients. Whether you want to send weekly updates to your team or communicate with different departments within your company, grouping your contacts is a valuable tool.
Creating a group email in Gmail is easy. First, open your Gmail account and click on the “Contacts” option located on the left-hand side of the screen. There, you’ll see a list of all your contacts. If you already have contacts that you’d like to add to a group, select the ones you want to include by clicking on the checkbox next to their names. If you’re starting from scratch, don’t worry, you can add contacts to your group later.
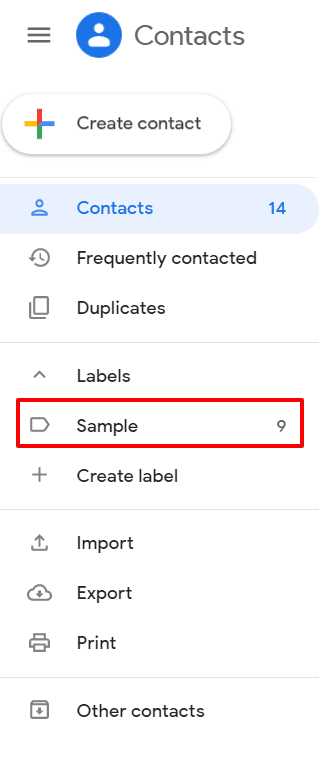
Once you’ve selected the contacts you want to add to your group, click on the “Manage labels” icon, which is represented by a label icon with a pencil. A new window will appear, and then you can click on the “Create label” button. Here, you can type in the name of your group. For example, if you’re creating a group for the marketing department, you can name it “Marketing Team”.
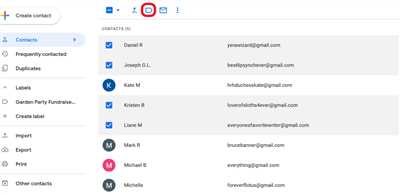
After you’ve named your group, click on the “Save” button. You’ll then be redirected to the Contacts page, and you’ll notice that your newly created group now appears on the left-hand side under the “Labels” section. To add contacts to the group, simply click on the checkbox next to their names and then click on the label icon with a plus sign. A drop-down menu will appear, and you can select your desired group from there.
Now that you have your group set up, you can start sending emails to everyone in the group. To do this, compose a new email as you would normally, and in the “To” field, start typing the name of your group. Gmail will automatically suggest the group name as you type. Once you see the group name appear, simply click on it, and all the members of the group will be added to the recipient list.
And that’s it! You’ve successfully created and managed a group email in Gmail. This step-by-step guide should help you make the most out of Gmail’s features and ensure effective communication with your contacts.
By using groups, you can save time and avoid the hassle of manually typing each email address. Additionally, if you need to rename or edit your group in the future, you can easily do so by clicking on the “Edit” option next to the group name. Furthermore, you can delete the group altogether if it’s no longer needed.
In conclusion, utilizing group emails in Gmail offers numerous benefits like organizing your contacts, sending emails more efficiently, and easily managing your groups. So, why wait? Start creating your group emails today and simplify your email communication in the year 2023 and beyond.
- How to and Why Create Gmail Groups in 2023
- What Is a Contact Group in Gmail Anyway
- How to Create a Group Email in Gmail
- How to create and send group emails using only Gmail
- Step one: Create a group in Gmail
- Step two: Add contacts to the group
- Step three: Edit contacts and send mail
- Rename Gmail Contact Group
- Video:
- How To Create A Group Email In Gmail
How to and Why Create Gmail Groups in 2023
Creating Gmail groups is an efficient way to manage and send emails to multiple contacts at once. By using groups, you can save time and effort by typing a single email address instead of individual email addresses every time you want to send a message. In this step-by-step guide, we will show you how to create and manage groups in Gmail in 2023.
Here are the benefits of creating Gmail groups:
- You can send emails to a large number of contacts more quickly and easily.
- You can label and organize your contacts based on different criteria such as department, project, or team.
- You can manage and edit groups, adding or removing contacts as needed.
- Groups make it easier to send test emails or mass emails for newsletters, announcements, or weekly updates.
To create a Gmail group, follow these steps:
- Open your Gmail account. If you don’t have one, create it on the Google sign-up page.
- Once you’re in your Gmail account, click on “Contacts” located on the left side of the screen.
- On the next page, you will see a list of all your contacts. Click on the “Create label” button at the top of the page.
- Type in the name for your group and click “Save” to create it.
- To add contacts to the group, select the checkbox next to each contact’s name.
- When you have selected all the contacts you want to add, click on the “Groups” button at the top of the page.
- A dropdown menu will appear, showing all the groups you have created. Click on the name of the group you just created to add the selected contacts to that group.
- Once the contacts are added, you can rename the group by clicking on the group’s name and selecting “Edit group” from the dropdown menu.
- You can also add or remove contacts from the group by clicking on the group’s name and selecting “Add to group” or “Remove from group.”
Now that you have created your Gmail group, you can start sending emails to the entire group by typing the group’s name in the “To” field when composing a new email. Gmail will automatically expand the group into individual email addresses, and you can send the email as usual.
So, whether you’re managing a small team or sending emails to a large number of recipients, creating Gmail groups in 2023 is a convenient and time-saving way to streamline your email communication. Try it out and see how it can benefit you!
What Is a Contact Group in Gmail Anyway
Contact groups in Gmail are a useful feature that allows you to organize and manage your contacts more efficiently. With contact groups, you can easily send emails to multiple recipients without typing their email addresses one by one. Whether you’re a individual user or a business professional, contact groups can help streamline your email communication.
So, what exactly is a contact group in Gmail? In simple terms, it is a collection of individual email contacts that are grouped together under a single name. This name can be anything you prefer, such as “Family,” “Friends,” “Work Colleagues,” or “Department XYZ.”
Creating a contact group in Gmail is a simple process. Here’s a step-by-step guide:
| 1. | Open your Gmail account and click on the “Contacts” option from the left-hand side menu. |
| 2. | On the Contacts page, click on the “+ Create label” button. A pop-up window will appear. |
| 3. | Type the name of your contact group in the “Label name” field, such as “Family.” Then click on the “Create” button. |
| 4. | Your contact group is now created. To add contacts to the group, simply click on their names in your Contacts list, then click on the “Edit” button and check the box next to the contact group you created. Click “Save” to apply the changes. |
Once you’ve created a contact group, you can easily send an email to everyone in the group by typing the group name in the “To” field when composing a new email. Gmail will automatically expand the group name to include all the email addresses within that group.
Contact groups in Gmail offer several benefits. Firstly, they save you time when sending emails to multiple recipients. Instead of typing each recipient’s email address manually, you can simply select the group name. Secondly, contact groups help you stay organized by keeping your contacts categorized. Lastly, they make it easier to manage your contacts, as you can add or remove contacts from a group with just a few clicks.
Remember that there is a limit to the number of contacts you can add to a group. Currently, Gmail allows you to add up to 2,023 contacts in one contact group. If you need to add more contacts, consider creating another group.
To sum it up, contact groups in Gmail are a valuable tool for managing your contacts and sending emails efficiently. Whether you’re emailing a small team or a large department, contact groups can save you time and simplify your email communication. So why not create a contact group in your Gmail account today and reap the benefits?
How to Create a Group Email in Gmail
Gmail is a popular email service offered by Google, and it provides a convenient way to manage your emails. One useful feature within Gmail is the ability to create a group email, which allows you to send messages to multiple recipients at once. This can save you time and effort, especially if you frequently send the same message to a specific set of people. Here’s a step-by-step guide on how to create a group email in Gmail:
Step 1: Open your Gmail account and go to the Contacts page.
Step 2: Click on the “Create Label” button on the left-hand side of the screen and give your group a name. This label will be used to identify the group in your contacts list.
Step 3: After creating the label, go to the “All Contacts” tab and select the contacts you want to add to the group. You can do this by clicking on the checkbox next to each contact’s name.
Step 4: Once you have selected the contacts, click on the “Manage labels” button above the list of contacts. Select the label you just created for your group.
Step 5: Now, whenever you want to send an email to this group, simply type the label name in the “To” field when composing a new email. Gmail will automatically add all the contacts associated with that label to the recipient list.
The benefits of using group emails in Gmail are numerous. Not only does it save you time and effort in typing out multiple email addresses, but it also ensures that you don’t accidentally miss anyone when sending important messages to your group. Additionally, you can easily manage your groups by adding or removing contacts as needed, and the group label helps you keep track of which contacts are part of each group.
Creating a group email in Gmail is a quick and easy process. Whether you’re sending weekly newsletters to your team, coordinating with different departments in your organization, or simply staying in touch with a group of friends, Gmail’s group email feature can simplify and streamline your email communications.
How to create and send group emails using only Gmail
If you use Gmail for every email you send, you might prefer to create groups to make the process faster and more efficient. With Gmail, you can easily create and manage groups to streamline your email sending. This step-by-step guide will show you how to create and send group emails using only Gmail.
Step 1: Create a new group
To create a new group, open your Gmail account and click on the “Contacts” option on the left side of the screen. This will open a new page where you can see all your contacts. Click on the “Labels” option at the top and then click on the “Create label” button. Enter a name for your group and click “Save”.
Step 2: Add contacts to the group
Once you have created the group, you can start adding contacts to it. To do this, go back to the “Contacts” page and find the contacts you want to add to the group. Select the checkbox next to their names and then click on the “Labels” option at the top. Check the box next to the group name you created and click “Apply”. Now, these contacts will be part of the group.
Step 3: Sending emails to the group
Now that you have created the group and added contacts to it, you can easily send emails to the entire group. When composing a new email, simply type the group name in the “To” field and Gmail will automatically suggest the group as you type. Select the group from the suggestions and finish composing your email. Once you click send, the email will be sent to everyone in the group.
Important tips and benefits:
- Creating groups in Gmail helps you save time by not having to type each email address individually.
- You can edit and manage your groups at any time by going to the “Contacts” page and clicking on the group name.
- If you have multiple Gmail accounts, you can test the group functionality by creating a group and sending a test email to see how it appears in different accounts.
- Gmail also allows you to rename or delete groups if needed, giving you full control over your contact lists.
- By using groups, you can easily send weekly updates, department emails, or any other type of group email without having to manually select each recipient.
By following this step-by-step guide, you can create and send group emails using only Gmail. Enjoy the benefits of managing your contacts efficiently and speed up your emailing process!
Step one: Create a group in Gmail
To manage your contacts more efficiently and streamline your email communication, you can create a group in Gmail. This allows you to send emails to multiple recipients without having to type their email addresses one by one. Here’s a step-by-step guide on how to create a group in Gmail.
Step 1: Open your Gmail account and go to the Contacts page. You can do this by clicking on the “Gmail” text at the top left corner of the screen, and then clicking on “Contacts” from the dropdown menu.
Step 2: On the Contacts page, you will see a label called “My Contacts” on the left side of the screen. Below that label, you’ll find an option called “Create label+”. Click on this option.
Step 3: A new dialog box will appear, asking you to enter a name for your group. Type in a name that best represents the purpose of the group. For example, if you want to create a group for your department at work, you might name it “Marketing Team 2023”. Once you’ve typed in the name, click on the “Create” button.
Step 4: After clicking the “Create” button, the group will be created and will appear under the “Labels” section on the left side of the screen. You can now add contacts to this group.
Step 5: To add contacts to the group, click on the checkmark box next to each contact’s name. You can select multiple contacts at once. Once you’ve selected all the contacts you want to add, click on the “Labels” icon at the top of the screen, and then click on the name of the group you just created. This will assign the group label to the selected contacts.
Step 6: Now, whenever you want to send an email to the group, you can simply start typing the name of the group in the “To” field of your email, and Gmail will suggest the group’s name. You can click on the suggestion to add the group to the recipient list.
What are the benefits of creating a group in Gmail?
Creating a group in Gmail offers several benefits. Firstly, it saves time by allowing you to send emails to multiple recipients at once, without the need to type each individual email address. Secondly, it helps you organize your contacts, making it easier to manage and find specific groups of contacts. Lastly, it allows you to rename, edit, or delete the group, and also add or remove contacts from the group as needed.
Creating groups in Gmail is a useful feature that can improve your emailing experience. By following the steps outlined above, you can easily create and manage groups in Gmail.
Step two: Add contacts to the group
Now that you have created a group in Gmail, it’s time to add contacts to it. By doing so, you can easily send emails to multiple people at once without having to type their email addresses one by one. This step-by-step guide will show you how to add contacts to your Gmail group:
1. Open your Gmail account and click on the “Google apps” icon, which is represented by nine small dots arranged in a square. It is located on the top right corner of the screen.
2. From the drop-down menu, click on “Contacts.” This will open a new page with all your contacts listed.
3. On the left side of the page, you will see a list of labels. Scroll down and find the label you created for your group. Click on it.
4. Within the group, you will see a “Add a contact” button. Click on it to add a new contact to your group.
5. A pop-up window will appear where you can enter the name and email address of the contact you want to add to the group. You can also add any additional information you prefer, such as phone number or company name. Once you have entered the details, click on the “Save” button.
6. Repeat steps 4 and 5 to add more contacts to the group. You can add as many contacts as you need. Just click on the “Add a contact” button each time and enter the information for the new contact.
7. Once you have added all the contacts you need, click on the “Close” button to exit the pop-up window.
8. You will now see all the contacts you have added listed within your group. You can manage the contacts by clicking on their name to edit their details or remove them from the group if needed.
By adding contacts to a group, you can save time and effort when sending emails. Instead of typing each email address individually, you can simply select the group label when composing an email, and Gmail will automatically send the email to all the contacts within that group.
Remember that there is a limit to the number of contacts you can add to a group in Gmail. As of 2023, the limit is 25,000 contacts.
So, now that you know how to add contacts to a group in Gmail, you can start creating and managing your own email lists. This can be particularly useful for sending out newsletters, weekly updates, or any type of mass email to a specific group of people.
Step three: Edit contacts and send mail
Once you have created a group email account in Gmail, you can start managing your contacts and sending emails to the group. Here is a step-by-step guide on how to do this:
- Type “gmail.com” in your browser’s address bar and open Gmail.
- Login to your Gmail account by typing in your email address and password.
- Once you are logged in, click on the “Contacts” option on the left side of the screen.
- Within the contacts page, you will see a list of all your contacts. If you have created the group already, you will find it listed under the “Labels” section on the left side of the screen.
- Click on the name of the group to edit the contacts within it.
- You can add new contacts to the group by clicking the “Add” button and typing in their name and email address.
- If you want to rename the group, click on the group’s name and type in the new name.
- You can also manage the contacts in the group by clicking on their names. Here, you can edit their details, remove them from the group, or add additional information.
- After you have finished editing the contacts, go back to the main Gmail page by clicking on the “Gmail” logo at the top left of the screen.
- Click on the “Compose” button to start creating a new email.
- In the “To” field, type in the name of the group you created (or select it from the drop-down list if it appears).
- You can now start typing your email message in the main text area. You can also add attachments, format the text, and customize the email as needed.
- Once you are done typing your email, click the “Send” button to send it to the group.
By creating groups and managing your contacts, you can send emails to multiple recipients at once, saving you time and effort. The benefits of using groups in Gmail include:
- Efficiently sending emails to a large number of recipients without the need to manually type each email address.
- Quickly reaching specific departments or teams within your organization with just one email.
- Organizing your contacts into different groups for easier management and categorization.
- Sending regular updates or weekly newsletters to a specific group of people.
With the step-by-step guide provided above, you can easily create and edit contacts within groups and send emails to them using your Gmail account.
Rename Gmail Contact Group
In this guide, we will explain how to rename Gmail contact groups. By default, Gmail groups your contacts into different lists based on the emails you receive and send. However, you might want to rename these groups to better manage your contacts.
To rename a Gmail contact group, follow these step-by-step instructions:
- Open your Gmail account by clicking on the Gmail text in the top left of your screen.
- From your Gmail inbox, click on “Contacts” in the left menu to open the contact page.
- In the contact page, you will see a list of all your contact groups. Choose the group you want to rename by clicking on it.
- In the group details screen, you will see the current name of the group at the top. To rename the group, click on the “Edit” button next to the group name.
- A text box will appear where you can type the new name for the group. Type in the new name and click “Save” to apply the changes.
- Once you have renamed the group, the new name will appear in the contact page.
By renaming Gmail contact groups, you can easily identify and manage your contacts based on their department, leads, or any other criteria you prefer. This can be especially useful when sending emails to multiple contacts within a specific group.
Furthermore, renaming contact groups also has the benefit of organizing your contacts and creating a more efficient email management system. You can create as many groups as you need and rename them to suit your needs.
Thus, by following these step-by-step instructions, you can easily rename your Gmail contact groups and enjoy the benefits of a well-organized and manageable contacts list.