

Setting up your online store on Shopify is an exciting first step towards launching your e-commerce business. With the right settings in place, you can easily navigate through the process and handle all the necessary configurations to make your store ready for business. In this article, we will guide you through the main steps of setting up your Shopify store, from selecting a theme to customizing your store’s appearance and configuring payment providers.
First, make sure you have signed up for a free trial on Shopify’s website. Once you’ve created your account, the next step is to select a theme for your store. Shopify offers a wide range of customizable themes for you to choose from. Browse through the available options and select the one that best suits your store’s style and brand.
Now it’s time to configure your store’s settings. In the “General” section, you can set up your store’s title, default currency, and time zone. You can also test your store’s checkout functionality by making a test purchase. In the “Shipping” section, you can configure your shipping rates and choose whether you want to handle shipping manually or use one of Shopify’s shipping providers. In the “Payments” section, you can set up your store’s billing information and configure the payment providers you want to use. Shopify allows you to accept credit card payments, as well as payments through third-party providers like PayPal and Stripe.
Once you’ve configured all the necessary settings, it’s time to add the pages that will appear on your store. The “Pages” section allows you to create and customize pages such as the homepage, about us page, contact page, and any other page you want to include on your store. You can also add sections to your pages, such as a blog or a testimonials section, to enhance your store’s functionality.
Now that you have set up the main settings for your store, it’s time to start adding products. Shopify makes it easy to add, edit, and organize your products. In the “Products” section, you can create new product listings, add product images and descriptions, set prices, and manage your inventory. You can also create collections to group similar items together, making it easier for customers to browse and search for products on your store.
Next, let’s talk about marketing your Shopify store. In the “Marketing” section, you can set up various marketing campaigns to promote your store and attract customers. You can create discount codes, set up email marketing campaigns, and integrate your store with social media platforms to reach a wider audience. You can also configure search engine optimization (SEO) settings to improve your store’s visibility in search engine results.
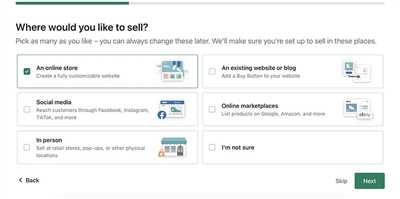
Finally, once you’ve completed all the steps above, it’s time to make your store live and start selling your products. In the “Sales Channels” section, you can activate the online store channel, which makes your store available to customers. You can also configure additional sales channels, such as social media platforms or marketplaces, to expand your store’s reach. Shopify makes it easy to manage your orders, process payments, and track your sales and inventory.
To sum up, setting up your Shopify store is a straightforward process that allows you to create a professional online store with all the necessary features and functionality. With Shopify’s easy-to-use tools and customizable themes, you can customize the appearance of your store to match your brand and provide a seamless shopping experience for your customers. Whether you’re a first-time entrepreneur or an experienced business owner, we highly recommend Shopify as a reliable and user-friendly e-commerce platform.
- Setting up your online store
- Create your Shopify account
- How to Use Shopify – Step by Step Guide
- 1 Create a Shopify Account
- 2 Configure the Shopify Store
- 3 Pick a Theme to Customize in the Shopify Website Builder
- 4 Customize the Look of Your Theme
- 5 Create Products and Services to Sell
- 6 Organize Products on the Homepage and Beyond
- 7 Set up Shopify Payments for Payment Processing
- 8 Add Relevant Apps to the Shopify Website Builder
- 9 Configure Your Shopify Marketing Tools
- Video:
- Best Shopify Tutorial and Ultimate Step by Step Guide for Beginners to Set up your Shopify store
Setting up your online store
Setting up your online store on Shopify is an easy and straightforward process. You’ll need to complete a series of steps to activate your store and make it ready for customers to browse and shop.
The first step is to sign up for an account on Shopify. You can do this by visiting the Shopify website at www.myshopify.com and entering your email address and choosing a unique store name. Once you’ve completed this step, you’ll have access to the Shopify admin area.
Next, you’ll need to customize the look and feel of your store. Shopify offers several pre-designed themes that you can choose from, or you can customize the design using the built-in editor. You can customize the colors, fonts, and layout of your store to make it look exactly how you want.
After customizing the design, you’ll need to add products to your store. You can do this manually by entering product information in the admin area, or you can use an automated tool to upload products in bulk. You can also organize your products into collections to make it easier for customers to browse and filter through your offerings.
Once your products are added, you can set up payments and billing. Shopify supports a wide range of payment providers, so you can choose the one that best fits your needs. You’ll need to provide your bank account information so that payments can be transferred to you. Shopify also offers additional features, such as social media campaign integration and the ability to accept gift cards.
Finally, you’ll want to make sure everything is set up correctly before launching your store. You can preview your store to see how it will look to customers and make any necessary changes. You’ll also want to test the checkout process to ensure that payments are being processed correctly.
Once everything is in order, you can publish your store and start selling! Shopify makes it easy for you to promote your store and reach potential customers through various marketing tools and apps. You can also track your store’s performance through the analytics dashboard, which provides insights into your sales and customer behavior.
Remember, setting up your online store is just the first step. To have a successful online business, you’ll need to continually update and customize your store, offer great products and customer service, and spend time and effort on marketing and advertising to attract customers.
| Step | Description |
|---|---|
| 1 | Sign up for a Shopify account at www.myshopify.com |
| 2 | Customize the design of your store |
| 3 | Add products and organize them into collections |
| 4 | Set up payments and billing |
| 5 | Preview and test your store before launching |
| 6 | Publish your store and start selling |
Create your Shopify account
1. Open the Shopify website in your browser and click on the “Get started” button. This will take you to the sign-up page.
2. Fill in your email address, password, and store name. Make sure to choose a unique and memorable name for your store.
3. Select your location and currency. This is important for setting up shipping and handling fees and ensuring that your store is accessible to customers in your target market.
4. Once you’ve filled in all the necessary information, click on the “Create your store” button.
5. The next step is to choose a Shopify theme. Shopify offers a wide range of customizable themes to suit your store’s design and style. You can view and select themes on the Shopify Themes page. Take your time to browse through the available themes and pick the one that best fits your brand.
6. After choosing a theme, you’ll have the option to customize it. Shopify’s theme editor makes it easy to add and organize sections, select colors and fonts, and turn on or off social media buttons. Use the editor to create a unique and visually appealing design that enhances the user experience on your store.
7. Once you’re satisfied with the design and customization of your theme, click on the “Publish” button to make your store live. Note that Shopify automatically publishes a default webpage for your store, but you can hide it if necessary.
8. Now that your store is published, you can start adding products to your store. Shopify provides an easy-to-use product management section where you can add, edit, and organize your products. Make sure to add appealing product titles, descriptions, and images to attract customers.
9. If you’re selling digital products or services, you can also use Shopify’s tools to handle the delivery and fulfillment of these items. For example, you can set up automated delivery emails or provide download links for digital products.
10. Before you launch your store, make sure to test its functionality. Go through the entire buying process as if you were a customer to ensure everything works smoothly. Consider asking friends or family members to test your store as well and provide feedback.
Once you’re confident that your store is ready to go, you can activate your billing and payment options. Shopify allows you to accept various payment methods, including credit card payments, through its integrated payment gateway. Set up your billing information and configure your preferred payment options.
Now you’re ready to start promoting your store and driving traffic to it. Consider running marketing campaigns, leveraging social media, and using other online services to increase visibility and attract potential customers to your Shopify store.
Remember, setting up your Shopify store is just the first step. With time and effort, you can grow and optimize your store to increase sales and provide a great shopping experience for your customers.
How to Use Shopify – Step by Step Guide
Setting up a Shopify store can be a breeze if you follow these step-by-step instructions. Whether you are new to the ecommerce industry or an experienced seller, Shopify provides a user-friendly platform to create and manage your online store. Here’s everything you need to know:
- Create an Account: Visit the Shopify website and click on “Get Started”. Fill in your email address, password, and store name to create your account.
- Choose a Plan: Shopify offers different pricing plans to suit your business needs. Select the plan that aligns with your budget and requirements.
- Add Your Products: After signing up, you can start adding your products. Click on the “Products” tab in the left navigation menu and then on the “Add Product” button. Fill in all the necessary details such as the product name, description, price, and images.
- Customize Your Store: Make your store visually appealing by customizing the theme and layout. Shopify provides built-in themes that you can choose from. Click on “Customize” to modify colors, fonts, and more.
- Configure Your Settings: Go to the “Settings” tab and configure important settings such as payment gateways, shipping options, taxes, and checkout preferences. Set up automated order processing and choose the currency and location of your store.
- Publish Your Store: Once you have everything set up, it’s time to publish your store. Click on the “Online Store” tab and then on the “Activate” button. Your store will now be live and ready to accept orders.
- Handle Payments: To start accepting payments, go to the “Settings” tab, navigate to the “Payments” section, and choose the payment gateways you want to activate. Shopify provides a wide range of options, including PayPal and credit card processors.
- Social Media Integration: To increase your sales and reach a wider audience, consider integrating your store with social media platforms. You can browse through Shopify’s app store and install tools such as social media sharing buttons and Instagram galleries.
Keep in mind that your Shopify store is an essential tool for your business, so it’s important to regularly save and backup your data. Shopify provides an editor that allows you to make changes to your store without affecting the live version. Take advantage of this feature to test different layouts, colors, and product placements.
By following these steps, you can create a successful Shopify store and start selling your products in no time. Don’t hesitate to contact Shopify’s support team if you need any additional assistance. Good luck!
1 Create a Shopify Account
If you’re ready to start your online store, the first step is to create a Shopify account. This will give you access to all the tools and features you need to set up and run your online business.
To create a Shopify account, go to www.shopify.com and click on the “Get Started” button. You’ll be taken to a sign-up page where you’ll need to enter some basic information such as your email address, password, and store name.
When choosing a store name, pick something that represents your brand and is easy for customers to remember. You can also choose a theme for your store, which will determine the overall design and layout of your online shop.
Shopify provides a wide range of themes to choose from, with options for every type of business. You can search for themes, browse by category, or filter by features to find the perfect theme for your store.
Once you’ve selected a theme, you can customize it to match your brand’s look and feel. Shopify’s theme editor allows you to make changes to the design, layout, and content of your store’s pages. You can add sections and rearrange them to create a unique and engaging shopping experience for your customers.
Before making your store live, it’s important to set up your payment and billing information. This includes connecting a bank account for payment processing, setting your location for tax purposes, and choosing a plan that fits your business needs.
Shopify offers a 14-day free trial, so you can test out the platform and make sure it’s the right fit for you before committing to a paid plan. During the trial period, you can set up your store, add products, and start making sales.
In addition to the built-in features, Shopify also has a wide range of apps that can enhance your store’s functionality. Whether you’re looking to run marketing campaigns, handle customer support, or add custom features, there’s an app for every need. You can browse and install apps from the Shopify App Store.
Once you’ve completed these steps, your online store is ready to go! You can view your store, start adding products, and begin customizing every aspect of your store to create the perfect shopping experience for your customers.
Remember, setting up a Shopify store is just the beginning. It’s important to regularly update and optimize your store to attract and retain customers. Shopify provides a wealth of resources and guides to help you grow your business, so make sure to take advantage of everything they have to offer.
2 Configure the Shopify Store
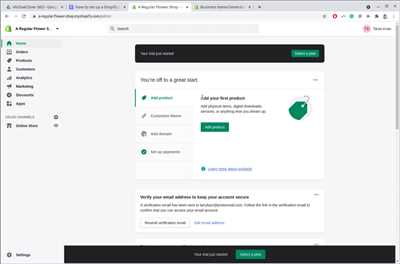
Once you’ve signed up for a Shopify account, you’ll be taken to the admin area of your new Shopify store. This is where you’ll find all the tools and functionality you need to set up and customize your online store.
To get started, click on the “Settings” tab in the left-hand menu. This will open up the settings page where you can configure everything from your store’s name and billing information to your shipping and payment providers.
One of the first things you’ll want to do is configure your store’s payment settings. Click on the “Payment providers” option under the “Settings” tab. Here, you’ll see a list of available payment providers that you can choose from. Select the payment provider that you’d like to use, such as Shopify Payments or a third-party payment gateway, and enter the necessary information to set up your account.
After setting up your payment providers, you can move on to customizing the design of your store. Click on the “Themes” option under the “Online Store” tab. Here, you’ll find a gallery of pre-designed themes that you can choose from. You can even browse additional themes or create a custom theme using Shopify’s theme builder.
Once you’ve selected a theme, you can further customize it by clicking on the “Customize” button. This will open up the theme editor, which allows you to make changes to the layout, colors, fonts, and more. Use this editor to create a design that matches your brand and makes your online store visually appealing.
Now that your store is starting to take shape, it’s time to add products. Click on the “Products” option under the “Products” tab to access the product editor. Here, you can add all the necessary details for your products, such as title, description, price, and images. Don’t forget to save your changes after entering each product’s information.
With your store set up and products added, you’re almost ready to launch. However, there are a few additional settings you’ll want to configure before making your store live. For example, you can set up shipping options, tax settings, and even enable customer accounts for easier shopping and order tracking.
Once you’re done configuring all the necessary settings, it’s time to test everything out. Click on the “Preview” button to see how your store looks from a customer’s perspective. You can also place a test order to make sure that your payment providers are working correctly.
Now that your store is configured, designed, and tested, you’re ready to launch! Shopify offers a 14-day free trial, so you can see how your store performs before committing to a paid plan. When you’re ready, simply click on the “Upgrade” button and enter your billing information to make your store live.
Congratulations! You’ve successfully set up and configured your Shopify store. Now it’s time to focus on marketing and driving sales to your new ecommerce website.
3 Pick a Theme to Customize in the Shopify Website Builder
Once you have set up your Shopify store, the next step is to choose a theme that will determine the overall look and feel of your website. Shopify offers a wide range of themes that are designed for various industries and purposes. The theme you choose will be the main location where your customers can find all the information about your products, contact information, and more.
Shopify makes sure to go beyond just the main location of your website by offering various theme options that cater to the specific needs of your industry. For example, if you sell clothing, there’s a theme specifically designed for fashion stores. If you sell electronics, there’s a theme for that category as well.
To start customizing your theme, go to the Shopify website builder and click on the “Themes” option. Here you will find a list of themes that are available for your store. You can browse through this list based on various options such as industry, collections, and more.
Once you’ve selected a theme, it will appear on the “Themes” page. From here, you can start customizing the theme to handle your specific needs. Click on the “Customize” button to open the theme editor.
In the theme editor, you can configure various settings for your theme. You can change the colors, fonts, and layout of your homepage and other webpages. You can also add or remove sections to customize the layout and appearance of your website.
For example, if you have an ecommerce store, you can configure the settings for the billing and shipping section. You can enter the name and contact information of your store, and customize the steps customers need to go through during the checkout process. You can also choose which payment providers to accept and configure any special features or settings you need.
Furthermore, you can use the theme editor to manage and organize your collections and items. You can assign different colors or tags to each collection to make it easier for customers to search and navigate through your store. You can also customize the layout and appearance of each collection page, as well as the individual product pages.
If you’re not familiar with HTML or coding, don’t worry. Shopify’s website builder provides an easy-to-use editor that allows you to customize your theme without any coding knowledge. You can simply click on buttons and options to make the changes you want.
Once you’ve customized your theme, click on the “Save” button to apply the changes. You can then view your website’s homepage as it will appear to your customers.
Keep in mind that some themes may require additional steps to fully customize. For example, some themes may have hidden settings or options that you need to figure out. In such cases, Shopify’s support team can guide you through the process or provide additional resources to help you configure your theme.
In conclusion, picking a theme is an important step in setting up your Shopify store. Choose a theme that best suits the needs of your industry and customize it to reflect your brand. By customizing your theme, you can create a unique and visually appealing online store that attracts customers and helps you sell your products or services.
Shopify also offers various marketing and SEO options that can help you promote your store and increase your online visibility. You can link your store to social media providers and set up marketing campaigns to reach a wider audience. Additionally, Shopify provides tools to track and analyze the performance of your store, such as sales reports and visitor analytics.
Remember, your online store is like a virtual storefront, so make sure it looks attractive and showcases your products or services in the best possible way. With Shopify’s website builder and theme customization options, you can create a professional and functional online store that stands out from the competition.
4 Customize the Look of Your Theme
After setting up your Shopify store, it’s important to customize the look and feel of your theme to make it unique to your brand. Shopify provides a variety of customization options to help you create a visually appealing and professional online store.
One of the first things you should do is choose a theme from the available options on Shopify. The theme builder allows you to pick and customize a pre-designed template that suits your industry and store’s needs. You can also upload your own theme if you have one.
Once you have selected a theme, you can start customizing it by going to the “Themes” section in your Shopify admin. This is where you can make changes to the layout, colors, fonts, and other design elements of your store. You can also add custom content such as a logo or a banner image to make your store stand out.
Shopify also allows you to customize the homepage of your store. You can add sections such as featured products, testimonials, or a blog to showcase relevant content and encourage visitors to explore more. Additionally, you can customize the navigation menu, footer, and other elements to make sure your store is user-friendly.
In addition to the visual customization, you can also customize the functionality of your Shopify store. For example, you can set up different payment providers such as credit card or PayPal, select a shipping method, and set up delivery options. Shopify provides a built-in tool for managing your inventory, which allows you to add, edit, and organize your products into collections.
After customizing your store, it’s important to review and test all the settings to make sure everything is working as expected. Shopify provides an automated preview feature, so you can see how your store will look like without publishing the changes. Once you are ready, you can turn off the “password-protected” mode and publish your store to make it accessible to the public.
Keep in mind that customization and functionality options may vary depending on your Shopify plan. Some features such as automated shipping rates or the ability to sell digital products may not be available in all plans. Make sure to check the feature list and pricing details on shopify.com to know exactly what’s included in your plan.
By customizing your Shopify store, you can create a unique online shopping experience for your customers. With the right design, functionality, and content, you can build a store that reflects your brand and encourages visitors to make a purchase.
5 Create Products and Services to Sell
Once you have set up your Shopify store, the next step is to create products and services to sell. Shopify provides you with an easy-to-use tool to add and manage your products and services. Here is a step-by-step guide on how to do it:
- From your Shopify admin dashboard, navigate to the Products section.
- Click on the “Add product” button on the top left corner of the page.
- Enter the necessary information for your product, such as its title, description, and price. You can also upload images of the product to make it more appealing to customers.
- Choose the product type from the options provided by Shopify, or create a custom type if none of the available options suit your needs.
- Configure the settings for your product, such as its availability, visibility, and inventory management.
- If you are offering digital products or services, you can either upload the files directly or enter a download link for customers to access them.
- Set up the shipping and delivery options for your product, making sure to specify the regions you are willing to ship to and any additional costs or restrictions.
- Customize the appearance of your product’s webpage by choosing colors and layouts that align with your brand.
- Make sure you activate the “Buy button” in order to accept payments for your products. You can choose from a variety of payment providers that are supported by Shopify, such as credit card payments and PayPal.
- Configure the checkout settings by entering essential information, such as your business contact details and return policy.
- Once you have done all these steps, your product is ready to be published to your Shopify store. Click on the “Publish” button on the top right corner of the page.
By following these steps, you can easily create and manage your products and services on Shopify. Whether you are selling physical or digital items, you have full control over the appearance, settings, and customization options. Shopify’s intuitive interface and industry-leading features make it a top choice for entrepreneurs looking to set up an online store.
6 Organize Products on the Homepage and Beyond
When you set up your Shopify store, organizing your products effectively is crucial to encourage sales and provide a seamless shopping experience for your customers. Shopify offers various options to help you organize and display your products on the homepage and other sections throughout your online store.
One option is to use the automated product section on your homepage. This section can be used to showcase a selection of your products, and you can choose to display them based on specific criteria such as bestsellers, new arrivals, or products from a certain category.
If you want more control over how your products are displayed on the homepage, you can use the Shopify editor. This editor lets you add a product section to your homepage and customize its design and layout. You can even add buttons or links to encourage customers to browse all your products or shop collections related to a specific theme or industry.
Another way to organize your products is by creating additional sections on your homepage or other pages. For example, you can add a section to showcase new or featured products, a gallery of product images, or a social media feed that displays products that customers have tagged on Instagram.
When setting up your product sections, you have several options for choosing how your products are displayed. You can arrange them in a grid or list view, enable a filter to allow customers to sort products based on various attributes, or even enable the quick view feature to let customers view product details without leaving the current page.
To add products to your sections, you can either manually enter the product details or upload a CSV file to bulk import them. Shopify also provides an option to publish products in a hidden state, allowing you to test and preview them before making them available to customers.
Once your products are added and organized, you can further enhance the shopping experience by customizing the checkout process. Shopify offers various options for payment and delivery, allowing you to choose the best fit for your business. You can also customize the look and feel of the checkout page to match your brand.
When you’re done setting up your products and sections, don’t forget to consider the billing and payouts process. Shopify provides a default payment gateway, but you can also integrate other payment providers to offer more options to your customers. Additionally, you can set up automatic payouts to streamline your financial transactions.
In summary, organizing your products on the homepage and beyond is an essential aspect of running a successful e-commerce store. By carefully choosing how your products are displayed, creating additional sections, and customizing the shopping experience, you can create a visually appealing and user-friendly store that encourages sales and builds customer loyalty.
| 9 | 10 | guide |
| making | sure | your |
| products | stand | out |
| when | browse | your |
| online | store | . |
| Consider | using | a |
| default | theme | options |
| or | customize | the |
| design | to | create |
| a | unique | look |
| for | your | store |
7 Set up Shopify Payments for Payment Processing
When it comes to running an online store, one of the most important things to consider is how you will process payments. With Shopify, you have the option to set up Shopify Payments, a built-in payment processing solution that makes everything from entering payments to managing payouts quick and easy. In this guide, we will show you how to set up Shopify Payments for your store.
1. First, make sure you have an active Shopify account. If you don’t have one yet, go to shopify.com and sign up for a plan that suits your needs.
2. Once you’re ready, log in to your Shopify account and open the Shopify admin dashboard.
3. From the main dashboard, click on the “Settings” button located on the lower left corner of the screen.
4. In the Settings menu, click on “Payment Providers”.
5. Scroll down until you see the “Accept Payments” section. Under this section, you will find a list of available payment gateway options. Look for Shopify Payments and click on the “Set up” button next to it.
6. You will now be taken to the Shopify Payments setup page. Here, you will need to enter some information and configure your payment settings.
- First, in the “Payments” section, make sure the Shopify Payments toggle is turned on.
- Next, enter your business details such as your business name, industry, and website URL.
- Then, you will need to enter your personal details such as your name and date of birth.
- In the “Billing” section, enter your billing address and contact information.
- In the “Banking” section, enter your bank account details where you want your payouts to be deposited. Make sure to double-check your banking information to avoid any delays or issues with your payouts.
- Next, in the “Payouts” section, choose how often you want to receive your payouts. You can either choose daily, weekly, or monthly.
- Finally, customize your checkout experience by selecting the colors and content that will appear on your payment pages.
7. Once you have entered all the necessary information and customized your settings, click on the “Activate” button to enable Shopify Payments for your store.
That’s it! You have now successfully set up Shopify Payments for payment processing on your online store. With Shopify Payments, you can easily manage and process payments, ensuring a smooth and seamless shopping experience for your customers.
8 Add Relevant Apps to the Shopify Website Builder
When building your Shopify store, there are a plethora of apps available that can enhance the functionality and design of your site. These apps allow you to customize and personalize your store to create a unique shopping experience for your customers.
1. Payouts: This app allows you to manage your payments from different sales channels in one place. It also provides detailed analytics and reporting on your sales, making it easier to track your revenue.
2. Trial: If you’re not quite sure which apps will work best for your store, consider using the Trial app. It lets you test out different apps before committing to a purchase, giving you the opportunity to find the ones that align with your needs.
3. Sections: With the Sections app, you can easily customize the layout of your web pages. It offers drag-and-drop functionality, which makes it simple to arrange your content and create a visually appealing site.
4. Relevant Colors: Choosing the right colors for your store is important, as they can greatly impact the overall feel and impression of your brand. Relevant Colors is an app that can help you select a color palette that aligns with your industry and the products you sell.
5. Automated Shipping Tool: Managing the shipping process can be time-consuming, but there’s an app available that can automate this task for you. The Automated Shipping Tool allows you to configure your shipping settings, select carriers, and even print shipping labels directly from the Shopify admin.
6. Social Media Gallery: Social media is a powerful tool for marketing your store and driving traffic. With the Social Media Gallery app, you can showcase your social media posts and encourage your customers to follow and engage with your brand beyond the Shopify store.
7. Campaign: If you’re running marketing campaigns, the Campaign app can help you track the success of your efforts. It provides insights and analytics on how your campaigns are performing, allowing you to make data-driven decisions to optimize your marketing strategies.
8. Contact Us: A “Contact Us” page is a necessary component of any online store. The Contact Us app lets you create a dedicated area for customers to reach out to you with any questions or concerns. It can also be used to display your contact information and business hours.
By adding these apps to the Shopify Website Builder, you can enhance the functionality and appearance of your store. Consider your specific needs and goals, and choose the apps that best align with your business. With the right selection, you can create a seamless and enjoyable shopping experience for your customers.
9 Configure Your Shopify Marketing Tools
After setting up your Shopify store, it’s important to configure your marketing tools to optimize your sales and reach a wider audience. In this guide, we’ll walk you through the steps to install and customize your marketing tools.
1. Install and Customize Your Theme
Customizing your theme is an important step to make your online store visually appealing and unique. You can browse and pick from a variety of themes in the Shopify theme store. Once you’ve selected a theme, you can upload and customize it through the theme editor.
2. Configure Your Store’s Settings
In your Shopify admin area, navigate to the settings section and enter relevant information about your store, such as your store name, contact details, and location. This will help customers find your store and make it more trustworthy.
3. Set Up Payments and Payouts
To start accepting payments on your store, select a payment provider and enter your card or bank account information. You can choose from a variety of payment options, such as credit cards, digital wallets, and other services.
4. Configure Your Sales Channels
Beyond your online store, Shopify offers various sales channels to reach customers and sell your products. You can configure social media platforms, such as Facebook and Instagram, to connect your store and encourage sales.
5. Install Apps for Additional Functionality
Shopify has a wide range of apps that extend the functionality of your store. For example, you can install apps for email marketing, product reviews, and SEO optimization. Browse the Shopify app store to find relevant apps for your business.
6. Set Up Marketing and Promotions
To boost sales and attract customers, you can set up marketing campaigns and promotions. Use Shopify’s built-in marketing tool to create discounts, run ad campaigns, and track performance.
7. Test and Publish Your Store
Before launching your store, it’s important to thoroughly test its functionality. Make sure all links, buttons, and features are working correctly. You can also use Shopify’s built-in test mode to simulate transactions.
8. Customize Your Product Pages
Your product pages are the main selling point of your store. Customize them to showcase your items in the best possible way. Use high-quality images, compelling titles, and detailed descriptions to make them attractive to customers.
9. Use SEO Tools to Improve Visibility
To improve your store’s visibility in search engine results, use Shopify’s SEO tools. Enter relevant keywords, optimize meta tags, and create unique page titles and descriptions. This will help customers find your store when searching for related items.
By following these steps, you’ll be able to configure your Shopify marketing tools and optimize your store for success. Remember to regularly monitor and update your marketing efforts to stay relevant and drive more sales.