

In today’s digital age, social media has become an integral part of our lives. Facebook, being one of the most popular platforms, offers a wide range of opportunities for developers to create their own applications. If you’re looking to develop a Facebook app, this tutorial will guide you through the necessary steps.
The first step in creating a Facebook app is to register as a developer on the Facebook platform. Once you’ve done that, you’ll need to create an app ID and secret. These unique identifiers will be used to integrate your app with Facebook’s API.
Next, you’ll need to select the type of app you want to create. Facebook offers several options, including canvas apps, which are used within the Facebook website, and social plugins, which can be used on external websites.
Once you’ve selected the app type, you’ll need to fill out the required fields, such as the app name and category. You’ll also need to provide a short and long description of your app, as well as a privacy policy URL.
After you’ve completed these steps, you can start developing your app. Facebook provides a range of tools and resources to help developers with the process. From the core API to the Graph API, you’ll find everything you need to build a successful app.
When developing your app, it’s important to keep in mind the common features that users expect from a Facebook app. These include newsfeed integration, sharing capabilities, notifications, and more. By incorporating these features, you’ll be able to create an app that users will love to use and share with their friends.
In conclusion, creating a Facebook app may seem like a daunting task, but by following these step-by-step instructions, you’ll be well on your way to developing your own successful application. Remember to take advantage of the resources provided by Facebook and don’t hesitate to reach out to their support team if you encounter any issues. Good luck!
- How to Make a Facebook App Tutorial
- Step 1: Setting Up
- Step 2: Register Your App
- Step 3: Integrate with Facebook API
- Step 4: Developing Your App
- Step 5: Notifications
- Step 6: Testing and Launching
- Setting up a Facebook app for asset sharing
- Step 1: Registration
- Step 2: Setting up the app
- Step 3: Creating a Facebook canvas
- Step 4: Configuring permissions and features
- Step 5: Obtaining an app secret and ID
- Step 6: Notifications and webhooks
- Step 7: Core development and testing
- Step 8: Printing and distribution
- Create a Facebook App ID App Secret Print
- Step 1: Setting Up Your Facebook Developer Account
- Step 2: Obtaining Your App ID and App Secret
- Step 3: Printing Your App ID and App Secret
- Developing Your Facebook App
- Step 1: Setting Up a Facebook Developer Account
- Step 2: Creating Your App
- Step 3: Selecting an App Category
- Step 4: Configuring App Settings
- Step 5: Integrate Core Facebook Features
- Step 6: Get Your App ID and Secret
- Step 7: Develop Your App
- Step 8: Publish and Promote Your App
- Common Pitfalls and Best Practices
- Using the Facebook API
- Step 1: Setting Up
- Step 2: Creating App Pages
- Step 3: Generating the API Key and Secret
- Step 4: Developing Your App
- Step 5: Integrating into Your HTML
- Step 6: Registering Users with Facebook
- Step 7: Using the Graph API
- Step 8: Customizing Your App’s Canvas Page
- Step 9: Sharing Content to Facebook
- Step 10: Testing and Troubleshooting
- Video:
- How to Create Facebook Account (Quick & Simple)
How to Make a Facebook App Tutorial
If you are a developer looking to create a Facebook app, this tutorial will guide you through the necessary steps to develop and integrate your app with Facebook’s core API. Whether you want to create a social sharing app, a newsfeed or an affiliate app, this tutorial will help you get started with creating your own Facebook application.
Step 1: Setting Up
To start developing your Facebook app, you’ll need to go to Facebook’s developer website and create a developer account. Once you’ve done that, you can create a new app by selecting the “Create App” button. Give your app a title and assign it a unique ID.
Step 2: Register Your App
When you’ve created your app, you’ll need to register it with Facebook. In the app settings, you’ll find a section where you can provide your app’s details such as the Canvas URL, icon, and asset. Fill out these fields accordingly to complete the registration process.
Step 3: Integrate with Facebook API
Once your app is registered, you can start integrating it with Facebook’s core API. This will allow you to access common features such as user registration, login, and sharing. You can also access the Graph API to retrieve data from Facebook’s social graph.
Step 4: Developing Your App
When developing your app, you’ll need to decide on the specific features and functionalities you want to include. You can create custom pages for your app, develop a newsfeed to display user activities, or integrate with other popular platforms. Be creative and think about how you can make your app stand out!
Step 5: Notifications
If you want to send notifications to your users, you’ll need to implement the Facebook Notifications API. This will allow your app to send updates and alerts to users’ Facebook accounts, making sure they stay engaged and informed.
Step 6: Testing and Launching
Before launching your app, it’s important to thoroughly test it to ensure it functions properly and provides a good user experience. Facebook provides a testing environment where you can test your app and ensure everything is working as expected. Once you are confident in your app’s functionality, you can submit it for review and, upon approval, make it available to the public.
Follow these steps, and you’ll be well on your way to creating a successful Facebook app. Good luck with your development!
Setting up a Facebook app for asset sharing
Setting up a Facebook app for asset sharing is a common and essential step for developers who want to integrate their applications with Facebook’s social graph API. In this tutorial, we will guide you through the steps to create and configure a Facebook app, so you can start developing an app that allows users to share assets on their Facebook pages and newsfeed.
Step 1: Registration
When you are ready to create a Facebook app, go to the Facebook developers website and sign in with your Facebook account. Once logged in, navigate to the “My Apps” section and click on the “Add a New App” button. Give your app a title, select a category, and click on the “Create App ID” button.
After the registration process, you’ll be redirected to the app dashboard.
Step 2: Setting up the app
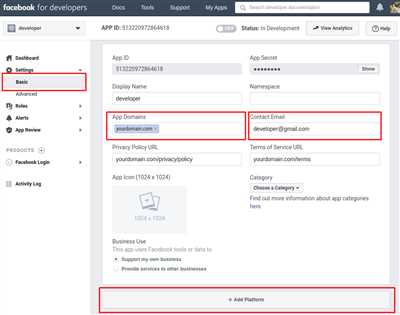
In the app dashboard, you’ll find the necessary tools to configure your app settings. On the left-hand side menu, select the “Settings” tab. Here, you can fill in the required fields such as the basic information, contact email, privacy policy URL, and terms of service URL. Make sure to provide accurate and up-to-date information.
Step 3: Creating a Facebook canvas
To enable users to interact with your app directly on Facebook, you’ll need to set up a Facebook canvas. Under the “Settings” tab, click on the “Add Platform” button and select “Facebook Canvas”. Enter the canvas URL, which is the URL of your app’s landing page on Facebook, and save the changes.
Step 4: Configuring permissions and features
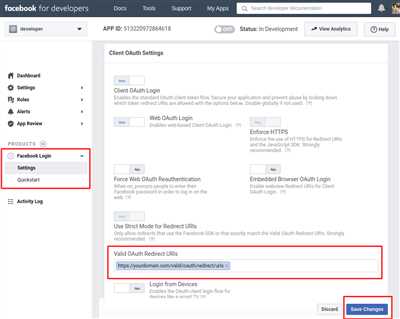
Under the “Settings” tab, you can also configure the permissions and features that your app will require. Use the “Permissions” and “Features” sections to select the necessary options for your asset sharing app.
Step 5: Obtaining an app secret and ID
To secure your app’s communication with Facebook’s API, you’ll need an app secret and ID. Under the “Settings” tab, navigate to the “Basic” section. Here, you’ll find your app ID. To obtain the app secret, click on the “Show” button next to the “App Secret” field. Keep these values secure and do not share them with anyone.
Step 6: Notifications and webhooks
If you want to receive real-time notifications about events in your app, such as when users share assets, you can set up webhooks under the “Webhooks” section in the “Products” menu. Follow the instructions provided to configure the webhook URL and select the events you want to receive notifications for.
Step 7: Core development and testing
With your Facebook app set up, you can start developing the core features for asset sharing. Make use of the Facebook developer documentation and API references to learn how to use the various APIs and SDKs available.
During this development phase, you can also test your app using Facebook’s built-in testing tools. These tools allow you to simulate user interactions and ensure that your app is functioning as expected.
Step 8: Printing and distribution
Once your app is complete and thoroughly tested, you can prepare it for distribution to users. Consider creating promotional materials, such as print ads or online banners, to advertise your app. You can also leverage Facebook’s advertising platform to reach a wider audience.
Setting up a Facebook app for asset sharing requires careful planning and attention to detail. By following these steps, you’ll be on your way to creating a successful app that allows users to share their assets seamlessly on Facebook.
Create a Facebook App ID App Secret Print
In order to develop and integrate your HTML app with Facebook’s Graph API, you’ll need to create a Facebook app and obtain an App ID and App Secret. This tutorial will guide you through the steps of creating a Facebook app and printing your App ID and App Secret.
Step 1: Setting Up Your Facebook Developer Account
- Go to the Facebook for Developers website by clicking here.
- Click on the “My Apps” dropdown menu and select “Add a New App”.
- Enter a name for your app and select a category that best represents your app.
- Click on the “Create App ID” button to finish creating your app.
Step 2: Obtaining Your App ID and App Secret
- Once your app is created, you’ll be taken to the app dashboard. On the left-hand side, you’ll see a menu. Click on “Settings” and then go to the “Basic” section.
- Under the “App Secret” section, you’ll find your App Secret. Click on the “Show” button to reveal it. Make sure to keep your App Secret a secret and don’t share it with anyone.
- Next, under the “App ID” section, you’ll find your App ID. This is a unique identifier for your app.
Step 3: Printing Your App ID and App Secret
Now that you have obtained your App ID and App Secret, you can print them using HTML and JavaScript. Here’s an example:
By including this code in your HTML file, you’ll be able to see your App ID and App Secret in the developer console of your browser.
Remember to replace ‘your-app-id’ and ‘your-app-secret’ with the actual values you obtained in Step 2.
And there you have it! You’ve successfully created a Facebook app, obtained your App ID and App Secret, and printed them using HTML and JavaScript.
Developing Your Facebook App
When developing your Facebook app, there are several important steps and considerations to keep in mind. In this tutorial, we’ll walk you through the process of creating an app on Facebook.
Step 1: Setting Up a Facebook Developer Account
The first step in developing your Facebook app is to create a Facebook Developer account. You’ll need this account to access the Facebook API and other developer resources.
Step 2: Creating Your App
Once you have a developer account, you can create a new app by visiting the Facebook Developer dashboard. Click on “Create App” and fill in the required fields, such as the app name and your contact email.
Step 3: Selecting an App Category
When creating your app, you’ll need to select an appropriate app category. This category helps Facebook categorize your app and display it correctly in the App Store.
Step 4: Configuring App Settings
After creating your app, make sure to configure the necessary settings. This includes setting up a privacy policy and terms of service, as well as specifying the app’s domain and the URL of the canvas page.
Step 5: Integrate Core Facebook Features
To make your app more social, you can integrate core Facebook features such as the newsfeed, sharing, and notifications. This allows your users to easily share their app activities with their friends on Facebook.
Step 6: Get Your App ID and Secret
Once your app is created, Facebook will provide you with an App ID and Secret. These credentials are required for your app to communicate with Facebook’s Graph API and other services.
Step 7: Develop Your App
Now you’re ready to start developing your app. This involves writing the necessary HTML, CSS, and JavaScript code to create your app’s user interface and functionality.
In addition to development, it’s important to test your app thoroughly to ensure it works correctly in different scenarios and on different devices.
Step 8: Publish and Promote Your App
Once your app is ready, you can publish it on Facebook and promote it to attract users. You can create dedicated Facebook pages for your app, run advertisements, or integrate it into affiliate programs to increase its visibility.
Common Pitfalls and Best Practices
When developing a Facebook app, there are some common pitfalls to avoid. For example, make sure to handle errors gracefully and follow Facebook’s policies and guidelines.
It’s also important to keep your app secure by implementing proper authorization and authentication mechanisms.
Remember, developing a successful Facebook app takes time and effort. Following these steps and best practices will help you create a high-quality app that users will love.
Using the Facebook API
The Facebook API provides developers with a powerful tool for creating applications that can be integrated with Facebook. When developing a Facebook app, you’ll need to make use of the API to access and manipulate various aspects of a user’s Facebook profile. In this tutorial, we’ll walk through the steps to create a Facebook app and make use of the API to enable features like social sharing, user registration, and more.
Step 1: Setting Up
To get started, you’ll need to have a Facebook account and a registered Facebook developer account. Once you’re set up, go to the Facebook Developers page and create a new app. Give your app a unique name and select the category it belongs to.
Step 2: Creating App Pages
After creating your app, go to the “Settings” tab and fill in the required fields. Make sure to provide a valid privacy policy URL and terms of service URL. You’ll also need to specify the platforms you’ll be developing for (e.g. web, iOS, Android).
Step 3: Generating the API Key and Secret
Next, go to the “Basic” tab and under “App Secret,” click on the “Show” button. Copy the secret key and securely store it as you’ll need it to make API calls.
Step 4: Developing Your App
Now that your app is created, you can start developing its core functionality. The Facebook API documentation provides detailed information on the various methods available to interact with Facebook’s API. Some common API requests include retrieving a user’s profile information, posting to their newsfeed, and sending notifications.
Step 5: Integrating into Your HTML
To integrate your app into your HTML, you’ll need to include the JavaScript SDK that Facebook provides. This library allows you to authenticate users, get their permission to access their Facebook data, and make API calls on their behalf.
Step 6: Registering Users with Facebook
If your app requires user registration, you can make use of the Facebook API to streamline the process. By implementing Facebook Login, users can sign up or log in to your app using their Facebook credentials. This not only simplifies the registration process but also allows you to access their Facebook data to personalize their experience.
Step 7: Using the Graph API
The Graph API is a powerful feature of the Facebook API that allows you to retrieve data from a user’s Facebook profile and interact with their social graph. With the Graph API, you can retrieve a user’s posts, photos, and friends, among other things. This data can be used to enhance the functionality of your app.
Step 8: Customizing Your App’s Canvas Page
If you’re developing a canvas app, you can customize the appearance of your app’s canvas page using HTML, CSS, and JavaScript. This allows you to create a unique and engaging experience for your users.
Step 9: Sharing Content to Facebook
The Facebook API provides methods for sharing content from your app to the user’s Facebook newsfeed. This can be used to promote your app or to allow users to share their achievements or other content from your app with their Facebook friends.
Step 10: Testing and Troubleshooting
Once you’ve created your app and integrated the Facebook API, it’s important to thoroughly test your app’s functionality and ensure that everything is working as expected. You can use the Facebook Developers Dashboard to track any errors or issues that users may encounter while using your app.
By following these steps and leveraging the power of the Facebook API, you’ll be able to create a unique and engaging social application that leverages the vast network of Facebook’s user base.