

If you want to promote yourself or your business online, creating a Facebook profile is a good idea. With over 2 billion users, Facebook is a powerful social networking platform that can help you connect with people and build a community around your brand. Whether you are an individual or a business, having a Facebook profile can be a very important step in building your online presence.
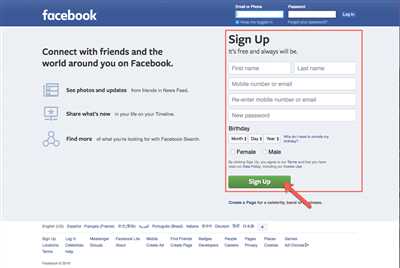
To create a Facebook profile, you first need to sign up for an account. You can do this by visiting the Facebook website and clicking on the “Sign Up” button. Fill in your name, email or phone number, password, and date of birth. Once you’ve entered all the required information, click “Sign Up” and you will be taken to the next step.
After signing up, you will be asked to add a profile photo. This can be a personal photo or a logo for your business. Choose a photo that represents you or your brand well. You can always change it later if you want. To add a photo, click on the “Add Photo” button and choose a photo from your computer. If you don’t have a photo on your computer, you can also upload one from your phone or take a new one.
Once you’ve added a profile photo, the next step is to add a cover photo. The cover photo is the large photo that appears at the top of your profile. It’s a great opportunity to showcase your personality or your brand. You can choose a photo from your computer or you can use Facebook’s cover photo feature to create a custom cover photo. If you choose to create a custom cover photo, make sure it is the right size. Facebook recommends using a photo that is 820 pixels wide and 312 pixels tall.
Now that you’ve added your profile and cover photos, it’s time to fill in some basic information about yourself or your business. Click on the “About” tab and you will be taken to a page where you can enter details such as your name, contact information, website, and a short bio. This information will help people find you and learn more about you or your business.
After you’ve filled in your information, click on the “Save Changes” button to save your profile. Congratulations! You’ve now created a Facebook profile. However, don’t worry if you’re not getting any followers or engagement right away. Building a community takes time and effort. Stay active on Facebook by posting interesting content, engaging with your followers, and promoting your page. With patience and dedication, you will see your Facebook profile grow and become a valuable asset for your personal or business brand.
How to Make a Facebook Profile Video
Creating a Facebook profile video is a great way to add a personal touch to your online presence. With this feature, you can convert a good profile photo into a dynamic video that helps you stand out in the Facebook community. Whether you’re using Facebook for personal or business purposes, a profile video can help promote your name, logo, or even showcase your products or services.
To make a Facebook profile video, follow these simple steps:
Step 1: Click on your profile picture, located at the top left corner of your Facebook homepage, to open your profile.
Step 2: On your profile page, click on the camera icon above your cover photo. This will prompt a drop-down menu, from which you should select “Upload Video.”
Step 3: Choose a video from your computer that you’d like to use as your profile video. Facebook recommends videos that are between 7 and 15 seconds long and have a resolution of at least 820 x 820 pixels.
Step 4: Once you’ve selected the video, you can add a title and description if you’d like. This is a good opportunity to add keywords that can help others find your profile.
Step 5: Click on the “Next” button to preview your profile video. If you’re happy with how it looks, click on the “Save” button to set it as your profile video. If not, you can always go back and choose a different video or edit the current one.
Step 6: Sit back and relax! Your profile video is now added to your Facebook profile. It will appear in the same location as your profile picture, but with a small play button overlay. When someone visits your profile, they can simply click on the play button to watch your profile video.
Remember, you don’t need to worry about your profile picture when you have a profile video. However, if you still want to keep your profile picture, you can simply add it as a separate photo in the “Profile Pictures” album.
Creating a Facebook profile video is a fun and creative way to express yourself and engage with your Facebook community. So don’t hesitate to make a profile video that reflects your personality and helps you connect with friends, followers, or potential customers on this popular social networking site.
If you have any questions about creating a Facebook profile video or need further assistance, please contact the Facebook Help Center or reach out to our dedicated support team. Like always, we’re here to help you make the most of your Facebook experience.
Why you should be on Facebook
Facebook is one of the most popular and widely used social networking platforms in the world. Whether you want to connect with friends and family, promote your business or brand, or simply stay updated with the latest news and trends, Facebook has something for everyone.
One of the main reasons why you should be on Facebook is that it helps you build and grow your online presence. By creating a Facebook profile, you can showcase who you are, what you do, and what you’re interested in. You can add a profile photo and cover photo, personalize your profile with your name and bio, and even share photos and videos with your friends and followers.
For businesses, Facebook offers a great opportunity to promote your products or services. You can create a business page and add a logo, photos, and a description of your business. You can also create and promote events, run ads, and engage with your followers and customers.
Facebook also has a community feature that allows you to join groups based on your interests. Whether you’re into cooking, photography, fitness, or any other topic, you can find like-minded people and connect with them. You can share your ideas, ask questions, and get advice from the community.
Another important feature of Facebook is the ability to create and manage pages. If you’re a business owner or a public figure, you can create a page for your business or brand. This allows you to separate your personal and professional life and gives you more control over your online presence.
Furthermore, Facebook offers a range of tools and analytics that can help you understand your audience and reach more people. You can see how many people have viewed your posts, track engagement and conversions, and even run advertisements to reach a wider audience.
Facebook is also a great platform for networking and making new connections. You can connect with old friends, colleagues, and classmates, and also make new connections with people who share your interests or work in the same industry. You can reach out to them, share ideas, collaborate on projects, and even find new job opportunities.
Finally, the best part about Facebook is that it’s free to use. You don’t have to worry about any hidden charges or fees. All you need to do is create an account, and you’re good to go!
So, whether you’re a business owner, a professional, or just an individual looking to stay connected with others, Facebook is a platform that can help you achieve your goals. Don’t hesitate, click on the sign-up button and start creating your Facebook profile today!
Step 2: Add Pictures
Now that you’ve created your Facebook profile, it’s time to add some pictures to make it more personalized and inviting to your friends and followers. Adding pictures is an important step to create an online presence, whether it’s for personal or business purposes.
If you’re using Facebook for business, you should add pictures that are based on your business topic. For example, if you manage a business in Ventura, California, you can add photos from your local community or pictures related to your business. This will help promote your business and attract more followers.
To add pictures to your profile, follow these simple steps:
Step 1: When you are on your Facebook profile page, click on “Add Photo or Video” option. It is usually located near your profile picture or cover photo.
Step 2: Click on the “+ Create Photo Album” button to create a new photo album. Give your album a name that best represents the pictures you are going to add.
Step 3: Now, you can either upload pictures from your computer or choose from the pictures that are already added to your Facebook account. If you have a logo or any other important pictures that you want to include in your profile, you can add them here.
Step 4: After you have selected the pictures, you can add a description or tag people in your photos if you want. This is a good way to engage with your friends and followers.
Remember, the pictures you add should be of good quality and relevant to you or your business. Also, make sure the dimensions are appropriate for Facebook. The recommended size for profile pictures is 180×180 pixels, and for cover photos, it is 820×312 pixels.
Once you’ve added the pictures, you can rearrange them by dragging and dropping. You can also set one of the pictures as your profile picture by clicking on the “Options” button and selecting “Make Profile Picture”.
That’s it! You’ve successfully added pictures to your Facebook profile. Now, your profile will be more appealing and inviting to your friends, followers, and potential customers.
If you need any further assistance or have any questions, please feel free to contact me. I’d be happy to help!
How Do I Convert My Personal Facebook Profile to a Business Page
If you’re creating a business based on a personal Facebook profile, it’s very important to convert it into a business page. By doing so, you will be able to create a strong online community, network with other businesses, and promote your brand. Converting your personal profile to a business page is a simple process, and in this article, we will guide you through the steps to make this transition.
Before we dive into the steps, it’s important to understand why you should convert your personal profile to a business page. Firstly, a business page allows you to add important information such as your business name, contact information, and logo. This will help followers easily identify your business and get in touch with you. Additionally, business pages have access to features such as Insights, which provide analytics and data about your page’s performance. This information is crucial when it comes to understanding your audience and tailoring your content to their preferences.
Here’s how you can convert your personal profile to a business page:
- When logged into your personal profile, click on the arrow in the top right corner of your Facebook homepage. A drop-down menu will appear.
- From the drop-down menu, click on “Settings”.
- In the left column, click on “Your Facebook Information”.
- In the “Your Facebook Information” section, click on “Transfer a copy of your photos and videos”.
- On the next page, you will see a message that explains the process of converting your profile to a page. Click on “Get Started”.
- Choose a category for your new page. This should be based on the type of business you’re creating.
- Add a profile picture and cover photo to your page. These visuals are very important for branding purposes, so make sure to choose ones that represent your business well.
- Fill in the necessary information for your business page, such as your business name, contact details, and a short description.
- Review the details you’ve added and make any necessary changes.
- After reviewing, click on “Create Page” to complete the conversion process.
Once you’ve completed these steps, your personal profile will be converted into a business page. Congratulations! You can now start promoting your business, inviting followers, and posting content. Remember to regularly engage with your audience and provide valuable information and updates.
Creating a business page on Facebook is a great way to establish your online presence and connect with potential customers. Whether you’re a small local business or a large corporation, Facebook’s networking capabilities can help you grow your brand and reach a wider audience. So, take the time to convert your personal profile into a business page and start reaping the benefits of this powerful platform.
Please note that these instructions are based on the current version of Facebook at the time of writing this article. If you encounter any issues or if the process has changed, please refer to Facebook’s Help Center for the most up-to-date information.
How To Create A Facebook Business Page
If you have a business and want to promote it online, creating a Facebook business page is a very important step. With over 2 billion active users, Facebook provides a great opportunity to reach a massive audience and connect with potential customers. In this article, we will guide you through the process of creating a Facebook business page in just a few simple steps.
- Step 1: Sign in to Facebook
- Step 2: Click on “Create” and select “Page”
- Step 3: Choose a name and category
- Step 4: Add a profile picture and cover photo
- Step 5: Customize your page
- Step 6: Add a call-to-action button
- Step 7: Create and share engaging content
- Step 8: Promote your page
- Step 9: Use Facebook Business Manager
- Step 10: Track performance with Facebook pixels
If you already have a personal Facebook profile, you can simply log in to your account. If not, you will need to create a personal profile first by clicking on the “Sign Up” button on the Facebook homepage.
Once you are logged in, click on the “+” button located at the top right corner of your screen. From the dropdown menu, select “Page” and then choose the “Business or Brand” option.
Give your Facebook business page a name that reflects your business. Select the appropriate category that best describes your business, such as “Local Business”, “Company”, or “Brand”.
Upload a professional profile picture that represents your business, such as your logo or a high-quality photo related to your products or services. Similarly, choose a visually appealing cover photo that captures the essence of your business.
You can add more information about your business, such as a description, contact details, address, and website URL. Make sure to fill out all the relevant fields to provide a comprehensive overview of your business to your followers.
A call-to-action button is a great feature that allows you to direct people to take specific actions, such as “Shop Now”, “Contact Us”, or “Sign Up”. Choose the call-to-action button that best aligns with your business goals.
Now that your Facebook business page is set up, start creating and sharing engaging content with your audience. Share updates, photos, videos, and any other relevant information that will help promote your business and connect with your community.
To increase your page’s visibility and reach more potential customers, you can promote your page by inviting your friends, sharing the page with your personal network, and running Facebook ads.
If you manage multiple Facebook pages or ad accounts for multiple businesses, using Facebook Business Manager can help you organize and manage them more efficiently. It provides various tools and features to streamline your business page management.
Facebook pixels are snippets of code that you can add to your website to track conversions, optimize ads, and build targeted audiences. Install Facebook pixels on your website to gather valuable insights about your page’s performance and audience engagement.
Creating a Facebook business page is a simple and effective way to establish an online presence for your business, enhance your brand visibility, and connect with your target audience. While it may seem overwhelming at first, follow these steps and take advantage of Facebook’s features to grow your business and reach new heights.
Berta Ventura

Creating a Facebook profile is a very important step in promoting your business and connecting with a wider audience. If you haven’t already, it’s time to create a profile and start building your online presence. In this article, we will guide you through the process of creating a profile for Berta Ventura, a community manager based in the online networking community.
Step 1: Sign up on Facebook
To create a Facebook profile for Berta Ventura, you should first visit the Facebook website and click on the “Sign Up” button. This will prompt you to enter your personal information, such as your name, email address, and a password. Make sure you provide accurate information so that your followers can easily find and contact you.
Step 2: Add a Profile Photo and Cover Photo
After signing up, you will be asked to add a profile photo and cover photo. These photos should be good quality and represent Berta Ventura’s personal brand. The profile photo should be a clear picture of you, while the cover photo can be a visually appealing image that relates to your role as a community manager.
Step 3: Convert Profile to a Page
If Berta Ventura wants to create a business page instead of a personal profile, she can convert her profile to a page. This feature is added by Facebook to help users manage their business pages more effectively. However, please note that converting a profile to a page will convert all your personal and networking contacts to page followers. Whether you should convert depends on the nature of your business and whether you want to keep your personal and professional contacts separate.
Step 4: Add Page Logo and Description
Once Berta Ventura has created a page, she should add her logo and a description of what she does. The logo should be a high-resolution image with dimensions of at least 180 pixels by 180 pixels. The description should provide a clear and concise overview of Berta Ventura’s skills, experience, and the services she offers as a community manager.
Step 5: Post Engaging Content
After setting up the profile or page, it’s time to start posting engaging content. You can share photos, videos, and articles related to the topic of community management. It’s important to be consistent with your posting schedule and interact with your followers regularly. This will help you build a community of loyal followers and establish yourself as an expert in your field.
Step 6: Promote Your Page
To increase the visibility of Berta Ventura’s page, you should promote it through various channels. Share the page on other social media platforms, your website, and include links to it in your email signature. You can also run Facebook ads to reach a wider audience and attract new followers. Remember to continuously analyze your page’s performance and make adjustments to your promotional strategies accordingly.
In conclusion, creating a Facebook profile or page for Berta Ventura can help her build a strong online presence and connect with a wider audience. By following these steps and consistently sharing valuable content, she can establish herself as a community manager and grow her business.