

Adding a digital ID to your documents can provide an additional layer of security and ensure their authenticity. Adobe Acrobat is a powerful tool that allows you to import and use digital IDs for various operations, such as signing and encrypting your files. In this guide, we will show you how to add a digital ID to your Adobe Acrobat.
Step 1: Generate or obtain a digital ID
Before you can add a digital ID to your Adobe Acrobat, you need to have one. There are different kinds of digital IDs available, such as self-signed certificates or those issued by a trusted agency. You can either generate your own digital ID or obtain one from a trusted authority. Once you have the digital ID file, remember its location as you’ll need it in the following steps.
Step 2: Open the Signatures panel
In Adobe Acrobat, locate the Signatures panel. It is usually displayed on the right-hand side of the window. If it is not already shown, go to the View menu, then click on Show/Hide and select Signatures.
Step 3: Import the digital ID
In the Signatures panel, click on the “More…” button at the top to open the Signatures editor. In the Signatures editor, click on the “Add ID” button. A new window will open, where you can select the kind of digital ID you want to add. Choose the “Digital ID File” option and click “Next”.
Step 4: Locate and select the digital ID file
Browse your files and locate the digital ID file you want to import. Select it and click “Next”. If the digital ID is protected by a password, enter it and click “Finish” to complete the import process. Your digital ID will now be added to your Adobe Acrobat.
- Create a digital ID
- How to Import a Digital ID
- Step 1: Open Adobe Acrobat
- Step 2: Go to the Security Settings
- Step 3: Select the Digital ID Option
- Step 4: Locate the Digital ID File
- Step 5: Enter the Digital ID Password
- Step 6: Finish Importing the Digital ID
- Create a Digital ID for a Signature in Adobe Acrobat
- Step 1: Open Adobe Acrobat
- Step 2: Open the Digital IDs Editor
- Step 3: Create a New Digital ID
- Step 4: Name and Location
- Step 5: Self-Signed or Acrobat Self-Signed
- Step 6: Finish Creating the Digital ID
- Import or Export Digital IDs
- Using Digital IDs for Signatures
- The Self-Signed Digital ID
- Step-by-Step Guide:
- Importing Digital IDs from other Files:
- Video:
- How to import digital ID’s in Acrobat
Create a digital ID
To add a digital ID to your document, follow these simple steps:
1. Open the Adobe Acrobat software on your computer. If you don’t have it yet, you can download it from the Adobe website.
2. Once you have Adobe Acrobat open, go to “Edit” in the top menu and click on “Preferences”.
3. In the Preferences window, select “Signatures” from the left-hand panel.
4. Look for the “Identities & Trusted Certificates” section and click on the “More…” button.
5. In the Identities & Trusted Certificates window, you will see a list of digital IDs. If you don’t have any yet, click on the “Add ID” button.
6. A new window will open where you can create a new digital ID. Enter a name for your digital ID and then select the kind of digital ID you want to create. For most purposes, a self-signed digital ID will suffice.
7. Follow the guide provided by Adobe to finish creating your digital ID. You may need to enter some personal information and save the ID as a PKCS#12 file.
8. Once your digital ID is created, it will be shown in the Identities & Trusted Certificates window. Select the ID you just created and click on the “Import” button.
9. Locate the PKCS#12 file you saved earlier and open it.
10. Now your digital ID is added to Adobe Acrobat. You can use it to sign your documents.
Remember, digital IDs add a professional touch to your documents and will show that you are the author or sender. This is especially important in a business or agency setting where documents need to be verified and signed.
Now that you know how to create a digital ID, you can add it to any document you want. Just open the document in Adobe Acrobat, go to the “Sign” tool, select your digital ID, and add the signature to the desired location on the document.
Good luck with adding digital IDs to your documents!
How to Import a Digital ID
If you work with digital signatures at any level, you may need to import a digital ID into your system. Importing a digital ID allows you to sign PDF files and authenticate yourself without the need for a physical signature or the PKCS#12 certificate format.
Here is a step-by-step guide on how to import a digital ID using Adobe Acrobat:
Step 1: Open Adobe Acrobat
First, open Adobe Acrobat on your computer. If you don’t have it yet, you can download it from the official Adobe website.
Step 2: Go to the Security Settings
Once Adobe Acrobat is open, go to the “Edit” menu and select “Preferences” from the dropdown. In the Preferences window, click on “Security” in the left-hand panel.
Step 3: Select the Digital ID Option
In the Security panel, locate the “Digital IDs” category and select “Digital IDs” from the list. Then click on the “Add ID” button.
Step 4: Locate the Digital ID File
In the Add Digital ID window, click on the “Browse” button and navigate to the location where you have saved the digital ID file on your computer. Select the file and click “Open”.
Step 5: Enter the Digital ID Password
In the Add Digital ID window, enter the password for the selected digital ID file. If the digital ID file is password-protected, you will need to enter the correct password to import it.
Step 6: Finish Importing the Digital ID
After entering the password, click on the “Finish” button to complete the import process. The imported digital ID will be displayed in the Digital IDs panel of Adobe Acrobat.
Remember to save your changes before closing the Preferences window. From now on, you will be able to use the imported digital ID to sign PDF files and perform other cryptographic operations.
This guide has shown you how to import a digital ID into Adobe Acrobat. Follow these steps to import a digital ID from a self-signed certificate or any other kind of digital ID file. With a digital ID imported, you can now add your signature to PDF files and securely send them to recipients or agencies.
Create a Digital ID for a Signature in Adobe Acrobat
To add a digital ID for a signature in Adobe Acrobat, you will need to follow the steps below:
Step 1: Open Adobe Acrobat
First, open Adobe Acrobat on your computer.
Step 2: Open the Digital IDs Editor
In Adobe Acrobat, click on “Edit” in the top menu bar, and then select “Preferences”. In the “Preferences” window, click on “Signatures” from the list on the left-hand side. Under “Identities & Trusted Certificates”, click on “More…” next to “Digital IDs”.
Step 3: Create a New Digital ID
In the “Digital ID and Trusted Certificates” window, click on “Add ID” and select the option to “A new digital ID I want to create now”. Click “Next”.
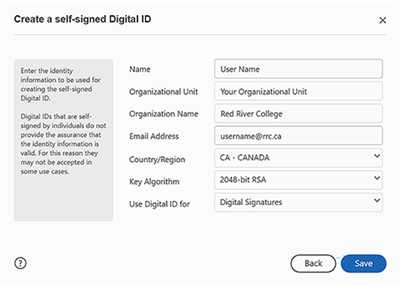
Step 4: Name and Location
Enter a name for the digital ID, and choose a location to save the file. Click “Next”.
Step 5: Self-Signed or Acrobat Self-Signed
Choose the “Self-Signed” or “Adobe Self-Signed” option based on your requirements. Click “Next”.
Step 6: Finish Creating the Digital ID
Follow the remaining steps in the digital ID creation wizard to finish creating the digital ID. Once completed, the digital ID will be displayed under “Identities & Trusted Certificates”.
Remember to save the digital ID file in a safe and secure location.
You can now use this digital ID for signing documents in Adobe Acrobat.
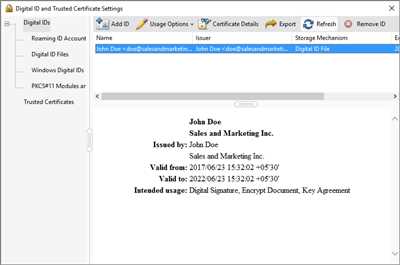
Import or Export Digital IDs
If you have an existing digital ID in a PKCS#12 (.pfx, .p12) file format, you can import it by clicking on “Import” in the “Digital ID and Trusted Certificates” window. You can also export a digital ID by selecting it and clicking on “Export” in the same window.
Using Digital IDs for Signatures
To sign a document with your digital ID, open the document in Adobe Acrobat, click on “Tools” in the top menu bar, and then select “Certificates”. In the “Signatures” panel, click on “Sign” and select your digital ID from the list of available IDs.
Follow the on-screen instructions to complete the signature process. Your digital ID will be used to sign the document.
This guide provides instructions on creating a digital ID for a signature in Adobe Acrobat. Digital IDs are an important tool for adding trusted digital signatures to your documents.
The Self-Signed Digital ID
To add a digital ID to your Adobe Acrobat software, you can create a self-signed digital ID. This guide will show you how to add a self-signed digital ID using the Adobe Acrobat professional tool.
Step-by-Step Guide:
- Open Adobe Acrobat and select the “Tools” tab.
- In the “Prepare Form” section, click on the “More” option.
- Scroll down and click on the “Digital Signature” option.
- In the “Signatures” panel, click on the “Identities & Trusted Certificates” section.
- In the navigation pane on the left side, click on “Digital IDs” to expand the options.
- Click on “More” and then select “Security Settings” from the drop-down menu.
- In the “Security Settings” window, click on the “Add ID” button.
- Choose the option to create a new digital ID and click “Next”.
- Enter a name for the digital ID and click “Next”.
- Select the level of security you require and click “Next”.
- In the “Save As” window, choose a location to save the digital ID file and click “Save”.
- In the “Security Settings” window, click “Finish” to complete the process.
Once you have created the self-signed digital ID, you can use it to sign documents without the need for a professional third-party certificate. The digital ID will be shown in the “Identities & Trusted Certificates” section, and you can select it to sign your documents.
Remember to keep your digital ID file safe and secure, as it is a unique identifier for your digital signatures.
Importing Digital IDs from other Files:
If you have digital ID files in other formats, such as PKCS12 certificates, you can import them into Adobe Acrobat.
- Open Adobe Acrobat and go to the “Tools” tab.
- In the “Prepare Form” section, click on the “More” option.
- Scroll down and click on the “Digital Signature” option.
- In the “Signatures” panel, click on the “Identities & Trusted Certificates” section.
- In the navigation pane on the left side, click on “Digital IDs” to expand the options.
- Click on “More” and then select “Security Settings” from the drop-down menu.
- In the “Security Settings” window, click on the “Add ID” button.
- Choose the option to import a digital ID from a file and click “Next”.
- Locate the digital ID file on your computer and click “Open”.
- Follow the instructions in the import window to complete the process.
After importing the digital ID, it will be displayed in the “Identities & Trusted Certificates” section, and you can select it to use for your digital signatures.
Adding a digital ID is a complex process, but once you have it set up, you can easily sign documents and authenticate your identity without relying on third-party tools or agencies.