

Welcome to the world of Android development! If you’ve ever wondered how to create your own Android apps from scratch, you’re in the right place. Android is a popular operating system used by millions of users worldwide, and developing for this platform opens up a world of possibilities. Whether you want to build a small application for your own use or share your creations with the world through the Google Play Store, this guide will take you through the steps to becoming an Android developer.
Before we begin, it’s important to note that developing for Android requires a basic understanding of programming. The most common programming language used for Android development is Java, so if you’re not already familiar with it, now is a great time to start learning. There are various online tutorials and resources available to help you get acquainted with Java programming.
The first step in your Android development journey is to set up your development environment. To do this, you’ll need to download and install the Android Software Development Kit (SDK) on your computer. The SDK includes all the tools and libraries you’ll need to start working on your Android projects. Once you have the SDK installed, you can choose to use either the official integrated development environment (IDE) provided by Google, called Android Studio, or you can use other IDEs such as Eclipse. Android Studio is recommended for beginners, as it provides a user-friendly interface and many helpful features.
After setting up your development environment, you can begin working on your first Android application. Android apps are made up of various components, such as activities, services, broadcast receivers, and content providers. These components work together to create the functionality and user interface of your app. Understanding the lifecycle of these components is crucial to developing a well-designed and efficient Android app.
While there are many ways to design an Android app, it’s important to understand the basic structure and principles of Android development. Android uses a modified version of the Model-View-Controller (MVC) design pattern, called the Model-View-Presenter (MVP) pattern. This pattern helps separate the user interface logic from the application logic, making it easier to maintain and test your code.
Once you have a good grasp of the basic concepts and skills needed for Android development, you can start working on more advanced projects. Android provides a wide range of features and APIs that allow you to create rich and interactive apps. Depending on your specific goals and requirements, you can create apps that utilize features like GPS, camera, sensors, and more.
When you finish developing your app, it’s time to distribute it to users. The most common way to distribute your Android app is through the Google Play Store. However, there are other ways to share your app, such as sideloading it onto your phone or distributing it through third-party app stores. The choice is yours, depending on the scope and target audience of your app.
In conclusion, developing for Android can be an exciting and rewarding journey. By mastering the basics of Android development, you can create your own apps and share them with the world. With the right knowledge and skills, you can become a proficient Android developer and contribute to the ever-growing Android ecosystem.
- How to Build an Android App in 2023
- Create a new Android project
- Create a project
- Configure project JDK
- Step 2: Open a New Project
- Guide to Becoming an Android Developer
- Start With a Programming Language
- Understand the Android Application Lifecycle
- Learn the Basics of an Android Platform
- Get to Know the Android Tools
- Start With Small Projects
- Distribute Your Project
- Videos:
- How ChatGPT Built My App in Minutes 🤯
How to Build an Android App in 2023
In 2023, Android continues to dominate the mobile operating system market with its wide user base and integrated software platform. If you’re a developer looking to start a career in mobile app development or want to create your own app for personal or business use, learning how to build an Android app is a great next step.
When it comes to Android app development, the two most common programming languages used are Java and Kotlin. While Java has been the official language for Android development for many years, Kotlin has gained significant popularity since it was released in 2017. Many developers prefer Kotlin due to its modern and concise syntax that helps them write cleaner and more readable code.
To start building Android apps, it’s essential to understand the basics of the Android operating system and the development process. Once you have the necessary software installed, such as Android Studio, you can begin working on your first Android application.
The Android development process follows a lifecycle that involves several steps, starting from setting up the development environment to distributing the finished app on the Google Play Store. It’s important to understand each step in the process to ensure a successful app development journey.
A beginner in Android development should first learn the fundamentals of programming, as it lays the foundation for building Android apps. Learning concepts like variables, loops, conditionals, and functions are essential for any developer, regardless of the programming language used.
With the basics of programming in hand, the next step is to dive into Android-specific concepts and features. Understanding activities, intents, views, and fragments will help you create interactive and user-friendly apps.
Once you have a good understanding of the Android framework, it’s time to start working on your first app project. A common first project for beginners is building a simple app with a user interface, such as a dialog box or settings page. These small projects will help you get familiar with the various components and workflows involved in Android app development.
As you progress and master the Android development skills, you can take on more complex projects and explore advanced topics like background services, network requests, databases, and animations.
One great resource for Android developers is the official Android Developer website, which provides comprehensive tutorials, documentation, and sample code. It’s also helpful to join online communities and forums where you can ask questions, share your work, and learn from experienced developers.
While Java and Kotlin are the most commonly used programming languages for Android development, there are also other languages like C++ that can be integrated into Android projects. Depending on the nature of your app, you can choose the language that best suits your needs.
In conclusion, building an Android app in 2023 involves learning the basics of programming, understanding the Android operating system and its components, and mastering the development process. With the right resources and dedication, you can create innovative and successful apps that can be distributed on the market for Android phones.
Create a new Android project
In order to start developing your own Android applications, you need to create a new Android project. This process requires a basic understanding of the Android platform and some knowledge of programming languages like Java or Kotlin.
Before you start, make sure you have the correct versions of the necessary software installed on your computer. You will need the Java Development Kit (JDK) and the Android Studio IDE, which is the official integrated development environment for Android.
Once you have installed the required software, you can open the Android Studio and start a new project. The Android Studio provides various templates and settings that can help you configure your project according to your needs.
When you create a new project, you will be prompted to provide some basic information such as the project name, package name, and the location where you want to save your project files.
After creating the project, you will be presented with a blank workspace where you can start building your application. The workspace is divided into various sections like the project explorer, the code editor, and the preview window.
The code editor is where you will write your application’s source code. Android applications are typically written in Java or Kotlin, and you can switch between the two languages depending on your preference.
The project explorer allows you to navigate through your project’s files and directories. This is where you will find all the resources and source code files that make up your application.
The preview window shows you a real-time preview of how your application will look like on different device screens. This can help you design and visualize the user interface of your application.
As you progress in your development journey, you will need to learn more about the various tools and features provided by Android Studio. There are many online tutorials and official documentation sources that can help you master the basics and advance your skills as an Android developer.
Once you have finished developing your application, you can use the Android Studio to build a distributable APK file. This file can be installed on Android devices and shared with others.
Android developers have a wide range of career opportunities in the field of mobile app development. The Android platform is one of the most popular and widely used platforms, and there is a high demand for skilled Android developers in the market.
In conclusion, creating a new Android project is the first step towards developing your own Android applications. By getting acquainted with the Android Studio and learning the basic settings and features, you can start your journey into the exciting world of Android development.
| Step | Description |
|---|---|
| 1 | Open Android Studio |
| 2 | Create a new project |
| 3 | Configure project settings |
| 4 | Start developing your application |
| 5 | Build and distribute your application |
Create a project
Before you can start developing Android applications, you need to set up your development environment. This involves installing the necessary tools and configuring your system to work with the Android platform.
The first step is to make sure you have the correct software installed. Android development requires the Java Development Kit (JDK), Android SDK (which includes the Android Developer Tools or ADT), and Android Studio. You can download these tools from the official Android website.
Once you have the necessary tools, you can begin creating your project. Android projects are structured in a specific way, and it’s important to follow the correct structure to ensure your app works correctly.
To start a new project, open Android Studio and select “Start a new Android Studio project” from the main dialog. You will be prompted to enter some basic information about your app, such as its name and the package name.
After entering this information, you can choose the minimum and target Android versions that your app will support. It’s best to choose versions that cover a wide range of devices, so your app can reach a larger user base.
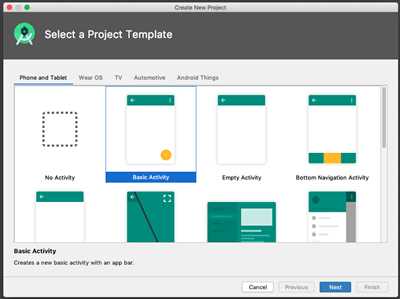
Next, you can select the activity template for your app. An activity represents a single screen in your app, and selecting a template will create the basic structure for this screen. There are various templates available, such as a blank activity, a basic activity with a layout, or a master/detail flow activity.
Once you have selected a template, click “Finish” to create your project. Android Studio will generate the necessary files and folders for your app, including a main Java file where you will write most of your code.
Now that your project is created, you can start developing your app. Android Studio provides a rich set of tools to help you build your app, such as an integrated development environment (IDE) and a visual layout editor. You can also use Gradle, a build system that automates the process of building your app.
As a beginner Android developer, it’s important to spend some time learning the basics of Android development. There are many tutorials and resources available online to help you get started. You can also join developer communities and forums to learn from more experienced developers.
When developing an app, it’s always a good idea to test it on a real device or an emulator. This will help you identify any issues and fix them before distributing your app to the market. Android Studio provides tools for testing your app on different devices and Android versions.
As you progress on your Android development journey, you will become more acquainted with the various tools and techniques used by professional Android developers. You can also share your progress and learn from others by participating in open-source projects.
In conclusion, creating an Android project requires setting up your development environment, configuring the necessary tools, and learning how to build an app. It’s important to follow the correct structure and learn the basics of Android development. With time and practice, you can become a skilled Android developer and explore careers in this fast-growing field.
Configure project JDK
Before you start working on an Android app, you should understand the basics of how the Android operating system works and what you need to get started. Learning how to develop Android apps will not only help you in your journey to becoming a mobile app developer but also give you a better understanding of how software and programming work on phones and other devices.
To create Android applications, you will need to have the correct software installed on your system. As of 2023, Android Studio is the best and most commonly used software for Android app development. It is an official integrated development environment (IDE) provided by Google, designed specifically for Android developers. Android Studio uses the Java programming language and Kotlin as an alternative programming language. The steps for setting up your project JDK (Java Development Kit) will be the same regardless of which language you choose.
Here are the steps to configure your project JDK in Android Studio:
| Step | Description |
|---|---|
| 1 | Open Android Studio. |
| 2 | Go to “File” menu and select “Project Structure”. |
| 3 | In the “Project Structure” dialog, navigate to “SDK Location” on the left panel. |
| 4 | Check if the “JDK location” is set to the correct path. |
| 5 | If the JDK is not installed, click on “Download JDK” and follow the instructions. |
| 6 | Click “OK” to save the changes. |
Note that it is important to have the correct JDK version installed for your project. You can find the required JDK version in the Android Studio documentation or in the project requirements. If you don’t have the correct JDK version installed, you may encounter issues while building and running your app.
Once you have configured the project JDK, you can proceed with the next steps in your Android app development journey. It’s important to keep learning and gaining new knowledge, as the Android platform and tools are constantly evolving. There are many online resources, tutorials, and communities that can help you along the way. Don’t be afraid to ask questions and seek help when needed.
Remember that becoming a skilled Android developer requires a combination of learning the basics, understanding the Android lifecycle, working with Gradle (the build system), and continuously improving your coding skills. Start with simple projects and gradually progress to more complex ones. Share your applications with the public and get acquainted with the feedback and design considerations. Note that there are also other ways to build Android apps, such as using frameworks like React Native or Flutter, but learning the official Android development tools and knowledge will give you a strong foundation.
Step 2: Open a New Project
As a beginner in Android development, one of the first steps you’ll take is to open a new project. This is an essential part of understanding the basics of Android app development and is the starting point for developers to begin their journey.
When you open a new project, you’ll be greeted with a dialog box that prompts you to enter some necessary information. This includes the name of your project, the package name, the save location, and the programming language you’ll be using, such as Java or Kotlin.
It’s important to note that in order to open a new project, you need to have several essential tools and components installed. First, make sure you have the Java Development Kit (JDK) installed on your system. This is necessary as Android apps are developed using Java as the primary programming language. Additionally, you’ll need to have the Android Software Development Kit (SDK) installed, which includes various tools and libraries that are used in Android app development.
Once you have these tools installed, you can open a new project in Android Studio, which is the most commonly used integrated development environment (IDE) for Android app development. Android Studio provides a user-friendly interface that helps developers create, test, and debug their applications.
When opening a new project, you can choose from various project templates that suit your specific needs. For beginners, it’s recommended to start with a “Empty Activity” template, as this provides a small and simple starting point for learning the lifecycle of an Android app.
After setting up your project, you’ll be presented with the project’s file structure. This includes folders such as “app” (where most of your code will be), “manifests” (where you define your app’s settings and permissions), and “gradle” (which handles building and managing your app’s dependencies).
It’s important to understand that developing Android apps is a continuous learning process. As you progress through your development journey, you’ll encounter various challenges and learn new skills along the way. However, opening a new project is a crucial step in getting started with Android app development.
Once you have opened a new project, you can start working on your app. This includes writing code, fixing bugs, and testing your application on different devices and operating system versions. When you’re ready, you can distribute your app to the public, either through the Google Play Store or other common distribution platforms.
In conclusion, opening a new project is a fundamental step in Android app development. It is where you begin your learning journey and understand how the different components of the Android platform work together. By following these steps and gaining knowledge in this field, you’ll be well-equipped to create your own Android applications in the best possible way.
| Summary of Step 2: Open a New Project |
|---|
| 1. Open Android Studio and choose the “Empty Activity” template. |
| 2. Set up your project by providing necessary information. |
| 3. Familiarize yourself with the project’s file structure. |
| 4. Start working on your app by writing code and testing it. |
| 5. Once your app is ready, distribute it to the public. |
Guide to Becoming an Android Developer
Becoming an Android developer can be a rewarding career choice. Android is one of the most popular operating systems in the world, used by billions of people on their phones and tablets. If you have a keen interest in software development and want to work on projects that reach a wide audience, then becoming an Android developer might be the next step in your journey.
Before diving into the world of Android development, it’s important to get acquainted with the basics. Android development is primarily done using the Java programming language, although Kotlin is becoming more popular, and will most likely replace Java as the default language for Android development by 2023. You’ll also need to have a good understanding of the Android operating system and its structure.
Once you have a basic understanding of the Android system, you can start working on your first Android application. The development process typically involves creating a new project, setting up the development environment, and familiarizing yourself with the Android Studio IDE. Android Studio is the official IDE for Android development and provides a wide range of tools and resources for developers.
During the development process, you’ll need to progress through various steps such as designing the user interface, working with the activity lifecycle, and distributing your app on the Google Play Store. It’s also important to note that Android development is an ongoing process, as new versions of the Android operating system are released regularly and developers need to keep their apps up-to-date with the latest changes.
To master Android development, it’s essential to gain knowledge and skills in areas such as app architecture, testing, debugging, and performance optimization. There are many resources available online, such as official Android documentation, tutorials, and community forums, where you can learn and get support from other developers.
Once you have mastered the basics and gained some experience in Android development, you can explore more advanced topics and dive into more complex projects. It’s common for Android developers to work on both small and large-scale applications, depending on their interests and career path.
Working as an Android developer can provide you with a wide range of career opportunities in various fields. Android developers are in high demand, and the skills you gain as an Android developer can also be transferred to other fields such as web development or software engineering.
In conclusion, becoming an Android developer is a rewarding journey that requires time, dedication, and continuous learning. By following the steps outlined in this guide and staying up-to-date with the latest tools and technologies, you can become a successful Android developer and make your mark in the exciting world of mobile app development.
Start With a Programming Language
To develop an Android application, you need to start by choosing a programming language. The official language for Android development is Java. Java is a popular and widely used programming language that is also the default language for developing Android apps. However, it is not the only language you can use to build Android apps. Google has recently introduced Kotlin as an official language for Android development, and it is becoming more and more popular among developers.
Before you start coding, you should have a basic understanding of programming concepts and principles. If you are new to programming, it is recommended to start with learning Java or Kotlin and then move on to Android development.
Once you have chosen your programming language, you need to set up your development environment. To develop Android apps, you need to have the Java Development Kit (JDK) installed on your computer. The JDK is a set of tools that allows you to develop Java applications. You also need to install Android Studio, the official Integrated Development Environment (IDE) for Android development. Android Studio is a powerful tool that provides all the necessary tools and features to help you build, test, and debug your Android applications.
After setting up your development environment, you can start working on your first Android app. Android apps are built using the Android Software Development Kit (SDK), which provides a set of libraries and tools that allow you to develop applications for the Android operating system.
Before you start coding, it’s a good idea to go through some tutorials and guides to familiarize yourself with the Android development process. There are many online resources available, such as official Android documentation, tutorials, and forums, that can help you in your learning journey.
When designing your application, you should consider the user experience and the overall look and feel of your app. There are many tools and libraries available to help you design and style your app, such as XML layouts, material design guidelines, and third-party libraries.
One important aspect of Android development is the ability to distribute your app on the app market. By default, Android apps are distributed through the Google Play Store, but there are also other sources where you can distribute your app. You need to configure your app, create digital certificates, and sign your app before you can publish it on the market.
As you progress in your Android development journey, you will encounter common issues and bugs. Fixing these issues and debugging your application is an important skill that every Android developer should have. Android Studio provides powerful debugging tools that can help you identify and fix issues in your app.
It’s worth mentioning that Android is an open-source platform, which means that the source code of the Android operating system is freely available. This allows developers to customize and modify the operating system according to their needs.
In conclusion, when starting to develop Android applications, it is important to choose a programming language that you are comfortable with, such as Java or Kotlin. Set up your development environment with the necessary tools and libraries. Learn the basics of Android development, understand the concepts and principles, and familiarize yourself with the Android SDK and the Android Studio IDE. Take advantage of online resources and tutorials to help you in your learning process. And most importantly, start building small projects and working on real-life applications to gain practical experience and improve your skills.
Understand the Android Application Lifecycle
The Android application lifecycle is a crucial concept that every Android developer should master. Understanding the lifecycle allows developers to build robust and efficient applications that can handle various user interactions and system events.
When you develop an Android application, it goes through several stages before it is ready to be released to the market. This article will guide you through the most common steps in the Android application development process and help you understand how to create, build, and distribute your app.
First, as a beginner Android developer, you need to configure your development environment. This includes setting up the Android Studio, an Integrated Development Environment (IDE) used for Android application development. You’ll also need to learn the basics of the Android operating system and become acquainted with the Kotlin programming language, which is commonly used for developing Android apps.
Once you’re set up, it’s time to start working on your app. You’ll need to have a clear understanding of the app’s structure and design. This involves creating the user interface, defining the functionality, and writing the necessary code to make the app work.
Developers should note that the Android application lifecycle has two main versions: the activity lifecycle and the fragment lifecycle. Activities represent the screens of an app, while fragments are reusable UI components within an activity. Understanding the lifecycles of both activities and fragments is essential to ensure that your app functions correctly and provides a seamless user experience.
As you progress in your Android development journey, you’ll also need to learn how to use Gradle, a build system used for Android projects. Gradle helps manage dependencies, compile the source code, and distribute the app to different devices.
Once your app is developed, tested, and ready to be released, you can share it with the world. You have several ways to distribute your app, such as uploading it to the Google Play Store or sharing the APK file directly.
It’s important to note that developing Android applications requires continuous learning and keeping up with the latest trends and best practices in the field. The Android ecosystem is constantly evolving, and new versions of the operating system and developer tools are released frequently.
In conclusion, understanding the Android application lifecycle is essential for becoming a successful Android developer. It allows you to build high-quality apps that work seamlessly on various phones and operating system versions. Take the time to learn the basics, master the necessary skills, and dive into the world of Android app development.
Learn the Basics of an Android Platform
As a beginner, it is important to learn the basics of an Android platform before you begin your journey in Android application development. Understanding the structure and working of an Android platform will help you create and distribute your own applications for Android phones.
The first step is to have the basic skills in Java programming, as it is the most common programming language used in Android development. Make sure you have the Java Development Kit (JDK) installed on your computer, as it is required to configure and build Android applications. You should also have the latest version of Android Studio installed, as it is the integrated development environment (IDE) used for developing Android applications.
Once you have the necessary tools installed, it’s time to get acquainted with the Android platform. Start by understanding the structure of an Android application, such as the manifest file, activities, services, and content providers. Learn how to create an Android project and how to design user interfaces using XML and Java code.
One of the most important things to learn is how to work with the various components and settings of an Android application. Understand how to use and configure activities, fragments, intents, layouts, and resources. Get familiar with the common Android UI widgets and how to handle user interactions.
Another crucial aspect of Android development is understanding the concept of version control and managing project dependencies. Learn how to use Gradle to manage dependencies and build your project correctly. This will help you fix any errors or issues that may arise during development.
Once you have mastered the basics, it’s time to start building your first Android application. Start small, with a simple project that showcases your skills and understanding of the platform. Make sure to test your application on various Android versions and devices to ensure compatibility.
As a developer, it’s important to share your code and ideas with the open-source community. You can contribute to existing projects or create your own open-source projects. This will help you gain more experience and improve your skills as an Android developer.
In 2023, Android is going to be the most widely used platform worldwide. It’s a great time to learn Android development and become a part of this growing community. With the right skills and knowledge, you can create amazing Android applications and share them with millions of users.
In conclusion, learning the basics of the Android platform is essential for anyone starting their journey in Android application development. Understand the structure, tools, and components of an Android application, and learn how to build and distribute applications for Android phones. With the correct skills and knowledge, you can become a successful Android developer and contribute to the growing Android community.
Get to Know the Android Tools
As an Android developer, it’s important to become acquainted with the various tools that can help you build and distribute your applications. These tools are designed to assist you throughout the entire lifecycle of your Android project, from development to distribution.
One of the most essential tools for Android development is Android Studio. This is the official integrated development environment (IDE) for Android, where you can create, code, and test your applications. Android Studio provides a user-friendly interface and a wide range of features that make the development process easier.
When starting a new Android project, Android Studio allows you to configure your project settings, such as the target Android version, the default language used (Java or Kotlin), and other project-specific settings. It also provides an emulator where you can start your app and see how it works on a virtual device, simulating different screen sizes and Android versions.
For those who are new to Android development, it’s important to understand the basics of the Android platform and the Android system. Android is an open-source operating system used on various phones and devices. Understanding the Android platform and system will help you design and build applications that are compatible with a wide range of devices.
Another important tool for Android developers is Gradle. Gradle is a build automation tool used to manage dependencies and build Android projects. It allows you to define and configure your project’s build process, including compiling code, packaging resources, and generating the APK file that can be distributed on the Google Play Store or other app markets.
During the development process, you may encounter bugs or issues that need fixing. Android Studio provides debugging tools and a powerful system for fixing and troubleshooting issues in your code. It allows you to set breakpoints, inspect variables, step through code, and fix errors.
Once your app is ready, you can distribute it to the market through the Google Play Store or other app markets. Android Studio provides tools to help you generate a signed APK file, which is necessary for publishing your application. It also offers features to help you analyze and optimize your app’s performance.
Lastly, don’t forget about the official Android developer documentation and other learning resources. These sources can help you learn more about Android programming and master your skills as an Android developer. They provide guides, tutorials, and reference materials covering various topics and aspects of Android development.
In conclusion, getting to know the Android tools is crucial for becoming a proficient Android developer. Android Studio, Gradle, and other tools can help you build, debug, and distribute your applications. The official documentation and learning resources will assist you in learning and mastering the skills needed to develop for the Android platform.
Start With Small Projects
When it comes to Android development, it’s always a good idea to start with small projects. This allows you to gradually build up your skills and knowledge in the field, rather than diving straight into complex tasks.
Beginners in Android development should first get acquainted with the basics of the platform. This includes learning the fundamentals of Java or Kotlin, which are the two main programming languages used for developing Android applications. You should also take the time to understand the basic structure of an Android app and how to configure the development environment.
A great way to start your journey as an Android developer is by working through online tutorials and step-by-step guides. There are many resources available that provide tutorials on how to create your first Android app, where you can learn the necessary skills and tools required in Android development. These tutorials will guide you through the process of setting up your development environment, understanding the source code, and fixing common issues that may arise along the way.
Once you have a good understanding of the basics, you can start working on small projects. These projects can range from simple apps that display a dialog box or a table, to more complex apps that integrate with various operating system features. The key is to start small and gradually progress to more advanced projects as you gain more experience.
One of the best ways to learn is by working on real-world projects. By doing so, you will not only gain practical knowledge but also understand how to share and distribute your app. Android provides a platform called Google Play, where you can distribute your apps to a wide audience. This allows you to get feedback, improve your skills, and even kickstart your careers as an Android developer.
It’s worth noting that Android development requires a good knowledge of Java or Kotlin, as well as familiarity with various development tools. You should also make sure to download and install the Java Development Kit (JDK), as it is the foundation for Android development.
To sum up, if you’re a beginner in Android development, it’s best to start with small projects. This allows you to understand the basics, gain hands-on experience, and gradually progress to more advanced tasks. With time and practice, you can become a master Android developer and create amazing applications for phones and tablets.
Distribute Your Project
Once you have mastered the basics of Android development and have created your first application, the next step is to distribute your project. This involves making your application available for others to download and install on their devices. In this section, we will discuss the various steps involved in distributing an Android application.
When it comes to distributing your Android application, you have two main options: distributing it through the official Android market (Google Play) or sharing the APK (Android Package) file directly with users. The former is the most common method used by developers to distribute their applications, as it provides a centralized platform for users to discover and download Android apps. The latter method requires users to manually install the APK file onto their devices.
Before you can distribute your application, you need to ensure that you have the necessary tools and software installed on your system. First, you should have the Java Development Kit (JDK) installed, as Android development requires Java programming. Additionally, you should have the Android SDK (Software Development Kit) installed, which includes various tools and libraries for developing Android applications.
Once you are acquainted with the necessary tools and have set up your development environment, you can begin the process of distributing your Android application. The first step is to generate a signed APK file, which is a version of your application that is ready for distribution. This requires you to sign your application with a certificate to ensure its authenticity and integrity.
Next, you need to understand the structure of an Android application and the various settings and configurations that can be defined. This includes specifying the version number and name of your application, as well as the minimum and target Android SDK versions. You may also need to configure permissions, define activities, and declare dependencies on external libraries.
Once you have finished configuring your application, you can proceed to publish it. If you choose to distribute your application through the official Android market (Google Play), you need to create a Google Play Developer account and upload your application to the market. This requires you to provide various details about your application, such as its description, screenshots, and pricing information.
If you choose to share the APK file directly with users, you can do so through various means, such as email, file sharing services, or hosting it on a website. Users can then download the APK file onto their devices and manually install it. However, this method requires users to enable the installation of applications from unknown sources in their device settings.
In summary, distributing your Android application involves a series of steps, from generating a signed APK file to publishing it on the official Android market or sharing it directly with users. Understanding the basics of Android development and being familiar with the tools and platform are crucial in this process. As a beginner Android developer, it is best to start with smaller projects to learn and understand the development lifecycle before going on to distribute larger applications.
| Step | Description |
|---|---|
| Step 1 | Master the basics of Android development |
| Step 2 | Create your first Android application |
| Step 3 | Install the necessary tools and software |
| Step 4 | Generate a signed APK file |
| Step 5 | Configure your Android application |
| Step 6 | Publish your application on Google Play (optional) |
| Step 7 | Share the APK file directly with users (optional) |