

Are you looking for a way to make your photos and images stand out from the crowd? Adding a custom watermark can be a great idea! With a watermark, you can add your own personal touch, whether it’s a logo, text, or a combination of both. It’s an excellent way to protect your work and build your brand identity.
But how do you make a watermark? Don’t worry, it’s easier than you think! There are various software tools available that can help you create and customize watermarks, such as Microsoft Word or Photoshop. Once you have your software of choice open, you can start by picking a font, color, and style for your watermark that best suits your idea or brand.
Adding a watermark is a simple process. You can either insert it as a layer over your photo or use the software’s built-in watermarking tool. Generally, this tool is a button or an option positioned somewhere in the editing timeline. You can adjust the size, opacity, and position of your watermark until you’re satisfied with the result. This step is crucial to ensure that your watermark is useful without losing the appeal of your photograph or artwork.
Watermarks are particularly helpful if you’re sharing your images on social media or distributing them online. They can protect your work from being used without permission and provide a sense of ownership to the viewers. Whether you’re an artist, a content creator, or a marketing manager, adding a watermark can add a professional touch to your work and help you establish your creative identity.
- Start watermarking all your images now
- Custom Watermark
- Text Watermark
- 1. Open your document or image in your preferred editing software.
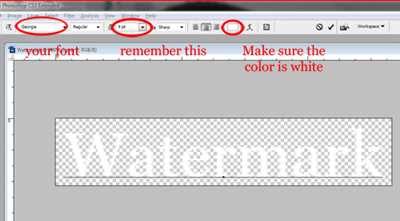
- 2. Choose the text and pick your font, style, and size.
- 3. Adjust the color, opacity, and position of the watermark.
- 4. Insert the watermark and layer it over your content.
- Edit the Watermark
- Learning how to make a watermark
- Video:
- How to add a watermark in Word
Start watermarking all your images now
Watermarking your images is a useful way to protect your creative work and ensure that no one can use your pictures without permission. By adding a watermark, you can insert your logo, text, or any other elements to your photograph, making it clear that the image belongs to you.
There are various software options available that can help you with watermarking. For example, Microsoft Word has a built-in tool that allows you to insert a watermark over your pictures. This can be especially helpful for artists or marketing managers who want to add a corporate logo or a custom text to their images.
When adding a watermark, you can generally pick the size, position, opacity, and color of the watermark. You can also choose different styles and fonts to customize the watermark to match your brand identity. The whole idea is to make the watermark visible without losing the appeal of the image itself.
Here’s how you can start watermarking your images:
- Open your preferred software for image editing.
- Import the image you want to watermark.
- Select the watermarking tool or option.
- Choose the type of watermark you want to use, such as a text or a logo.
- Customize the size, position, opacity, and color of the watermark.
- Adjust the watermark on your image using the software’s timeline or layer manager.
- Once you are satisfied with the placement and appearance of the watermark, save the image.
- Repeat the process for all the images you want to watermark.
Watermarking your images can be an effective way to protect your work from unauthorized distribution on social media or other platforms. It adds a layer of identity and helps to ensure that your images are credited to you.
Remember to be creative with your watermark, but also keep in mind that it shouldn’t distract from the main focus of the image. Use a style and font that align with your overall branding and marketing visuals. Watermarks can be a powerful tool, especially when it comes to protecting your intellectual property and ensuring proper credit for your work.
Start watermarking all your images now and enjoy the added peace of mind!
Custom Watermark
Adding a custom watermark to your images or photographs is a useful marketing tool that can help protect your content and maintain your brand identity. Watermarks are typically a transparent text or logo that is placed over an image or document, serving as a visual identifier of ownership.
There are several ways to create and edit watermarks, especially with the abundance of editing software and online tools available now. Here’s how you can customize a watermark:
- Choose a suitable image editing software or online tool that has watermarking capabilities. Popular choices include Adobe Photoshop, GIMP, and various online image editors.
- Select the image or photograph you want to add a watermark to. Make sure it is a high-quality image that represents your brand or message effectively.
- Decide on the type of watermark you want to use. Watermarks can be text-based, such as your company name or website URL, or they can be logo-based, using your corporate identity. Choose a font, size, and color that align with your brand’s style and make sure the text or logo is distinctive and legible.
- Position the watermark on the image. This can be anywhere you prefer, but it is generally placed in a way that it doesn’t obstruct important elements of the image, such as the main subject or key details.
- Adjust the opacity or transparency of the watermark. This will determine how visible or subtle the watermark appears on the image. Generally, a lower opacity is preferred to ensure the watermark doesn’t distract from the main content.
- Customize the style of your watermark. Experiment with different styles, such as different fonts, sizes, and colors, to find the one that best suits your image and brand identity.
- Once you’re satisfied with the design of your watermark, save the image file with the added watermark. Make sure to use a format that supports transparency, such as PNG.
- Now you can use your customized watermark on your website, social media timelines, marketing materials, or any other distribution channels. Simply insert the watermark onto your images using your chosen image editing software or online tool.
By adding a custom watermark to your images, you not only enhance the appeal and professionalism of your content but also protect your copyright and creative work from unauthorized use or distribution. Start learning now and pick the watermarking tool that works best for you. With a well-designed custom watermark, you can present your images with confidence and maintain your brand’s integrity without losing any of the creative elements that make them unique.
Text Watermark
Adding a text watermark to your images or documents can help protect your copyright, maintain your identity, and add a professional touch to your work. Watermarks are generally transparent text or images that are layered over your content.
Text watermarks are especially useful for artists, photographers, and corporate managers who want to ensure that their work is not copied or distributed without permission. They can also be a great marketing tool, as they can help promote your brand or logo.
If you’re using Microsoft Word or any other editing software, you can easily insert a text watermark without losing any of your original content. Here’s how:
1. Open your document or image in your preferred editing software.
Start by opening the document or image that you want to add a watermark to. This can be your timeline, social media graphics, a photograph, or any other element that you want to protect or customize.
2. Choose the text and pick your font, style, and size.
Select the text that you want to use for your watermark. You can use your copyright symbol, your company name, or any other text that you think would be appropriate. You can also customize the font, style, and size of the text to match your preferences.
3. Adjust the color, opacity, and position of the watermark.
You can adjust the color, opacity, and position of the text watermark to ensure that it blends well with your document or image. Experiment with different colors and opacity levels to pick the one that works best for you. You can also choose to position the watermark at the center, top, bottom, or any other part of the document.
4. Insert the watermark and layer it over your content.
Once you’ve customized your text watermark, it’s time to insert it into your document or image. Layer the watermark over your content and ensure that it doesn’t obstruct any important elements. You can also adjust the layering to make the watermark appear behind or in front of your content.
Adding a text watermark is a simple and effective way to protect your work and add a professional touch to your documents or images. It can help you establish your brand identity, maintain the integrity of your content, and appeal to your audience. So, next time you’re looking to add a watermark, consider using text!
Edit the Watermark
Once you have created a watermark for your logo or word, you may want to edit it further to add more elements or adjust its appearance. Watermarking is a useful tool, especially for artists who want to protect their work or for corporate managers who want to ensure copyright and identity distribution. Here’s how you can edit your watermark:
- Start by opening the software or application you are using to create or edit your watermarks, such as Adobe Photoshop or Microsoft Word.
- Insert your logo or word into the editing screen. You can pick pictures or create a custom logo.
- Select the text and choose a font style and size that best suits your watermark.
- Choose the color for your watermark. Generally, a light color with low opacity works best to avoid losing the appeal of the main image.
- Position your watermark by dragging it to the desired location on the image or document.
- Customize the style of your watermark by adding additional elements, such as clip art or shapes, if desired.
- Preview the watermark to ensure it looks how you want it to.
- Once you are satisfied with your edits, save the edited watermark as a separate file or overwrite the previous version.
- Now you can use your edited watermark by adding it to your images or documents, either manually or using a batch processing tool.
Editing the watermark allows you to create a more personalized and professional touch to your photographs or documents. It helps to maintain your brand or social media identity and adds a creative touch to your work.
Learning how to make a watermark
Creating a watermark is an essential skill for anyone who wants to add a professional touch to their digital content, especially in the corporate world. Watermarks are often used to ensure that images, documents, or other visual materials are protected from unauthorized use and distribution. They can also be a creative way to add your own custom text or logo to your work, helping to establish your brand identity and make your content more visually appealing.
There are various tools and software available to help you with watermarking, but one of the most commonly used programs is Microsoft Word. Here’s how you can make a watermark using Microsoft Word:
- Open Microsoft Word and start a new document.
- Click on the “Page Layout” tab in the top toolbar.
- Click on the “Watermark” button in the “Page Background” group.
- A dropdown menu will appear with different watermark styles to choose from. Pick the one that suits your needs.
- Once you’ve chosen a style, you can customize it further by adjusting the font, size, color, opacity, and position of the watermark.
- You can also insert your own custom text or logo by selecting the “Custom Watermark” option.
- Click on the “Apply” button to add the watermark to your document.
- If you’re working with images, especially photographs, you can add a watermark as a separate layer using photo editing software.
- This will help ensure that the watermark doesn’t interfere with the main elements of the image.
Watermarks can be a useful tool for artists, photographers, and content creators of all kinds. They not only provide a way to protect your work from copyright infringement, but they also help to promote your brand and maintain a professional image. With the right approach and a little practice, you can learn how to make watermarks that enhance the overall appeal of your content.