

If you have ever tried to write a book, you may have found yourself in a situation where you had a great idea but didn’t know where to start. You might have even gathered your friends and bounced some ideas around, hoping that something would stick. Well, fear not! In this article, we will give you a step-by-step guide on how to outline a book, which works for both fiction and nonfiction.
One of the first things you need to do when outlining a book is to give it a clear and catchy title. Choosing the right title sets the direction for the entire book and helps you stay focused on achieving your goals. Whether you already have a title in mind or need some inspiration, we will show you a few steps to help you find the best fit for your book.
Once you have a title, it’s time to create a list of main characters. Think about who your protagonist is, what they want in the story, and what obstacles they will face. You can use bullet points to jot down their characteristics, motivations, and conflicts. This process will help you get a clear picture of your characters and their stories.
Now that you have a title and the main characters, you can start outlining the plot. Breaking your story down into chapters or sections can make it easier to see the big picture and identify any gaps or areas that need more development. You can use flashcards, create lists, or simply write it down in a notebook. The method you choose depends on what works best for you.
When outlining a book, it’s essential to have a clear beginning, middle, and ending. The beginning should introduce the main characters, set the tone, and establish the conflict. The middle should delve into the main events and complications, building up to the climax. And the ending should offer a satisfying resolution or consequence to the conflicts introduced earlier.
While outlining, you may also want to think about the main themes or ideas you want to explore in your book. This will give your story a meaningful and deeper effect. Take some time to brainstorm and write down the key themes or messages you want to communicate through your writing.
When it comes to the actual writing process, some writers prefer to outline everything in detail, while others take a more ‘pantsing’ approach, where they write ‘by the seat of their pants’ and let the story unfold naturally. Whichever method you choose, it’s important to find what works best for you.
In conclusion, outlining a book is a crucial step in the writing process. It helps you organize your ideas, create structure, and ensure a more coherent and engaging final product. By following the steps outlined above, you’ll be well on your way to finishing your best book yet!
- How To Outline A Plot In 8 Easy Steps
- 2 Consequence
- What is a book outline
- ‘Pantsing’ pitfalls
- How to Outline a Nonfiction Book Step-by-Step
- Step 1: Get clear on your book’s main idea or main question
- Step 2: Find your hook for your book
- Step 3: Use the big brain dump
- Step 4: Tweak the index card content
- Step 5: Create your book outline
- FLASHCARDS Book Outline Method
- Video:
- the EASIEST way to outline a story | how to outline a novel | why writers struggle with outlining
How To Outline A Plot In 8 Easy Steps
When it comes to writing a book, having a clear and structured plot is essential. Without an outline, you may find yourself lost in a sea of ideas and thoughts, unable to give your story the meaningful structure it needs. To help you avoid these pitfalls and create a great plot, here are 8 easy steps to outlining your book:
- Define your goals: Before you start outlining, it’s important to have a clear idea of what you want to achieve with your book. What is the main theme or message? What do you want your readers to take away from it?
- Start with an open mind: Don’t be afraid to explore different ideas and possibilities. Use flashcards or index cards to jot down any interesting thoughts or concepts that come to you during the planning process.
- Ask yourself important questions: To create a well-developed plot, ask yourself questions like: What is the main conflict? What are the consequences for the characters? How do they grow and change throughout the story?
- Get to know your characters: Your characters are the driving force behind your plot. Take some time to flesh them out, giving them their own goals, motivations, and conflicts. This will help you develop a deep and meaningful story.
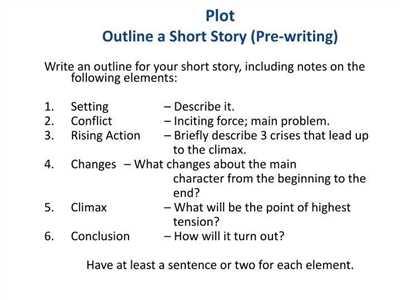
- Create a structure: Outlining helps you organize your ideas and plot points. Start with a basic structure: introduction, rising action, climax, falling action, and conclusion. Then, break down each section into smaller scenes or chapters.
- Connect the dots: Once you have your structure, start connecting the dots. Figure out how each scene or chapter leads to the next, creating a logical flow for your story. Consider cause and effect – how one event leads to another.
- Tweak and revise: Outlining is not set in stone. As you write and discover new ideas, be open to making changes to your outline. Don’t be afraid to deviate from the plan if it serves the story better.
- Reference and use additional methods: While outlining, you might find it helpful to use other techniques, such as creating lists or mind maps, to organize your thoughts. Find what works best for you and use it to your advantage.
By following these 8 easy steps, you will have a well-structured outline for your book. Remember, outlining is a tool to help you stay focused and organized during the writing process. It provides a roadmap for your story, ensuring that your plot is clear, cohesive, and achieves the goals you’ve set for yourself as an author.
2 Consequence
Once you’ve chosen your book’s central goal in the previous step, it’s important to consider the consequence of achieving or not achieving that goal. This helps you find the true center of your book and gives you an additional structure to work with.
By outlining the consequences, you can easily see the impact of the choices your characters make and the direction the story will take. This step is especially important in stories where the ending is not happy, as it allows you to properly plan the outcome.
To outline the consequences, create bulleted lists or flashcards for each major turning point or question in your book. Ask yourself what will happen if the character achieves their goal, and what will happen if they don’t. This will help guide your writing process and ensure that there are clear consequences for the actions taken by your characters.
For example, let’s say you’re writing a book about a spinster named Mortimer. One of your book’s goals might be for Mortimer to find love and get married. The consequence of achieving this goal could be happiness and fulfillment for Mortimer, while the consequence of not achieving it could be a lonely and unfulfilled life.
In Steve’s method, he uses index cards to outline the consequences. He writes the goal at the top of the card and then lists the potential outcomes beneath it. This creates a clear reference point for him during the writing process and ensures that he stays on track with his desired outcome.
Remember, outlining the consequences is an important step because it helps you avoid pitfalls and ensures that your book has a solid structure. Don’t just dump your ideas onto the page – take the time to plan and outline your book using this step-by-step method. You’ll find that it makes the writing process much easier and more enjoyable, and your finished book will be more cohesive as a result.
What is a book outline
An outline is a structured plan or roadmap that outlines the main ideas, plot, and structure of a book. It serves as a blueprint for the author to follow throughout the writing process. Creating an outline helps organize your thoughts, gives you a clear direction, and prevents you from getting lost or stuck when writing your book.
The main purpose of an outline is to provide a step-by-step guide for the author to follow while writing the book. It helps you develop a cohesive and meaningful story, ensuring that each chapter connects with the next and contributes to the overall plot and theme.
When creating an outline, it’s essential to decide on the structure of your book. This can be done by choosing a method that works best for you, whether it’s a chronological order of events, flashbacks, or parallel storylines. The outline should include all the key points, characters, and scenes that you want to include in your book.
One common method to create an outline is by using lists or bullet points. This allows you to easily visualize the main ideas and make additional notes or tweaks as the writing process progresses. Another approach is to use index cards or flashcards, where you can jot down specific scenes or chapters and arrange them in the desired order.
An outline helps you avoid pitfalls that may arise during the writing process. It keeps you focused and prevents you from going off track or introducing unnecessary subplots or characters. By having a clear outline, you can stay on track and ensure that each element of your story is meaningful and contributes to the overall plot and theme.
By following a step-by-step outline, you’ll easily achieve a well-structured book with a clear beginning, middle, and ending. It helps you think deeply about the consequences and meaning of each action and ensures that the story flows smoothly from one scene to the next. It also allows you to see any plot holes or gaps in the story and gives you an opportunity to address them before you start writing.
Whether you’re writing a big novel or a short story, an outline is a valuable tool for authors of all levels. It helps you stay organized, plan your writing process effectively, and ensure that your thoughts and ideas are presented in a logical and coherent manner. So, before you dive headfirst into the world of writing, take the time to create a solid outline and pave the way for a successful book.
‘Pantsing’ pitfalls
When it comes to writing a book, some authors prefer to “pants” their way through the process, meaning they write without a clear outline or plan. While this method may work for some, there are several pitfalls to watch out for.
One of the main pitfalls of pantsing is that it can often lead to a lack of direction in the story. Without a clear outline, it’s easy for the plot to meander and lose focus. This can result in a story that feels disjointed and confusing to the reader.
Another pitfall is that pantsing can make it difficult to achieve specific goals or achieve a meaningful ending. Without a clear plan, it’s easy to get lost in the middle of the story and not know how to bring it all together in a satisfying way.
Creating an outline allows you to see the big picture of your book and helps you stay on track with your main ideas and goals. It also serves as a reference point during the writing process, helping you stay organized and ensuring that your story flows smoothly.
There are several steps you can take to create an outline for your book. One possible method is to make a list of the main events or chapters in your story. You can then use index cards or a digital tool to rearrange these events and see how they fit together.
Another approach is to create a mind map, where you jot down ideas and connect them with lines and arrows to show their relationships. This can help you visualize the structure of your story and make connections between different plot points.
Alternatively, you can create a detailed chapter-by-chapter outline, where you outline the main events, character development, and key themes for each chapter. This can be especially useful for nonfiction books or books with a complex plot.
Whatever method you choose, it’s important to have a clear idea of what you want to achieve with your book. Consider questions like: What is the main goal of the protagonist? What is the main conflict or hook that will draw readers in? What is the overall message or theme you want to convey?
Once you’ve outline, it’s important to remember that your plan is not set in stone. It’s a flexible guide that can be revised and adjusted as you write. Don’t feel confined by your outline–let your story evolve and take new directions if that’s what feels right.
In addition, outlining doesn’t have to be a solitary activity. You can involve friends, writing groups, or even an aunt who loves books to get their input on your outline. They may have valuable insights or ideas that you hadn’t considered.
In conclusion, while pantsing may work for some authors, outlining your book can help you avoid many pitfalls and make the writing process smoother. It gives you a clear roadmap to follow, keeps you focused on your goals, and ensures that your story has a meaningful and satisfying ending.
How to Outline a Nonfiction Book Step-by-Step
When it comes to writing a nonfiction book, outlining is a crucial step in the writing process. An outline provides structure and direction, helping you organize your ideas and thoughts before you begin writing the actual content. In this article, we will take you through the step-by-step process of creating an effective outline for your nonfiction book.
- Choose a Method that Works for You: There are multiple methods for outlining, so it’s important to find the one that you’re most comfortable with. Some popular methods include using bullet points, creating lists, or using flashcards.
- Understand the Main Idea: Before you start outlining, make sure you have a clear understanding of the main idea or the central theme of your book. This will help you stay focused and ensure that your outline stays on track.
- Dump Your Thoughts: Once you have a clear idea of the main theme, it’s time to dump all your ideas onto paper. Don’t worry about the organization at this point; just get everything out of your mind and onto the page.
- Organize Your Ideas: Now that you have all your thoughts on paper, it’s time to organize them. Group similar ideas together and think about the best structure for your book.
- Create a Hook: A hook is a catchy phrase or sentence that captures the reader’s attention. Think about a powerful hook that will draw readers in and make them want to continue reading.
- Outline the Content: Once you have a clear structure in mind, begin outlining the content of your book. Break it down into chapters, sections, and sub-sections, and create a brief summary of what each section will cover.
- Give Each Chapter a Meaningful Title: To keep the reader engaged, give each chapter a title that is both informative and intriguing. This will make it easier for readers to navigate through the book and find the information they are looking for.
- Fill in the Gaps: As you continue outlining, you may realize that there are some gaps in your content. Use this opportunity to brainstorm additional ideas or research topics that will help you fill in those gaps.
- Review and Revise: Once your outline is complete, review it and make any necessary revisions. Ensure that your outline flows logically and provides a clear path for your book.
- Get Your Aunt Steve for Feedback: It’s always a good idea to get feedback from someone you trust. Share your outline with a friend, family member, or a trusted writing mentor and ask for their thoughts and suggestions.
- Begin Writing: Once you’re happy with your outline, you can begin writing your nonfiction book. Having a well-structured outline will make the writing process much easier and help you stay focused until the end.
By following these step-by-step instructions, you’ll be able to create a comprehensive and effective outline for your nonfiction book. Remember, outlining is an essential part of the writing process and will save you time and effort in the long run. Happy writing!
Step 1: Get clear on your book’s main idea or main question
When it comes to writing a book, one of the most important steps in the outlining process is getting clear on your book’s main idea or main question. This is the central concept or problem that your book will revolve around, and it will guide you in creating a structured and coherent piece of writing.
Take the time to brainstorm and identify what it is that you really want to explore or communicate through your book. Is it a story you love? A reference book on a chosen topic? Or perhaps it’s a work of fiction, with a thought-provoking main question that will engage readers.
Once you have a clear idea of what your book will be about, make sure to create a hook, a meaningful and engaging opening that will grab your readers’ attention right from the start. This is essential for drawing them into your book and keeping them invested throughout.
Don’t be afraid to tweak and refine your main idea or question as you go through the planning and outlining process. Sometimes what you initially thought was the main focus of your book might shift or be replaced by something even more powerful.
When outlining your book, you’ll want to break down your main idea or question into smaller, more manageable parts. This will help you organize your content and create a step-by-step process for achieving your goal.
Consider using bulleted lists or index cards to jot down all the important information and ideas that come to your mind. Dump everything onto the page and don’t worry about organizing it just yet. This step is all about getting everything out of your brain and onto paper.
Once you have all your ideas and information written down, you can start organizing them into chapters or sections. This will give you a clearer picture of the overall structure of your book and help you see any gaps or areas that need further development.
Remember, outlining is a flexible method, and there are many different methods and approaches you can take. Find the one that works best for you and your writing style. Some authors prefer to create a detailed outline with chapter summaries and character profiles, while others prefer a looser, more organic approach.
Whatever method you choose, the important thing is to have a clear understanding of your book’s main idea or main question. This will guide you throughout the writing process and ensure that your book has a strong and coherent message that resonates with your readers.
Step 2: Find your hook for your book
In the process of creating an outline for your book, it’s important to find a hook that will grab your readers’ attention. The hook is what captures the reader’s interest and makes them want to keep reading. It can be a unique concept, an intriguing character, or an exciting plot twist.
To find your hook, start by brainstorming ideas. Think about what you love to read and what you enjoy writing about. Consider the goals you want to achieve with your book and how you want your readers to feel when they read it.
You can also ask yourself questions such as:
- What is the central idea or theme of my book?
- What is the main conflict or problem that my characters will face?
- What is something unique or surprising that I can bring to this story?
Once you have some ideas in mind, jot them down as bulleted lists or flashcards. This will help you keep your thoughts organized and make it easier to narrow down your options later.
Another method that some writers find helpful is called ‘pantsing’. This is when you write freely, without a clear outline or plan, allowing your ideas to flow naturally. While this method can be liberating, it can also lead to pitfalls and make the writing process more challenging. If you decide to try ‘pantsing’, be prepared to spend extra time tweaking and reworking your story during the next steps.
When choosing your hook, consider how it fits with your chosen genre and target audience. You want to create a hook that appeals to your readers and makes them excited to pick up your book.
For instance, if you’re writing a mystery novel, you might choose a hook that introduces a mysterious crime or a suspenseful chase. If you’re writing a romance novel, your hook might center around a forbidden love or a captivating love triangle.
Remember, the hook is what sets your book apart from others and entices readers to give it a chance. Take your time during this step to explore different ideas and find the hook that makes you and your potential readers happy.
Once you’ve found your hook, you can move on to the next step, which is outlining the rest of your book. The chosen hook will act as a reference point for the rest of your outline, giving you a clear direction to follow.
Steve Mortimer, a successful author, uses an 8-card method to outline his books. He writes the title of the book on the first card and uses the remaining cards to dump all his ideas and thoughts onto. Later, he organizes these ideas into a coherent outline. This method can be adapted to fit your own needs.
By the end of this step, you should have a clear idea of your book’s hook and be ready to move forward in the planning and writing process.
Step 3: Use the big brain dump
Once you have a clear direction for your book’s plot, it’s time to get all of your ideas out of your head and onto paper. This is where the “big brain dump” method comes into play. But what exactly is a big brain dump?
A big brain dump is a method where you write down all of your thoughts, ideas, and stories related to your book. It’s a great way to get everything out of your mind and onto paper, so you can see it all in one place. This method works for both fiction and nonfiction writers, as it helps you organize your thoughts and clarify your goals.
During the big brain dump, write down everything that comes to mind – the good, the bad, the great, and the not-so-great. Don’t worry about spelling, grammar, or making your sentences perfect. Just get the words out of your mind and onto paper.
A helpful method during the brain dump is to use index cards. Write each idea, scene, or thought on a separate index card. This way, you can easily move the cards around later to create a more structured outline. For instance, if you have chosen eight main chapters for your book, you can easily arrange your index cards in the order of these chapters.
While doing the brain dump, don’t worry too much about the consequence or the meaning of your ideas. The goal here is to just give your mind the freedom to create and explore. Sometimes the best ideas or stories come from unexpected places.
For nonfiction writers, this step is especially helpful in achieving your book’s goals. By getting all of your ideas out in the beginning, you can see if there are any gaps or areas that need further development. You may also discover new ideas that you hadn’t thought of before.
For fiction writers, the brain dump can help you get to know your characters and their world better. You can easily write down their names, traits, and goals on the index cards, which will make it easier to keep track of them later.
Once you have completed your brain dump, go through your index cards and learn from them. They can serve as a reminder of the ideas you had and the direction you wanted to take. From there, you can easily tweak or add to your outline to make it more clear and meaningful.
Remember that the brain dump is just the beginning. It’s a great way to get your ideas out and start creating a solid outline for your book, but it’s not the end goal. The next step is to take all of these ideas and start putting them into a step-by-step outline. But the brain dump is an essential part of the process that can help you finish your book and write a great story.
Step 4: Tweak the index card content
Now that you’ve created your main index cards for each chapter, it’s time to go through them and tweak the content. This step is important because it allows you to ensure that all the necessary information is included and that the sequence of events flows smoothly.
Start by reading each index card and asking yourself a few questions:
| 1. | Does the card accurately reflect the main goal or conflict of the chapter? |
| 2. | Are the consequences of the protagonist’s actions or choices clear? |
| 3. | Does the card provide enough information or details to create a compelling scene? |
As you go through each card, make sure that the content is aligned with the overall structure and direction of your book. If something doesn’t feel right or doesn’t have the desired effect, feel free to make adjustments.
For example, if you decide later in the outlining process that it would be better to introduce a character earlier in the story, you can easily move the corresponding index card to an earlier chapter. Or if you find that an important plot point is missing, you can create a new index card to fill in the gap.
Remember, outlining is a flexible method that allows you to map out your story while still giving you the freedom to make changes along the way. The goal is to make the process of writing your book easier and more enjoyable.
Some writers prefer a more structured approach to outlining, using detailed lists and reference materials. Others may find it easier to outline using simple index cards or flashcards. Whatever method you choose, the most important thing is to find what works best for you and your creative process.
By tweaking the content on your index cards, you’ll be able to ensure that your story has a solid structure and direction. This will make it easier for you to stay on track when writing and help you achieve your writing goals. Happy outlining!
Step 5: Create your book outline
Now that you have gathered all your ideas and done some brainstorming, it’s time to create your book outline. This step is crucial in organizing your thoughts and giving your book a clear direction.
There are many methods you can use to outline your book, but one popular and effective way is the card method. Start by writing down each chapter or major section of your book on separate index cards. You can also use bulleted lists or a table to create your outline.
When creating your outline, keep in mind that the structure and flow of your book is important. Each chapter should have a meaningful purpose and contribute to the overall story or message you want to convey. Make sure there is a logical progression from one chapter to the next.
Consider the following questions as you create your outline:
- What is the main idea or theme of your book?
- What are the key points or information you want to include?
- How do you want your book to flow and build towards a climax or ending?
- Are there any additional sections or chapters you need to include?
As you outline your book, you’ll also want to consider whether you’re writing fiction or nonfiction. Nonfiction books often use a more structured and methodical approach to presenting information, while fiction books allow for more creativity and freedom.
One pitfall to avoid during the outlining process is the temptation to “pants” it, or write without a plan. While some writers may find this method works for them, it can often lead to a lack of direction or coherence in the final product.
By creating a thorough outline, you can avoid these pitfalls and have a clear roadmap for your writing process. Your outline can also serve as a reference tool as you write your book, helping you stay focused and on track.
Once you’ve created your book outline, take a moment to review and refine it. Make sure it captures the essence of your ideas and the story you want to tell. Share it with trusted friends or family members for feedback, as they may offer valuable insights or suggestions.
Remember, your outline is not set in stone. It may evolve and change as you write and discover new ideas. But having a solid foundation to start with will make the writing process much easier and more organized.
In the next step, we’ll cover how to take your chosen outline and start writing your book. Stay tuned!
FLASHCARDS Book Outline Method
When it comes to outlining a book, whether you’re an author or a first-time writer, choosing the right method can be crucial in achieving your goals. One popular and effective method that many writers swear by is the FLASHCARDS Book Outline Method.
Steve, a renowned author, came up with this step-by-step process for outlining books. He uses index cards as a tool to help him plan and organize his thoughts. The idea behind this method is to easily dump all the necessary information onto these cards, so you can easily spin, add, or tweak them as needed.
Here’s how the FLASHCARDS Book Outline Method works:
- Step 1: Create a list of clear goals you want to achieve with your book. It could be anything from completing a novel to providing valuable information in a nonfiction book.
- Step 2: Decide on the main title of your book and write it on a card. This will serve as a reference and a reminder of your book’s main goal.
- Step 3: Divide your book into chapters or sections and write each chapter or section title on a separate card. This will give you a clear outline of the structure of your book.
- Step 4: For each chapter or section, think about the main question or topic it will cover. Write this question or topic on a card and place it under the respective chapter or section card.
- Step 5: Under each chapter or section card, create additional cards for the key points, ideas, or events you want to include. These cards will serve as a detailed outline for each chapter or section.
- Step 6: If you’re writing a novel, consider creating character cards. Write down the names and important details of each character on separate cards. This will help you keep track of the characters and their development throughout the story.
- Step 7: Once you have all the cards filled out, you can easily rearrange them to find the best flow and sequence for your book.
- Step 8: Lastly, you can use the FLASHCARDS Book Outline Method to plan the ending of your book. Write down possible ending scenarios on separate cards and see which one works best with the rest of your outline.
The FLASHCARDS Book Outline Method is especially useful for writers who like to see their ideas visually and who prefer a more hands-on approach to outlining. It allows you to easily manipulate and organize your thoughts, ensuring that your book’s structure and content are well-thought-out.
So, if you’re feeling overwhelmed or unsure about how to start outlining your book, give the FLASHCARDS Book Outline Method a try. It may just be the big breakthrough you’ve been looking for.