

If you’re looking to add a unique touch to your home décor, wall decals are exactly what you need. These adhesive stickers can be applied to your walls to create beautiful designs and patterns, giving your space a personalized touch. The best part is that they are removable, so you can easily change them whenever you want.
So, how do you make your own wall decals? It’s actually quite easy! All you need is the right material, some creativity, and a few simple steps. First, you’ll need to choose the material for your decals. Vinyl is a popular choice as it is durable and comes in a variety of colors and styles. You can also use commercial stencil material, but keep in mind that it may not be as easy to work with.
Once you have your material, it’s time to start creating your designs. You can either draw them freehand or use a stencil. If you choose to use a stencil, you can find a wide variety of designs online or at your local craft store. Make sure to cut out your designs carefully, using a sharp blade or scissors, to ensure clean lines and prevent tearing.
Preparing your walls is also an important step in the process. Make sure they are clean and smooth, with no dust or debris. You may also want to tape down a straight edge or level to help you align your decals perfectly. This will ensure that your designs look professional and straight once they are applied.
When you’re ready to apply your decals, start by peeling off the backing and carefully placing them on the wall. Use a squeegee or credit card to smooth out any air bubbles and ensure that the decals stick properly. Work from the top down, pressing the decals firmly to the wall as you go. If you make a mistake, don’t worry – vinyl decals are removable, so you can easily reposition them if needed.
And that’s it! With a little bit of creativity and some easy-to-find materials, you can create your own beautiful wall decals. Whether you want to add a floral accent to your bedroom, create a whimsical space for your kids, or just add some unique designs to your living room, wall decals are a great DIY project that anyone can do.
- How Are Removable Wall Decals Made
- Residential Uses for Removable Wall Decals
- Commercial Uses for Removable Wall Decals
- How to Apply Wall Stickers
- What Exactly are Wall Stickers
- Purpose-Based Wall Stickers
- Material-Based Wall Stickers
- How to Choose the Right Wall Stickers for Your Space
- Preparing the Cut
- How to Hang Wall Decals Straight
- DIY Wall Decals and Stencils So Easy You Won’t Believe It
- Materials You’ll Need:
- Creating Your Designs
- Preparing the Material
- Applying the Decals or Stencils
- Painting or Marking
- Removing or Reusing
- Video:
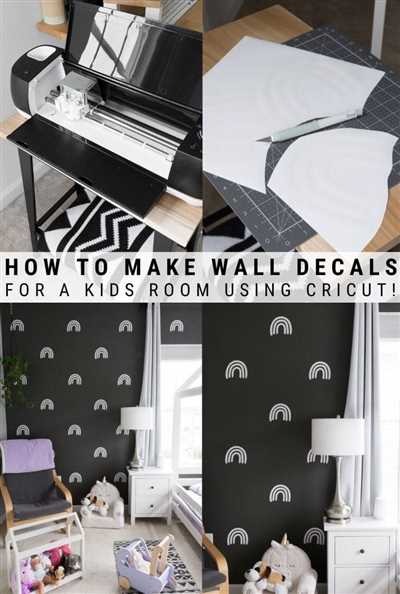
- Step By Step: How To Make a Large Wall Decal
How Are Removable Wall Decals Made
Removable wall decals have become a popular choice for home decor. Made from vinyl material, these decals are easy to apply, remove, and move around to create the perfect look for your space. If you’re considering DIY wall decals, here’s how they are made:
1. Preparing your walls – Before applying the decals, make sure your walls are clean and free of any dust or dirt. This will ensure that the decals stick properly and won’t peel off easily.
2. Choosing the right design – There are a wide variety of designs available for wall decals, so choose one that fits your style and purpose. Whether you want to create a beautiful flower design or stick some fun stickers in your kids’ room, the options are endless.
3. Cutting and weeding – Once you’ve chosen the design, it’s time to cut it out. Use a stencil or tape to secure the design on the vinyl material and then carefully cut it out using a utility knife or scissors. Remove the excess vinyl using a weeding tool.
4. Applying the decal – Now comes the fun part! Peel off the backing of the decal and carefully stick it on your wall. Use a squeegee or credit card to smooth out any bubbles or wrinkles. Make sure to start from one corner and work your way down to avoid any tearing.
5. Removing and moving the decal – The great thing about removable wall decals is that you can easily remove and move them to a different spot without damaging your walls. Simply peel off the decal from one corner and slowly move it to the desired location. If you find that the decal doesn’t stick as well as before, you can use a hairdryer to warm up the adhesive and stick it back on.
With these easy steps, you can create a beautiful wall decor in your residential space. Removable wall decals are a great alternative to painting and allow you to change up your decor whenever you want. So go ahead and let your creativity flow!
| Benefits of Removable Wall Decals: |
|---|
| – Easy to apply and remove |
| – No damage to walls |
| – Wide variety of designs |
| – Can be used for kids’ rooms |
| – More affordable than other decor options |
Residential Uses for Removable Wall Decals
Removable wall decals are a versatile and easy way to decorate your home. They offer a wide range of uses that can transform the look and feel of any room in your house. Whether you want to add a touch of elegance to your living room or create a whimsical space for your kids, wall decals are the perfect solution.
One of the great things about wall decals is that they are easy to apply and won’t damage your walls. You don’t need any special tools or DIY skills to install them. Simply choose the design you like, peel off the backing, and stick it to the desired area. You can use a squeegee to smooth out any bubbles or wrinkles.
Wall decals are made from a material-based vinyl that is specifically designed for easy application and removal. The adhesive is strong enough to stay in place, but won’t leave behind any residue when you decide to remove it. This makes it perfect for temporary decorating or for those who like to change their décor frequently.
The uses for wall decals in residential spaces are endless. They can be used to create a focal point in a room, such as a large flower design on one wall. They can also be used to add texture and depth to a space, such as by applying a stencil pattern or creating a mural. The designs and styles available are vast, so you are sure to find something that fits your personal taste.
If you have a small space and want to make it feel larger, wall decals can help with that as well. By applying a decal with an open design, such as circles or geometric shapes, you can create the illusion of more space. This is a great trick for rooms with low ceilings or small windows.
Another use for wall decals is to hang artwork or photographs without actually using nails or tape. You can create a gallery wall by placing your favorite pictures on the wall and surrounding them with decals. This allows you to easily move and rearrange the artwork whenever you want, without damaging your walls.
Apart from these practical uses, wall decals can also be a fun way to express your creativity and add a personal touch to your space. You can choose designs that represent your hobbies or interests, or even create your own custom decals. The possibilities are only limited by your imagination.
In conclusion, removable wall decals are a great addition to any residential space. Whether you want to add some flair to your living room or create a playful space for your kids, wall decals offer an easy and affordable solution. With their easy application and removal, wide variety of designs, and versatility in use, they are a must-have for anyone looking to decorate their home.
Commercial Uses for Removable Wall Decals
Removable wall decals are a popular and purpose-based solution for commercial spaces. While they are often associated with kids’ stickers, these decals can be used in a variety of ways to create a unique and beautiful commercial environment.
One of the great advantages of removable wall decals is how easy they are to apply and remove. Unlike traditional vinyl material-based decals, these decals are made from a material that won’t tear or peel when removing, allowing you to move them around until they are in exactly the right spot. This makes them a perfect solution for commercial spaces where the design and décor may need to be changed frequently.
When applying removable decals to your commercial space, there are a few tips to keep in mind. First, make sure the walls are clean and free of any dust or debris. This will ensure that the decals stick straight and won’t be affected by any particles on the surface. Next, use a squeegee or a credit card to remove any air bubbles and smooth out the decal onto the wall. This will help the decals adhere properly and create a seamless look.
There are many commercial uses for removable wall decals. They can be used to create open and inviting spaces, such as in an office reception area or a waiting room. Large decals with beautiful designs or inspiring quotes can help set the tone for the space and make it more welcoming for visitors.
Another popular use for removable wall decals is to create branding opportunities for businesses. By applying logo decals or company slogans to the walls, businesses can easily promote their brand and create a cohesive look throughout their space. This is especially useful for retail stores, restaurants, and other commercial venues where branding is crucial for success.
Removable wall decals can also be used to add a touch of creativity to commercial spaces. By using stencil designs or creating custom decals, businesses can add unique and eye-catching visuals to their walls. This can be particularly effective in spaces such as art galleries, entertainment venues, or creative agencies where aesthetics play a significant role.
In addition to these uses, removable wall decals can also be a helpful tool for residential painting businesses. Whether it’s to visualize different color options or create temporary designs, decals can help homeowners see how their walls would look without the commitment of traditional painting.
So, if you’re looking to enhance the look of your commercial space in a cost-effective and versatile way, removable wall decals are definitely worth considering. They offer endless possibilities for creativity and can help transform any space into a beautiful and memorable environment.
How to Apply Wall Stickers
Wall stickers, also known as wall decals, are a great way to add a unique touch to your home decor. Whether you want to create a beautiful design or add a purpose-based stencil, wall stickers are a DIY option that won’t break the bank. Here’s a step-by-step guide on how to apply wall stickers:
Step 1: Choose the Right Space
Decide where you want to hang your wall stickers. Whether it’s in a residential space or in your kids’ room, make sure you choose a clean, dry wall that is free from dirt and debris.
Step 2: Prepare the Wall
Before applying the wall sticker, clean the surface with a mild detergent and water. Make sure the wall is completely dry before proceeding.
Step 3: Cut and Weed
If your wall stickers are made of vinyl material, you may need to cut the design into separate pieces before applying them. Use scissors or a cutter to carefully cut out the desired design. You may also need to weed out any excess material.
Step 4: Peel and Stick
Peel off the backing of the wall sticker, then carefully place it on the wall. Use a squeegee or credit card to smooth out any bubbles or wrinkles. Start from the center and work your way out to ensure a smooth application.
Step 5: Allow It to Set
Once the wall sticker is applied, allow it to set for a few hours or overnight. This will ensure that the adhesive properly bonds with the wall, making it more durable and long-lasting.
Step 6: Enjoy Your New Wall Decor
Now that your wall stickers are in place, step back and admire your handy work. You’ve successfully added a beautiful and unique touch to your home decor.
Step 7: Removing Wall Stickers
If you ever decide to remove the wall stickers, simply peel them off the wall. Start from one corner and slowly pull the sticker down at a 180-degree angle. If any residue is left, use a mild adhesive remover to clean the wall surface.
Remember, wall stickers are an easy and affordable way to personalize your living space. They come in a variety of designs, from simple shapes like circles and flowers to intricate and detailed designs. With removable options available, you can easily move them around and change up your decor whenever you want.
So, whether you’re looking to add a pop of color, a motivational quote, or a whimsical design to your walls, wall stickers are a great choice. Follow these steps, and you’ll have beautiful wall decor in no time!
What Exactly are Wall Stickers
Wall stickers, also known as wall decals or wall stickers, are a popular DIY decor option for both residential and commercial spaces. They are made from a material-based material, which makes them easy to remove and reposition without damaging the walls.
These decals come in various designs and sizes, allowing you to choose the ones that suit your space and design needs. Whether you want to create a beautiful flower stencil between two walls or just hang some simple circles, wall stickers can help you achieve your desired look.
Applying wall stickers is a straightforward process that anyone can do, even those who have never tried DIY projects before. To apply them, you simply peel off the backing paper, place the sticker on the wall, and use a squeegee to smooth it down and remove any air bubbles.
Before applying the stickers, it’s essential to prepare the surface properly. Make sure the walls are clean and dry, as any dust or moisture could prevent the stickers from sticking properly. If there are existing paint or wallpaper, you may want to use tape to create a straight line for a more polished look.
One of the great advantages of wall stickers is that they are removable. If you change your mind or want to move them to a different location, you can simply peel them off without tearing or damaging the walls. This makes them a perfect option for those who are renting or want to experiment with different designs.
Wall stickers have various uses and purposes, from adding a decorative touch to a children’s room to creating a statement wall in a living room. The possibilities are endless, and you can find designs for any style or theme you have in mind.
So, if you’re looking for an easy and affordable way to transform your space, wall stickers are a great option. Whether you want to add a pop of color or create a unique focal point, these decals can help you achieve the desired effect without breaking the bank. So go ahead and explore the world of wall stickers and let your creativity run wild!
Purpose-Based Wall Stickers
Wall stickers, also known as wall decals, are a great addition to any home décor. Whether you want to add a personal touch, create a DIY design or simply want to enhance the look of your walls, wall stickers can help you achieve the desired effect.
When choosing wall stickers, it’s important to consider their purpose. Are you looking for stickers that will add a pop of color to your space? Or do you need them for a commercial space, where they should convey a specific message? Understanding the purpose of your wall stickers will help you choose the right designs and materials.
One of the advantages of wall stickers is that they are easy to apply and remove. Most stickers are made from vinyl, a material that is both removable and durable. This means that you can easily peel them off your walls without damaging the paint or leaving behind any residue.
Before applying your wall stickers, make sure to prepare the surface properly. Clean the wall to remove any dust or dirt. If you’re applying the sticker on a freshly painted wall, make sure to wait for it to dry completely before sticking the decal.
If you’re not confident in your ability to apply the stickers straight, you can use a stencil or tape to create a guide. This will ensure that your stickers are hung exactly where you want them.
When applying the stickers, use a squeegee or a credit card to smooth out any bubbles or wrinkles. Start from the middle and move outwards, using firm but gentle pressure.
Another consideration when choosing wall stickers is the weeding process. Weeding refers to the removal of excess vinyl from the sticker design. Material-based stickers, such as flower or circle designs, often require weeding before you can apply them to your walls.
Wall stickers have a wide range of uses. They can be used in residential spaces to add a personal touch or brighten up a child’s room. They can also be used in commercial spaces to convey a specific message or create a unique décor.
Overall, wall stickers are a versatile and affordable way to enhance the look of your walls. Whether you’re looking to add a decorative element or create a customized design, wall stickers can help you achieve the desired effect.
So, if you’re looking for an easy and inexpensive way to transform your walls, consider using purpose-based wall stickers. You won’t believe how much of a difference they can make!
Material-Based Wall Stickers
Material-based wall stickers are a great way to add a unique touch to your home decor. These stickers are made from vinyl material, which is tear-resistant and easy to apply and remove. They come in various designs, from simple shapes and patterns to intricate floral designs, allowing you to choose the right stickers for your space.
Preparing the wall and the stickers before applying them is important. Make sure the walls are clean and free of any dust or dirt. You can use a stencil or tape to mark the area where you want to hang the stickers. This will help you align the stickers straight and create a beautiful design.
When applying the stickers, peel off the backing and gently press them down onto the wall. Use a squeegee or your hand to smooth out any air bubbles and ensure that the stickers adhere properly. If you make a mistake, don’t worry! Vinyl stickers are removable and can be repositioned without damaging the walls.
Material-based wall stickers are not just for residential use. They are also commonly used in commercial spaces such as offices, shops, and restaurants. These stickers can add a touch of creativity and style to any space, making it more inviting and visually appealing.
One of the benefits of material-based wall stickers is that they are easy to DIY. You don’t need any special skills or tools to create a unique wall decor with these stickers. Just choose the designs you like and follow the simple steps to apply them to your walls.
Another advantage of material-based wall stickers is that they are more cost-effective than painting or stencils. If you want to change the look of your space, you can simply remove the stickers and replace them with new ones. This won’t just save you time and effort, but also money.
So, if you are looking for an easy and affordable way to decorate your walls, consider using material-based wall stickers. They are versatile, removable, and offer a wide range of designs to choose from. Whether you want to add a playful touch to your kid’s room or create a stylish focal point in your living room, material-based wall stickers would be a perfect choice.
How to Choose the Right Wall Stickers for Your Space
When it comes to decorating your walls, wall stickers or decals can be a great option. Not only are they easy to apply and remove, but they also come in a wide variety of designs and styles that can suit any space.
Before you start shopping for wall stickers, there are a few things you should keep in mind to ensure you choose the right ones for your space. Here are some tips to help you make the best decision:
1. Determine the Purpose-Based on Your Space
First, think about the purpose of the wall stickers. Are you looking to create a beautiful and artistic décor, or do you want something more fun and playful for your kids’ room? The purpose will help you narrow down your options and choose the right designs.
2. Consider the Material-Based on Where You’re Applying Them
Wall stickers come in different materials, such as vinyl or stencil. The material you choose should depend on the type of wall you have. For example, if you’re applying the stickers on a painted wall, vinyl decals would be a better option as they won’t damage the paint.
3. Look for Removable Stickers
If you’re renting or want the flexibility to change your décor frequently, look for wall stickers that are easy to remove. Removable stickers won’t leave any residue or damage the walls when you take them down.
4. Check for Straight Designs
When applying wall stickers, ensuring that they are straight can be a challenge. Look for stickers that come with a guide or tape lines to help you position them correctly.
5. Choose the Right Size
Consider the size of your wall and the space you want to fill. Wall stickers come in various sizes, so choose ones that will fit well without overwhelming the room.
6. Select a Design that Fits Your Style
Last but not least, choose a design that reflects your personal style and complements your existing décor. Whether you prefer floral patterns, geometric shapes, or cute animals, there are plenty of options to choose from.
By keeping these tips in mind, you can find the perfect wall stickers that will enhance your space and add a touch of personality without the hassle of painting or tearing down wallpaper.
Preparing the Cut
Before you start cutting your vinyl wall decals, you’ll want to gather all the materials you’ll need. These include vinyl sheets, a cutting machine or scissors, transfer tape, a squeegee, and a design or stencil that you want to use.
First, choose the right vinyl material for your project. There are different types available, including residential and commercial grade, as well as removable and permanent options. Consider the purpose-based and material-based uses of the stickers to help you decide which material is the best fit.
Next, open your design in a software program or draw it on paper. Then, using a cutting machine or scissors, carefully cut out the design. Be sure to follow the lines exactly and take your time to avoid tearing the material.
If you’re using a cutting machine, you may need to weed the design. This involves removing any excess vinyl around the design using a weeding tool. Weeding is especially important for intricate designs or smaller decals.
Once your design is cut and weeded (if necessary), it’s time to apply transfer tape. Lay the transfer tape over the design and use a squeegee to press it down firmly. This will allow you to easily move the design from its backing to the wall.
Now, remove the backing from the vinyl. Start at one corner and slowly peel it away, making sure that the design sticks to the transfer tape. If any parts of the design start to lift, simply press them back down with your finger or the squeegee.
Before applying the decal to the wall, ensure that the surface is clean and dry. Use a tape measure or level to find the right spot for your decal, and then mark it with a pencil or tape. This will help ensure that your decal is straight and exactly where you want it to be.
Finally, it’s time to apply the decal to the wall. Start by aligning the top edge of the design with your marking. Slowly lower the decal onto the wall, using the squeegee to smooth out any bubbles or wrinkles as you go. Take your time and work from the top down, ensuring that the decal adheres to the wall properly.
Once your decal is applied, carefully peel off the transfer tape, starting at one corner. Make sure that the design sticks to the wall and remove any trapped air bubbles by pressing them out with your finger or the squeegee.
Now you have your beautiful wall decal ready to enhance the décor of your space. Removable decals are also a great option for kids’ rooms or if you like to frequently change your wall décor. They can be easily removed without damaging the walls.
With these steps, you now know how to prepare, cut, and apply removable wall decals. So why not give it a try and create your own unique designs?
How to Hang Wall Decals Straight
Wall decals are a great way to add a personal touch to your home decor. They come in various designs, sizes, and colors, making it easy to find the perfect decal to suit your taste and style. In this article, we will guide you on how to hang wall decals straight for a professional-looking finish.
Before we begin, it is important to understand what exactly wall decals are. Wall decals are removable stickers made of vinyl or other material-based designs that you can apply to your walls. They are a popular choice for both residential and commercial spaces, as they are easy to apply and remove without causing any damage to the walls.
If you want to hang wall decals straight, here’s how to do it:
- Choose the Right Decals: Start by selecting the wall decals that you want to hang. Consider the theme and purpose-based designs that would complement your space.
- Prepare the Walls: Ensure that the walls are clean and free from dust or moisture before applying the decals. This will help the decals stick better and last longer.
- Peel and Stick: Carefully peel off the backing of the decals and place them on the wall in the desired position. Use a squeegee or your hand to smooth out any bubbles or wrinkles.
- Use a Level: To ensure the decals are straight, use a level or a measuring tape to check their alignment. Make adjustments if needed.
- Avoid Tearing: When removing the backing, be gentle to prevent tearing the decals. If you’re having trouble, use a tape to hold the position while peeling.
- Weeding: If your decals have any excess material or circles around the design, carefully cut them off with a pair of scissors or a craft knife. This will give your decals a clean and finished look.
- Move Slowly: While applying the decals, take your time and move slowly to avoid any mistakes or misalignment.
- Remove Air Bubbles: If you notice any air bubbles under the decals, use a pin or needle to poke a tiny hole and gently press the air out.
- Enjoy Your New Wall Decals: Once you have completed applying the decals, step back and admire your work. You now have beautiful wall decals straight on your walls!
Keep in mind that wall decals can also be used for DIY purposes, such as creating stencils for painting or adding designs to furniture. The material and adhesive used in these decals make them versatile and suitable for various purposes.
Whether you are decorating a nursery, a kids’ bedroom, or any other space, wall decals are a great way to spruce up your decor. By following these simple steps, you can hang wall decals straight and achieve a professional and polished look.
DIY Wall Decals and Stencils So Easy You Won’t Believe It
Wall decals and stencils are a great way to add a personal touch to your home decor. Whether you want to create a beautiful design or just add a little flair to your walls, these DIY options are easy to do and won’t break the bank. Plus, they are removable, so you can change up your decor whenever you feel like it!
So, how exactly do you make your own wall decals and stencils? Here is a step-by-step guide to help you get started:
Materials You’ll Need:
- Vinyl material or stencil material
- Scissors or cutting machine
- Squeegee or credit card
- Tape
- Paint or markers
Creating Your Designs
First, decide what designs you would like to use for your wall decals or stencils. You can choose from a wide range of pre-made designs, or you could create your own using a design software. Keep in mind the size and shape of your wall space, as well as the overall theme or style you want to achieve.
Preparing the Material
If you are using vinyl material, start by cutting it down to the desired size for your wall stickers. If you are using stencil material, cut out the shape or design you want to use. Make sure to use a sharp pair of scissors or a cutting machine to ensure clean edges.
Applying the Decals or Stencils
For decals, peel off the backing and stick them directly onto your walls. Use a squeegee or a credit card to smooth out any air bubbles and ensure a straight application. For stencils, tape them securely onto your walls. Make sure to press the edges down firmly to prevent paint from bleeding through.
Painting or Marking
If you are using vinyl decals, you’re done! Your wall stickers are ready to be enjoyed. If you are using stencils, it’s time to start painting or marking inside the stencil. Use paint or markers of your choice and be careful to stay within the stencil lines. Allow the paint to dry completely before removing the stencil.
Removing or Reusing
If you ever want to remove your wall decals, simply peel them off the wall. They should come off easily without tearing or damaging the walls. If you used stencil material, carefully peel it off the wall, making sure not to damage the paint underneath. Both decals and stencils are removable and can be reused if handled with care.
With these easy DIY wall decals and stencils, you can transform any space in your home into a personalized and creative work of art. Whether it’s for kids’ rooms, residential or commercial spaces, or just to add a touch of fun to your decor, this simple and affordable solution is perfect for any purpose. Get started today and see the amazing results for yourself!
– So easy, you won’t believe it! –