

If you are an Android app developer, at some point you will need to generate a signed APK. This is an essential step before you can publish your app on the Google Play Store. Generating a signed APK involves a few steps, but it is a straightforward process if you follow the instructions. In this post, we will guide you through the process of generating a signed APK using Android Studio.
Before we dive into the steps, there are a couple of things you need to have in place. First, you will need a valid keystore file and the corresponding password. The keystore file contains the private key that is used for signing the APK. If you have never generated a keystore file before, don’t worry, we will cover that later in this post.
Second, make sure you have the latest version of Android Studio installed on your computer. You can download it from the official Android Studio website. Once you have Android Studio installed, open your project and navigate to the “Build” menu. From there, click on “Generate Signed Bundle/APK” to start the signing process.
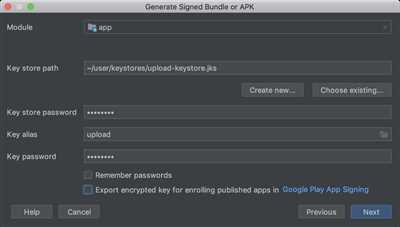
Once you click on “Generate Signed Bundle/APK,” a window will appear where you can specify the path to your keystore file, as well as the passwords for the keystore and the key. If you have previously generated a keystore file, simply browse to its location and fill in the required information. If you haven’t generated a keystore file yet, you can do so by clicking on the “Create new” button and following the prompts.
After you have provided the necessary information, click “Next” to proceed. On the next screen, you will need to specify whether you want to generate an Android App Bundle or an APK file. An Android App Bundle is a publishing format that includes your app’s compiled code and resources, while an APK file is a single file that contains all the necessary components of your app. If you are unsure which one to choose, Google provides thorough documentation that can help you make the right decision.
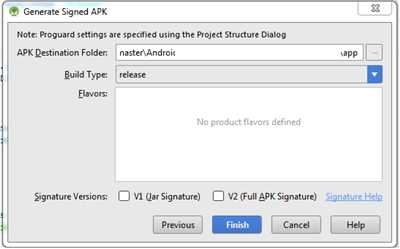
After selecting the appropriate option, click “Next” to continue. On the following screen, you can specify the build variant you want to use, as well as the output directory and the filename for the generated APK. Once you have configured these settings, click “Finish” to start the process of generating the signed APK.
During the signing process, Android Studio will generate the signed APK and save it to the specified output directory. Once the process is complete, you can find the generated APK file and use it to distribute your app. It is important to keep in mind that the signing process can take some time, especially if you have a large project with a lot of code and resources. So be patient and let Android Studio do its magic.
In conclusion, generating a signed APK is a crucial step in the Android app development process. It ensures that your app is secure, valid, and ready for distribution. By following the steps outlined in this post, you will be able to generate a signed APK in a straightforward and efficient manner. Remember to keep your keystore file and passwords safe and secure, as they are essential for future updates and releases of your app.
Generating Signed APK
If you have developed an Android application using Android Studio, you will eventually need to generate a signed APK file. This is necessary if you want to publish your app to the Google Play Store, or if you want to distribute your app outside of the Google Play Store.
To generate a signed APK, you will need to follow these steps:
- Click on the “Build” menu in Android Studio, then click on “Generate Signed Bundle/APK”.
- A window will appear asking you to choose whether you want to generate an Android App Bundle or an APK. Choose “APK”.
- Next, you will need to select which module you want to generate the APK for. If you have a single module in your project, this step can be skipped.
- Then, you will need to create a keystore file. A keystore file is a file that contains the cryptographic keys needed for signing your APK. You can create a keystore file using the keytool command-line tool provided by Java.
- Once you have created the keystore file, you can simply browse for it in the Android Studio window. You will also need to enter the password for the keystore file.
- After selecting the keystore file, you will need to enter other required details such as the key alias, key password, and validity years. Make sure to remember these details, as you will need them later when signing your APK.
- Finally, click on the “Finish” button to start the process of generating the signed APK.
Android Studio will then generate the signed APK file for you. This file can be found in the “release” folder of your project.
It is important to note that generating a signed APK is a process that involves a lot of steps and requires you to thoroughly understand the concepts of signing in Android development. It is often recommended to keep backup copies of your keystore file and other required details.
If you have any issues or questions during the process of generating a signed APK, you can find answers to your questions on various forums and websites dedicated to Android development. You can also post your question on the official Android Developers forum, where you will often find helpful responses from experienced developers.
Remember, the signed APK file is the final result of the entire Android app build process. It contains all your application’s code and resources, wrapped in a format that is suitable for distribution and installation on Android devices.
In conclusion, generating a signed APK is an important step in the Android development process. It is required if you want to publish your app to the Google Play Store or distribute it outside of the store. Make sure to follow the steps carefully, and be patient as the process may take some time to complete.
12 Answers 12
If you are wondering how to generate a signed APK for your Android application, you are in the right place! This process may seem a bit complicated at first, but with the help of 12 answers to common questions, you will be able to successfully generate a signed APK in no time.
| # | Question | Answer |
|---|---|---|
| 1 | Where can I find the signing process? | The signing process is usually done using the Android Studio IDE. You can find it under the “Build” menu. |
| 2 | What steps are required to generate a signed APK? | To generate a signed APK, you will need to follow a specific set of steps, which include creating a keystore, configuring your project, and signing the APK with the generated keystore. |
| 3 | Is it possible to generate a signed APK for any project? | Yes, you can generate a signed APK for any Android project as long as you have the necessary credentials and access to the project files. |
| 4 | Do I need to remember the keystore password? | Yes, it is crucial to remember the keystore password as it is required to sign the APK later on. |
| 5 | What is the role of Gradle in generating a signed APK? | Gradle is responsible for building and packaging your Android application. It also contains the necessary configuration for the signing process. |
| 6 | How can I find the keytool? | The keytool is a command-line tool that comes with the Java Development Kit (JDK). You can find it in the JDK’s “bin” directory. |
| 7 | Is there a post-processing step after generating the signed APK? | After generating the signed APK, it’s always a good idea to thoroughly test it on different devices to ensure it works as expected. |
| 8 | Can I also generate a signed APK for a native project? | Yes, you can generate a signed APK for a native project by following similar steps. However, the process may vary slightly depending on the tools and frameworks used. |
| 9 | Is it necessary to keep both the debug and release keys? | While it’s not required, it’s always a good practice to keep both the debug and release keys. This allows you to switch between them easily during development. |
| 10 | What is the role of wrapping the window in the signing process? | Wrapping the window ensures that only authorized individuals can access the signing details and generate a signed APK. |
| 11 | Can anyone generate a signed APK? | Since generating a signed APK requires access to the necessary credentials, not anyone can generate a signed APK. |
| 12 | Do I need to keep both the bytecode and the generated APK? | No, you only need to keep the generated APK file. The bytecode is used internally during the build process and is not required for distributing the application. |
In conclusion, generating a signed APK may seem like a complex process, but by following these 12 answers to common questions, you will be able to generate a valid signed APK for your Android application. Just remember to be patient and thoroughly test the APK on different devices to ensure its functionality.
Conclusion
In conclusion, generating a signed APK file is a crucial step in the Android app development process. By signing your APK, you ensure that only you can make changes to your app and that users can trust that the code they are running is valid and safe.
To generate a signed APK, you need to follow a series of steps. First, make sure your project contains a signing configuration in the build.gradle file. Then, gather all the required information for signing, such as your keystore file and passwords. Next, open the Build Variants window in Android Studio and select the desired build variant (e.g., release). Finally, click on the “Generate Signed Bundle or APK” option and follow the prompts to generate your signed APK file.
It’s important to note that the signing process involves wrapping your app’s bytecode with a digital signature. This signature verifies the integrity of the code and ensures it hasn’t been tampered with. Without a valid signature, your app may not run on devices or be accepted by app stores.
In conclusion, generating a signed APK may seem like a complex process at first, but with thorough understanding and patience, anyone can achieve it. Remember to keep your keystore file and passwords safe, as losing them can make it impossible to update your app or generate new signed APKs in the future. Additionally, Google Play now requires all apps to use the Android App Bundle format, which bundles native code more efficiently. So, it’s worth considering using this format instead of traditional APKs.
Hopefully, this step-by-step guide has answered any questions you might have had about generating a signed APK. If you ever find yourself needing help in the future, always refer back to this post for assistance.