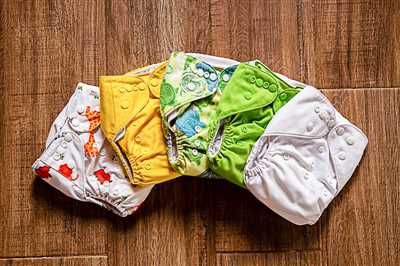
If you are a parent or a caregiver, you know how important it is to have a reliable and comfortable diaper for your baby. Instead of constantly buying disposable diapers, you can save money and create your own cloth diapers. In this article, we will guide you through the process of making a diaper from scratch, using simple materials and easy-to-follow instructions.
The first step in making a diaper is to assemble the necessary materials. You will need a base sheet of nonwoven fabric, three layers of absorbent material, and a waterproof outer layer. The absorbent material can be made from different fabrics, such as muslin or polyester, that have the property of being able to absorb moisture. The waterproof layer can be a sheet of acrylate or plastic, which will help to keep the diaper leak-proof.
Once you have gathered all the materials, you can start to assemble the diaper. First, lay the base sheet of nonwoven fabric flat on a table or any other working surface. Then, place the three layers of absorbent material on top of the base sheet, making sure they are evenly spread. To hold these layers together, you can use stitching or ropes to create links between them.
After assembling the absorbent layers, it’s time to add the waterproof layer. Take the sheet of acrylate or plastic and place it on top of the absorbent layers. Make sure it covers the entire surface and secure it in place with stitching or adhesive. This waterproof layer is essential to prevent any leaks from the diaper.
Now that you have the main structure of the diaper, you can add some finishing touches. You can create bows or other decorations with your favorite fabric to make the diaper more visually appealing. Additionally, you can attach Velcro or other fasteners to easily secure the diaper on your baby. These extra details will not only enhance the look of the diaper but also make it more practical to use.
In conclusion, making your own diaper is a great way to save money and create a comfortable and reliable option for your baby. By using different materials and following simple instructions, you can create a diaper that is both absorbent and leak-proof. With a little bit of creativity and sewing skills, you can provide your baby with the perfect diaper that meets their needs.
- DIY Cloth Diaper Inserts
- Raw Materials
- Absorbent pad
- Nonwoven fabric
- Other components
- Train Diaper Cake
- What are the things you need to start making the cloth diapers
- What to use as the Outer layer for the diapers
- What to use as the Inner layer for the cloth diapers
- What are used as Inserts
- What kind of Fastenings are used on fabric diapers
- Diaper Cake Directions
- How to Make Diaper Cakes Step 1
- How to Make Diaper Cakes Step 2
- How to Make Diaper Cakes Step 3
- How to Make Diaper Cakes Step 4
- How to Make Diaper Cakes Step 5
- Video:
- How to Make a Diaper Cake
DIY Cloth Diaper Inserts
If you’re using cloth diapers for your baby, you may want to make your own diaper inserts. These inserts are known for their high absorbency and can be easily made at home using a few basic materials. By following these directions, you can create your own cloth diaper inserts that will provide great absorbency for your baby’s needs.
Here’s what you’ll need:
- Raw materials: muslin sheets
- Water-resistant outer layer: polyethylene
- Fastenings: velcro or satin ribbon
- Thick absorbent layer: acrylate or fibrous material
- Interlocking layer: plastic chains or ropes
To create DIY cloth diaper inserts:
- Start by cutting the muslin sheets into rectangles of the desired size. A standard size is about 5 inches wide and 12 inches long.
- Place the muslin sheets on top of each other to create a layered base.
- Cut the polyethylene into smaller strips and sew them onto the outer layer of the muslin sheets. This will provide a water-resistant barrier.
- Using a sewing machine, stitch the layers together using a tight stitch. Make sure the stitches go through all the layers to hold them in place.
- Add the fastenings to the edges of the insert. Velcro or satin ribbon can be used to secure the insert inside the diaper.
- For the absorbent layer, you can use acrylate or a fibrous material like cotton or bamboo. Cut this layer to the same size as the muslin sheets and place it on top of the layered base.
- Interlock plastic chains or ropes in a crisscross pattern and place them on top of the layer of absorbent material. These chains will help distribute the liquid evenly and enhance the absorbency.
- Sew along the edges to secure all the layers and chains in place.
Once the DIY cloth diaper inserts are completed, you can use them by inserting them into the diaper pocket or laying them on top of the diaper. These inserts provide super absorbency and are great for overnight use or during potty training.
Now you know how to create your own cloth diaper inserts. By following this tutorial, you can save money and have diaper inserts that are customized to your baby’s needs.
Raw Materials
When making a diaper, there are a few essential raw materials that you would need. These materials will help you create a diaper that is absorbent, soft, and comfortable for your baby.
- Fabric: The fabric used for the outer layer of the diaper is typically a polymeric satin or muslin material. This fabric is waterproof and helps keep moisture away from the baby’s skin.
- Inserts: The inserts used in the diaper are typically made of nonwoven fabric. These inserts have a high absorbent property and can absorb a lot of moisture.
- Plastic: The plastic material is used to create a waterproof layer in the diaper. It is typically made of polyethylene and is placed on the back of the fabric layers to ensure that no leaks occur.
- Ribbon: Ribbons are used to create bows and embellishments on the diaper. They add a decorative touch to the design.
- Needle and thread: A needle and thread are necessary for the assembly of the diaper. They are used to stitch the various components of the diaper together.
These raw materials, when used together, create a diaper that is both functional and aesthetically pleasing. With the help of the instructions in this DIY tutorial, you can easily assemble these components to make a diaper that is perfect for your baby.
Absorbent pad
The absorbent pad is an essential component of a diaper. Its main function is to absorb moisture and keep the baby dry and comfortable for an extended period of time, typically around 2 to 4 hours or even overnight. The pad is made using a combination of fibrous materials such as polyester and polyethylene, which have great absorbency and strength.
To assemble the absorbent pad, you will need the following materials:
- A base layer of nonwoven fabric, typically made of polyester or polyethylene
- A layer of smaller nonwoven strips for better absorbency
- A layer of raw, fibrous material, such as muslin or cotton
- An outer layer of waterproof material, such as polyurethane
The first step is to cut the materials into the desired shape and size. The base layer should be rectangular, while the other layers can be smaller and narrower. It’s best to follow the directions of a tutorial or use a template for accurate measurements.
Next, you’ll need to link the layers together. To do this, you can use stitching, adhesive, or interlocking fibers. For disposable diapers, the layers are typically linked using acrylate, a type of adhesive that forms strong bonds when in contact with water. For cloth diapers, you can use stitching or attach velcro strips to keep the layers in place.
Once the absorbent pad is assembled, it can be inserted into the diaper’s pocket or placed directly on the base layer. The pad should be positioned in the center to ensure even distribution of moisture. The waterproof layer on the outer side of the pad prevents any leaks or seepage.
It’s important to note that the absorbent pad’s capacity depends on the materials used and the size of the pad itself. Generally, the more layers and fibers used, the higher the absorbency. However, it’s crucial to strike a balance between absorbency and bulkiness, as a pad that is too thick may not be comfortable for the baby.
Using high-quality materials and following the proper instructions when making the absorbent pad is essential in ensuring that it effectively absorbs moisture and keeps the baby dry. With the right pad, parents can have peace of mind knowing that their baby stays comfortable and protected throughout the day and night.
Nonwoven fabric
Nonwoven fabric is an essential component in making diapers. It is a type of fabric that is created by interlocking fibers together, rather than weaving or knitting them. This nonwoven fabric has many properties that make it a great choice for diaper making.
One of the most important properties of nonwoven fabric is its absorbent capacity. It can absorb a large amount of water or moisture, which is essential for diapers to keep babies dry throughout the night. The tiny fibers in the fabric create a network of interlocking ropes that have a high absorption rate.
Nonwoven fabrics are typically made using polymeric materials, such as acrylate. These materials are formed into sheets or ribbons, which are then assembled into multiple layers. Three layers are commonly used in diapers, with the middle layer being the most absorbent.
To make a diaper, the nonwoven fabric is cut into the desired shape and size. Inserts or additional layers may be added for extra absorbency. The fabric is typically fastened using Velcro or other types of closures.
Nonwoven fabrics are also used in disposable diapers, where cost and convenience are important factors. These diapers are made by using a layer of nonwoven fabric sandwiched between two layers of raw materials. The nonwoven layer provides strength and absorbs moisture, while the other layers provide comfort and help to prevent leaks.
When making traditional cloth diapers, nonwoven fabric can still be a useful component. It can be used as inserts or as a liner to add extra absorbency. Additionally, the fabric can be used to create reusable diaper covers or to make small items like diaper bags.
In summary, nonwoven fabric plays a vital role in diaper making. Its absorbent capacity, strength, and versatility make it an ideal choice for both disposable and cloth diapers. Whether you choose to use it in multiple layers or as inserts, nonwoven fabric is a key component in creating diapers that keep babies dry and comfortable.
| Pros | Cons |
|---|---|
| High absorbency | May be more expensive than other fabrics |
| Strength and durability | Not as soft as some other fabrics |
| Can be used in both disposable and cloth diapers | May require special care when washing |
| Versatile and can be used for additional diaper components | May not be as breathable as natural fabrics |
Other components
When making your own diapers, there are several additional components to consider:
- Directions and instructions: It’s important to have detailed step-by-step instructions to guide you through the diaper-making process. These instructions may include interlocking patterns, sewing directions, and tips for a better fit.
- Base and inserts: The diaper base is the main part that goes around the baby’s waist and hips, while the inserts are the absorbent layers that go inside the diaper to increase its capacity. These can be made of polyester, muslin, or other absorbent fabrics.
- Velcro or snaps: To make the diaper adjustable, you’ll need fasteners such as Velcro or snaps to secure the diaper in place. These ensure a snug fit and make it easier to put on and take off the diaper.
- Waterproof layer: To prevent leaks, a waterproof layer is typically added to the diaper. This can be made of polyethylene or other polymeric fabrics that have waterproof properties.
- Outer layer: The outer layer of the diaper is the part that comes in contact with the baby’s skin. It should be made of a soft and breathable material to keep the baby comfortable.
- Inner layer: The inner layer is the part that is in direct contact with the baby’s skin. It should be made of a moisture-wicking fabric to keep the baby dry and prevent diaper rash.
When sewing the diaper, it’s essential to use the right kind of thread. Polyester thread is often recommended because it is stronger and more durable than other types of thread.
Depending on the design you choose, you may also need small plastic strips, bows, or other items to give the diaper a more decorative look.
Some diapers have additional layers or inserts for extra absorbency, especially for nighttime use. These may be made of thicker or more absorbent fabrics, such as wool.
Keep in mind that there are many different types of diapers, and the components may vary. It’s important to do your research and find a design that suits your needs and preferences.
Now that you know what other components are involved, you can start gathering the materials and get ready to create your own cloth diapers.
Train Diaper Cake
Train diaper cake is a popular baby shower centerpiece that is both practical and adorable. It is made using layers of diapers stacked in an interlocking pattern to create the shape of a train. This unique diaper cake not only serves as a decoration, but also provides new parents with a supply of diapers for their little one.
To make a train diaper cake, you will need a sufficient number of diapers, which can vary depending on the size and type of train cake you want to create. The diapers should be made of a material that has good moisture absorption capacity, such as nonwoven fabric or muslin. You will also need some additional materials and components to assemble the cake.
The raw materials for the train diaper cake include a wood or plastic base, diaper ropes, nonwoven fabric, resin, velcro strips, and acrylate absorbent. The inner layers of the cake are made from diapers wrapped with nonwoven fabric, while the outer layers are wrapped with a waterproof material to prevent any leaks or accidents.
Start by creating the inner layers of the cake, which will give it shape and stability. Roll up the diapers tightly and secure them with diaper ropes. Arrange these diaper rolls in a circular pattern on the base to form the first layer. Repeat this process to create additional layers, making them slightly smaller in size as you move up the cake.
Next, wrap the outer layers of the cake with a waterproof material, such as a plastic sheet or a thick layer of nonwoven fabric. This will help to contain any moisture and keep the cake intact. Use velcro strips or ribbon to secure the layers in place.
To make the train diaper cake more decorative, you can add additional elements such as small toys, baby clothes, or other baby items. You can also wrap the layers with colorful ribbons or create a network of fibrous fabrics to give it a more appealing look.
When assembling the diaper cake, make sure to follow the directions provided in a tutorial or guide. This will ensure that the cake is sturdy and secure, and that it doesn’t collapse or fall apart. It is essential to use the right materials and techniques to create a high-quality train diaper cake.
The train diaper cake is known for its traditional design and practical use. It provides new parents with a supply of diapers for their baby, while also serving as an eye-catching centerpiece for a baby shower or newborn celebration.
In conclusion, making a train diaper cake requires some time and effort, but the end result is a beautiful and useful gift for new parents. It can be a great help in making those late night diaper changes a little more enjoyable. So gather the necessary materials and get creative in making your own train diaper cake!
What are the things you need to start making the cloth diapers
When making your own cloth diapers, there are a few essential things you’ll need to gather before you begin. These items will ensure that you have everything necessary to create comfortable and functional diapers for your baby.
1. Outer material: Choose a fabric that is both soft and durable for the outer layer of the diaper. This material will be in direct contact with your baby’s skin, so it should be gentle and breathable. Common choices include cotton, flannel, or PUL (polyurethane laminate) fabric.
2. Inner padding: For added absorbency, you’ll need a smaller pad or insert that can be placed inside the diaper. This can be made from layers of fabric, such as bamboo or hemp, that are known for their absorbent properties.
3. Fastenings: To secure the diaper around your baby, you’ll need fastenings such as snaps or Velcro. These will allow you to adjust the diaper’s fit and make it easy to undo for diaper changes.
4. Raw edges: Having access to a sewing machine or serger will make it easier to finish the raw edges of the fabric. This will prevent fraying and create a neater look for your diapers.
5. Other materials: In addition to the main components of the diaper, you may need some other materials such as thread, elastic, or ribbon to add extra features or decorations to your diapers.
Putting all these materials together, you’ll be ready to start making your own cloth diapers. By following online tutorials or instructions, you can create diapers tailored to your baby’s unique needs while saving money in the long run. With a little time and effort, you’ll have a set of personalized, eco-friendly diapers that are perfect for your little one.
What to use as the Outer layer for the diapers
When it comes to creating DIY cloth diapers, one of the essential components is the outer layer. This layer is responsible for keeping the moisture inside the diaper and preventing any leaks. There are several materials that can be used for the outer layer, each with its own properties and benefits.
Satin and muslin are two commonly used fabrics for diaper making. Satin is a smooth and shiny fabric that feels luxurious to the touch, while muslin is a lightweight and breathable material. Both fabrics are great choices for the outer layer as they are soft and gentle against the baby’s skin.
Another option for the outer layer is nonwoven fabric. Nonwovens are made by linking together fibrous materials using heat, chemicals, or pressure. They have a network-like structure that allows them to stay together without the need for any weaving or knitting. Nonwovens are often used in disposable diapers due to their waterproof properties.
For a more eco-friendly option, you can use wool as the outer layer. Wool is a natural and renewable material that has excellent moisture-wicking properties. It can absorb a considerable amount of moisture while still feeling dry to the touch. Additionally, wool is very comfortable against the baby’s skin and helps regulate their body temperature.
When choosing the outer layer material, it’s essential to consider the diaper’s absorbency and waterproofing capabilities. The outer layer should provide a barrier between the absorbent materials and the baby’s clothing, preventing any leaks or dampness. It should also be durable and easy to wash, as cloth diapers will be used multiple times.
In conclusion, the outer layer of a diaper is an essential component that determines its waterproofing and comfort. Satin, muslin, nonwovens, and wool are all viable options for the outer layer, each with its own set of advantages. Consider your baby’s needs and preferences when choosing the material for the outer layer of your DIY cloth diapers.
What to use as the Inner layer for the cloth diapers
When making cloth diapers, it’s important to choose the right materials for the inner layer. This layer is in direct contact with your baby’s skin, so it needs to be very soft and gentle. Additionally, it should be able to absorb moisture effectively and keep your baby’s skin dry.
One great option for the inner layer is a fabric called nonwoven. Nonwoven fabrics are made by bonding or linking fibers together, creating a thick and fibrous material. This kind of fabric has a great absorbency property, which makes it ideal for use in cloth diapers. It can quickly absorb and hold a large amount of liquid, keeping your baby’s skin dry and comfortable.
Another option is to use a material called polyethylene or PE. Polyethylene is a plastic resin that is often used in the making of waterproof items, such as diaper covers. It has a waterproof property, which means it won’t let any water or moisture pass through. Using a PE layer as the inner layer of your cloth diaper will help prevent leaks and keep your baby’s clothes and bedding dry.
You can create the inner layer of the cloth diaper by sewing together these two materials. Start by cutting two raw fabric pieces, one nonwoven and one PE, into the desired shape and size. Then, place the nonwoven fabric on top of the PE fabric, with the nonwoven facing the inside. Sew the two layers together, leaving a small space open for turning the fabric right side out. Once sewn, turn the fabric right side out and sew the opening closed.
These two layers, nonwoven and PE, combined together, provide a thick and absorbent inner layer for the cloth diaper. They are very easy to form into the shape of a diaper and give a great absorbency capacity. Additionally, they are soft and gentle, making them perfect for your baby’s delicate skin.
Baby diapers made with nonwoven and PE layers have many advantages. They are better for the environment compared to disposable diapers, as they can be washed and reused multiple times. They are also more comfortable for your baby, as the soft nonwoven fabric feels gentle against their skin. Furthermore, using cloth diapers can save you money in the long run, as you won’t need to constantly buy disposable diapers.
So, when making your own cloth diapers, consider using a combination of nonwoven and PE materials for the inner layer. This will ensure that your baby stays dry and comfortable, while also reducing your environmental impact and saving you money.
What are used as Inserts
When it comes to making a diaper, one of the most important components is the insert. Inserts are the absorbent layers that are placed inside the diaper to soak up any liquids. There are various materials that can be used as inserts, and each has its own unique set of properties.
One common option is using cloth sheets. These sheets can be made from a variety of fabrics, such as cotton or bamboo. They are reusable and can save money in the long run. Cloth inserts are also easy to clean and dry quickly.
Another popular choice is using traditional disposable diapers as inserts. Some parents prefer this option because these diapers are already designed to be highly absorbent. However, keep in mind that disposable diapers are not environmentally friendly.
For those who prefer a DIY approach, there are also options to create your own inserts. One method is to make inserts using layers of fabric linked together. A tutorial can be found at the following link: [insert link here]
Some inserts are made from a thick plastic material. These inserts serve as a waterproof base and help to prevent leaks. They are often used in combination with other absorbent materials.
Wool is another material that can be used for inserts. Wool has natural absorbent properties and can hold a significant amount of liquid. It is also moisture-wicking and helps to keep the baby’s skin dry.
Another option is using nonwoven inserts. Nonwoven fabrics are made by bonding fibers together, creating a fabric-like material. These inserts are often made from polyester and have a high level of absorbency.
Some inserts incorporate chains or cylinders made of absorbent material, such as acrylate. These chains or cylinders can enhance the absorbent capacity of the insert, ensuring that it stays dry for a longer period of time.
Overall, the choice of insert depends on personal preference and needs. It’s important to consider factors such as absorbency, ease of use, and environmental impact when selecting inserts for your baby’s diapers.
What kind of Fastenings are used on fabric diapers
When it comes to fabric diapers, there are many options for fastenings. The type of fastening you choose will depend on your personal preference and the needs of your baby.
One popular option is using snaps or hook-and-loop closures, such as Velcro. These fastenings are convenient because they allow for easy adjustments and a secure fit. Snaps are durable and long-lasting, while hook-and-loop closures are quick and easy to use.
Another option is using pins or diaper clips. These fastenings have been used for many years and are still a popular choice among parents. Pins provide a secure hold, but they require caution and skill to avoid poking your baby. Diaper clips are a safer alternative to pins, as they have a flat surface and are easier to use.
For those who prefer a more natural option, some fabric diapers can be fastened using ties or buttons. These fastenings are typically made from organic materials, such as cotton or wool, and provide a comfortable and adjustable fit. They take a little more time to put on and adjust, but many parents find them to be worth the extra effort.
Regardless of the type of fastening you choose, it is important to follow the manufacturer’s instructions when using fabric diapers. This will ensure that the diaper is fitted correctly and provides maximum absorbency and leak-proof protection.
Overall, fabric diapers offer a great alternative to traditional disposable diapers. They are better for the environment, easy to assemble, and can be used with a variety of absorbent materials. Whether you choose snaps, pins, ties, or buttons, fabric diapers are a comfortable and sustainable choice for your baby.
Diaper Cake Directions
When it comes to making a diaper cake, there are a few things you will need to gather before getting started. Here is a list of the materials typically used:
- Diapers
- Wood or cardboard base
- Baby items like onesies and socks
- Ribbon and bows
- Thread
First, start by creating the base of the diaper cake. You can use a round or square piece of wood or a cardboard cutout as the base. Make sure it’s sturdy and water-proof so the cake doesn’t fall apart.
Next, take the diapers and roll them into tight cylinders. You can use disposable diapers or cloth diapers for a more eco-friendly option. If you’re using cloth diapers, make sure they have good absorption and are comfortable for the baby. Disposable diapers are typically made with a polymeric material, like polyethylene, which gives them their waterproof and absorbent properties.
Once you have your rolled diapers, use rubber bands or thread to hold them together in layers. Start with the largest tier at the bottom and work your way up, making each tier slightly smaller than the one below it. This will give your diaper cake a layered look.
At this point, you can start decorating the diaper cake with baby items. Use ribbon, bows, and other decorative materials to wrap around each tier. You can also insert small baby items, like onesies or socks, between the layers to add a cute touch.
If you want to add more height to your diaper cake, you can use empty paper towel or toilet paper rolls as inserts. Just place them in the center of each tier and stack the rolled diapers around them.
To finish off your diaper cake, create a small topper. This can be a stuffed animal, a tiny baby toy, or whatever you like. Attach it to the top tier using a ribbon or string.
And there you have it, your DIY diaper cake is complete! It’s a fun and creative way to celebrate a baby shower or welcome a new arrival.
For a step-by-step tutorial on making a diaper cake, check out this link:
How to Make Diaper Cakes Step 1
To make a diaper cake, the first step is to gather all the necessary materials and supplies. You will need cloth or disposable diapers, absorbent strips, ribbons, bows, a cake base (which can be made of wood or cardboard), and other decorative items like baby toys or small accessories.
When choosing diapers, it is best to use ones that are highly absorbent, as they will be the main component of your cake. Disposable diapers are typically the go-to option, as they have a high absorbency capacity and come in various sizes. However, if you prefer to use cloth diapers, make sure they are made of a thick, absorbent fabric like muslin or wool.
The absorbent strips are an essential part of the diaper cake because they provide additional absorbency and help the cake hold its shape. You can use other fibrous materials like rope or even thread to create these strips, but make sure they are long enough to wrap around the diapers several times.
Next, you will need to stack the diapers to form the cake layers. The first layer should be the largest, followed by smaller layers as you move upwards. The diapers can be stacked in a circular or rectangular shape, depending on your preference.
Once the layers are in place, it’s time to secure them together. You can use ropes or thread to tie the diapers tightly, making sure they won’t come apart. Alternatively, you can use velcro or other fastening items to keep the layers in place.
After the layers are secure, it’s time to add the decorative elements. You can interlock ribbons or wrap them around each layer to give the cake a festive look. Bows and baby toys can be placed on top or in between the layers to add more charm to the cake.
It’s crucial to keep in mind that diaper cakes are decorative items and not intended to be used as actual diapers. The diapers used in the cake should be kept intact and not used on a baby’s bottom. It’s also essential to include directions or instructions with the diaper cake to clarify that the diapers are for display purposes only.
Lastly, if you want to make the diaper cake more practical, you can insert other baby items like bibs, pacifiers, or small clothing items between the layers. This way, the new parents will have some useful things to use once the cake is dismantled.
Follow these step-by-step instructions, and you’ll be able to create a beautiful diaper cake that not only looks great but also serves as a thoughtful gift for the new parents. Stay tuned for the next step in making a diaper cake!
How to Make Diaper Cakes Step 2
In this step, we will be focusing on assembling the diaper cakes. These cakes are made using disposable diapers and other baby items to create a unique and practical gift for new parents.
To start, you will need a base for your diaper cake. You can use a round piece of cardboard or a wooden board as the base. Make sure it is sturdy enough to hold the weight of the cake.
Next, take the disposable diapers and roll them up tightly. Secure each rolled diaper with a small piece of thread. You will need many diapers for the cake, depending on the desired height and size.
Once you have the rolled diapers, you can start building the tiers of the cake. Take the largest tier and arrange the rolled diapers around the base. Use some thread to tie the diapers together to form a tight bundle.
Repeat this process for the other tiers, making each one slightly smaller in diameter than the previous tier. Stack the tiers on top of each other, securing them with thread or using wooden dowels for extra stability.
Now it’s time to decorate the cake! Wrap a baby blanket or some fabric around each tier to hide the diapers and create a more appealing look. You can also add ribbons or chains to add a touch of elegance to the cake.
If you want to make the cake more functional, you can insert some baby items between the diapers, such as clothing, bibs, or small toys. This will make the cake a truly useful gift for the new parents.
It’s important to note that these diaper cakes are not meant to be eaten. They are purely decorative and serve as a centerpiece or gift for baby showers or other baby-related events.
By following these instructions, you can create a beautiful and practical diaper cake that will wow your friends and family. Diaper cakes are a popular and creative gift idea that will surely be appreciated by any new parent.
How to Make Diaper Cakes Step 3
In this step of making diaper cakes, you will start by preparing the inner layer. This layer is made of fibrous and absorbent materials to help with moisture absorption. One highly recommended material for this layer is muslin, a very comfortable and absorbent fabric.
To make the inner layer, you will need a sheet of muslin or other absorbent fabric. Cut the fabric into a large square or circle, depending on the shape and size of your diaper cake. It should be large enough to cover the entire inner layer of the cake.
Next, fasten the fabric to the inner layer of the cake using either thread or velcro fastenings. Make sure it is securely attached so it doesn’t come loose. This layer forms a barrier to prevent moisture from reaching the outer layers of the cake.
After the inner layer is in place, you can start adding more layers to the diaper cake. Each layer can be made using different materials or fabrics to create a visually appealing and unique design.
The most common material used for diaper cakes is cloth diapers. These are a great choice as they are reusable and eco-friendly. You can use different colors and prints to make the cake more visually appealing. You can also use cloth diapers with velcro or interlocking fastenings for added convenience.
In addition to cloth diapers, you can also use other materials such as polyester or polyethylene ropes, which have good absorbency properties. These can be wrapped around the layers of the cake to give it a thick and layered look.
To create the layers of the cake, you can use a raw chain or link the diapers together using acrylate or polymeric chains. This will help the diapers stay in place and maintain the shape of the cake.
Once the layers are in place, you can decorate the cake with ribbons, bows, and other decorative elements. You can also add baby essentials such as small toys or baby products to make the cake more functional.
Now you have completed the third step of making a diaper cake. Following these instructions will help you create a beautiful and unique diaper cake that can be a great centerpiece at a baby shower or a thoughtful gift for a new parent.
How to Make Diaper Cakes Step 4
In this step of the tutorial, we will be focusing on making the third tier of the diaper cake. The third tier is smaller in height compared to the previous tiers and will require fewer materials.
To start, you will need the following materials:
- 3 disposable diapers
- Thread
- Scissors
- Ribbon
- Small toys or baby essentials
First, take one disposable diaper and open it up. Place a small toy or baby essential in the middle of the diaper, ensuring that it remains in the center. Fold the edges of the diaper towards the center, creating a small insert. Use thread to secure the edges of the insert, making sure it stays in place. Repeat this process with the remaining diapers.
Next, take the three diaper inserts and layer them on top of each other, creating the third tier of the diaper cake. Use thread to link the inserts together, securing them in place.
Before moving on, it’s essential to ensure that the diaper cake is stable. You can insert a small piece of plastic or a waterproof pad in between the layers to provide better stability. This will also make it easier for the recipient to use the diapers later on.
Now it’s time to add some decorations to the diaper cake. Wrap a satin ribbon around each tier, using Velcro or interlocking chains to keep it in place. You can also tie bows or any other decorative elements around the cake to make it look more festive.
After completing this step, your diaper cake should be taking shape. The three tiers should be securely linked, and each tier should have a layer of inserts to provide absorbency. The diaper cake is now ready for the next step, which involves adding more decorative elements and finishing touches.
How to Make Diaper Cakes Step 5
Now that you have your base and tiers ready, it’s time to start assembling your diaper cake. This step involves creating the inner layers of the cake, which will be made up of cloth diapers and other absorbent materials.
The first thing you’ll need is a good material to use for the inserts. Muslin is often considered the best option because of its fibrous and absorbent properties. You can also use other nonwoven fabrics or even raw wool if you prefer. Cut the material into strips, about 1 inch in width, and long enough to wrap around the diapers.
Next, take one of the cloth diapers and place it flat on the table. Take one of your strips of material and insert it into the diaper, making sure it stays in place. Repeat this process with as many diapers as you need to create the desired number of layers for your cake.
Once you have all your diapers with the material inserts, you can start building the layers. Take one diaper with the insert and fold it in half lengthwise. Then, place it on top of another diaper, slightly offsetting it so that the corners line up with the edges of the diaper below. Keep adding diapers in this way until you have a layer of the desired height.
For a three-tier diaper cake, you’ll typically want to create three layers. However, you can add more if you prefer a taller cake. Just make sure to use enough diapers and inserts to make each layer absorbent.
After you’ve assembled all your layers, it’s time to secure them together. One common method is to use velcro strips. Simply attach a piece of velcro to each corner of the top diaper in the layer, and another piece to the bottom diaper in the layer above. This will help keep the layers in place.
Another option is to use small bows or ribbon, linking these to the corners of the diapers. This will also help create a sturdy structure for your cake.
Once your layers are secure, you can start adding the decorative elements. This is where you can get creative and use different items like toys, baby clothes, or baby care products. Remember to place them strategically around the cake to make it visually appealing.
With these steps, you are well on your way to creating a beautiful and functional diaper cake. It may take some time and effort, but the end result will be worth it. And remember, diaper cakes are not only great gifts for baby showers, but they can also be used as centerpieces for parties or decorations for the nursery.