

Do you have an amazing idea for an Android app and want to bring it to life? Creating an APK (Android Application Package) allows you to build and store your application file, enabling you to distribute it on the Google Play Store or share it with others. Whether you’re a beginner or an advanced developer, this tutorial will guide you through the process of creating an APK in a simple and straightforward manner.
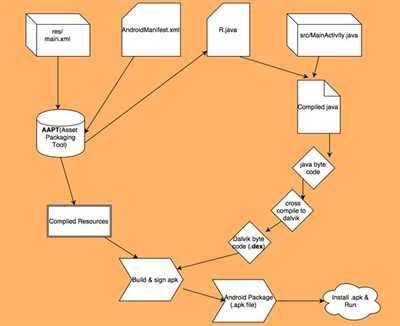
First, let’s understand the basics. An APK file is a single file that contains all the necessary components of your app, including the code, resources, and assets. In simpler terms, it’s like the complete package of your app. When users install your app, they’re actually installing the APK file onto their Android devices, which allows them to access and use your application.
There are multiple ways to create an APK, but in this tutorial, we will focus on one of the most commonly used methods. The first step is to initialize your project in Android Studio, an integrated development environment (IDE) for Android app development. Android Studio provides a user-friendly interface that allows you to write and modify your code while providing useful tools for building and testing your app.
Next, you’ll need to build and sign your APK. Building the APK involves compiling your code, packaging all the necessary files, and generating a single APK file from them. Once the build process is complete, the signed APK will be ready. Signing the APK involves adding a digital signature to your app, which ensures that it comes from a trusted source and hasn’t been tampered with. This is important for security reasons and allows your app to be installed on users’ devices.
In conclusion, creating an APK is an essential step in bringing your Android app to life. It allows you to distribute your app on the Google Play Store, generate revenue, and reach a wider audience. By following the steps outlined below, you’ll be able to create your own APK and share your app with others. Let’s get started!
How to create multiple apk files for android application
Creating multiple apk files for an Android application allows you to target different devices with different configurations, ensuring that your app works optimally on various screens, CPU architectures, and Android versions. In this tutorial, we will guide you through the process of generating multiple apk files for your Android application.
- First, open your Android app in Android Studio.
- Click on “Build” in the menu bar, and then select “Generate Signed Bundle or APK…”
- In the “Generate Signed Bundle or APK” window, select “APK” as the “Build Type” and click “Next”.
- In the next window, select “Create new…” next to the “Key store path” field, and provide the necessary details for your keystore file.
- Once you have provided the keystore details, click “Next”.
- You will then be prompted to select a destination folder for your APK files. Create a new folder for the multiple APK files.
- Next, select the method for how you want to generate your multiple APK files. You can choose to split by “ABI”, “Density”, or “Language”.
- Click “Finish” to generate the multiple APK files.
Once the process is complete, you will find the generated APK files in the folder you specified. Each APK will be optimized for the specific device configuration you selected during the split method.
Creating multiple APK files for your Android application is an advanced method that allows you to target a wider range of devices, ensuring compatibility and optimization. This is especially useful when you want to support different screen sizes, CPU architectures, or Android versions.
In conclusion, by following this tutorial, you will be able to create and build multiple APK files for your Android application. This enables you to reach a larger audience, increase your app’s revenue, and cater to the specific needs of different devices.
How to Create an APK Mod Method 1 Advanced
If you want to modify an Android application or game, there are multiple methods you can use. In this tutorial, we will focus on an advanced method called APK Mod method 1.
This method allows you to create a modified version of an APK file, which can be installed on Android devices. The modded APK will have additional features or changes that are not present in the original version.
To start, you will need the following:
- A Windows computer
- APKTool – a tool for modifying APK files
- The APK file of the app or game you want to modify
- A folder to store all the necessary files
- An image file for the modded APK’s icon
Once you have all the details ready, follow the steps below:
- First, you need to initialize the APKTool. Open the command prompt window and navigate to the folder where APKTool is stored.
- Next, use the command:
apktool ifto initialize APKTool. - Now, create a new folder in the same directory as the APK file. This folder will contain all the mod files.
- Copy the APK file to the newly created folder.
- Open a command prompt window and navigate to the folder where you placed the APK file.
- Use the command:
apktool dto decompile the APK file. - The APKTool will generate a folder with the same name as the APK file. It will contain all the files of the original APK.
- Modify the necessary files according to your requirements. You can edit the code, resources, or any other file.
- Once you have made the desired changes, use the command:
apktool bto build the modded APK. - The APKTool will generate a new APK file in the “dist” folder within the mod folder. This is the modded APK.
- If you want to sign the modded APK, you can use the command:
apktool b -s. This will sign the APK using the provided keystore file.
And that’s it! You have successfully created a modded APK using the advanced method 1. You can now install the modded APK on your Android device and enjoy the additional features or changes.
In conclusion, the APK Mod method 1 advanced allows you to create a modified version of an Android application or game. By following the steps provided in this tutorial, you can modify the necessary files and build a modded APK. This method gives you more control over the modifications and customization of the app or game. However, please note that modifying apps or games can violate their terms of service, and it’s important to respect the developers’ work and revenue stream.
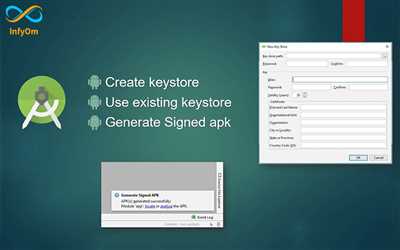
Generating a Signed APK File
Creating an APK file for an Android application is an essential step in the app development process. In this tutorial, we will explain how to generate a signed APK file using Android Studio.
First, open Android Studio and select the project for which you want to generate the APK file. Then, click on the “Build” menu option at the top of the window. From the dropdown menu, click on “Generate Signed Bundle / APK”.
A window will appear with multiple options. Select “APK” and click on the “Next” button. Then, you will need to create a keystore file to store your key information. This keystore file is required to sign your APK file.
If you already have a keystore file, click on the “Choose existing” button and locate the file on your computer. If this is your first time creating an APK file, click on the “Create new” button and follow the instructions to initialize a keystore file. Make sure to store your keystore file in a safe location.
Next, you will need to fill in the key information. Provide a name for your key, a password, and other details as needed. It is highly recommended to use a strong password to protect your key.
Once you have filled in the details, click on the “Next” button. In the next window, select the build variant for which you want to generate the signed APK file. In most cases, you will want to select the “release” variant, as this is the version that you will distribute to users.
Click on the “Finish” button to start the process of generating the signed APK file. Android Studio will build the APK file and show you the progress in the bottom panel.
Once the process is complete, you will find the signed APK file in the “app/release” folder of your project. The file will be named based on the application ID and version details provided in the build.gradle file.
To test the signed APK file on your device, you can either connect your device to your computer using a USB cable or copy the APK file to your device and install it manually. Make sure to enable the “Unknown sources” option in your device’s settings to allow the installation of apps from sources other than the Google Play Store.
In conclusion, generating a signed APK file is an important step in the app development process. It allows you to distribute your Android application to multiple devices and enables you to generate revenue through app sales or advertisements. Following the steps provided in this tutorial, you can easily create a signed APK file for your application.
Initialize your app
Once you have generated the APK file for your Android app, the next step is to initialize your app before releasing it to the public. This process allows you to provide users with a smooth experience and ensure that your app works correctly on different devices.
Here are the steps to initialize your app:
- Create a signing key: Before you can publish your app, you need to sign it with a private key. This key will be used to verify that the app is authentic and has not been tampered with. You can create a signing key using the
keytoolcommand provided by the Android SDK. - Store your signing key: After creating the signing key, you need to store it in a secure location. Make sure to keep this key safe, as it is required to sign future updates of your app.
- Initialize the app details: When initializing your app, you need to provide important details such as the app name, package name, version code, version name, and the minimum Android version required to run the app. These details will be shown to users on the Google Play Store.
- Add images: It is recommended to include screenshots and a feature graphic for your app. These images will showcase your app’s functionality and attract potential users.
- Set up different revenue models: If you want to monetize your app, there are multiple revenue models available, such as in-app purchases, ads, or subscriptions. Choose the one that fits your app and revenue goals.
- Configure advanced settings: There are several advanced settings you can configure, such as restricting the app to specific countries or setting up content ratings. These settings will allow you to target your app to specific audiences and comply with regulations.
- Test on multiple devices: It is crucial to test your app on different Android devices to ensure compatibility and functionality. This will help you identify and fix any device-specific issues before releasing your app.
- Build and sign the APK: After completing the above steps, you can build the final APK file. This file will be signed with your private key, ensuring its authenticity and integrity.
- Generating the mod APK: If you want to create a modified version of your app, you can follow a tutorial or use a third-party tool to modify the APK. This allows you to add features or customize the app according to your needs.
In conclusion, initializing your app is a critical step before releasing it to the public. By following the method outlined above, you can ensure that your app works smoothly, provides a great user experience, and generates revenue for your business.
Conclusion
In conclusion, this tutorial has shown you how to create multiple APKs using an advanced method. By using a patcher, you can modify the code and assets of an app to create different versions for different devices or revenue generation.
The tutorial first explained how to initialize the necessary files and folders. Then, it provided details on how to generate a signed APK using the Android Studio. This method allows you to create a single APK that works for most devices.
Next, the tutorial explained how to modify the code and assets of the app by clicking on the “Build” menu and selecting “Modify”. This window allows you to find and modify the necessary files.
The tutorial then showed you how to create multiple APKs by generating different signed APKs for different devices or revenue models. The tutorial provided a step-by-step process for creating multiple APKs using the patcher.
In conclusion, this tutorial has provided an advanced method for creating multiple APKs for an Android application. By following the steps outlined above, you can modify your app to generate different versions for different devices or revenue models.