In today’s fast-paced world, where information is delivered in a quick and visual format, timelines have become an essential tool to communicate data effectively. Whether you’re a small business owner, a content creator, or a designer working for large brands, knowing how to create an infographic timeline can help you tell your story and promote your ideas.
In this guide, we will walk you through the necessary steps to create an impressive infographic timeline that will captivate your audience. We will provide you with valuable resources, templates, and examples to help you easily illustrate your content in a clear and visually appealing way.
The first step in creating an infographic timeline is to define the purpose and the milestones you want to highlight. This will give you a clear idea of what information you need to include and how it should be presented. Once you have outlined the content, it’s time to choose the right format and design that best suits your message.
There are many tools available to assist you in the creation of your infographic timeline. One popular option is the online platform called PicMonkey. With PicMonkey, you can easily insert graphics, icons, and text into a blank template or choose from their pre-designed templates. It’s a user-friendly tool that doesn’t require any graphic design skills. Another great resource is Icograms, which provides a wide range of icons and graphics to enhance your timeline’s visuals.
When you have created the initial design of your infographic timeline, it’s important to revise and make any necessary changes to ensure it looks perfect. This is the stage where you can add more details, revise the text, and fine-tune the overall look of your timeline. Remember, visuals are crucial in capturing your audience’s attention, so aim for a visually appealing design that complements your content.
Once you’re satisfied with the final design of your infographic timeline, it’s time to publish and promote it. There are various platforms where you can share your creation, such as social media, your website, or even in a presentation. The key is to choose the most appropriate platforms that align with your target audience and their potential interest in your timeline.
In conclusion, creating an infographic timeline can be a quick and effective way to communicate information and tell a story. By following the steps outlined in this guide and utilizing the available resources and tools, you can easily create captivating timelines that will help you promote your ideas and engage your audience.
- How to Make a Timeline Infographic Your Guide with Free Templates and Resources
- Chosen by brands large and small
- How to work with Icograms Designer
- How to create a timeline infographic
- Create an outline
- Define milestones
- Design the template
- Choose fonts and visuals that help to tell the story
- Revise
- Publish and promote
- 1. Define your milestones
- 2. Choose a template
- 3. Insert your content and visuals
- 4. Illustrate with examples
- 5. Publish your infographic
- 6. Promote your infographic
- 7. Find resources for help
- How to make a timeline infographic in PicMonkey
- Sources
- Videos:
- 14 Infographic Do’s and Don’ts to Design Beautiful and Effective Infographics
How to Make a Timeline Infographic Your Guide with Free Templates and Resources
Creating a timeline infographic is a great way to visually represent information and tell a clear and concise story. Whether you’re a designer or someone with no design experience at all, there are some easy steps you can follow to create your perfect timeline infographic. In this guide, we’ll give you some tips and resources to help you get started.
- Define what you want to illustrate: Before you start creating your timeline, it’s important to define what information you want to include and what story you want to tell. Have a clear idea of the contents and the order in which they should appear.
- Choose a template or start from scratch: There are many free templates available online that you can use as a starting point for your timeline infographic. These templates can give you an idea of the structure and layout you might want to use. Alternatively, you can create a blank canvas and design your own timeline from scratch.
- Find the right visuals: Visuals are an important part of any infographic. They help to break up text and make your timeline more engaging. Look for icons, graphics, or illustrations that are relevant to your topic and that will enhance your timeline.
- Insert your chosen visuals: Once you have chosen your visuals, you can insert them into your timeline. Use a graphic design tool like Canva, PicMonkey, or Adobe Illustrator to add your icons and graphics in the appropriate places.
- Add text and fonts: To make your timeline infographic more informative, you’ll need to add text. Use clear and concise language to explain each point in your timeline. Choose fonts that are easy to read and align with your brand or topic.
- Revise and make necessary changes: After you have created your timeline, take a step back and review it. Make sure the information is accurate and that the visuals and text are well-organized. If necessary, make revisions or changes to improve the overall design and flow.
By following these steps, you can create a visually appealing timeline infographic that effectively communicates your information. Remember to keep it simple and concise, and use visuals to help tell your story. With the help of free templates and resources, you can easily create stunning timelines that grab attention and engage your audience.
Chosen by brands large and small
When it comes to creating infographics, timelines are a popular choice for many brands. Whether you’re an established company or a small business just starting out, timelines can help you tell your story in a clear and visually appealing way.
There are some contents you may want to include in your timeline. For example, you can highlight key milestones or important events that have shaped your brand. You can also use timelines to outline the time it took for your company to achieve certain goals or objectives.
If you’re not a designer or have limited resources, don’t worry! There are many free online tools and resources available that can help you create stunning infographic timelines with ease. For example, you can use tools like Piktochart, Infogram, or Canva to easily customize timeline templates and add your own content.
When designing your timeline, it’s important to choose fonts, colors, and graphics that align with your brand’s look and feel. This will help make your timeline more cohesive and consistent with your overall design. You can browse through various templates and examples to get an idea of what works well and to find something that suits your brand.
Once you have a clear outline of your timeline, you can start filling in the necessary information. You can drag and drop icons, images, and text boxes to the stage and order them as needed. This will help you define the most important points and give readers a quick overview of your brand’s story.
After you’ve created your timeline, you can easily revise and make changes as necessary. This is especially helpful if you need to add or remove milestones, update information, or change the overall design. Once you’re satisfied with your timeline, you can publish it online or use it in your marketing materials to promote your brand.
Whether you’re a large corporation or a small startup, infographics timelines are a powerful tool to showcase your brand’s journey. By using a timeline maker like PicMonkey, you can easily create a timeline that tells a compelling story and engages your audience.
So, if you’re looking for a way to make your brand’s milestones and achievements stand out, consider using an infographic timeline. It’s a perfect format to visually present your story and capture the attention of your target audience.
How to work with Icograms Designer
When it comes to creating infographics or timelines, Icograms Designer is a great tool to use. With its wide variety of templates, you can easily choose one that fits your needs and start creating your own unique timelines. Whether you want to promote your brand, tell a story, or simply give an outline of your project, Icograms Designer has the resources to help you create visually appealing graphics that will capture your audience’s attention.
To get started, open Icograms Designer and choose a template that you like. If you’re not sure exactly what you’re looking for, you can browse through the available timelines to find one that fits your needs. Once you’ve chosen a template, you can easily customize it to fit your specific content and style.
With Icograms Designer, you have the flexibility to create your own timeline from scratch or use one of the pre-designed templates. If you’re starting from a blank canvas, you can insert text, icons, and other design elements to illustrate your points. If you’re working with a template, you can revise and edit the existing content to make it perfect for your needs.
One of the most helpful features of Icograms Designer is the ability to easily insert milestones into your timeline. This allows you to define important events or stages in your story, giving your audience a clear sense of the timeline. You can also insert additional graphics to further illustrate your points and make your content more engaging.
Icograms Designer also provides a wide range of fonts and icons to choose from, so you can customize your timeline to match your brand or design aesthetic. Whether you’re working on a small project or a large-scale campaign, Icograms Designer has the tools and resources to help you create professional-looking infographics and timelines.
Once you’ve created your timeline in Icograms Designer, you can easily publish it to share with others. This makes it a great tool for designers, marketers, and anyone else who wants to visually communicate information or promote their brand.
In conclusion, Icograms Designer is a versatile and user-friendly tool that can help you create stunning infographics and timelines. Whether you’re a beginner or an experienced designer, Icograms Designer provides the resources and templates you need to bring your ideas to life. So why not give it a try and see how it can help you tell your story in a visually compelling way?
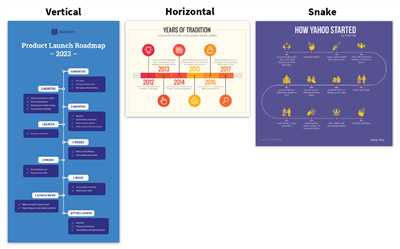
| Here are some examples of timelines created with Icograms Designer: | ||
 |  |  |
As you can see, the possibilities are endless with Icograms Designer. So why not start creating your own timeline today?
For more information and to download Icograms Designer for free, visit the official website at www.icograms.com.
In order to make your timeline creation even easier, you can also use other tools such as PicMonkey, which is a quick and user-friendly online graphics editor. With PicMonkey, you can easily create and edit images to insert into your timeline, adding even more visual appeal to your content.
How to create a timeline infographic
Infographic timelines are a great way to tell a story or illustrate the progression of events over time. They can be easily created using various online tools and resources. In this guide, we will give you some tips on how to make your own timeline infographic.
First, start by finding a template or blank canvas to work with. There are many free infographic makers available that offer pre-designed templates for you to choose from. Some popular options include Canva, Piktochart, and PicMonkey.
Once you have chosen a template or a blank canvas, it’s time to insert your timeline content. Start by creating an outline of the milestones or events you want to include in your infographic. This will give you a clear idea of what information you need to include and in what order.
When it comes to design, you can choose to work with the existing template or create something from scratch. Many infographic makers offer a wide range of graphics, fonts, and icons to choose from, which can help you create the perfect design for your timeline.
You can also find free resources online, such as fonts and icons, to use in your infographic design. Websites like IcoGrams offer a variety of icons that can be used in infographic creation.
Once you have chosen your design elements, it’s time to start creating your timeline. Insert the necessary text and graphics to illustrate each point in your timeline. You can use arrows, lines, and other visual elements to make the timeline more visually appealing and easy to understand.
It’s important to make sure that the timeline is easy to read and follow, especially if you are using it to publish or promote content. Use clear headings and subheadings, and make sure that the text is legible. You can also use colors and different fonts to make different stages or milestones stand out.
Finally, when your timeline infographic is complete, make sure to proofread it for any errors or inconsistencies. Double-check that all the information is accurate and that the visuals match the content. Once you’re satisfied with the final design, you can save it in a suitable format and publish or share it as desired.
These are just some guidelines to help you create a timeline infographic. There are many examples and resources available online to assist you in the creation process. Whether it’s a small personal project or a large-scale brand promotion, infographics can be a powerful tool to communicate complex ideas and information in a visually appealing and easy-to-understand format.
Create an outline
Before you start creating your infographic timeline, it is important to have a clear outline of what you want to include. This will guide the design process and help you stay focused on the key points you want to promote.
Start by defining the story or information you want to tell with your timeline. What is the main idea or theme you want to convey? Are there any specific milestones or stages that you want to highlight?
Once you have a clear idea of the content, you can then think about the design elements that will best help you communicate your message. Think about what visuals, icons, or graphics you can use to enhance the timeline and make it more engaging.
There are many sources you can find to help you with this stage. Some designers may choose to create their own custom graphics, while others may find it helpful to use templates or pre-made icons from free infographic makers like PicMonkey, ICograms, or other websites.
When creating the outline, it is also important to consider the format and size of your timeline. Do you want a large, full-width timeline that spans the entire page? Or would a smaller, more compact timeline be more appropriate?
In addition to the visual elements, think about the text and fonts you will use. Make sure they are easy to read and well-suited to your chosen design. Consider using headers, subheaders, and bullet points to break up the information and make it easier for viewers to digest.
Once you have your outline and chosen design elements, you can start working on the creation of your infographic timeline. Insert your chosen visuals and text into your template or starting point, and revise as necessary until you are satisfied with the final result.
Remember, the most important thing is to have a clear and logical flow to your timeline. Make sure it tells a story and provides all the necessary information in a quick and easy-to-understand manner. This will help you effectively communicate your message and engage your audience.
After you have created your timeline, it is time to publish and promote it. Share it on your website, social media platforms, or other relevant channels to help spread the word and reach a larger audience.
With a well-structured outline and a visually appealing design, you can easily create an infographic timeline that will grab attention and help communicate your message effectively.
Define milestones
When creating an infographic timeline, it is important to have clear milestones in order to guide the design process. To start, think about the most important events or stages that you want to include in your timeline. These milestones will serve as the backbone of your infographic and will help tell the story you want to convey.
One way to define your milestones is by creating an outline of the timeline. This can be done by listing the necessary contents in a logical order. For example, if you’re creating a timeline for a project, you can list the different stages of the project and the major milestones associated with each stage.
Once you have a clear idea of your milestones, it’s time to choose the icons and graphics that will be used to represent each milestone. There are many resources available online where you can find free or paid icons and graphics for your infographic. Some popular options include Icograms, Iconfinder, and Flaticon.
When choosing icons or graphics, make sure they are well-chosen and easily understood by your audience. The icons should be visually appealing and relate to the content of each milestone.
Next, you can start designing your timeline. If you have a specific design idea in mind, you can use graphic design software like Adobe Illustrator or Canva to create the timeline from scratch. If you’re not a designer, you can use a template from a timeline maker tool like Piktochart or Venngage.
During the design stage, you can insert the icons and graphics you have chosen for each milestone. You can also add text to provide more information and context for each milestone. It’s important to use fonts and visuals that are easy to read and look aesthetically pleasing.
Once you’re happy with the design of your infographic timeline, it’s time to revise and give it a quick look-over. Make sure all the milestones are in the correct order and that the timeline tells a clear and cohesive story. If necessary, make any revisions or changes to improve the overall flow and readability of your infographic.
Finally, when your infographic timeline is complete, you can publish it and promote your work. Share it on social media platforms or use it as a visual aid in presentations. Infographics are a great way to present information in a visually appealing and easy-to-understand format, so make sure to take advantage of their potential to showcase your ideas and tell your story.
In conclusion, defining the milestones for your infographic timeline is an important starting point in the creation process. By following this guide, you can easily create a visually appealing and informative infographic that effectively communicates your message.
Design the template
Once you have gathered all the necessary content and information for your infographic timeline, it’s time to design the template. Here are some steps to help you create a visually appealing and clear template:
- Define the story: Before starting the design process, make sure you have a clear idea of what you want to communicate with your infographic timeline. Define the main milestones or events you want to illustrate.
- Choose the layout: Look for examples and templates that can help you find the perfect starting point for your design. There are many free resources available online that can assist you in this creation.
- Select the fonts: Fonts play a crucial role in the design of an infographic. Choose fonts that are easy to read and match the style and message of your timeline. Make sure the fonts you’ve chosen are well positioned both in terms of size and style.
- Create or find icons and graphics: Icons and graphics are essential elements that can help you convey information in a visual way. There are many free and paid resources where you can find icons and visuals to use. Drop these elements into your timeline template to enhance its visual appeal.
- Insert text and visuals: Insert your timeline content into the template, along with any visuals or illustrations that you have chosen. Make sure the text is concise and the visuals are relevant to the information you’re presenting.
- Revise and revise again: After creating the initial design, take a quick look at your timeline to see if everything looks well-organized and visually appealing. Revise and make any necessary changes to ensure a clear and professional appearance.
- Publish your infographic timeline: Once you’re satisfied with the design and layout of your timeline, it’s time to publish and share it with others. Consider using an online infographic maker like PicMonkey or any other design tool you prefer to finalize your timeline in a printable or shareable format.
By following these steps and using the resources available to you, you can easily create a professional and engaging infographic timeline to promote your brand or tell a story. The possibilities are endless when it comes to designing timelines, so let your creativity flow and enjoy the process of creating your own unique template!
Choose fonts and visuals that help to tell the story
When creating an infographic timeline, it is crucial to select fonts and visuals that effectively convey your message and enhance the overall storytelling experience.
The fonts and visuals you choose should illustrate what your timeline is about. Large fonts can be used to highlight important milestones or key points, while small fonts can be used to provide additional information or context.
Icons and graphics are also valuable visual elements that can be used to enhance your timeline. Choose icons that align with your content and help to convey your message in a clear and visually appealing way. For example, if you’re creating a timeline about the history of technology, you might choose icons that represent different technological advancements over time.
There are various resources available online where you can find free templates and graphics to use in your infographic timeline creation. Websites like PicMonkey offer a wide range of templates and design resources that you can customize to fit your specific needs.
Before starting the design process, take some time to define the story you want to tell with your timeline. Outline the key milestones or stages that you want to include, and consider how you can visually represent them in your infographic.
Once you have a clear outline and an idea of the visuals you want to use, you can start working on the design. Insert text and visuals into your chosen template or start from a blank canvas if you prefer a more customized design.
As you work on your infographic timeline, don’t be afraid to revise and make changes. Play around with different fonts, colors, and visuals to see what works best for your design. Remember that the goal is to create a visually appealing and informative timeline.
When choosing fonts, opt for ones that are easy to read and align with the tone and style of your timeline. Different fonts convey different emotions and messages, so choose a font that matches the overall theme and purpose of your infographic.
Visuals play a crucial role in capturing your audience’s attention and helping them understand the information you present. Utilize visuals such as charts, graphs, and images to break down complex data and make it more easily digestible.
By choosing fonts and visuals that help to tell the story, you can create an engaging and impactful infographic timeline that effectively communicates your message. Once created, you can use it to educate, promote, or publish the information in a visually appealing format.
Revise
Once you have created a timeline using a free infographic timeline maker or by designing it from scratch, it’s important to revise and refine your design before finalizing it. This stage of the timeline creation process is where you go over the content, design, and information that you have chosen to include in your infographic timeline.
First, take a look at the overall design and layout of the timeline. Make sure that the chosen fonts, colors, and icons are visually appealing and consistent throughout. If necessary, make any necessary adjustments to create a cohesive and attractive design.
Next, go over the timeline starting from the beginning and work your way to the end. Make sure that the milestones, events, or points you have chosen to include are presented in a logical and easy-to-follow order. Insert any additional information or graphics that may help to tell your story and define the timeline more clearly.
If you find that certain sections of your timeline are lacking in content or visuals, consider adding more information or examples to better illustrate the point you are trying to make. You can find free templates and icons from various online sources to help enhance your timeline.
During the revision stage, it’s also a good idea to seek feedback from others, such as fellow designers or colleagues, to get their input on the design and content. They may be able to give you helpful suggestions or identify areas that may need improvement.
Use tools like PicMonkey or other graphic design software to make any necessary changes to your timeline. These tools allow you to easily edit and revise your design to ensure it meets your requirements and looks exactly the way you want it to.
When you’re satisfied with the final version of your timeline, you can publish it on your website, blog, or social media platforms to promote your brand or share your story. Infographic timelines are a great way to engage your audience and provide them with visually appealing and easy-to-understand information.
Publish and promote
Once you have created your infographic timeline using the timeline maker, it’s time to publish and promote it. Here are some steps to help you with that.
1. Define your milestones
Start by outlining the key milestones or events you want to include in your infographic timeline. This will give you a clear idea of what to include and how to order the contents.
2. Choose a template
Select a template from the timeline maker that best suits your design and content. There are many templates to choose from with different styles, fonts, and graphics. Pick the one that aligns with your brand or the story you want to tell.
3. Insert your content and visuals
Once you have chosen a template, start inserting your milestones and their corresponding information. You can also drop in graphics and icons to make your timeline more visually appealing. Use the formatting options to customize the look of your timeline.
4. Illustrate with examples
If you have relevant examples or case studies to support your milestones, include them in your infographic timeline. Visual examples can help readers better understand the information you are presenting.
5. Publish your infographic
When you are done creating your timeline, publish it using the timeline maker. This will generate a shareable link or allow you to download the infographic in a suitable format.
6. Promote your infographic
In order to reach a larger audience, promote your infographic timeline on various platforms. Share it on social media, email it to relevant contacts, or even include it in blog posts or articles. The more exposure your infographic gets, the more potential it has to be seen by others.
7. Find resources for help
If you need assistance or want to explore more options, there are resources available online to guide you. Websites like PicMonkey, Canva, and iCograms provide tools, tutorials, and templates to help you create stunning infographics.
By following these steps and utilizing the resources available, you can make an eye-catching infographic timeline to showcase your information in a clear and visually appealing way. Don’t hesitate to get started and unleash your creativity!
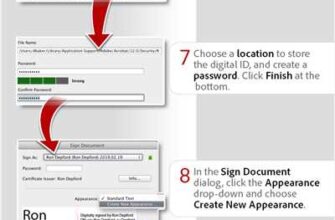
How to make a timeline infographic in PicMonkey
If you’re looking to give your content a visual boost and promote your information in a clear and engaging way, creating a timeline infographic can be a great choice. PicMonkey is a popular online graphic design tool that offers an easy-to-use timeline maker feature, allowing designers of all levels to create professional-looking infographics.
Here’s a step-by-step guide on how to make a timeline infographic in PicMonkey:
- Start by choosing a timeline template. PicMonkey provides a variety of pre-designed templates that you can choose from, or you can start with a blank canvas to create a timeline from scratch.
- Define the timeline’s contents and milestones. Decide on the key points and events that you want to include in your timeline, and prepare the information accordingly.
- Insert the timeline on the canvas. Use PicMonkey’s tools to add the timeline to your design. You can easily drag and drop the timeline wherever you want it to appear.
- Add visuals and graphics. To make your timeline more engaging, insert icons, photos, or other visuals that are relevant to the content of each milestone. There are many resources available, including PicMonkey’s built-in collection of icons and the option to import your own graphics.
- Customize the design. PicMonkey offers various editing options to help you make your timeline look exactly how you want it. You can change the colors, fonts, and other elements to match your branding or create a unique look.
- Revise and format. Take the time to review your timeline and make any necessary revisions. Ensure that the information is accurate, the visuals are cohesive, and the design is visually appealing.
- Publish or download your infographic. Once you’re satisfied with your timeline, you can publish it directly from PicMonkey or download it in a preferred format (such as JPEG or PNG) to use on your website, social media, or presentations.
With PicMonkey’s easy-to-use interface and the wealth of creative tools available, creating a timeline infographic becomes a quick and hassle-free process. Whether you’re a beginner or an experienced designer, PicMonkey can help you effectively illustrate your story and present your information in a visually appealing way.
So if you’re looking for a starting point or need some inspiration, give PicMonkey a try and easily create a timeline infographic that will help your content stand out!
Here are some examples of timeline infographics created with PicMonkey to give you an idea of the potential:
Remember, you can always find helpful resources, templates, and icons to assist you in the creation of your perfect timeline infographic. So don’t hesitate to explore the options and let your creativity shine!
Sources
- When starting the creation of an infographic timeline, it’s important to have some resources that can help clarify the process. Here are some sources to consider:
- Templates: Choose a template that suits your timeline’s design and content needs. There are many free infographic timeline templates available online that can give you a starting point.
- Fonts: Select fonts that work well with your design. Clear and easy-to-read fonts are necessary to ensure that the information is easily understood.
- Graphics and icons: Find some icons and graphics to illustrate the milestones and stages of your timeline. There are some free resources available as well as paid ones.
- Online infographic makers: There are many online tools available that can help you create your timeline quickly and easily, such as Piktochart, Canva, and Picmonkey.
- Examples: Look for some examples created by other designers or brands to get an idea of what works well in terms of design and content.
- Work with a designer: If you have the budget for it, working with a professional designer can help you create a timeline that aligns with your brand and tells your story effectively.
- Revise and edit: Once you have created your infographic timeline, make sure to revise and edit it to ensure that all the information is clear and in the right order. This will help make it perfect and ready to publish.
- Icograms: Icograms is a website where you can create customizable infographics and timelines. They have a variety of templates and icons to choose from, making it easy to create a visually appealing timeline.