

If you’re looking to create a successful YouTube channel, it’s important to carefully set up and manage your channel settings. The right settings can help you make the most out of your channel and attract more subscribers, while also allowing you to customize your channel based on your unique needs and preferences.
In this article, we’ll walk you through the step-by-step process of setting up your YouTube channel and show you how to make the most of the available options. Whether you’re just starting out or already have a channel, these tips will help you optimize your channel and grow your audience.
- Step 1: Setting Up Your Channel
- Step 2: Uploading and Managing Your Videos
- Step 3: Promoting Your Channel
- Step 4: Managing Your Channel Settings
- YouTube Promotion Tactics Let’s Go
- Survey says it’s time for video
- What Can You Do with YouTube Advanced Settings
- 1 Set your channel as made for kids or not
- 2 Display the number of people subscribed to your channel or not
- 3 Three other channel settings
- 4 Disable the interest-based ads
- Conclusion
- Q1 How Do I Set My YouTube channel To Private
- Q2 How Do I Make YouTube Videos Private On Mobile
- Q3 Why Is My YouTube Video Private
- Q4 Is There A Way To Make My YouTube Channel Private
- Q5 Can You Delete Or Hide Your YouTube Channel
- Hide the Latest Category from the Navigation Bar
- Video:
- How to START & SETUP a New YouTube Channel (The ULTIMATE Guide)
Step 1: Setting Up Your Channel
The first step in setting up your YouTube channel is selecting the right name, image, and cover photo. These elements will be used to represent your channel across YouTube and other platforms.
Next, you’ll need to choose a channel description that clearly explains what your channel is about and what viewers can expect to see. Use keywords related to your content to help potential viewers find your channel.
Finally, you can set your channel’s homepage layout. You can choose between different layouts, including the option to display your most recent uploads, your playlists, or a specific video that you want to highlight. Selecting the right homepage layout can help you showcase your best content and encourage viewers to explore your channel further.
Step 2: Uploading and Managing Your Videos
Once your channel is set up, it’s time to start uploading videos. You can either upload videos directly to YouTube, or you can use third-party software to schedule and manage your uploads.
To make your videos more discoverable, be sure to optimize their titles, descriptions, and tags with relevant keywords. This will help YouTube’s algorithms understand what your videos are about and rank them higher in search results.
You’ll also want to create playlists to organize your videos and make it easier for viewers to navigate your channel. Playlists allow you to group related videos together, making it easier for viewers to find and watch the content they’re interested in.
Step 3: Promoting Your Channel
Promoting your YouTube channel is essential to attract more viewers and grow your subscriber base. There are several tactics you can use to promote your channel and increase its visibility.
One of the most effective ways to promote your channel is through social media. Share your videos on platforms like Facebook, Twitter, and Instagram to reach a wider audience and encourage them to check out your channel.
You can also collaborate with other YouTubers in your niche to cross-promote each other’s channels. This can help you tap into their existing audience and attract new viewers who are interested in similar content.
Additionally, you can consider running ads on YouTube to reach a larger audience. YouTube offers different ad formats, such as display ads, skippable video ads, and bumper ads, that allow you to showcase your content to viewers who may be interested in your channel.
Step 4: Managing Your Channel Settings
As your channel grows, it’s important to regularly check and update your channel settings to ensure everything is up to date and optimized for your audience.
You can manage your channel settings by clicking on the “Settings” option in the YouTube Studio dashboard. From there, you can customize various settings, such as privacy options for your videos, managing your subscribers, and enabling or disabling certain features.
For example, you can hide or disable comments on your videos if you’d prefer not to receive feedback or if you want to create a more curated viewing experience for your audience. You can also select whether or not to display advertisements on your videos, based on your preferences and content goals.
By following these steps and optimizing your channel settings, you’ll be able to create a successful YouTube channel that stands out from the competition and attracts a loyal audience. Take the time to explore all the available options and stay up to date with the latest YouTube trends and features to make the most out of your channel. Good luck!
YouTube Promotion Tactics Let’s Go
When it comes to promoting your YouTube channel, there are a number of tactics you can use to increase your visibility and reach a wider audience. Here are some advanced promotion techniques to consider:
- 1. Promote on Other Social Media Channels: Take advantage of the power of social media by sharing your videos on platforms like Facebook, Twitter, and Instagram. This will help you reach more people and increase your chances of getting more subscribers.
- 2. Create Playlists: Organize your videos into playlists to make it easier for viewers to find the content they are interested in. This will also increase the amount of time people spend on your channel and improve your video’s visibility.
- 3. Optimize Your Channel Settings: Make sure to fill in all the required information in your channel settings to give viewers a better understanding of what your channel is about. This includes adding a channel description, selecting relevant categories, and choosing a channel icon and banner image.
- 4. Disable Interest-Based Ads: If you want to save your viewers’ time and ensure they see only relevant ads, you can disable interest-based ads in the Advertisements section of your account settings.
- 5. Manage Your Subscribed Channels: Take some time to review the channels you have subscribed to in order to keep your homepage and navigation bar clutter-free. You can delete or hide channels that are no longer of interest to you.
By following these tactics, you’ll be able to promote your YouTube channel in a more advanced way and attract more viewers. Remember that promotion is not only about getting people to watch your videos, but also about building a community and engaging with your audience.
Survey says it’s time for video
A recent survey has shown that video is an extremely effective way to promote your YouTube channel. When it comes to setting up and managing your channel, knowing how to make the most of these tactics can be crucial. That’s why it’s important to know what people want to see, and how to deliver it in the most engaging way possible.
One of the key findings from the survey is that people are most likely to subscribe to a channel if they are interested in the videos or the series being promoted. This means that you need to create content that not only appeals to your target audience, but also keeps them coming back for more. By delivering videos that are informative, entertaining, and relevant to your category, you can increase the number of subscribers and keep them engaged.
Another important tactic highlighted in the survey is the use of interest-based ads. By selecting the right options in your Google Ads settings, you can ensure that your videos are shown to people who are most likely to be interested in them. This targeted approach can save you time and money, as well as increase the effectiveness of your promotion.
Furthermore, the survey found that mobile is the preferred way for people to watch YouTube videos. So, it’s essential to optimize your channel and videos for mobile viewing. This includes ensuring that your videos are mobile-friendly, and that they can be easily played and viewed on a smaller screen.
When it comes to promoting your channel on other platforms, such as Facebook, the survey suggests using advanced tactics. For example, you can create ads that target specific demographics or interests, or you can use Facebook’s click-to-play option to engage viewers and encourage them to subscribe to your channel.
Additionally, the survey revealed that having a clear and organized channel layout is important. By creating playlists and organizing your videos into categories, you can make it easier for viewers to navigate your channel and find the content that they are most interested in.
Finally, the survey highlighted the importance of keeping your channel up-to-date with the latest trends and news. By regularly posting new videos and staying active on social media, you can build a loyal following and keep viewers coming back for more. It’s also important to interact with your subscribers and respond to their comments, as this can help to foster a sense of community and loyalty.
In conclusion, the survey says that video is the way to go when it comes to promoting your YouTube channel. By using the right tactics and following the steps outlined in this article, you can effectively manage and grow your channel, and keep your subscribers engaged and coming back for more.
What Can You Do with YouTube Advanced Settings
YouTube’s advanced settings provide a range of capabilities that can greatly enhance your channel and overall YouTube experience. Here are some of the key features and options you can take advantage of:
1. Customizing Your Channel Appearance
With advanced settings, you have the ability to modify the layout and design of your YouTube channel. You can choose from various options to make your channel stand out, such as changing the color scheme, adding a channel trailer, or creating a custom banner.
2. Personalizing Your Homepage
YouTube allows you to customize your homepage based on your interests. By selecting your preferred category or channels, you’ll be provided with tailored recommendations and content that align with your preferences. This helps you discover new videos and creators that you may find interesting.
3. Setting Up Playlists
Playlists are a great way to organize and showcase your videos. With YouTube’s advanced settings, you can create and manage playlists, making it easier for your viewers to navigate and enjoy your content. You can also choose to make your playlists public, private, or unlisted.
4. Monetization Options
If you want to monetize your YouTube channel, advanced settings allow you to enable various income-generating options. You can choose to display ads on your videos, enable channel memberships, or promote sponsored content. This helps you generate revenue from your content and grow your channel.
5. Maintaining a Safe and Family-Friendly Environment
YouTube’s advanced settings include features to ensure a safe and family-friendly experience for viewers. You can set viewer restrictions to disable comments, limit video availability to certain age groups, or enable YouTube Kids mode. This is particularly useful if you create content suitable for children or want to cater to a specific audience.
In conclusion
YouTube’s advanced settings offer a wide range of options to enhance your channel, promote your content, and create a personalized experience for your viewers. By utilizing these settings, you can make your channel more appealing, increase engagement, and reach a wider audience. So, take the time to explore and optimize your YouTube channel’s advanced settings to make the most out of your online presence.
1 Set your channel as made for kids or not
Setting up your YouTube channel is a crucial step in starting your online presence. It’s important to understand the different options available to you when it comes to setting up your channel, particularly in terms of targeting your audience. One key decision you need to make is whether your channel is made for kids or not.
To set your channel as made for kids or not, follow these steps:
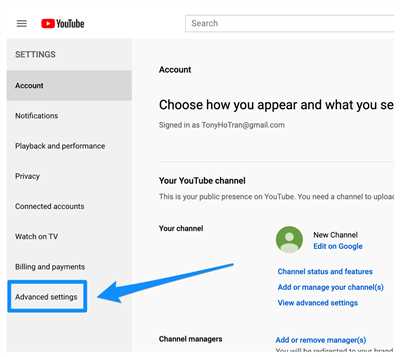
- Go to your YouTube Studio homepage.
- Click on the Settings tab in the left navigation bar.
- Select the Channel option from the following menu.
- Scroll down to the Audience section and click on the Advanced Settings link.
- In the Audience section, you’ll find the option to set your channel as made for kids. Check the box if your content is made for kids, or leave it unchecked if the content is not intended for kids.
- Click on the Save button to apply the changes.
It’s important to note that marking your channel as made for kids or not has significant implications for your content and how it’s displayed on YouTube.
If your channel is marked as made for kids, certain features and functionalities will be disabled, such as personalized ads, comments, and notifications. This is due to Google’s strict policies regarding data collection from children.
On the other hand, if your channel is not marked as made for kids, you’ll have access to more advanced features and settings. You’ll be able to enable ads, navigate to different promotion options, and have more control over the display of your videos, playlists, and stories.
So, how do you know if your channel is made for kids or not? YouTube provides some guidelines to help you determine this. According to YouTube, a general rule of thumb is that you should consider your primary audience. If your content is intended for children aged 12 and under, it’s likely made for kids.
However, YouTube also acknowledges that there may be some gray areas. They suggest considering factors such as the subject matter, themes, language, toys, and characters featured in your videos. If your content includes popular children’s characters, toys, or nursery rhymes, it’s likely made for kids.
Furthermore, YouTube says that if you’re targeting both children and adults, or if your content is suitable for older children and families, you may not need to mark your channel as made for kids.
In conclusion, setting your channel as made for kids or not is an important decision that will impact the features and settings available to you. It’s crucial to follow the guidelines provided by YouTube to ensure you’re compliant with their policies and to effectively reach your target audience.
2 Display the number of people subscribed to your channel or not
One effective way to manage and promote your YouTube channel is by displaying the number of people subscribed to your channel. This helps create social proof and can attract more viewers to subscribe. In this article, we will discuss how to enable or disable the display of the subscriber count on your channel.
Step 1: Go to your channel settings
- Click on your profile icon in the top-right corner of the YouTube homepage.
- Select “YouTube Studio” from the drop-down menu.
- In the left navigation bar, click on “Settings”.
Step 2: Click on “Channel”
- In the left navigation bar, click on “Channel”.
Step 3: Choose your subscription status
- Under the “Subscriber count” section, click on the drop-down menu.
- Choose whether you want to display the number of subscribers on your channel or not.
Step 4: Save your settings
- After selecting your preferred option, click on the “Save” button at the top-right corner of the page.
By following these steps, you can easily enable or disable the display of the subscriber count on your YouTube channel. Depending on your goals and marketing tactics, you can choose the option that best suits your needs. Whether you want to show off a large following or create a sense of exclusivity, this feature gives you the flexibility to customize your channel’s appearance.
In conclusion, displaying the number of people subscribed to your channel can be an effective way to promote your videos and attract more subscribers. It’s important to consider your goals and audience preferences when deciding whether to enable or disable this feature. With these steps, you can easily manage and customize your channel settings to optimize your YouTube presence.
3 Three other channel settings
When it comes to setting up your YouTube channel, there are a few other settings that you’ll want to know about. In this section, we’ll go over three additional settings that can help you manage and promote your channel.
- Subscribed channel options: If you want to make your channel private or hide it from the subscribed channels list on the homepage, you can do so by going to the “Channel” tab in your YouTube settings. From there, select “Advanced settings” and scroll down to the “Subscriber count” section. Here, you’ll find options to hide your subscriber count, disable notifications for new videos, and more. This can be useful if you want to maintain a more private or exclusive channel.
- Promotion tactics: In order to promote your channel effectively, it’s important to know what options are available to you. YouTube offers a number of ways to promote your channel, such as through featured content on your channel homepage, cross-promotion with other YouTube channels, and promoting your channel on social media platforms like Facebook. You can also create a series or playlist of videos that will be displayed on your channel page, making it easier for viewers to find related content.
- Regular communications: To keep your audience engaged and informed, you can use the “Community” tab on your YouTube channel to post regular updates, news, and announcements. This can be a great way to share behind-the-scenes stories, upcoming video plans, or engage with your viewers through surveys or Q&A sessions. By regularly communicating with your audience, you can build a loyal community around your channel.
In conclusion, setting up your YouTube channel involves more than just uploading videos. By taking advantage of these three additional settings, you can better manage your channel, promote your content, and communicate with your audience effectively. So, make sure to check out these options and see what works best for your channel’s needs!
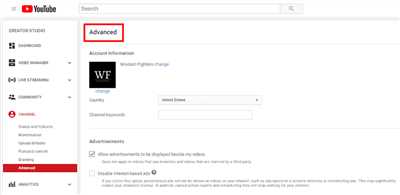
4 Disable the interest-based ads
When managing your YouTube channel, it’s important to consider the type of ads that are displayed on your videos. By default, YouTube shows interest-based ads, which are targeted to users based on their browsing history and online activities. However, if you want to provide a safer and more kid-friendly environment on your channel, you can disable these ads. Here’s how:
- Go to your YouTube homepage and click on your profile picture.
- Select “YouTube Studio” from the dropdown menu.
- On the left sidebar, click on “Settings” to open the settings menu.
- In the settings menu, select “Channel” and then “Advanced settings”.
- Scroll down to the “Ads” section and click on “Interest-based ads”.
- Toggle the switch to disable interest-based ads.
Once you disable interest-based ads, YouTube will no longer collect or use data for the purpose of showing targeted ads to users on your channel. This tactic is especially important if your channel is focused on content for kids or if you want to provide a more personalized and tailored experience for your subscribers.
In conclusion, managing your YouTube channel involves several important steps, and disabling interest-based ads is one of them. By doing so, you can ensure that your channel is safe and appropriate for all viewers, while also promoting a positive and engaging environment for your audience.
Conclusion
In conclusion, setting up a YouTube channel requires careful consideration of several key factors. First, you need to select the category that best suits your channel’s content and target audience. This will help you attract the right people and make your channel more discoverable.
Once your channel is set up, you’ll need to manage your videos and playlists effectively. Regularly upload new and engaging content to keep your subscribers interested. You can also create playlists to organize your videos and showcase your expertise in specific areas.
To promote your channel, make sure to optimize your video settings. Marketers and content creators can use advanced tactics like interest-based ads to reach the right audience. Additionally, you can use the homepage and subscription feed to display your most recent videos and let people know when you upload new content.
It’s also essential to interact with your audience. Respond to comments and engage with your subscribers. This will help you build a loyal community around your channel and encourage them to share your content with others.
Lastly, stay informed about the latest updates and new features that YouTube offers. Regularly check the YouTube Creator Academy for tips and tricks on how to improve your channel’s performance.
Setting up a successful YouTube channel takes time and effort, but with the right strategies and consistent dedication, you can create a thriving platform for your content. So, follow the steps outlined in this article, and you’ll be well on your way to establishing a successful presence on YouTube!
Q1 How Do I Set My YouTube channel To Private
If you want to know how to set your YouTube channel to private, we have all the information you need. Setting your channel to private is a great way to control who can see your content and protect your privacy. Here’s how you can do it:
1. First, go to YouTube and sign in to your Google account. Click on your profile picture in the top right corner of the screen, and then click on “YouTube Studio”.
2. In YouTube Studio, navigate to the left-hand side bar and click on “Settings” at the bottom of the navigation menu. This will open the settings page for your channel.
3. On the settings page, click on the “Privacy” tab. Here, you’ll see a number of privacy options for your channel. Select the option that says “Private” to make your channel private.
4. Once you’ve set your channel to private, only the people you choose will be able to see your videos, playlists, and other channel content. Subscribed viewers will still be able to see your content, but it will not be visible to the general public.
5. If you want to let certain people access your private channel, you can add their email addresses or YouTube usernames to the “Approved Users” section. They will receive an email notification and will be able to view your private content.
That’s it! Now your YouTube channel is set to private, and only the people you’ve approved can see your content. This is a great option for personal channels or for those who want to test out new videos before making them public.
Keep in mind that when your channel is set to private, your videos will not be searchable, and they will not be shown in any recommendations or on your channel page. Only those who have the direct link to your video will be able to watch it.
To manage your private channel settings or to change them back to public, you can always go back to the settings page and make the necessary adjustments.
Now that you know how to set your YouTube channel to private, you can control who sees your videos and protect your privacy while still sharing your content with those you want to see it.
Q2 How Do I Make YouTube Videos Private On Mobile
If you want to keep your videos private on mobile devices and control who can see them, you can follow these steps:
| Step | Instructions |
|---|---|
| 1 | Open the YouTube app on your mobile device |
| 2 | Go to the video that you want to make private |
| 3 | Click on the three vertical dots (More options) below the video |
| 4 | Click on “Edit” |
| 5 | Scroll down to the “Visibility” section |
| 6 | Click on the dropdown menu and select “Private” |
| 7 | Click on “Save” to apply the changes |
By setting your video to “Private”, only those with whom you share the video link will be able to view it. It will not be visible on your channel, in search results, or anywhere else on YouTube.
It’s important to note that setting your video to “Private” will not delete it, and you can always change the visibility settings in the future if needed.
In conclusion, if you want to keep your YouTube videos private on mobile, follow the steps outlined above. It’s a simple and effective way to control who can see your videos and ensure their privacy.
Q3 Why Is My YouTube Video Private
If you upload a video to your YouTube channel and it is set to private, it means that only you can watch it. The video will not be displayed on your channel or in search results. This can be frustrating if you want other people to see and enjoy your content.
There are a few reasons why your YouTube video might be private:
1. You selected the wrong privacy settings: When you upload a video, you have the option to select the privacy settings. If you accidentally set it to private instead of public or unlisted, only you will be able to view the video. Make sure to double-check your settings before uploading.
2. You made the video private after uploading: If you initially set the video to public or unlisted and then changed it to private, it will no longer be visible to others. This can be done in the YouTube Video Manager by clicking on the “Edit” button next to the video and changing the privacy settings.
3. The video is marked as private based on its category: YouTube has specific privacy options for certain types of content, such as videos involving minors or sensitive topics. If your video falls into one of these categories, it may be automatically set to private for safety reasons.
If your video is private and you want to make it public again, follow these steps:
1. Go to your YouTube channel homepage and click on the “Video Manager” option in the navigation bar.
2. Find the video you want to make public and click on the “Edit” button next to it.
3. In the “Privacy” section, select either the “Public” or “Unlisted” option and save your changes.
It’s important to note that promoting your YouTube channel and videos can be done in various ways, and making them public is one of the most effective tactics. By setting your videos to public, more people will be able to find, watch, and share your content. However, there may be certain situations where keeping your videos private is necessary, such as for schools or businesses that only want their intended audience to see the videos.
In conclusion, if you find that your YouTube video is private, check your privacy settings and make sure it is set to public or unlisted. This way, you’ll be able to reach a wider audience and get your content seen by more people.
Q4 Is There A Way To Make My YouTube Channel Private
If you’re wondering whether it’s possible to make your YouTube channel private, the answer is yes! YouTube offers the option to make your channel and its videos private, which means they will only be accessible to people you choose to share them with.
To make your YouTube channel private, you can follow these steps:
- Go to the YouTube homepage and click on your profile picture or icon in the top-right corner.
- From the drop-down menu, select the ‘YouTube Studio’ option.
- In the YouTube Studio, click on the ‘Settings’ option on the left-side navigation bar.
- Click on the ‘Privacy’ tab.
- Under the ‘Privacy’ tab, you’ll see the option to “Keep all my subscribed channels private.” If you enable this option, it will make your subscriptions private and not visible to others.
- You can also disable the option to “Personalize ads based on my interest” if you don’t want YouTube to use your online behavior for targeted ads.
- Additionally, if you want to hide your liked videos, you can click on the ‘Advanced settings’ button and select the ‘Disable’ option next to the ‘Likes and subscriptions’ section.
- If you want to delete a video you no longer want on your channel, go to the ‘Videos’ tab under the ‘Content’ section and select the video you want to delete. Click on the ‘Actions’ button and choose the ‘Delete forever’ option.
- Keep in mind that when you make your YouTube channel private, it will still be possible for people to subscribe to your channel and see your video uploads if they have the direct link. To ensure privacy, be cautious about sharing this link only with trusted individuals.
In conclusion, there are several ways to make your YouTube channel private. By following the steps outlined above, you can manage your channel’s settings, hide specific videos, and control who can see your subscriptions. This is particularly useful if you want to create a private channel for personal use or restrict access to specific content.
Q5 Can You Delete Or Hide Your YouTube Channel
Yes, you have the option to delete or hide your YouTube channel if you no longer want it to be available to the public. Here’s what you need to know:
- If you delete your YouTube channel, all the videos, playlists, and comments you have made will be permanently removed. Make sure to save any content you want to keep before proceeding with the deletion.
- To delete your YouTube channel, go to your YouTube settings. You can access the settings by clicking on your profile picture on the top right corner of the YouTube homepage, then selecting “Settings”.
- In the settings, navigate to the “Advanced settings” tab which is located on the left-hand side navigation menu.
- Under the “Advanced settings” tab, you will see the option to either delete or hide your channel. Click on the “Delete channel” button.
- If you select to delete your channel, you will be prompted to enter your Google account password to confirm the deletion.
- Once your channel is deleted, it cannot be recovered. All your subscribers will be unsubscribed, and your channel name and URL will no longer be available.
- If you prefer to hide your channel instead of deleting it, you can do so by selecting the “Hide my channel” option. This will make your channel private, and it won’t be displayed on your homepage or in search results.
- To hide your channel, go to the “Account information” tab in your YouTube settings, then select “Settings” next to your channel name. Under the “Privacy” section, click on the “Edit on Google” link.
- On the “Privacy” page, you can choose to make your channel private or customize the visibility settings for individual videos or playlists.
By following these steps, you can either delete or hide your YouTube channel, depending on your preference. It’s important to consider the consequences before making a decision, as once your channel is deleted, it cannot be undone.
In conclusion, if you no longer want your YouTube channel, you have the option to delete or hide it. Deleting your channel will permanently remove all your content, while hiding it will make it private and not visible to the public. Think carefully about your choice and make sure to save any important videos or information before taking any action.
Hide the Latest Category from the Navigation Bar
If you have a YouTube channel and you want to manage the videos and playlists that appear on your homepage, you may want to hide the latest category from the navigation bar. This can be a useful tactic if you want to focus on promoting specific content or if you want to save space in the navigation bar for other channels or categories. Here are the steps to hide the latest category:
- Login to your YouTube channel and click on the profile picture in the top right corner.
- Select “YouTube Studio” from the drop-down menu.
- In the YouTube Studio, click on “Settings” in the left sidebar.
- Go to the “Channel” section and click on “Advanced settings”.
- In the “Advanced settings” page, scroll down to the “Browse” section.
- Under the “Browse” section, you will see a category called “Latest”.
- Click on the checkbox next to “Latest” to disable it.
- Click on “Save” to apply the changes.
Once you have disabled the latest category, it will no longer appear on the navigation bar of your channel. This means that viewers will not be able to see the latest videos and playlists that you upload to your channel’s homepage. However, they will still be able to access these videos and playlists through other ways, such as searching for the channel or subscribing to it.
It’s important to note that hiding the latest category is an advanced setting and it’s not available for all YouTube channels. You may need to meet certain criteria or have a certain number of subscribers to access this option. If you don’t see the option to hide the latest category in your channel’s settings, you may need to delete or move the videos and playlists that you don’t want to show on the homepage.
In conclusion, hiding the latest category from the navigation bar of your YouTube channel can be an effective way to manage and promote your videos. By following these steps, you can select the content that you want to show on your channel’s homepage and provide a better experience for your viewers.