

If you want to become a pro in using GitHub, this article provides a step-by-step guide on how to use the GitHub app. GitHub is a third-party platform that allows you to host and collaborate on your code projects. Prior knowledge of version control systems and command line workflow is beneficial, but not necessary. With the GitHub app, you can easily manage your repositories, collaborate with teammates, and automate repetitive tasks.
Before diving into the steps, there are a few pre-requisites to keep in mind. First, make sure you have a GitHub account. If you don’t have one, you can easily create it on the GitHub website. Second, it’s important to have a basic understanding of Git, as GitHub relies on Git for version control. Lastly, familiarize yourself with some of the concepts used in the GitHub ecosystem, such as repositories, branches, commits, and pull requests.
To start using the GitHub app, the first thing you need to do is to install it on your machine. The GitHub app is available for Windows, Mac, and Linux operating systems. Simply visit the GitHub website and download the app that corresponds to your operating system. Once the installation is complete, open the GitHub app and sign in with your GitHub account.
With the GitHub app, you can perform various tasks such as creating repositories, cloning existing repositories, committing changes, and pushing/pulling code. Additionally, the GitHub app allows you to easily collaborate with teammates by creating and resolving pull requests, reviewing code changes, and merging branches. It also provides a seamless integration with other popular development platforms such as Bitbucket, so you can work on projects hosted on different platforms using a single app.
Building GitHub Apps

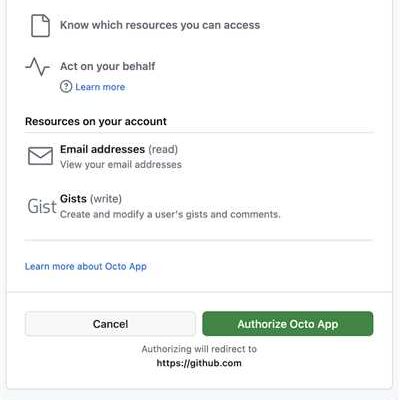
GitHub provides a workflow for building GitHub Apps, which allows you to automate tasks and integrate with other tools and services. When you have a GitHub App, it can listen to events and take actions based on those events.
Building a GitHub App involves several steps. First, you need to have a GitHub account and a repository to work with. If you don’t have one, you can create them on GitHub’s website.
There are a few pre-requisites for building GitHub Apps. You need to have knowledge of web development, APIs, and command line tools. You also need to have a basic understanding of GitHub’s APIs and how to use them.
Once you have all the pre-requisites, you can start building your GitHub App. GitHub provides documentation and resources to help you with this process. You can find the official GitHub App documentation and other helpful resources on their website.
When building a GitHub App, there are a few options available to you. You can use serverless platforms like Databricks or OpenFaaS, which allow you to deploy your app without managing the underlying infrastructure. You can also use tools like Arkade, which provide a command-line interface for managing your app.
GitHub Apps can integrate with other tools and services, such as Bitbucket. This allows you to automate workflows and streamline your development process. For example, you can set up your app to automatically create pull requests in Bitbucket when certain conditions are met.
In conclusion, building GitHub Apps requires knowledge of web development, APIs, and command line tools. GitHub provides resources and documentation to help you with this process. You can use serverless platforms and other tools to simplify the deployment and management of your app. Integrating with other tools and services can further enhance your app’s functionality.
Prior knowledge needed

If you want to use the GitHub App with OpenFaaS, there are a few pre-requisites and prior knowledge that you should have. First, you should have some knowledge of building serverless apps and workflows. This is important because the GitHub App allows you to automate actions when certain events occur in your GitHub repositories.
Additionally, you should have a basic understanding of the Git version control system and how to use GitHub as a source code hosting platform. This will help you in understanding the steps involved in setting up and using the GitHub App.
You will also need to have a GitHub account and a personal access token. The personal access token is needed to authenticate your GitHub account with the GitHub App.
Lastly, you should be comfortable with using the command-line interface, as you will need to run a few commands to configure and use the GitHub App.
Overall, having prior knowledge of serverless apps, GitHub, and using the command-line interface will be beneficial when using the GitHub App with OpenFaaS. If you don’t have this prior knowledge, don’t worry! There are plenty of online resources and tutorials available to help you learn.
I don’t want to use a third-party GitHub Action
If you prefer not to use a third-party GitHub Action for your project, you can still leverage the power of GitHub Apps directly. GitHub Apps allows you to integrate your own custom logic and workflows into your GitHub repositories without relying on external services.
GitHub provides a wide range of APIs and tools that you can use to build your own logic and automation. For example, you can use the GitHub API to programmatically interact with your repositories, create new issues, or update existing ones. You can also use the GitHub Checks API to perform automated code checks and enforce coding standards.
One way to leverage GitHub Apps is by using the arkade command-line tool. Arkade provides a set of commands and steps that you can use to build and deploy your own GitHub App. With arkade, you have full control over the entire workflow and can customize it to suit your specific needs.
The steps to create your own GitHub App using arkade are generally as follows:
- Have prior knowledge of GitHub Apps and the GitHub API
- Install the necessary pre-requisites, such as Docker and Minikube, if needed
- Configure your GitHub App, including permissions and event triggers
- Build and package your GitHub App using arkade
- Deploy your GitHub App to a serverless platform, such as OpenFaaS or Databricks
- Integrate your GitHub App with your repositories
By following these steps, you can create a fully customized GitHub App that meets your requirements without relying on third-party services. With GitHub Apps, you have full control over your automation workflows and can tailor them to fit your development process.
Pre-requisites
In order to use the GitHub app, there are a few pre-requisites that you need to fulfill:
- The first and foremost requirement is that you have a GitHub account. The app allows you to easily integrate and manage your code repositories.
- The app provides access to various features and functionalities, such as creating and managing repositories, version control, collaboration, and more.
- If you want to use the app’s APIs, you will need to generate a personal access token. This token will be used to authenticate your requests to the app’s API servers.
- The app supports actions and workflows, which allow you to automate repetitive tasks. In order to use these features, you need to have knowledge of YAML and GitHub Actions syntax.
- If you want to integrate with third-party tools or services, such as Bitbucket or Databricks, you may need to set up additional configurations or APIs.
- When building serverless applications, it is recommended to have prior knowledge of platforms like OpenFaaS or AWS Lambda. These platforms provide the necessary infrastructure to run your code in a serverless environment.
- You may need to have command line knowledge to execute certain actions or commands that are not available through the app’s user interface.
By fulfilling these pre-requisites, you will be ready to use the GitHub app and take advantage of its features and capabilities.
Bitbucket
In addition to GitHub, another platform that you can use to manage your code and collaborate with other developers is Bitbucket. Bitbucket is a web-based version control platform that is owned by Atlassian. It provides similar functionality to GitHub, but with a few differences.
When it comes to deploying serverless functions with openfaas, the process is quite similar to what we discussed for GitHub. However, there are a few pre-requisites you need to have in place:
- A Bitbucket account: In order to get started with Bitbucket, you will need to create an account if you don’t already have one.
- A repository: Just like GitHub, Bitbucket uses repositories to store and manage your code. You can create a new repository on Bitbucket or use an existing one.
- Knowledge of Git: Bitbucket uses Git as its version control system, so having some knowledge of Git is important.
Once you have these pre-requisites in place, you can start using Bitbucket with openfaas. The basic steps are similar to what we discussed for GitHub:
- Create a new folder on your local machine for your function code.
- Initialize the folder as a Git repository using the command line.
- Link the Git repository to your Bitbucket repository using the provided URL.
- Commit your code changes to the Git repository and push them to Bitbucket.
- Set up a webhook in Bitbucket to trigger your deployment when code changes are pushed.
Bitbucket also allows you to integrate with third-party tools and services to enhance your development workflow. For example, you can use Bitbucket’s integration with Jira to track and manage your project’s issues and tasks. Additionally, Bitbucket provides APIs that allow you to automate tasks and build custom integrations.
In summary, Bitbucket is a great alternative to GitHub for managing your code and collaborating with other developers. With its powerful features and flexible workflow, Bitbucket can be a valuable tool in your development toolkit.
Sources
When it comes to using the GitHub app, there are various sources you can refer to for guidance and information. These sources are essential to have prior knowledge before diving into the necessary steps to use the GitHub app.
– First and foremost, the official GitHub website provides detailed documentation on how to use their app. You can find step-by-step instructions and tutorials to help you get started. It’s always a good idea to refer to the official documentation because it is the most reliable source.
– Another great source is third-party tutorials and articles. Many developers and GitHub users have created their own resources to help others understand and utilize the GitHub app. These tutorials often provide a different perspective and can offer valuable tips and tricks that may not be covered in official documentation.
– If you’re already familiar with other version control systems like Bitbucket, you can find resources that compare and contrast the GitHub app with these systems. This can help you understand the similarities and differences in workflow and functionalities.
– Another useful source is the GitHub API documentation. If you want to integrate GitHub actions or use GitHub APIs, understanding the documentation is crucial. It provides in-depth explanations of how to interact with GitHub programmatically to perform various tasks.
– Additionally, there are a variety of books and online courses available that provide comprehensive tutorials on GitHub app usage. These resources can be helpful if you prefer a structured and guided approach to learning.
By exploring these sources, you’ll gain the knowledge and information needed to start building your workflow on GitHub and make the most out of their app.
Remember, it’s important to have a solid understanding of GitHub concepts and features before using their app. This will ensure a smooth and efficient experience.


