

If you love the retro look and want to add a little vintage decor to your project, making your own vintage stickers is a great option. Vintage stickers have a distressed, rough-up look that adds a unique charm to any surface. Whether you want to decorate jars, label your coffee cartons, or add an amazing vintage touch to your Easter eggs, this post is for you!
Making vintage stickers is easier than you could ever imagine. In just a few simple steps, you can create your own custom vintage sticker sheets. All you need are some printable templates, waterslide decal paper, and a printer. Click here to download our free vintage sticker templates.
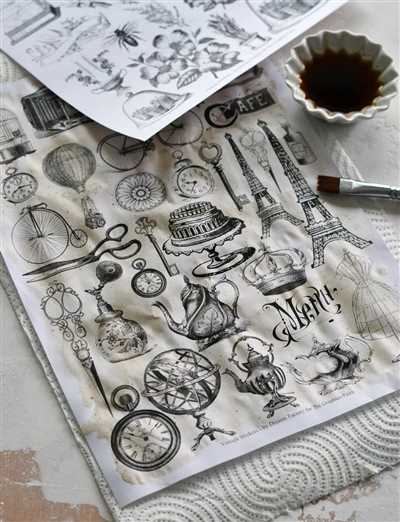
Step 1: Print the vintage sticker templates on waterslide decal paper. The brown kraft background of the templates will give your stickers a more authentic, older look. Make sure to print a few extra sheets, as you will love them more than you think!
Step 2: Peel the printed decal off the backing and stick it onto the surface you want to decorate. The edges of the sticker may be a little rough, but that’s all part of the vintage charm. Just like a classic cartoon, vintage stickers have a handmade look that adds character to any label or décor.
- Vintage Sticker Sheets
- How To
- Step 1: Choose Your Vintage Images
- Step 2: Print Your Vintage Images
- Step 3: Rough-up Your Sticker Surface
- Step 4: Peel and Stick
- Step 1 Print Label Templates
- Step 2 Rough-Up The Edges
- Step 3 Add Distressed Look
- Step 4: Peel & Stick
- Vintage Sticker Printable
- SHOP THIS POST ♥
- Video:
- How to Make Quick Easy Vintage Stickers
Vintage Sticker Sheets
If you are a fan of retro and vintage decor, you would love to have distressed and aged labels, decals, and stickers for your projects. Vintage sticker sheets are a great way to add that old-world charm and nostalgic feel to your crafts.
Step 1: Print the vintage sticker templates that you can find on our blog or in our shop. These templates will give you a variety of options, including cartoon characters, coffee labels, and Easter eggs.
Step 2: Peel off the backing of the sticker sheets and stick them on the surface you want to decorate. You could use these stickers to label jars, add a vintage touch to your scrapbook, or simply decorate your home.
Step 3: To achieve a distressed and vintage look, rough-up the edges of the stickers a little with a brown waterslide decal. This will give them an aged appearance and make them look like older labels.
Step 4: If you want to go for a more rustic look, you can print the stickers on Kraft paper instead of regular sticker sheets. This will add a touch of vintage charm to your projects.
These vintage sticker sheets are a fun and creative way to add a retro decor element to any project. Whether you use them in your scrapbooking or to decorate your home, these stickers will add that special touch of vintage flair. Click here to check out our amazing selection of printable vintage stickers in our shop.
We hope you love this DIY project as much as we do. If you try it out, tag us on social media – we would love to see how you use these vintage sticker sheets!
How To
If you love the vintage look and want to add some retro charm to your decor or craft projects, making your own vintage stickers is a fun and creative way to do it. In this post, we will show you how to make amazing vintage stickers using printable templates and waterslide decal paper.
Step 1: Choose Your Vintage Images
First, you will need to find vintage images that you like. You could search online for free vintage clip art or browse through old books and magazines. You can also check out our shop for some amazing vintage sticker templates.
Step 2: Print Your Vintage Images
Once you have found the vintage images you like, print them out on waterslide decal paper. This type of paper allows you to transfer the image onto your sticker surface easily. Make sure to follow the instructions that come with the decal paper for the best results.
Step 3: Rough-up Your Sticker Surface
If you want your vintage stickers to have a distressed look, you can rough-up the sticker surface before applying the image. One way to do this is by using sandpaper or a nail file to gently scrape the edges of the sticker. This will give it an older, worn appearance.
Step 4: Peel and Stick
Once you have printed and prepared your vintage images, it’s time to stick them onto your desired surface. Peel off the backing of the decal paper and carefully place the sticker onto your chosen object. Smooth out any air bubbles or wrinkles with your fingers or a soft cloth.
And there you have it! Your very own vintage stickers with a beautiful distressed look. Now you can use them to decorate your journals, scrapbooks, or any other craft projects you like.
If you’d like to see more step-by-step tutorials on how to make vintage stickers or other DIY projects, be sure to follow our blog. You can also click here to download our printable vintage sticker templates to get started on your next amazing project.
Step 1 Print Label Templates
To start creating your own vintage stickers, you will need some printable label templates. There are many websites and blogs where you can find these templates, ready to be downloaded and printed. Simply do a quick search on the internet using keywords like “vintage label templates” or “retro sticker templates” and you will find a variety of options.
Once you have found the templates you like, download them and open them in a program like Microsoft Word or any other design software you are comfortable with. Make sure to choose templates that are in a size suitable for your project. For example, if you are planning to make smaller stickers to decorate your coffee jars, choose smaller templates.
When printing the label templates, it is important to pay attention to the type of paper you use. To achieve a more authentic and vintage look, it is recommended to use brown kraft paper or any other type of paper that has a rough, distressed texture. This will give your stickers an aged appearance, making them look like they have been stuck on for years.
Load your printer with the chosen paper and click the print button. Make sure to print enough sheets of labels, as you will need them for the entire project. You can either print one sheet at a time or print multiple sheets to save time, depending on how many stickers you want to make.
After printing, let the sheets of labels dry for a little while to ensure that the ink has fully settled on the paper. This will prevent smudging or smearing when you handle the labels later on.
Once the sheets are dry, you can start cutting out the individual labels. Use a pair of scissors or a craft knife to carefully cut along the edges of each label. Take your time and be precise to ensure clean-cut stickers.
With the label templates printed and cut out, you are now ready for the next step in making your vintage stickers. Stay tuned for Step 2, where you will learn how to distress the labels to give them an amazing aged look.
Step 2 Rough-Up The Edges
Once you have printed out your vintage sticker sheets or templates, it’s time to give them that aged, distressed look. To achieve this effect, you will need some brown craft ink or a distressing tool.
Start by using a brown craft ink pad and dabbing it along the edges of each sticker. This will give them a slightly worn and vintage appearance. If you don’t have a craft ink pad, you could also use a distressing tool and lightly rub it along the edges to create the same effect.
If you want to go for a more vintage look, you can also tear the edges of the sticker sheets or templates. This will make them look like older, well-loved stickers that have been used and handled over time.
Another option is to use a coffee stain technique to add some additional aging to your stickers. You can simply take a cup of strong coffee, dip a brush into it, and lightly brush it along the edges of your stickers. This will give them a faded and weathered appearance.
For those who love their stickers to have a little extra character, you can also add some cartoon-like distress marks. Simply use a brown pen or marker and draw small “X” marks, dots, or other rough-up details along the edges of your stickers. This will give them a playful yet vintage feel.
If you are creating vintage sticker decals for jars or other home decor projects, you could also consider adding some distressed label designs. There are many printable vintage labels available online that you can print out and use as a base for your stickers. Just click here to download some amazing printable vintage labels for your project!
Peel off the sticker sheets or templates and stick them onto your desired surface. Whether it’s a scrapbook, a journal, your easter eggs, or a shop sign, these vintage stickers will add a touch of retro charm to any decor.
Remember, this step is all about adding that distressed and rough-up look, so don’t be afraid to experiment and have fun with it! The more you rough up the edges, the more vintage your stickers will look.
Now that you know how to rough up the edges of your vintage stickers, you are one step closer to creating your own unique decals. In the next step, we will talk about how to seal and protect your stickers so that they will last for many years to come.
Step 3 Add Distressed Look
To give your vintage stickers a worn and aged look, you can add a distressed effect. This will make them appear as if they have been used for years and have developed a charming patina.
One way to achieve this is by using the “peel and stick” labels that you printed in the previous step. Instead of applying them directly, you will rough up their edges to create a weathered appearance.
If you can find vintage label templates or retro sticker sheets, they could work wonderfully for this project. You could also download printable label designs from various websites or blogs that offer free downloads. The possibilities are endless!
To start, gather the supplies you will need:
- Printed peel and stick labels
- Brown distressing ink or coffee
- A small sponge or cloth
Once you have everything ready, follow these steps:
- Apply some brown distressing ink or coffee to the sponge or cloth.
- Gently rub the ink or coffee along the edges of the labels. You can also dab it randomly across the surface to create a more aged look.
- For a more distressed effect, you can crumple the labels slightly or even tear sections of them.
- Allow the ink or coffee to dry completely. This can take some time, so be patient!
Once the labels are completely dry, they will have a beautiful vintage look. The distressed edges and roughed-up appearance will add character to any project you use them on!
Remember, you don’t have to limit yourself to just labels – this distressed technique can also be applied to other items like jars, Easter eggs, or even decal stickers. Get creative and have fun with it!
Click here to shop for amazing printable label designs and vintage sticker sheets. Your next DIY decor or craft project will look even more stunning with a distressed touch!
♥ Love these vintage stickers? Check out our blog for more inspiration and ideas on how to make your own!
Step 4: Peel & Stick
Once you have printed and cut out your vintage stickers, it’s time to peel and stick them onto your desired surface. Here’s how:
1. Begin by peeling off the backing paper from the sticker sheet. You will notice that the edges of the stickers are slightly roughed-up to give them a more vintage and distressed look.
2. Place the sticker on the surface you want to decorate. Whether it’s a journal, a scrapbook, a coffee jar, or any other decor item, these vintage stickers will add a retro touch to it.
3. Gently press down on the sticker to ensure it sticks firmly to the surface. If you’re using waterslide decals, make sure to follow the instructions on the printable sheet for application.
4. Repeat the steps above to add more vintage stickers to your project. You can mix and match different designs to create a unique and personalized look. The possibilities are endless!
In addition to using them for your own projects, you can also shop for vintage sticker templates online. There are many websites that offer downloadable templates, which you can print and use to create your own vintage stickers.
Click here to download printable vintage sticker templates.
Whether you’re a fan of cartoon characters, love easter eggs, or just want to label your belongings in a charming way, these vintage stickers are perfect for you. Their old-time charm and distressed look will make your items stand out.
So go ahead and make your own vintage stickers using this easy step-by-step guide. You’ll be amazed at how much more character and style they will add to your decor and crafts. Happy crafting!
Vintage Sticker Printable
If you’re a fan of vintage stickers, you’ll love these vintage sticker printable templates. They will add a retro and distressed look to any project or decor you want to stick them on. Whether you’re decorating your scrapbook, labeling jars, or adding a little something extra to your coffee mugs, these vintage stickers will make it look amazing!
To make these vintage stickers, you would need the following supplies:
- Waterslide decal paper sheets
- A printer
- Scissors
Here’s how to make your own vintage stickers:
- Download the vintage sticker printable sheets from our blog post.
- Print the sheets on kraft or brown paper for an authentic vintage look.
- Carefully cut out the vintage stickers along their edges.
- Peel off the back and stick the vintage stickers wherever you like.
These vintage stickers have a distressed and rough-up look, just like older stickers from the past. The cartoon labels and designs on these vintage sticker printables will make you feel nostalgic and add a unique touch to your crafts.
So, if you’re a fan of vintage vibes and want to give your projects a retro twist, click here to download our vintage sticker printable. You’ll love how these stickers add character and charm to any item you stick them on!
Enjoy your vintage sticker printable and have a great time getting creative! ♥
SHOP THIS POST ♥
- Click here to add the vintage Easter labels to your cart
- Shop the cartoon decor stickers
- Stick older kraft labels to jars, eggs, and more
- Download and print these amazing vintage sticker templates
- Rough-up the edges for a distressed look
- If you love the retro vibe, you’ll want to check out this post
- Printable sticker sheets for all your crafting needs
- Peel and stick these waterslide decals for an easy project
- Make your own vintage coffee labels with these printable templates
- The brown kraft paper gives a rustic look to any project
- Add a little love to your crafts with these cute heart labels
- Print and cut out these vintage sticker sheets for a nostalgic touch
- The distressed edges will give your crafts a unique and worn-in look
- Grab these retro sticker sheets for a fun and quirky decor
- Decorate your home with these vintage-themed stickers
- These labels will give your crafts a charming and rustic feel
- Enhance your Easter projects with these adorable vintage stickers
- These sticker sheets are perfect for adding a touch of nostalgia to any craft
- Add these vintage Easter labels to your cart and start crafting
- Download and print these amazing vintage sticker templates for your next project
- Printable kraft sticker sheets for all your crafts
- Peel and stick these waterslide decals for an easy and fun decorating solution
- Make your own retro coffee labels with these printable templates
- Give your crafts a distressed look with roughed-up edges
- If you like a vintage look, these sticker sheets are perfect for you
- Get creative with these vintage-themed labels
- Create a charming and aged look with these retro stickers
- Bring a touch of nostalgia to your crafts with these printable sticker sheets
- These brown kraft labels are perfect for adding a rustic feel to any project
- Add a little love to your crafts with these heart-shaped stickers
- Add a vintage touch to your crafts with these printable sticker sheets
- Give your projects a worn-in look with the distressed edges on these sticker sheets
- Create a fun and quirky look with these retro sticker sheets
- Decorate your home with these vintage-themed stickers
- These labels will give your crafts a charming and rustic feel
- Enhance your Easter projects with these adorable vintage stickers
- Print and cut out these vintage sticker sheets for a nostalgic touch
- These sticker sheets are perfect for adding a touch of nostalgia to any craft
- Add these vintage Easter labels to your cart and start crafting
- Download and print these amazing vintage sticker templates for your next project
- Printable kraft sticker sheets for all your crafts
- Peel and stick these waterslide decals for an easy and fun decorating solution
- Make your own retro coffee labels with these printable templates
- Give your crafts a distressed look with roughed-up edges
- If you like a vintage look, these sticker sheets are perfect for you


