If you are an app developer and want to build amazing desktop applications for macOS, this article will guide you on how to develop a macOS app using SwiftUI. Whether you are a beginner or an experienced developer, this step-by-step guide will help you exceed your app development goals.
SwiftUI is the latest framework introduced by Apple that allows you to build user interfaces for macOS, iOS, watchOS, and tvOS using a declarative syntax. It is a modern and intuitive way to create applications, and it provides a rich set of tools and features to match your creativity.
To start building a macOS app using SwiftUI, you will need to have Xcode installed on your system. Xcode is the only IDE that supports macOS app development, and it comes with all the necessary tools and settings. If you don’t have Xcode installed, you can download and install it from the Mac App Store.
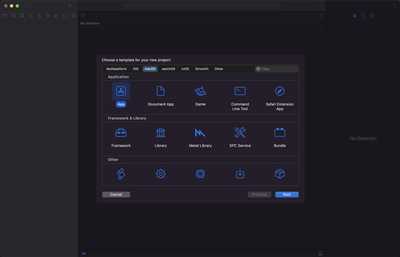
Once you have Xcode installed, you can create a new project by going to “File” > “New” > “Project”. In the project settings, choose “macOS” and select “App” as the template. Give your project a name, choose a region for your app, and specify the value for the organization identifier.
After creating the project, Xcode will generate the initial project files and directory structure for you. You can customize the project settings and add dependencies as per your requirements. Xcode also provides a visual interface builder that allows you to design your app’s UI using drag-and-drop, or you can write the code directly using SwiftUI syntax.
Once you’ve built your macOS app, you can run and test it in the Xcode simulator or on a physical device. Xcode provides options to install and run your app on a Mac, iPhone, iPad, or Apple Watch. You can also minimize, resize, or close the app’s window as you would with any other application.
In conclusion, developing a macOS app using SwiftUI is an amazing and rewarding experience. With SwiftUI and Xcode, you have all the tools and resources at your disposal to create high-quality desktop applications. So, what’s stopping you? Get started with macOS app development and unleash your creativity!
Build a Feathers UI project as a macOS app
If you are a macOS developer and want to build native apps using the Feathers UI framework, you are in luck! Feathers UI supports building macOS applications, giving you the power to create stunning desktop apps.
The Feathers framework is built with cross-platform support in mind, so you can share the same codebase between different platforms. However, it is important to note that building a macOS app is slightly different than building for other platforms, such as Windows or mobile operating systems.
When building a macOS app with Feathers UI, you should use Xcode, which is the official development environment for macOS. Xcode provides all the necessary tools and resources for building macOS apps, including SwiftUI, which allows for easy creation of user interfaces using declarative syntax and live previews.
To get started, you will need to create a new project in Xcode and choose the macOS option. You can then configure your project’s settings and choose the Feathers UI library as a dependency. Feathers UI renders the user interface using the SpriteKit framework, which is a powerful graphics rendering engine built by Apple.
Within your Feathers UI project, you can create custom components and UI elements using the Feathers UI API. Feathers UI provides a wide range of components, such as buttons, text fields, and lists, which you can use to build your macOS app’s user interface. You can also easily modify the look and feel of these components to match the design of your application.
In addition to Feathers UI, you can also use other libraries and frameworks within your macOS app. For example, you can use the Unity engine for 3D graphics or the Corona SDK for game development. It all depends on the requirements and goals of your project.
When building a macOS app with Feathers UI, it is important to be aware of the macOS windowing system and how it handles events and resizing. Feathers UI supports resizing windows and handling events, such as mouse clicks and keyboard input, so you can create a fully interactive app.
By default, a macOS app created with Feathers UI will have a title bar with buttons to minimize, maximize, and close the window. You can customize these options and add your own controls, such as a settings menu or a sidebar, to enhance the user experience.
To resize a window in a macOS app built with Feathers UI, users can simply click and drag the window borders. You can specify the minimum and maximum window sizes to ensure that the window does not exceed the available screen space.
In conclusion, building a macOS app with Feathers UI gives you the flexibility to create powerful and responsive desktop applications. Whether you are developing a productivity app, a game, or a creative tool, Feathers UI has all the features and tools you need to bring your ideas to life.
If you want to learn more about building macOS apps with Feathers UI, including step-by-step instructions and code examples, I recommend checking out “Feathers UI for macOS Development” by Paul Walker. This book provides a comprehensive guide to developing macOS apps using Feathers UI and will help you get started on your next project.
Subscribe to the Feathers UI newsletter to stay informed about the latest updates and new features. You can also join the Feathers UI community and contribute to the open-source project, share your experiences, and learn from other developers.
| Feathers UI | SpritesKit | Unity | Xcode | Corona SDK |
| macOS app | UI components | Windowing system | Resizable windows | Custom controls |
| User interface | Event handling | Minimum and maximum window sizes | Flexibility | Responsive desktop applications |
What’s more, Feathers UI supports multi-window applications, so you can build apps that have multiple windows open at the same time. This is ideal for productivity apps or applications that require users to work with multiple documents or views simultaneously.
So, if you are a macOS developer looking for a powerful and flexible UI framework, give Feathers UI a try. With its extensive feature set and easy-to-use architecture, it is a great choice for building macOS apps.
Happy hacking and have fun building your next macOS project with Feathers UI!
Build the application
To develop a macOS application, you have several options, including using Xcode, Unity, or Corona SDK. In this tutorial, we will focus on building the application using Xcode.
First, make sure you have Xcode installed on your Mac. Xcode is available for download from the App Store or the Apple Developer website. Once installed, open Xcode and create a new project.
In Xcode, you can choose from various project templates, including macOS App, SwiftUI App, SpriteKit Game, and more. Select the template that best suits your needs and click “Next”.
Xcode will prompt you to specify the project details, including the name, location, and other settings. Make sure to provide a meaningful title for your application.
Once the project is created, you can start developing your macOS app. Xcode provides a powerful IDE with all the necessary tools and features to build custom macOS applications.
The architecture of a macOS application is based on the MVC (Model-View-Controller) design pattern. The model represents the data and the business logic of the application, the view handles the user interface, and the controller acts as the mediator between the model and the view.
To create the user interface of your macOS app, you can use Interface Builder, which is integrated into Xcode. Interface Builder allows you to design the UI of your app visually, using drag and drop, and also provides an option to edit the UI components using code.
When developing your macOS app, you should be aware of the operating system’s windowing system. macOS supports multiple windows, and each window can have its own settings, such as size, position, and resizing behavior.
By default, Xcode will create a single window for your macOS app. However, you can configure the window to match your requirements. For example, you can specify the minimum and maximum size of the window, whether the window should be resizable or not, and what happens when the window is minimized or closed.
To handle user events in your macOS app, you can use the AppKit framework, which provides classes and APIs for handling user input, such as mouse clicks, keyboard events, and more.
Once you have developed your macOS app, you can build and run it using Xcode. Xcode will compile your source codes, link any necessary frameworks and libraries, and package the app into an executable file.
You can also archive your macOS app for distribution, either for the Mac App Store or for direct distribution. Xcode provides instructions on how to sign, notarize, and prepare your app for distribution.
In conclusion, developing a macOS app using Xcode is a great option if you want to build a powerful and custom-built application. Xcode provides a feature-rich IDE with excellent support for macOS development, including a wide range of project templates, a visual interface designer, and advanced debugging and profiling tools. With Xcode, you have everything you need to bring your amazing macOS app ideas to life!
For further learning, you can explore other options such as Unity or Corona SDK, which are both powerful tools for developing macOS applications. Whatever you choose, make sure to subscribe to Paul Hudson’s amazing course on “How to Develop macOS Apps” to get in-depth instructions and guidance on building macOS apps.
Window Settings
The window settings in a macOS app are an important aspect of the development process. There are various event triggers and powerful APIs that can be used to customize the window settings to match the desired user interface. Within a macOS project, whatever architecture is chosen, developers must be aware of the window settings and how they will handle various events, including resizing, closing, and minimizing the window.
macOS supports both built-in settings and custom settings for windows. When building an application, developers can specify the default window size, title, and various other attributes. These settings can be applied programmatically using codes, or they can be set within the Xcode IDE using the Interface Builder. Ideally, the window settings should be specified in the project files, so they can be easily archived and used for future development.
One powerful API for handling window settings is the NSWindow class. This class provides methods and properties to customize the window, such as its size, appearance, and region. For example, developers can resize the window to be larger or smaller than the desktop space, handle window resizing events, and even create custom windows with non-rectangular shapes.
In addition to the NSWindow class, there are other libraries, such as SwiftUI and SpriteKit, that can be used to create windows with custom UI. These libraries provide further customization options and allow developers to build powerful and interactive windows.
When developing a macOS app, it’s important to be aware of the system-level window settings. These include the title bar, window borders, close/minimize/maximize buttons, and the overall appearance of the window. Developers can specify whether the window should have a borderless design or include standard system controls. They can also set the window to be full-screen or allow it to be minimized to the Dock. By understanding and using these settings, developers can create a seamless and user-friendly experience for their app.
In conclusion, when developing a macOS app, it is crucial to pay attention to the window settings. These settings determine the appearance and behavior of the windows within the app. Developers can use powerful APIs like NSWindow and libraries like SwiftUI to customize the window and create a unique user interface. By understanding the system-level window settings, developers can build an app that is both functional and visually appealing on the macOS operating system.
What’s in the course
In this course, you will learn how to develop macOS apps using different frameworks and tools. The course covers a wide range of topics, including building, resizing, and handling events in the app’s UI.
You will start by learning about the macOS operating system and how to install Xcode, the IDE used for macOS app development. You will also be introduced to Swift and SwiftUI, the primary programming languages for building macOS apps.
The course includes step-by-step instructions on how to create a new project, including setting up the project’s architecture, adding UI elements, and handling events. You will learn how to resize and match the app’s window to the user’s specified size, as well as how to minimize, maximize, and close the app’s window.
Throughout the course, you will also explore different frameworks and libraries, such as SpriteKit and Unity, which allow you to add animations, sound effects, and 2D/3D graphics to your apps. You will learn how to work with assets, including images and audio files, and how to use them in your app’s UI.
The course will cover advanced topics, such as building a desktop app with Electron and hacking the macOS system to customize the app’s appearance and behavior. You will also learn how to create an archive of your app and distribute it to users, including options for making your app available for purchase on the Mac App Store.
In conclusion, this course provides a comprehensive guide to macOS app development, from the basics of setting up the development environment to advanced topics such as customizing the app’s UI and handling events. By the end of the course, you will be equipped with the knowledge and skills to develop your own macOS apps and take advantage of the powerful features and capabilities offered by the macOS operating system.
Conclusion
In this article, we have explored various aspects of developing macOS applications. We have seen how powerful and flexible SwiftUI can be in building UIs for your app. We have also discussed the option of using UIKit, especially if you are working with an existing project or need more advanced features.
We have touched upon the importance of proper handling of events, resizing windows, and managing window borders. Additionally, we have discussed the architecture of a macOS app, including how to handle file operations, such as opening and closing files.
We have also highlighted the significance of Xcode as the IDE for developing macOS apps. Xcode supports both SwiftUI and UIKit, and it provides a range of tools for building, debugging, and testing your app.
Furthermore, we have mentioned that you should be aware of the macOS system settings and conventions to ensure that your app behaves correctly in different situations. Additionally, we have mentioned the importance of considering the various screen sizes and resolutions that your app may run on. This includes handling smaller screens and supporting the resizing of windows.
Finally, we have touched upon the different frameworks and libraries that you can use to enhance your app, such as SpriteKit for game development. We have also mentioned the possibility of monetizing your app through in-app purchases or subscription models.
In conclusion, developing a macOS app requires careful attention to detail and a good understanding of the specific features and capabilities of the operating system. By following the guidelines and best practices discussed in this article, you will be well-equipped to create a high-quality app that will delight your users.
Subscribe to Paul Walker
If you are developing a macOS app, you may want to consider subscribing to Paul Walker. Paul Walker is a powerful library that can be used with Xcode to develop amazing applications for macOS.
With Paul Walker, you have the option to open a window in your app that supports resizing. This means that your app can be resized to whatever size the user specifies, including being minimized or maximized. This is a feature that does not come built-in with the macOS system architecture, but Paul Walker handles it for you.
To subscribe to Paul Walker, you must first install the library into your Xcode project. Once installed, you can use the library to create a custom UI window for your application. This window will have the option to be resized by the user, as well as other features that Paul Walker supports, such as title bar customization and event handling.
One of the powerful features of Paul Walker is its support for different window architectures, including SwiftUI, SpriteKit, and UIKit. This means that you can use Paul Walker with any of these frameworks to build your macOS app. Whether you are building a game or a productivity application, Paul Walker has you covered.
In addition to window resizing, Paul Walker also includes many other features that can enhance your macOS app. For example, you can use Paul Walker to create custom menus, handle file operations, and even integrate with other native macOS libraries such as Corona and Unity.
With Paul Walker, you have the option to subscribe to additional features, such as hacking detection and system-level event handling. These features can be very useful in ensuring that your app is secure and aware of any changes happening within the operating system.
In conclusion, if you are developing a macOS app and want to have more control over window resizing and other features, subscribing to Paul Walker is the way to go. It provides a powerful set of tools and instructions for building an app that goes beyond what the macOS system architecture offers. Subscribe to Paul Walker today and see what’s possible!