

Are you a teacher looking for a fun way to reward your students? Or maybe you’re an artist wanting to sell your own custom stickers? No matter your reason for wanting to create personalised stickers, we’ve got you covered. In this article, we’ll show you how to easily design and print your own stickers, making your ideas come to life with just a few clicks.
Step 1: Prepare Your Artwork
Before you start creating your stickers, it’s important to have your artwork ready. This can be a design you’ve already made, or you can choose from one of the many online design generators available. Make sure to adjust the size and layout according to the type of stickers you want to create – whether it’s square, round, or custom-shaped.
Step 2: Upload Images and Add Text
Once you have your artwork ready, it’s time to upload it to a sticker maker tool. You can also add text to your stickers to make them more personalized. Choose the area where you want your image and text to appear, and then click the “Add Image” or “Add Text” button to insert them into your design.
Step 3: Preview and Edit
After adding your images and text, take a moment to preview your sticker design. This will give you an idea of how the final product will look. If you’re not satisfied with something, you can still edit it – adjust the size, position, or add more elements to make it just right.
Step 4: Pick a Type and Quantity
Now it’s time to choose the type and quantity of stickers you want to create. Whether you need just a few for personal use or a large number to sell, there are different printing options available. You can also decide if you want your stickers to have a bleed or a white edge.
Step 5: Printify and Sell
Once you’ve finalized your sticker design, it’s time to bring it to life. You can use a printing service like Printify to get high-quality stickers printed and delivered to your doorstep. Then, you can start selling your unique creations online or at local markets.
Creating personalised stickers doesn’t have to be a struggle. With the help of this guide, you’ll know exactly how to design, print, and sell your own custom stickers. So, what are you waiting for? Start unleashing your creativity and make your ideas stick with personalised stickers!
Step 2: Choose your design
Once you’ve decided to create personalised stickers, the next step is to choose a design. There are several factors to consider when picking the best design for your stickers:
- Type of stickers: Decide if you want round, square, or custom-shaped stickers. This will set the basic outline for your design.
- Design options: Research the market and consider what types of designs are already popular. You can either choose from pre-made designs or create your own from scratch.
- Images and text: Think about what images or text you want to include on your stickers. This could be your brand logo, a catchy slogan, or any other artwork that represents your product or idea.
- Adjustment and editing: Use a design maker or editing software to adjust and edit your design until it’s perfect. You may need to resize or crop your images, add text, or make other modifications.
- Preview and check-list: Once your design is ready, preview it to ensure it looks good. Also, double-check for any errors or design flaws. Make sure your design meets the printing requirements, like bleed and safe area settings.
Remember, the goal is to create a design that stands out and represents your brand or product in the best way possible. If you’re still struggling with ideas, you can seek inspiration from other creators or ask a designer for help.
Once you’re satisfied with your design, it’s time to move on to the next step!
Setting up your artwork
Before you start creating your personalised stickers, you’ll need to prepare your artwork. This step is crucial because your design will determine the final look of your stickers.
First, choose the type of sticker you want to create. Stickers come in different shapes and sizes, such as square, round, or custom shapes. Consider your target market and the purpose of your stickers when making this decision.
Next, you’ll need to pick the best image or design for your stickers. If you’re an artist or a graphic designer, you can create your own artwork from scratch. However, if you’re not artistically inclined, don’t worry! There are plenty of online design tools and sticker creators that can help you generate unique designs with just a few clicks.
Once you have your image or design ready, you can upload it to a sticker making tool or software. Most tools will have a designated area where you can add your artwork or image. If you’re using a sticker maker or generator, you can also choose from pre-made designs or templates.
After uploading your artwork, you may need to make some adjustments. For example, you might need to resize your image or adjust the colors to make it look better on a sticker. Some tools will also allow you to add text or other elements to your design.
Don’t forget to check the printing requirements for your stickers. Different printing companies may have different specifications. You’ll need to check if there’s a bleed area, the recommended file type, and the DPI (dots per inch) for the best print quality.
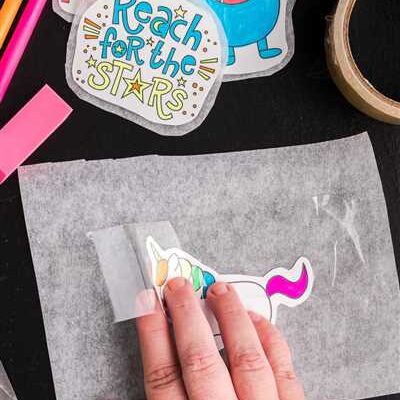
When preparing your artwork, keep in mind that the edge of your stickers will be cut during the printing process. To ensure that no important elements from your design are cut off, create a “safe zone” by keeping text and important elements at least 2mm inside the sticker’s edge.
Once you’re satisfied with your final design, it’s time to preview it. Some sticker makers or generators will allow you to see a mock-up of your stickers, showing how they will look once they’re printed and cut. This preview will help you make any last-minute adjustments before sending your artwork off for printing.
With your artwork set up and ready to go, you can now move on to the next step: printing and selling your personalised stickers!
About the author
My name is [Your Name] and I am a [Your Profession]. I have always been passionate about [Topic related to stickers]. Over the years, I have gained extensive knowledge and experience in creating personalized stickers and helping others bring their creative ideas to life.
With a step-by-step guide and the best tools at your disposal, you’ll be on the cutting edge of sticker design in no time. Whether you want to create your own stickers for personal use or to sell as products, I am here to help you every step of the way.
In September 2022, I joined the [Company Name] team as a teacher. My role involves educating and guiding individuals who want to learn how to design and sell their own stickers. Through this experience, I have seen firsthand the struggles that many people face when trying to enter the sticker market.
With my expertise, you will know exactly how to choose the right types of stickers, prepare your designs, and upload them to the printing service. I will show you the best practices for creating custom designs that stand out from the crowd.
Whether you’re a seasoned sticker maker or just starting out, this guide will provide you with the necessary knowledge and tools to create your own personalized stickers. From choosing the right image to adding text and adjusting the bleed area, I will walk you through each step of the process.
By the end of this guide, you will have a final design ready for printing. I will also provide a check-list to help ensure that your stickers are print-ready and of the highest quality.
So, if you’re ready to start creating your own unique stickers, let’s get started!
Teacher Check-list Guide to Preparing for September

In order to start the new school year off right, it’s important for teachers to be prepared. Planning ahead will save you time and stress later on. Here’s a handy check-list to help you get ready for September:
1. Know your students: Take the time to familiarize yourself with your new students. Find out what their interests and learning styles are so you can tailor your lessons accordingly.
2. Gather necessary materials: Make sure you have all the materials you need for the year. This includes textbooks, stationary, and any other supplies that will aid in your teaching.
3. Prepare your classroom: Arrange the classroom in a way that optimizes learning. Set up your desks, organize your materials, and create a comfortable and welcoming environment.
4. Create an artwork for your classroom: Use your creative skills to design a beautiful image or artwork that will brighten up your classroom. This can be a motivational quote, a poster, or a bulletin board display.
5. Set up your technology: Make sure all your devices are in working order and set up for classroom use. This includes computers, projectors, and any other technology you plan on using in your lessons.
6. Edit your lesson plans: Review and update your lesson plans from the previous year. Make any necessary adjustments based on student performance and new curriculum requirements.
7. Familiarize yourself with school policies: Take the time to read and understand the school policies and procedures. This will help ensure a smooth transition into the new school year.
8. Upload student information: If you haven’t already, upload student information into your school’s system. This will save you time when it comes to recording attendance and grades.
9. Check printing options: If you plan on using personalized stickers or other printed materials, check that your printer is in good working order. Make sure you have the necessary ink and paper.
10. Choose a sticker maker: There are many sticker maker options on the market. Pick the one that best fits your needs, whether it’s a custom design or a template-based generator.
11. Add text and adjust the design: Once you’ve chosen a sticker maker, customize your design by adding text and adjusting the layout to your liking. Don’t be afraid to get creative!
12. Check the bleed and safe area: When designing your stickers, be mindful of the bleed and safe area. This ensures that no important elements will be cut off during the printing process.
13. Print a test sticker: Before printing a large batch of stickers, print a test sticker to check for any issues with alignment, colors, or resolution. Make any necessary adjustments before proceeding.
14. Order your stickers: Once you’re satisfied with the final design, place your order for the desired number of stickers. Consider using a print-on-demand service like Printify to make the process easier.
15. Keep track of your orders: As you start selling your stickers, keep a record of the orders you receive. This will help you track your progress and ensure you fulfill all your customers’ requests.
16. Market your stickers: Promote your stickers through online platforms, social media, or word of mouth. Be sure to highlight the unique selling points of your products and reach out to potential customers.
17. Continue to create new designs: Don’t stop at just one design. Keep experimenting and creating new sticker designs to expand your product range and attract a wider audience.
18. Help yourself with online resources: There are plenty of online resources available to help you with sticker design and marketing. Take advantage of tutorials, forums, and design communities to further enhance your skills.
19. Reach out to other sticker creators: Connect with other sticker creators and share your experiences and knowledge. Collaborations and networking can help you learn from others and discover new opportunities.
20. Adjust and adapt: No matter how well you prepare, there will always be unexpected challenges. Stay flexible and open to adjustments as the school year progresses. Remember, teaching is a learning journey for both you and your students.
By following this check-list and staying organized, you’ll be well-equipped to start the school year off on the right foot. Good luck!
How to Make Your Own Stickers to Sell
If you’re a creative person who loves crafting or design, why not turn your passion into profit? Making and selling personalized stickers can be a fun and lucrative business venture. Whether you’re an artist, teacher, or just want to create something unique, follow these steps to start your own sticker line.
| Step 1: Pick a Sticker Type | Step 2: Create Your Artwork | Step 3: Upload Your Design | Step 4: Preview and Print |
| There are various types of stickers you can choose from, such as square, round, or custom-shaped. Consider the market demand and your target audience when deciding on the sticker type. | Create your own artwork using graphic design software or online tools. Make sure to consider bleed area and adjust your artwork accordingly to ensure a clean and professional look on the final sticker. | Use an online sticker maker or design software to upload your artwork and customize the sticker’s look. You can add text, edit colors, and pick from a range of products and printing options. | Preview and check the final design to make sure everything looks how you want it. Then, click on the Print or Sell button to start your listing for the stickers. |
Once you have your stickers ready, it’s time to sell them! Here’s a checklist to help you prepare:
- Know your market and niche – research what types of stickers are popular and in demand.
- Choose a platform to sell your stickers – there are many online marketplaces like Etsy, Printify, or even your own website.
- Set up your listing – write a compelling product description, set your pricing, and add high-quality product images.
- Market your stickers – use social media, email marketing, or collaborations with influencers to promote your products and reach potential customers.
- Keep track of your inventory and orders – make sure you have enough supplies and stay organized as you start selling.
- Ship your stickers – package your products securely and consider adding branded packaging for a professional touch.
By following this guide, you’ll be well on your way to creating and selling your own personalized stickers. Good luck!
Step One Pick Your Sticker Type
Before you start creating your own personalised stickers, you need to know what type of sticker you want to make. There are a variety of sticker types available, so it’s important to choose the one that best suits your needs.
Here are the three main types of stickers you can create:
- Custom Stickers: If you want to design your own stickers from scratch, this is the best option for you. You can use your own artwork, images, or text to create unique stickers that reflect your style and personality. With custom stickers, you have complete creative control.
- Pre-Made Stickers: If you’re not confident in your design skills or don’t have the time to create your own stickers, pre-made stickers are a great option. These stickers are already designed and ready to go, so all you need to do is choose the designs you like and upload them to the sticker maker.
- Text Stickers: If you’re a writer, teacher, or author looking to add some personality to your work, text stickers are a great choice. You can use a text generator to create custom stickers with your own quotes, sayings, or words of wisdom. Text stickers are simple but effective.
Once you’ve picked the sticker type that suits you best, it’s time to move on to the next step. In our next section, we’ll talk about preparing your designs and artwork for printing.
Step Two: Add Your Custom Design
Now that you have chosen the type of sticker you want to create, it’s time to add your own custom design. This is the fun part where you get to let your creativity shine!
There are a few different ways you can add your own design to your stickers. One option is to use a custom design tool or online sticker generator. These tools usually have an easy-to-use interface where you can upload your own images, choose from pre-made designs, or even add text to create a personalized sticker.
If you’re more of an artist yourself, you can also create your own design using graphic design software. Just make sure to set up your artwork with the correct bleed and trim lines, as this will ensure that your design will be printed and cut correctly. If you’re not sure about the technical details, don’t worry! There are plenty of online resources and tutorials that can guide you through the process.
Once you have your design ready, you can upload it to the sticker maker or generator. Most tools will allow you to preview and edit your design before finalizing it. Take your time to adjust the design to your liking, making sure that everything looks just right.
If you’re still struggling with the design, you can also reach out to professional designers or artists who specialize in sticker design. They can help you bring your vision to life and create a design that is truly unique.
Once you’re happy with your design, you can proceed to the next step, which is preparing your design for printing. This step usually involves setting up the correct file format, resolution, and color mode, as well as ensuring that your design has the correct bleed and trim lines.
Now that you know how to add your custom design to your stickers, you’re one step closer to creating your own personalized products. In the next step, we will go over how to prepare your design for printing, so keep reading!
Step Three Preview and Adjust Your Sticker
Now that you’ve chosen your design and prepared it for printing, it’s time to preview and adjust your sticker. This step is crucial to ensure that your final product looks exactly how you want it to be.
Previewing your sticker allows you to see a visual representation of what your sticker will look like when printed. It’s a great way to check if everything is in line and if there are any issues that need to be fixed.
Here are the steps to preview and adjust your sticker:
- Upload your artwork: Use a custom sticker maker or design software of your choice to upload the artwork you created.
- Choose your sticker type: There are various sticker types to choose from, such as round, square, or custom shapes.
- Preview your design: Once the artwork is uploaded, you’ll be able to preview your design on the sticker. Take a close look at every detail to ensure it meets your expectations.
- Adjust as needed: If you’re not satisfied with how your design looks, you can make adjustments. Play around with the size, color, and placement of elements until you’re happy with the result.
- Check the bleed area: The bleed area is the outer part of your sticker that will be trimmed during printing. Make sure important elements like text or logos are not too close to the edge to avoid them being cut off.
- Final check: Take a final look at your sticker design to ensure everything is perfect. Double-check the spelling, alignment, and overall appearance.
By following these steps, you’ll be able to create a personalized sticker exactly the way you want it. Once you’re satisfied with the preview, you can move on to the next step of selling or printing your stickers.
Keep in mind that there are many online sticker creators and printing services, such as Printify, that can help you with the process. They have tools and features that make it easy to upload your artwork, choose sticker types, and make adjustments with just a few clicks.
Now that you know how to preview and adjust your sticker, you’re one step closer to creating your own unique stickers to sell or use for personal purposes.
Step Four Start Selling

Once you’ve created your personalized stickers, it’s time to start selling them! Here’s a step-by-step guide on how to do it:
1. Choose the best platform to sell your stickers
Before you can sell your stickers, you’ll need to decide where to sell them. There are many online marketplaces and platforms that allow creators to sell custom products, such as Printify or Printful. Do some research to find the platform that best suits your needs.
2. Upload your designs
Once you’ve chosen a platform, you’ll need to upload your sticker designs. Make sure to check the platform’s guidelines for uploading images and follow them carefully. You may need to adjust the size, resolution, or file type of your designs to meet their requirements.
3. Add text or edit your designs
If you want to add text or make any changes to your designs, you can use the platform’s editing tools. They usually have a user-friendly interface that makes it easy to customize your stickers.
4. Preview your products
Before setting your stickers up for sale, it’s always a good idea to preview them. Look for any issues with the design, bleed lines, or any other elements that may need adjusting.
5. Pick a price and set up your listing
Decide how much you want to charge for your stickers and set up your listing on the platform. Take into consideration the cost of materials, printing, and any fees that the platform may charge you.
6. Market your stickers
To help sell your stickers, you’ll need to market them. Use social media, your website, or any other channels to promote your stickers and generate clicks. You can also reach out to influencers or collaborate with other creators to expand your reach.
7. Keep an eye on sales
Once your stickers are live for sale, keep track of your sales and adjust your strategy if necessary. Pay attention to customer feedback and make improvements to your designs or marketing efforts based on what you learn.
By following these steps, you’ll be well on your way to successfully selling your personalized stickers online. Good luck!
Sources
When it comes to creating personalised stickers, there are a number of sources you can turn to for help. Whether you need to create your own artwork or pick from a list of pre-made designs, these sources will guide you step-by-step through the process.
- Printify: One of the best platforms for creating custom stickers, Printify offers an easy-to-use design generator. Simply upload your own images or choose from a library of pre-made designs. You can add text, adjust the size and placement, and even preview how your stickers will look before printing.
- Marketplaces: There are a number of online marketplaces that offer personalised stickers. From Etsy to Amazon, you’ll find a wide variety of options to choose from. Just make sure to check the seller’s feedback and ratings before making a purchase.
- Design software: If you’re a graphic designer or artist, you may already have design software like Adobe Illustrator or Photoshop. These programs allow you to create your own custom artwork and adjust all aspects of the design, from the bleed area to the final print settings.
- Online design tools: For those who don’t have access to professional design software, there are a number of online design tools available. Websites like Canva or Sticker Mule have user-friendly interfaces that make it easy to create custom stickers.
Once you’ve chosen your source and created your design, it’s important to double-check everything before sending it off for printing. Make sure your artwork is the correct size and resolution, and that all text is legible. By following these steps, you’ll be well on your way to creating your own personalised stickers.


