

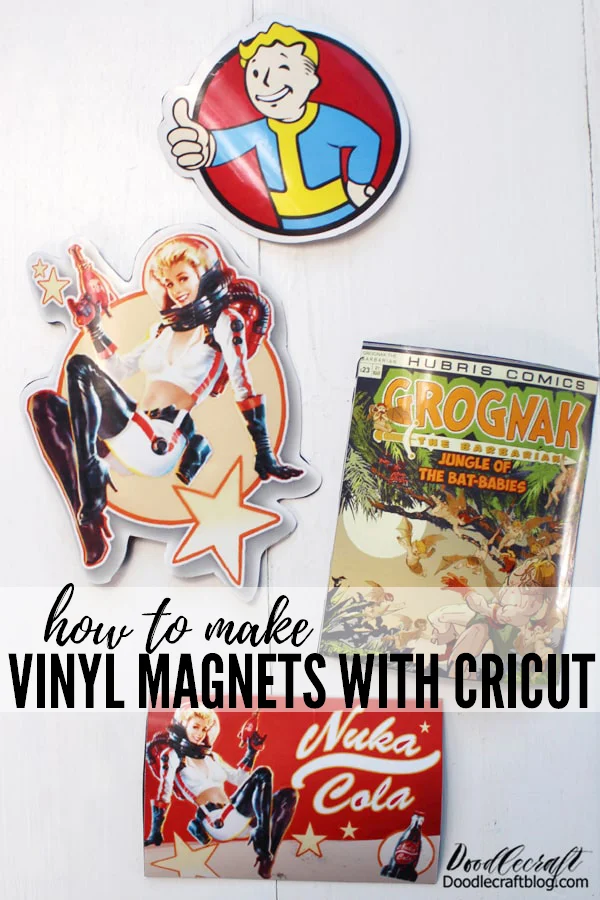
If you’re looking for a fun and creative way to add some personality to your space, magnet stickers are a great option. With just a few simple steps, you can turn any fabric into a custom magnet sticker that is sure to impress. In this tutorial, we will show you how to make your own magnet stickers using a Cricut machine, fabric, and magnets.
The first step in making magnet stickers is to gather all of the necessary materials. You will need a Cricut machine, fabric of your choice, magnet sheets, and scissors. You will also need a printer if you plan on using printable designs. Once you have everything you need together, you can move on to the next step.
Next, you will need to prepare your fabric. If you are using a fabric with a pattern or design, you may need to trim it down to the desired size. Use scissors to carefully cut out the fabric. Make sure to leave a little bit of excess fabric around the edges to allow for sewing.
Once your fabric is cut to the right size, you can now move on to sticking the magnet sheets to the fabric. Peel off the backing of the magnet sheet and carefully stick it to the back of the fabric. Make sure to press down firmly to ensure it sticks properly.
After the magnet sheet is securely attached to the fabric, it’s time to trim any excess fabric. Use scissors to carefully cut away any extra fabric around the edges of the magnet sheet. Be careful not to cut too close to the edge, as you want to make sure the magnet and fabric stay together.
Now that your magnet stickers are ready, you can start using them to decorate your space. Stick them on your fridge, magnetic board, or any other magnetic surface. You can even use them to hold up postcards, notes, or photos. The possibilities are endless!
In conclusion, making magnet stickers is a fun and easy DIY project that anyone can do. Whether you’re looking to add a personal touch to your home or create a special gift for someone, these magnet stickers are sure to impress. So gather your materials, follow these steps, and get ready to turn your fabric into unique magnet stickers!
- Easily Make Your Stickers Last Longer, More Moveable, and Sturdier by Turning Them Into Magnets
- Materials for DIY Fridge Magnets With Cricut
- Comments20
- Technical Information
- How To Make Custom Magnets
- Step 1: Design Your Magnet
- Step 2: Print Your Design
- Step 3: Laminate Your Design
- Step 4: Place the Magnet Sheet on Your Design
- Step 5: Cut Out Your Design
- Step 6 Show Them Off
- Video:
- Make Your Own Magnet – Turn Stickers into Magnets – Quick & Easy Magnets
Easily Make Your Stickers Last Longer, More Moveable, and Sturdier by Turning Them Into Magnets
Do you adore collecting stickers or have a special design that you would love to turn into magnets? Then this DIY project is perfect for you! By turning your stickers into magnets, you can easily make them last longer, more moveable, and sturdier, so you can enjoy them for many years to come.
Here’s how you can do it:
Step 1: Gather all the materials you’ll need for this project. This includes your sticker designs, printable magnetic sheets, a printer, scissors or a fine-point blade, and a flat surface to work on.
Step 2: If you haven’t already, design or select the stickers you want to turn into magnets. Make sure the designs are in a printable format, such as JPEG or PNG.
Step 3: Print your sticker designs onto the printable magnetic sheets. You can use a regular inkjet or laser printer for this step.
Step 4: Once the sheets are printed, let them dry for a few minutes or until the ink is completely dry to the touch.
Step 5: Carefully cut out the sticker designs using scissors or a fine-point blade. Make sure to follow the outline of each design and remove any excess material.
Step 6: Peel the adhesive backing off the magnetic sheets and place the sticker designs onto the magnet. Press firmly to ensure they stick well.
Step 7: Now your stickers have been transformed into magnets! You can place them on any magnetic surface, such as a fridge or a metal board.
By turning your stickers into magnets, you can easily move them around without worrying about them falling off. They also become sturdier, so they can withstand more wear and tear.
In addition, this DIY project is a great way to keep your cute sticker collection in one place. You can even share your magnet stickers with friends and family, or post pictures of them on Instagram for everyone to see!
Just remember to keep the original sticker sheet in case you want to make more magnets in the future.
In conclusion, this simple yet effective technique allows you to easily make your stickers last longer, more moveable, and sturdier by turning them into magnets. Whether you’re a sticker enthusiast or just want to add a touch of charm to your home, turning your stickers into magnets is a fun and creative project you’ll surely enjoy!
Materials for DIY Fridge Magnets With Cricut
When I first got my Cricut, I was excited to start making all sorts of projects. One of the first things I realized I could do was make my own fridge magnets. I had recently moved into a new apartment and the fridge was looking a little empty, so I thought some cute magnets would be the perfect addition to liven it up.
The first part of the project was figuring out what materials I needed. I did some research online and found that I would need magnetic sheets. I ordered a pack of 6 sheets from an online store and eagerly awaited their arrival.
When the package finally arrived, I was so excited to get started. I quickly unpacked the sheets and moved on to the next step. I needed some sort of adhesive to attach my designs to the magnetic sheet. After some more searching, I found that I could use a sticky laminate. I ordered a roll and anxiously waited for it to arrive.
Once everything was here, I was finally ready to start making my magnets. I found a tutorial online that walked me through the steps. First, I needed to print out my designs on the sticky laminate. I loaded the laminate into my printer and printed off a few test designs. They looked amazing!
Next, I needed to cut out my designs. I loaded the printed sheets into my Cricut and set the blade to the appropriate depth. It took a few tries to get the settings just right, but eventually, I was able to cut out my designs without any issues.
Once all of my designs were cut out, it was time to peel off the backing and stick them to the magnetic sheet. This part took a little bit of practice, but after a few tries, I got the hang of it. I carefully placed each design onto the magnetic sheet, making sure to avoid any air bubbles or wrinkles.
Finally, I cut each magnet out of the magnetic sheet and they were ready to go! I couldn’t believe how easy it was to make my own fridge magnets. I had a whole collection of cute magnets in no time at all.
In the future, I plan on experimenting with different colors and designs. I’ve seen some really cool diamond-shaped magnets that I would love to try making. The possibilities are endless!
| Materials: | Quantity: |
|---|---|
| Magnetic sheets | 6 sheets |
| Sticky laminate | 1 roll |
Overall, I am so happy with how my DIY fridge magnets turned out. They look amazing on my fridge and add a personal touch to the room. I would highly recommend trying this project out if you have a Cricut or similar cutting machine. It’s a fun and easy way to create your own custom magnets!
Comments20
In order to create magnet stickers, there are a few technical steps you should follow. First, make sure you have all the necessary materials in place. They include a printer, printable vinyl sheets, a fine-point cutter or scissors, a Cricut or similar machine, a rubber roller, and a backing board. It’s also important to have a working knowledge of Pantone colours, as well as access to a computer and printer.
The first step is to design your magnet sticker using a computer software or a custom-made design. You can choose from various designs and colours, depending on your preference. Once you have finalized the design, print it on the printable vinyl sheet.
Next, you will need to cut the magnet sticker using a fine-point cutter or scissors. Be sure to cut along the edges of the design and remove any excess vinyl. Once the cutting is complete, peel off the backing from the printable vinyl sheet.
Now, it’s time to place the magnet sticker on a backing board. Make sure the surface is clean and free from any dust or debris. Use a rubber roller to press down the magnet sticker and ensure it sticks well to the backing board.
Finally, you can move the magnet sticker to its desired location. The advantage of using magnet stickers is that they are moveable and can be easily repositioned. You can stick them on any magnetic surface, such as a refrigerator or a whiteboard.
Keep in mind that when it comes to magnet stickers, having the right tools is essential. A Cricut or similar machine can help make the process much easier and faster. Additionally, using a fine-point cutter or scissors will give you more control over the cutting process.
In conclusion, making magnet stickers is a fun and creative way to personalize your belongings or share your artwork with others. With a little practice and the right tools, you can create amazing magnet stickers that are sure to surprise and impress. So get your materials ready and start making your own magnet stickers today!
Technical Information
When making magnet stickers, there are a few technical details to consider. First, you’ll need printable magnet sheets, which you can find at your local crafts store or order online. These sheets will allow you to create your own custom designs and stick them to the fridge or any other metal surface.
To start, you’ll want to print your designs onto the magnet sheets. Make sure to use a printer with a fine-point black ink cartridge, as this will ensure high-quality and sharp images. If you’re using photographs, fabric, or postcards, you may need to trim them down to fit on the magnet sheets.
Once your designs are printed, carefully cut them out using a sharp blade or scissors. It’s important to be precise when cutting, as any excess material can affect the magnet’s ability to stick properly. If you’re using a sewing pattern or other intricate design, you may find it helpful to use a craft knife for more detailed cutting.
Next, peel the backing off the magnet sheets to reveal the adhesive side. Carefully place your cut-out designs onto the sticky side of the magnet sheet, making sure to press down firmly to ensure good adhesion. You can easily move the stickers around if needed, as the adhesive is moveable. Once you’re happy with the placement, firmly press the stickers into place to secure them.
Finally, carefully trim any excess magnet sheet around the edges of your stickers. This will give them a neat and professional finish. You can also round the corners if you prefer a softer look.
Now you have your own custom magnet stickers! They can be used to decorate your fridge, share cute messages, or display your favorite photographs. The options are endless!
As a note of caution, keep in mind that magnets can be very strong, so it’s important to handle them with care. Make sure to keep them away from small children and electronic devices, as they can cause damage if they are brought too close together.
If you’re looking for more step-by-step instructions on how to make magnet stickers, there are many DIY tutorials available online. They can show you different techniques and provide inspiration for your own creations. So, get creative and have fun making your own magnet stickers!
How To Make Custom Magnets
If you’ve ever wanted to create your own custom magnets, you’re in luck! With just a few materials and some simple steps, you can make your very own magnets to add a personal touch to your home or office. Here’s how:
Step 1: Gather Materials
First, gather the materials you’ll need. You’ll need a large sheet of magnet, which you can easily find at your local craft store. You’ll also need some printable sheets and a printer to create your custom designs.
Step 2: Design and Print
Next, use a design program or website to create your custom designs. Think about what you want your magnets to look like – whether it’s a favorite photo, a unique pattern, or even a personalized message. Once you have your designs ready, print them onto the printable sheets.
Step 3: Cut and Laminate
Once you’ve printed your designs, cut them out into the desired shape and size. If you want to add extra protection and durability to your magnets, consider laminating them. This will also give them a slightly glossy finish.
Step 4: Attach to Magnet Sheets
Take your cut-out designs and attach them to the magnet sheets. Lay the designs onto the magnet sheets, making sure they’re centered and aligned. Press them firmly to ensure they stick together well.
Step 5: Cut Out Magnets
Once your designs are securely attached to the magnet sheets, use a pair of scissors or a craft knife to cut out the magnets. Cut along the edges of your designs, making sure to leave a slight border to keep the magnets intact. Alternatively, you can opt for a decorative shape, such as a diamond or a circle.
Step 6: Enjoy!
Now that your custom magnets are made, you’re ready to enjoy them! Stick them onto your fridge, pinboard, or any magnetic surface. They can add a personalized touch to your space or make great gifts for friends and family.
So, the next time you’re in the mood for a fun and creative project, why not try making your own custom magnets? It’s a simple and enjoyable process that allows you to express your creativity and add a personal touch to your surroundings. Have fun!
Step 1: Design Your Magnet
If you could make your own magnet stickers, step 1 would be to design your magnet. You can do this by using a graphic design software or even a simple drawing program, such as Microsoft Paint. Think about the colors and images you want to use, and whether you want to include any text or logos. The design should be in the size and shape that you want your magnet sticker to be.
Once you have your design ready, you can print it out on a printer. Make sure to print it on a good quality paper so that the colors come out vibrant and true to the original design. If you are using an inkjet printer, let the printed page dry for a few minutes before moving on to the next step.
If you want your magnet sticker to be double-sided, you can print your design on both sides of the paper. Just make sure that the second side is facing the right way when you turn it over, so that the design is not upside down when you stick it on the fridge or any other magnetic surface.
Keep in mind that the color of the magnet sticker may appear slightly differently when it is printed compared to what you see on your computer screen. This is because different printers and screens can display colors slightly differently. If color accuracy is crucial for your design, you might want to consider using Pantone colors or ordering a sample from a printing company to see how your design will look in physical form.
Once your design is printed and dry, you can move on to the next step of turning it into a magnet sticker.
Step 2: Print Your Design
Now that you have your design ready, it’s time to print it out! Follow these steps to ensure a successful printing process:
- Make sure you have a printer available. Whether it’s a home printer or a professional one, make sure it’s in good working order.
- Select the right materials. Choose a printable vinyl sheet that is suitable for magnets. This will ensure that your design sticks well and doesn’t come off easily.
- Open the file with your design on your computer. Make sure it looks great on your monitor before printing. Adjust any colors or sizes if needed.
- Load the vinyl sheet into the printer. Place it in such a way that the printable side is facing up. Some printers have a specific tray for thicker materials like vinyl.
- Adjust the printer settings. Make sure the printer is set to its highest quality setting for the best results. You can also select the appropriate paper type to ensure accurate printing.
- Click “Print” and wait for it to do its magic! The printer might take a while, especially if you’re printing a large number of magnets.
- When the printing is done, let the sheet dry completely. This can take a few minutes, so be patient.
- Once the sheet is dry, carefully trim around the edges of each magnet using a sharp blade or scissors. Take your time to ensure clean and precise cuts.
- If you’re having trouble peeling the magnet off the sheet, slightly bend the sheet back and forth. This will help loosen the adhesive and make peeling easier.
- Your magnets are now ready to be used or shared! Place them on your fridge, pinboard, or any other magnetic surface. You can also give them as personalized gifts or use them as promotional materials for your business.
- Don’t forget to take some nice photographs of your magnets to show off your creativity. You can post them on social media, send them as postcards, or even include them in your portfolio for future reference.
Remember, practice makes perfect! If you’re not happy with the results, don’t be disappointed. Keep experimenting with different designs, materials, and printing techniques until you achieve the desired outcome. And, if you have any technical issues or questions, don’t hesitate to reach out to Matt from ShinigamiYoko. He’s always ready to help!
Step 3: Laminate Your Design
To ensure that your magnet stickers last longer and stay protected, it’s important to laminate them. Laminating creates a thin layer of plastic over your design, making it more durable and resistant to wear and tear.
You will need:
- Laminating sheets
- A laminating machine
- A pair of scissors or a paper trimmer
Here’s how you can laminate your magnet stickers:
- Open the laminating machine and plug it in, following the manufacturer’s instructions.
- Turn on the machine and let it warm up. Usually, it takes a few minutes to reach the desired temperature.
- While waiting for the laminating machine to heat up, trim your designs into individual stickers using a pair of scissors or a paper trimmer. Make sure to cut as close to the edge of your design as possible.
- Take a laminating sheet and peel off the backing. Place your design onto the sticky side of the sheet. Smooth out any wrinkles or bubbles.
- Once the laminating machine is ready, slide the sheet with your design into the machine. Use a laminating carrier sheet if one is provided.
- Wait for the machine to laminate your design. It will pass through heated rollers that seal the plastic around your magnet sticker.
- Once the sheet has passed through the machine, carefully peel off the plastic sheet from your design. Be sure to do this slowly to avoid peeling off any part of your sticker.
- Repeat the process for each magnet sticker you have.
Now that your magnet stickers have been laminated, they will be sturdier and better protected. You can now stick them onto your fridge, pinboard, or any other magnetic surface without worrying about peeling or wear and tear.
Remember, practice makes perfect, so don’t be disappointed if your first few attempts are not perfect. With time and practice, you will get better at making custom magnet stickers.
In the next step, we’ll look at how you can make your designs even more special by using special vinyl or fabric.
Step 4: Place the Magnet Sheet on Your Design
Once your design is printed on the printable vinyl, it’s time to move onto the magnet sheets. These magnet sheets are specially made for printing your designs and turning them into magnets that you can stick to your fridge or any other magnetic surface.
When my order of magnet sheets arrived, I was excited to see how they turned out. I grabbed the magnet sheet and carefully placed it on top of my design, making sure to line up the edges. The magnet sheet has a sticky adhesive on one side, so it easily sticks to the vinyl design.
I have to admit, I was a bit disappointed at first because the magnet sheet was thinner than I expected. But once I placed it on my design, it actually worked great. The thinness of the magnet sheet made the magnet more moveable and flexible, which is a plus.
With the magnet sheet in place, I used my Cricut machine with a fine-point blade to cut out the design. I followed the cut lines on the vinyl and carefully cut around the edges. It’s important to be precise when cutting, as any excess vinyl or magnet sheet can affect the final look of your magnet.
After cutting out the design, I carefully peeled off the excess vinyl and magnet sheet, leaving only the cute and colorful design. I loved how the colors turned out and was glad I chose the printable vinyl for this project.
Now that the design was ready, it was time to test it out. I went to my fridge and placed the magnet on it. It stuck perfectly and looked fantastic. I was so happy with the end result.
Since I had leftover magnet sheets, I figured I could practice making more magnets in the future. The magnet sheets are easy to work with and can be cut into any shape or size you want. I even thought about making some custom magnet straps for our kitchen utensils.
Overall, I would definitely recommend using magnet sheets for making your own magnets. They’re easy to use and the end result is great. Plus, with printable vinyl, you have so many design options to choose from. It’s a fun and creative way to add a personal touch to your fridge or any other magnetic surface.
In the next step, I’ll show you how to add a special touch to your magnets with diamond dust. Stay tuned!
To see more of my magnet designs, you can follow me on Instagram or subscribe to my email newsletter. Thank you for reading!
Step 5: Cut Out Your Design
Now that you have your magnet sheet with the printed design, it’s time to cut it out. Grab a pair of scissors or a craft knife and carefully trim around the edges of your design. Take your time to ensure a clean and precise cut.
If you find that the magnet sheet is too flimsy or difficult to work with, you can try using a sturdier material like vinyl. This will make it easier to cut and handle.
One little problem I ran into when I first made magnet stickers was that the edges of the magnet would sometimes curl up and not stick properly. To fix this issue, I found that trimming a tiny strip of vinyl and placing it between the magnet and the printed design would help keep the edges flat and stick properly. It’s a small detail but makes a big difference!
After you’ve trimmed your design, peel off the backing of the magnet sheet to reveal the adhesive side. Carefully place your design on a clean and smooth surface, such as a postcard or a piece of cardboard. Press down firmly to make sure it sticks nicely.
Now, your magnet sticker is almost done! If you want to add a little extra touch, you can use a glaze or clear sealant to give it a glossy and professional finish. Simply apply a thin layer of glaze or sealant over the entire surface of the design and let it dry completely before moving on.
Once your magnet sticker is fully dry, it’s ready to use! Stick it on your fridge, whiteboard, or any other magnetic surface. You can make more magnets using the same process or experiment with different designs and colors. The possibilities are endless!
Don’t forget to share your DIY magnet sticker creations on Instagram or email them to your friends. They will be amazed at what you’ve made!
Step 6 Show Them Off

Once your magnet stickers are all set and dry, it’s time to show them off! You can easily stick them onto any metal surface like your fridge, blackboard, or even your office whiteboard. Share your creations with friends and family, and let them adore your creative skills!
If you found that your magnets are not sticky enough, you can apply another layer of adhesive or use a stronger adhesive backing. When choosing colors for your magnet stickers, consider using Pantone colors for a more professional and custom look.
Now, what if you want a larger magnet? No issue! You can simply print your designs onto a larger magnet sheet. Just make sure to cut them out carefully. If you’re using a Cricut machine, it will make the cutting process much easier.
Remember to keep your magnets away from any heat source, as this may cause the adhesive to weaken or the colors to fade over time. Also, avoid placing them on the side of your computer monitor or any electronic device, as the magnets might interfere with the screen or internal components.
If you’re displaying photographs as magnet stickers, make sure to practice peeling them off carefully before sticking them onto any valuable or delicate items. You wouldn’t want to damage your precious memories!
Lastly, don’t forget to thank your magnet sticker maker, as they helped bring your ideas to life. These magnets are a great way to add a touch of personalization to your living space or office. They make for amazing gifts too!
Now that you know how to make magnet stickers, let your creativity run wild. Whether you’re creating magnets for yourself or for someone special, they are sure to be a unique and eye-catching addition to any room.
| 1 | 2 | 3 |
| 4 | 5 | 6 |


