Creating a computer collage is a fun and creative way to design stunning visuals by combining various elements together. With the help of software, you can easily make collages with sticking photos, text, and even videos. Thus, if you’re a developer, designer, or just a passionate artist, learning how to make computer collages is definitely worth your time.
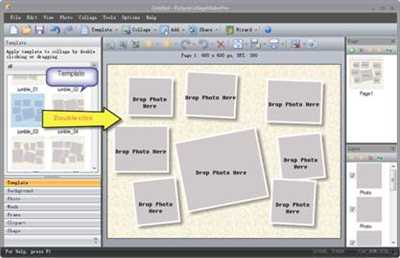
There are several steps you can follow to make a computer collage. First, you need to choose a software that suits your needs. Most computers already have the necessary software like Microsoft Word or PowerPoint, which makes it easier to create collages. Another option is to use specific collage maker software, such as SmartSHOW, that offers a wide range of templates and options.
Once you have the software set up, the next step is to gather the pictures, photos, and videos you want to use in your collage. You can choose from a wide variety of themes and styles, giving you the flexibility to create unique and personalized collages. You can also insert a background or use a placeholder for the picture.
After you have chosen your pictures, you can start working on the collage. Depending on the software you are using, you may have different options for arranging the pictures and adding text. Some software allows you to simply drag and drop the pictures onto the canvas, while others provide more advanced editing tools.
As you work on your collage, don’t forget to experiment with different arrangements, sizes, and effects. You can make your collage more dynamic by adding animations or transition effects to the pictures and videos. You can also play around with the text, adding captions or titles to enhance the visual storytelling of your collage.
How to Make a Video Collage In a Flash
Creating a video collage on your computer can be a fun and easy way to showcase a variety of pictures and videos in one place. With the help of computer software, you can create a video collage in just a few simple steps. In this article, we will show you how to make a video collage using Microsoft Windows and the SmartSHOW software.
Step 1: Choose your pictures and videos
First, you need to gather the pictures and videos that you want to include in your collage. You can choose from a wide variety of themes and templates to make your collage look unique and professional.
Step 2: Set up your workspace
Once you have chosen your pictures and videos, it’s time to set up your workspace. Open the SmartSHOW software on your computer and create a new project. You can name your project and choose the aspect ratio of your collage.
Step 3: Insert your pictures and videos
Next, you will need to insert your pictures and videos into the SmartSHOW software. Simply drag and drop them into the software or click on the “Insert” button and choose the files from your computer.
Step 4: Customize your collage
Now it’s time to customize your collage. You can add text, choose different backgrounds and front pictures, apply various effects, and more. SmartSHOW offers a variety of options to make your collage truly unique.
Step 5: Export your collage
Once you have finished making all the necessary adjustments, you can export your collage. Choose the export option in the SmartSHOW software and save your collage to your desktop or any other location on your computer.
By following these steps, you can easily create a video collage on your computer. Whether you are making a collage for personal use or for a professional project, this method is definitely an easy and efficient way to showcase your pictures and videos.
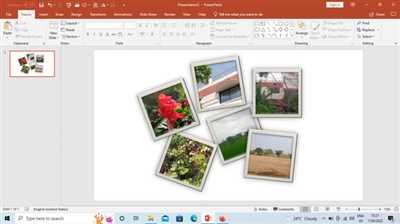
Part 2: How To Make A Photo Collage In Microsoft Word
To create a photo collage in Microsoft Word, you can use a variety of tools and features that the software has to offer. This step-by-step guide will walk you through the process of making a photo collage using Word on your Windows computer.
Step 1: Open Microsoft Word on your desktop or laptop computer.
Step 2: Click on the “Insert” tab located at the top of the Word window.
Step 3: Choose the “Pictures” option and select the photos you want to use for your collage. You can click and drag to rearrange them as needed.
Step 4: Once you have selected your photos, click on the “Pictures Tools” option that appears in the toolbar when you have a photo selected.
Step 5: In the “Pictures Tools” tab, click on the “Format” option. Here, you can adjust the size, shape, and other aspects of your photos to fit your collage vision.
Step 6: To add a background to your collage, click on the “Page Layout” tab and choose a background color or image from the options provided.
Step 7: With the photos and background in place, you can customize your collage further by adding text, stickers, or other visual elements to enhance the overall design.
Step 8: Once you are satisfied with your collage, you can save it by clicking on the “File” tab and selecting the “Save” option.
Step 9: To export your collage as an image file, click on the “File” tab again, and this time select the “Save As” option. Choose the format you want to save your collage in (such as JPEG or PNG) and click “Save”.
By following these steps, you can easily create a photo collage using Microsoft Word. With the wide range of options and features this software offers, you can make a collage that reflects your personal style and creativity.
Step 5 Set the Exported Collage as Desktop Background
Once you have created your computer collage using the SmartSHOW 3D software or any other collage maker, you might want to set it as your desktop background. This will allow you to showcase your pictures or photos in a creative way every time you turn on your computer.
If you are using a Windows computer, follow these steps to set your exported collage as the desktop background:
1. Choose the exported collage photo you want to set as the desktop background. Open the folder where you saved the exported collage.
2. Right-click on the exported collage photo and select “Set as desktop background” from the drop-down menu. This will automatically set the selected picture as your desktop background.
By setting your exported collage as the desktop background, you can enjoy a wide variety of themes and templates. You can choose different pictures or photos for different themes or insert a slideshow of your photographs to make your desktop background even more dynamic.
There are also other ways to set your exported collage as the desktop background. For Microsoft Word users, you can copy and paste the exported collage into a Word document and then save it as a picture. Right-click on the picture and select “Set as desktop background” from the drop-down menu. For Windows computers, you can also use the “Background” options in the “Personalize” section of the Control Panel to set your exported collage as the desktop background.
Setting your exported collage as the desktop background is an easy and fun way to customize your computer and showcase your creativity. With the help of collage-making software like SmartSHOW 3D, you can create stunning collages and easily set them as your desktop background with just a few clicks. So why stick with a plain background when you can have a digital masterpiece!
So Many Ways to Create Digital Collages
Creating a digital collage has never been easier with the wide variety of software options available for computers. Whether you’re a professional developer or a first-time user, there are so many ways to make a digital collage that it’s hard to know where to start!
One of the most popular ways to create a digital collage is by using photo editing software such as Microsoft Word or the Adobe Creative Suite. With these programs, you can easily insert pictures into a template and move them around to create a unique collage. There are also a variety of pre-made collage templates to choose from, so even if you’re not a skilled designer, you can still create a professional-looking collage.
If you want to get more creative with your collage-making, you can try using specialized collage software like SmartSHOW or SmartSHOW 3D. These programs offer a wide range of themes and options for you to work with. You can choose from different kinds of backgrounds, add text, insert videos or flash animations, and even set your own picture as the background. The possibilities are endless!
For those who prefer a more hands-on approach, there are also physical tools available to help you create a digital collage. You can print out photographs and cut them up, then stick them together on a piece of paper or a desktop background. This method may take more time and effort, but it definitely allows for more artistic freedom.
Once you’ve created your collage, you can export it as a picture or save it to share with others. Some software even allows you to export your collage as a video, making it easy to showcase your work on social media or your personal website.
In conclusion, there are so many ways to create digital collages on your computer. Whether you’re a beginner or an experienced designer, there’s a software or method out there that can help you bring your artistic vision to life. So don’t be afraid to click around and try out different options – you never know what kind of masterpiece you might create!