

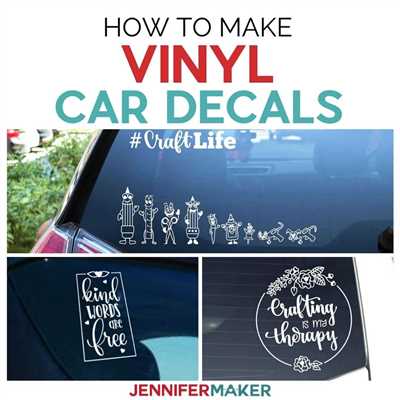
If you’re looking for a fun and creative way to add a personal touch to your belongings or if you want to start your own decal-making business, vinyl decals are the way to go. Vinyl decals are cute, versatile, and easy to make, making them a popular choice for both personal use and gift-giving. Whether you’re a beginner or an experienced crafter, this article will help you learn the step-by-step process of making vinyl decals at home using die-cutting machines and printable materials.
Before we dive into the detailed instructions, let’s first talk about the materials you’ll need. The main material you’ll need for making vinyl decals is, of course, vinyl. Vinyl is an excellent choice for decals because it is waterproof and durable, so your decals will last a long time. You’ll also need a die-cutting machine, such as a Cricut or a Silhouette, which will allow you to cut intricate designs and shapes with ease.
To start making your vinyl decals, you’ll need to prepare your design. You can either create your own design using graphic design software or download pre-made designs from websites that sell printable vinyl decals. Once you have your design ready, you’ll need to load your vinyl into the die-cutting machine and follow the machine’s instructions for scanning or clicking into place. Don’t forget to mirror your design if you want it to appear correctly on the decal.
After your design is loaded and ready to go, you can start the cutting process. The machine will cut out your design from the vinyl, leaving behind the parts that you want to stick onto your desired item. Once the machine is done, carefully remove the excess vinyl from around your design using a weeding tool. Take your time and be precise to avoid any accidental cuts or tears.
Now comes the fun part – applying the decal to the desired surface. Before you do that, make sure the surface is clean and dry. You can use a damp cloth to remove any dirt or dust. Once the surface is ready, carefully peel off the backing of the decal, making sure not to touch the sticky part with your fingers. Line up the decal with the desired location and slowly lower it onto the surface. Use a credit card or a plastic squeegee to smooth out any air bubbles or wrinkles, working from the center to the edges.
And there you have it! You’ve successfully made and installed your vinyl decal. Now sit back and admire your crafty work. Vinyl decals are a great way to personalize your belongings or to create unique gifts for your friends and family. So go ahead and give it a try – you’ll be amazed at what you can create!
- Materials You Need to Make Waterproof Vinyl Stickers at Home
- Step 2 Remove the Background
- How To Prepare Vinyl Decals To Sell – Tip 3 Include Actually Detailed Vinyl Decal Installation Instructions
- 👇 Subscribe right here grab your free vinyl decal instructions printable 👇
- Taping Vinyl Decals
- Video:
- How To Make and Apply Vinyl Decals With Your Cricut
Materials You Need to Make Waterproof Vinyl Stickers at Home
When it comes to making your own vinyl decals at home, there are a few essential materials you’ll need to ensure they’re waterproof and long-lasting.
1. Vinyl cutter or cutting machine: A vinyl cutter or cutting machine is essential for creating precise and professional die-cut stickers. There are various machines available on the market, such as the Silhouette Cameo or the Cricut Explore Air.
2. Waterproof vinyl sheets: To make sure your stickers can withstand water and outdoor environments, it’s important to use waterproof vinyl sheets. These sheets are designed to repel moisture and ensure the longevity of your stickers.
3. Transfer tape or overlay: Transfer tape or overlay is used to transfer the cut vinyl decals from the backing paper to the desired surface. It helps to keep the individual parts of the sticker in place while you apply it.
4. Scanning mat or printable vinyl: If you want to turn your hand-drawn designs or printed images into stickers, you’ll need a scanning mat or printable vinyl. This material allows you to scan or print your designs onto the vinyl sheets.
5. Cutting mat: A cutting mat is used to ensure clean and accurate cuts when using a vinyl cutter or cutting machine. It provides a stable and flat surface for the machine to work on.
6. Weeding tools: Weeding tools are essential for removing the excess vinyl from your designs. They help you carefully remove the unwanted parts and leave only the desired shapes and letters on the backing paper.
7. Background materials: Depending on the type of decal you’re making, you may need additional background materials. This could include clear vinyl for transparent decals or solid colored vinyl for a background color.
These are the basics materials you’ll need to get started with making waterproof vinyl stickers at home. Remember to follow the instructions for your specific vinyl cutter or cutting machine, and don’t forget to have fun and unleash your creativity!
Step 2 Remove the Background
Once you have your design ready, you’ll need to remove the background before printing the decals. This step is crucial because it ensures that only the desired parts of the design will be transferred onto the vinyl material. Here’s how to do it:
- First, scan or import your design into a graphics editing software. This will allow you to work with the image digitally.
- Use the tools in your graphics editing software to grab the background and delete it. You’ll want to be careful not to delete any important parts of your design.
- If you have a detailed design with tiny parts, it may be helpful to zoom in and use the eraser tool to carefully remove the background around those areas.
- Once you’ve removed the background, you can overlay your design onto a printable decal sheet. Make sure to line it up correctly.
- If you’re worried about the design not sticking well or getting damaged, you can also opt to print the design onto waterproof decal paper.
- If you plan to sell your decals or give them as gifts, including instructions on how to apply them can be a nice touch for your customers.
- Before printing, double-check that your printer settings are appropriate for the type of decal paper you’re using. For example, if you’re using a Canon printer, choose the appropriate settings for photo paper or glossy paper depending on your materials.
- Click the print button, and your design should come out onto the decal paper.
- Allow the printed decals to dry completely before moving on to the next step.
- Once dry, carefully cut out the decals following the edges of your design. This can be done with scissors, or for more precise cutting, you can use a die-cutting machine.
- Don’t worry if there are any white or unwanted parts left on the decal. They won’t show up once you apply the decal onto the desired surface.
By following these instructions, you’ll be well on your way to making cute and detailed vinyl decals that you can stick onto various things. In the next step, we’ll cover how to apply the decals to ensure a smooth installation.
How To Prepare Vinyl Decals To Sell – Tip 3 Include Actually Detailed Vinyl Decal Installation Instructions
When you want to sell your vinyl decals, it’s important to provide your customers with detailed installation instructions. This will help them apply the decals correctly and ensure the best results. Here are some tips on how to prepare vinyl decals to sell by providing actually detailed installation instructions:
1. Start with a Printable Decal Instructions Sheet:
Prepare a printable sheet of instructions that your customers can easily follow. This sheet should include step-by-step instructions on how to prepare the surface, apply the decal, and remove the transfer tape. Make sure the instructions are clear and easy to read.
2. Include Images and Illustrations:
To make your instructions even more helpful, include images and illustrations that visually guide your customers through the installation process. This will help them understand what each step entails and how to execute it correctly.
3. Break Down the Installation Process:
Divide the installation process into smaller, easy-to-follow steps. This will make it less overwhelming for your customers and ensure they don’t miss any important details. Clearly label each step and provide instructions on what they should do at each stage.
4. Explain the Right Techniques:
Provide information on the right techniques for applying the vinyl decal. Explain the importance of using smooth, even strokes to prevent air bubbles and wrinkles. Also, mention the correct way to remove the transfer tape without damaging the decal.
5. Cover Specific Parts of the Process:
Highlight any specific parts of the installation process that may require extra attention. For example, if the decal has intricate details or complex curves, provide instructions on how to overcome these challenges. This will help your customers feel confident in tackling any difficulties they may encounter.
6. Offer Troubleshooting Tips:
Include troubleshooting tips for common issues that your customers may face during the installation process. For example, if they’re having trouble getting the decal to stick, provide suggestions for ensuring proper adhesion. This shows that you care about their experience and are willing to help them overcome any obstacles.
By providing actually detailed vinyl decal installation instructions, you can differentiate yourself from other sellers and provide added value to your customers. This will not only help them achieve a successful application but also increase their satisfaction with their purchase. So don’t worry about the extra effort – it will pay off in the form of happy customers who recommend your decals to others!
👇 Subscribe right here grab your free vinyl decal instructions printable 👇
Clicking here will take you to a page where you can subscribe to our newsletter. By subscribing, you’ll get access to a free printable with complete instructions on how to make your own vinyl decals. You’ll learn what materials you’ll need and how to use them, including tips and tricks for die-cutting and scanning your designs.
One of the great things about making decals with paper is that you can create custom designs that are perfect for gifts or personal use. You’re not limited to the pre-made patterns typically found in stores. Instead, you can make decals that suit your own style and aesthetic. Plus, you can experiment with different types of paper to achieve the look you want.
To ensure the longevity of your decals, we recommend using a waterproof paper or applying a waterproof coating over the decal once it’s printed and cut. This will help protect it from moisture and make it more durable.
When it comes to installation, applying the decal is as easy as peel and stick. Just remove the backing paper, line up the decal with the desired surface, and press it down firmly. Smooth out any air bubbles or creases with a credit card or similar tool. If you ever need to remove the decal, simply peel it off gently.
| Tip 1: | If you’re unsure about how to remove the decal without damaging the surface, you can try using a hairdryer to heat up the adhesive and make removal easier. |
| Tip 2: | If you’re working with a large decal, consider taping it in place across multiple parts before fully applying it. This will help ensure proper alignment and reduce the chances of making mistakes. |
So if you’re ready to start making your own vinyl decals, subscribe to our newsletter and get your free printable instructions today! Just click the link above and fill out the form to receive the PDF file. Happy crafting!
Taping Vinyl Decals
When it comes to applying vinyl decals, proper taping is crucial to ensure a seamless installation. Here are some tips on how to tape your vinyl decals:
- Prepare the materials you’ll need for taping, which include the vinyl decal, a waterproof surface, and some tape.
- Carefully remove the backing paper from the vinyl decal, making sure not to touch the adhesive side with your fingers.
- Place the decal onto the desired surface, making sure it is aligned correctly.
- Grab a piece of tape and tape one side of the decal to the surface. This will help hold it in place while you work on the rest of the decal.
- Continue taping around the decal, working your way across and down. Make sure to smooth out any bubbles or creases as you go.
- If you’re working with a large decal, consider using an overlay to help guide the installation.
- If you’re worried about the decal sticking too quickly, use a water spray to dampen the surface before applying the decal. This will give you some extra time to position it correctly.
- Once the decal is taped down and positioned correctly, use a squeegee or credit card to firmly press the decal onto the surface, making sure it sticks properly.
- Slowly and carefully remove the tape, peeling it back at a sharp angle. This will help prevent any damage to the decal or surface.
Following these taping instructions will ensure that your vinyl decal is applied smoothly and looks professional. Whether you’re making decals for your own personal use or to sell to customers, proper taping is an important step in the overall process. So grab your materials, follow these tips, and start creating beautiful vinyl decals for yourself or as unique gifts.
If you found this detailed guide on taping vinyl decals helpful, be sure to subscribe to our newsletter for more tips and instructions on making beautiful decals.


