

If you’re in the mood for a creative project, why not try creating your own patches? Patches can be used to personalize various items, from clothing to bags and more. There are still many traditional ways to make patches, such as cut and sew or sealing with heat. However, with the advancement of technology, there are now other options available, such as using adhesive or sticky back patches. No matter what method you choose, it’s important to ensure that the patches are made to last and affix securely to the desired surface.
When making patches, you’ll likely need certain tools and materials. If you’re into embroidery, you can embroider your own patch design onto fabric or use pre-digitized designs. You can also choose to print your design onto a sheet of fabric or use a pre-made patch. Whatever method you select, it’s important to consider the durability and washability of the patch to ensure that it will last over time.
One popular method for creating patches is by using a hoop. This involves hooping a piece of fabric or felt, and then embroidering or sewing the design onto the fabric within the hoop. This creates a patch that can be easily affixed to a garment or other item. Another option is to use adhesive backing or sticky back patches, which can be simply pressed onto the desired surface. This method eliminates the need for sewing or other fabric manipulation.
If you’re looking for a more adventurous way to make patches, consider using a heat press. This involves using a heat press machine to apply heat and pressure to the patch, which then adheres it to the fabric. This method is commonly used for custom patches or patches made from materials that can’t be easily sewn, such as rubber or leather.
- You’ll need
- Turn Your Embroidery Art Into a Patch with Robert Mahar
- Two ways to affix patches: Heat Seal and Adhesive
- 1 Heat Seal Patches – Pressed onto Garments and Other Soft Goods
- 2 Sticky Patches – for adhering to hard goods and flat surfaces
- Creating a patch using Git
- How To Make Custom Patches
- Step 1: Patch design concept
- Step 2 Have the design digitized
- Step 3: Select a patch fabric
- Step 4: Sew a Hoop
- Step 5: Use heat sealing to put it in place
- Step 6 Cut your patch
- Video:
- DIY | I made a hand embroidered patch (for the first time)
You’ll need
- Fabric – whatever fabric you choose will depend on what you want to make the patch for. It could be canvas for a sturdy patch, or a soft felt for a more delicate item.
- Adhesive – there are various types of adhesive you can use for patch making. You’ll need one that is strong enough to hold the patch in place, but not so strong that it can’t be removed if need be.
- Adhering tool – this could be a sewing machine, if you plan to sew your patch onto the garment, or an adhesive tool for iron-on patches.
- Digitized design – you’ll need a digital version of the design you want to turn into a patch. This can be created using graphic design software, or you can use a ready-made design.
- Scissors – you’ll need a pair of sharp scissors to cut out your patch design.
- Paper – you’ll need a sheet of paper to trace your design onto before cutting it out of the fabric.
- Hoops – if you’re using an embroidery machine, you’ll need hoops to hold the fabric flat and tight while the machine stitches the design onto it.
- Heat source – if you’re creating an iron-on patch, you’ll need a heat source, such as an iron or a heat press, to affix the patch to the garment.
- Mahar – a Mahar is a special adhesive backing used to seal the edges of the fabric patch and prevent it from fraying.
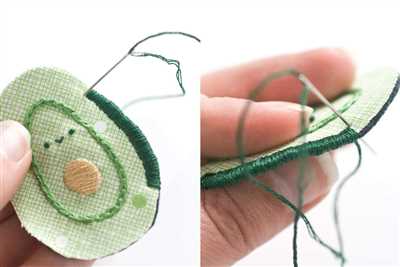
Turn Your Embroidery Art Into a Patch with Robert Mahar
If you’re into embroidery and want to turn your art into wearable patches, you’ve come to the right place. In this tutorial, we’ll walk you through the steps to create your own custom patches with renowned artist and craft expert, Robert Mahar.
Step 1: Cut and Hoop
- Cut a piece of strong adhesive backing that matches the size of your embroidery.
- Hooping is an important step to ensure that your patch stays in place during the sewing process. Make sure it’s tightly pressed.
Step 2: Trace and Digitize
- Trace your embroidery design onto a sheet of paper. This will serve as a template for digitizing.
- Use a digitizing software to convert your design into a digital format that can be used by embroidery machines.
Step 3: Sew and Seal
- Select the appropriate thread colors to sew your design onto the fabric.
- Once the embroidery is complete, remove it from the hoop and cut out the patches.
- Seal the edges of the patch using heat or a hard adhesive to ensure durability.
Step 4: Affix and Wear
- Lay the patch on the garment or item where you want it to be.
- Ensure that it’s positioned correctly and use a heat press or iron to affix it firmly.
- Wait for a few seconds for the adhesive to set and your patch is ready to wear!
Step 5: Consider Quality and Surrounding Surfaces
- When creating patches, choose high-quality materials like felt or canvas for a soft and durable finish.
- If you’re planning to attach the patches to items like mugs or glasses, make sure the adhesive used is suitable for those surfaces.
Step 6: Watch Robert Mahar’s Workshop
- For a more detailed guide on how to make patches, check out Robert Mahar’s workshop where he demonstrates the entire process.
- Robert Mahar is known for his expertise in various crafting goods and has written a book on DIY projects.
By following these steps, you’ll be able to turn your embroidery art into unique patches that can be used to personalize your garments or share with friends and other embroidery enthusiasts. So why wait? Get started and unleash your creativity today!
Two ways to affix patches: Heat Seal and Adhesive
When it comes to adding patches to your garments or accessories, there are two popular methods you can use: heat seal and adhesive. Each method has its own advantages and considerations, so let’s take a closer look at how to affix patches using these techniques.
- Heat Seal: Heat seal is a common method used for attaching patches onto fabric. This method involves using heat to activate the adhesive on the back of the patch and bond it to the fabric surface. Here are the steps to affix patches using heat seal:
- Cut out the patch you need from a sheet of heat seal adhesive.
- Place the patch onto the desired fabric or garment.
- Use a heat press or iron set to the appropriate temperature to heat the patch and fabric together. Apply pressure for a few seconds.
- Allow the patch to cool down before moving onto the next step.
- Once cooled, check the patch to ensure it is securely bonded to the fabric.
- Adhesive: The adhesive method is another popular way to affix patches. This method involves using an adhesive backing on the patch to stick it onto the fabric surface. Here’s how you can use adhesive to affix patches:
- Select the adhesive backing that matches your patch design.
- Peel off the adhesive backing to expose the sticky side of the patch.
- Position the patch onto the desired fabric or garment.
- Press the patch firmly onto the fabric surface, ensuring it is securely stuck.
- Allow the adhesive to set for the recommended amount of time, usually a few hours or overnight.
- Check the patch to confirm it is firmly attached to the fabric.
Whether you choose the heat seal or adhesive method, it is important to consider the fabric and garment you are working with. Some fabrics may not be suitable for heat seal, while others may require additional reinforcement when using adhesive. It’s also important to properly care for your patched garments to ensure the patches stay in place.
So the next time you want to give your garments or accessories a new look, consider using these two ways to affix patches – heat seal and adhesive. They are easy to use, versatile, and can add a touch of personalized style to your me-made goods.
1 Heat Seal Patches – Pressed onto Garments and Other Soft Goods
Heat seal patches are a popular and efficient way to affix custom designs onto various items such as garments, bags, and hats. This method involves pressing the patch onto the desired surface using heat, allowing the adhesive on the back of the patch to bond with the fabric. Here’s a step-by-step guide on how to create and apply heat seal patches:
Step 1: Select the Patch Design
First, choose the design you want to turn into a patch. It could be your logo, artwork, or any other custom design that you want to wear or showcase on your garments or other soft goods.
Step 2: Digitize the Design
If your design exists only as a physical item, such as a piece of artwork on paper, you’ll need to digitize it using a scanner or a digital camera. This step is crucial to create a digital file that can be used for patch production.
Step 3: Create the Patch Design
Using embroidery software or a graphic design program, create the patch design. Consider matching thread colors to the original artwork to ensure the design looks as close as possible to the original.
Step 4: Hoop and Sew the Design
Hooping is the process of securing the fabric into an embroidery hoop. Place the fabric into the hoop, ensuring it is flat and taut. Next, run your embroidery machine to sew the patch design onto the fabric. This will create a patch with a clean and professional look.
Step 5: Cut and Seal the Patch
After the embroidery is complete, carefully cut around the design, leaving a small border of fabric. This border will help ensure that the edges of the patch do not fray. Next, place the patch onto the garment or other soft goods in the desired location. Lay a heat-seal adhesive sheet on top of the patch and garment, then seal it using a heat press or an iron, following the manufacturer’s instructions.
Step 6: Watch Your Patch Adhere
As the heat is applied, the adhesive on the heat-seal sheet will melt and bond the patch to the garment or soft good. Watch closely and ensure that the patch is adhering flat with no wrinkles or bubbles. Once adhered, let it cool for a few seconds, and your custom patch is ready to be worn or showcased!
Heat seal patches offer a convenient and durable way to add customized designs to garments and other soft goods. By following these steps, you can create and apply your own heat seal patches at home or in a workshop with the help of heat-sealing machines. Enjoy your patch making adventure!
2 Sticky Patches – for adhering to hard goods and flat surfaces
When it comes to making patches, one important consideration is how to adhere them to different surfaces. While sewing is a popular method, there are other ways to affix your custom patches without having to pick up a needle and thread. In this guide, we’ll focus on two sticky patch options that are perfect for adhering to hard goods and flat surfaces.
1. Adhesive-backed patches: Adhesive-backed patches are a great option if you want a quick and easy way to attach your patch to a hard item. The adhesive on these patches is strong and can easily stick to surfaces such as mugs, glasses, and other hard goods. To use adhesive-backed patches, simply peel off the backing and press them onto the desired item. Make sure to clean and dry the surface before applying for the best adhesion.
2. Heat seal patches: Heat seal patches are made from a special adhesive that is activated by heat. These patches are commonly used on garments and fabrics, but they can also be used on hard goods and flat surfaces. To apply a heat seal patch, place it on the desired item, cover it with a sheet of heat-resistant paper, and press a hot iron or heat press onto the patch for a few seconds. The heat will activate the adhesive, creating a strong and lasting bond. Make sure to follow the manufacturer’s instructions for the correct temperature and timeline when using heat seal patches.
In addition to these two sticky patch options, there are various other ways to adhere patches to different surfaces. Some people prefer to sew their patches onto items, while others use adhesive sprays or fabric glue. The method you choose will depend on the item you’re working with and the look you want to achieve.
When selecting a patch adhesive, it’s important to consider the surrounding environment and how the patch will be used. If you’re creating patches for outdoor use or items that will likely be exposed to moisture or extreme temperatures, choose an adhesive that is known for its durability and resistance to these conditions.
Now that you know the basics of adhering patches to hard goods and flat surfaces, it’s time to turn your ideas into reality. Whether you’re making patches for personal use or to sell, having a strong and reliable adhesive method is crucial for ensuring that your patch stays in place and looks great.
Next, watch the how-to video below to get a step-by-step tutorial on how to properly adhere sticky patches:
- Step 1: Cut your patch design from fabric or choose a pre-made patch
- Step 2: Prepare your item by cleaning and hooping it
- Step 3: Lay the adhesive patch onto the item, matching it to the desired location
- Step 4: Use a heat press or iron to seal the patch onto the item
- Step 5: Once sealed, let the patch cool for a few seconds before removing the hoop or heat press
- Step 6: Congratulations, you’ve made your own sticky patch!
By following these steps, you’ll be able to create high-quality patches that can be easily affixed to a wide range of surfaces. Whether you’re making patches for yourself, your friends, or for sale, using a strong adhesive will ensure that your patch stays in place and looks professional.
So, what are you waiting for? Get out your patch-making supplies and start creating your own sticky patches today!
Creating a patch using Git
Git is a powerful version control system that allows developers to easily manage and collaborate on projects. One useful feature of Git is the ability to create and apply patches, which can be especially handy when you want to share specific changes with others or when you need to apply those changes on a different machine.
Here are the steps to create a patch using Git:
- First, make sure you have Git installed on your machine. If not, you can download it from the official Git website.
- In your Git repository directory, use the command git diff
> patch.diff to create the patch file. Replacewith the commit hash or branch name that you want to create the patch from. - Next, open the patch file using a text editor, and you will see the changes represented in a diff format.
- If you want to ensure that the patch only applies to specific files or directories, you can modify the patch file to match the desired path structure.
- Now that you have the patch file, you can send it to other developers or apply it on a different machine. To apply the patch, navigate to the target Git repository directory and use the command git apply patch.diff.
Creating patches using Git is a straightforward process that allows you to easily share or apply specific changes to your projects. Whether you’re working on a custom graphic design or digitized embroidery, patches are a great way to add style and personalization to your garments, mugs, or even home goods. So, if you’re up for an adventure in the world of patch creation, turn to Git and get started on your next creative project!
How To Make Custom Patches
If you want to add a personal touch to your garments or accessories, making custom patches is a great way to do it. Whether you want to create patches for your own use or to give as gifts to friends and family, this DIY project is both fun and rewarding.
To make custom patches, you’ll need a few materials and follow a series of steps. Here is a step-by-step guide to help you get started:
Step 1: Choosing the Design
The first and most important step is to choose a design for your patch. You can either create your own graphic or use existing artwork. Once you have a design in mind, you can further refine it by using graphic design software or by tracing it onto a sheet of paper.
Step 2: Selecting the Fabric
Next, you’ll need to choose the fabric for your patch. Felt is a popular choice as it is soft and easy to work with. You can also use other fabrics like cotton or canvas depending on the look and feel you want for your patch.
Step 3: Hooping the Fabric
If you’re using an embroidery machine, you’ll need to hoop the fabric before you can start sewing. Make sure the fabric is laid flat and taut in the hoop to ensure the best results.
Step 4: Sewing the Patch
Once the fabric is hooped, you can start sewing the patch. Use a strong thread that matches the color of your design and follow the outline of the design. Sew slowly and carefully to ensure precise stitching.
Step 5: Affixing the Patch to the Garment
After sewing, you’ll need to affix the patch to the garment or item you want to apply it to. There are various ways to do this, such as using heat or adhesive. Choose a method that works best for you and follow the instructions carefully.
Step 6: Sealing the Patch
To ensure that your patch stays in place and doesn’t fray, you’ll need to seal the edges. This can be done using fabric glue or by stitching around the edges of the patch.
By following these simple steps, you can create custom patches that are unique and personal. Not only will you save money by making your own patches, but you’ll also have the satisfaction of wearing something you’ve made with your own hands.
So, why wait? Turn your patch-making adventure into a reality today!
Step 1: Patch design concept
Before you start creating custom patches for yourself or others, you need to have a design concept in mind. This will ensure that the patch you create reflects your personal style and meets your specific needs.
1.1 Choose the design: Consider what you want the patch to represent. You can select a logo, an image, or even a digitized embroidery design. Think about the various surfaces you plan to affix the patch to – garments, bags, hats, and more. This will help you determine the size, shape, and colors of your patch.
1.2 Trace or digitize the design: If you already have a design, trace it onto a piece of paper or digitize it using embroidery software. This will serve as your template for creating the patch.
1.3 Select the fabric: Choose a fabric that is sturdy and durable, such as felt or a soft, spun fabric. This will ensure that your patch is strong enough to withstand wear and tear.
1.4 Cut out the fabric: Using your template, cut out the fabric to match the shape and size of your design. Make sure to leave a margin of about 1/4 inch around the edges of the design.
1.5 Hooping: Turn your embroidery hoop upside down and place the fabric flat on the inner hoop. Make sure the fabric is laid out smoothly and there are no wrinkles.
1.6 Sealing the fabric: If you have chosen an adhesive patch, apply a sticky backing material to the fabric. This will ensure that the patch stays in place while you sew it onto your garment. If you’re using a sew-on patch, you can skip this step.
1.7 Hoop the fabric: Place the outer hoop over the fabric and press down firmly to secure it. Ensure that the fabric is taut and the design is centered within the hoop.
1.8 Turn on the machine: Turn on your embroidery machine and select the appropriate stitch and thread color. Follow the instructions in your machine’s manual for stitching the patch.
1.9 Sew the patch: Start sewing the patch by following the digitized lines of your design. Take your time and watch carefully to ensure that the needle is sewing in the right places. Sew around the edges of the design to affix the patch securely.
1.10 Remove from hoop: Once you’ve finished sewing the patch, turn off the machine and carefully remove the fabric from the hoop. Cut any excess threads and inspect the patch to ensure that it is firmly sewn.
1.11 Seal the edges: To add extra strength to your patch, you can seal the edges with a fabric sealant or by hand-stitching around the perimeter. This will prevent any fraying or unraveling of the patch over time.
1.12 Save or wear your patch: Your patch is now ready to be worn or saved as a memento of your patch-making adventure! Put it on your favorite garment, sew it onto bags or hats, or create a patch directory to showcase your collection.
By following these steps, you can create custom patches to add a personal touch to your clothes, accessories, or gifts for friends and loved ones. Watch as your patch ideas come to life and enjoy the satisfaction of wearing or gifting your me-made patch!
Step 2 Have the design digitized
Once you have finalized the design for your patch, the next step is to have it digitized. Digitizing a design is the process of converting a graphic or artwork into a format that can be read by embroidery machines.
Digitizing is a crucial step in patch making as it determines the quality and accuracy of the final product. It involves using special software to create a digital file that contains the instructions for the embroidery machine to follow.
There are several ways to have your design digitized. You can choose to digitize it yourself if you have the necessary skills and software. However, this can be a time-consuming and complex process, especially if you are new to digitizing.
If you are not familiar with digitizing, it is recommended to seek professional help. There are many embroidery digitizing services available online or in your local area that can help you with this step. These services have experienced digitizers who can accurately digitize your design according to your specifications.
When selecting a digitizing service, make sure to choose one that has a good reputation and provides high-quality digitizing. You can ask for recommendations from friends or fellow embroiderers, or browse through online directories to find a reliable digitizing service.
Before digitizing, it’s important to ensure that your design is ready for the process. Clean up the design by removing any unwanted elements or unnecessary details. Simplify the design if needed, as intricate or complicated designs may not translate well into embroidery.
Once the design is ready, you can submit it to the digitizing service of your choice. They will take your design and convert it into a format that can be read by embroidery machines. The digitized design will be saved as a file, usually in a format like .DST or .PES.
Having your design digitized is an essential step in creating patches. It allows you to transform your artwork into a stitch-ready format that can be embroidered onto fabric. The digitized design ensures that the embroidery machine knows exactly where to place each stitch, resulting in a precise and accurate patch.
Digitizing your design may come with a cost, but it is usually worth it to ensure the best results. Once your design is digitized, you can use it repeatedly to create patches for various garments, bags, hats, or other goods.
In the next step, we will explore how to hoop your fabric and get ready for sewing your patches. Stay tuned!
Step 3: Select a patch fabric
When creating patches, one of the most important steps is selecting the right fabric for your project. The fabric you choose will determine the overall look, feel, and durability of your patch. Here are some key factors to consider when selecting a patch fabric:
- Material: The type of fabric you choose will depend on the look you want to achieve. Cotton, felt, and denim are popular choices for patches due to their durability and ease of sewing.
- Design: Consider the design you’ll be creating with your patch. If you have a complex or detailed design, choosing a fabric with a tighter weave, such as cotton, will help ensure that the design comes out clearly.
- Color and pattern: Select a fabric color and pattern that complements your garment or project. If you’re creating a custom patch, choose a fabric that matches or enhances the colors of your intended design.
- Texture: Patches can be made from various textured fabrics, such as embroidered or quilted fabric, to add dimension and visual interest to your project.
- Backing: Decide whether you want an adhesive backing or a sew-on patch. Adhesive backings are quick and easy to attach, but sew-on patches provide a more secure and durable attachment.
- Size: Consider the size of your patch and ensure that the fabric you choose is large enough to accommodate the design. It’s also important to cut the fabric to the desired size before starting the sewing process.
- Hooping: If you’ll be using an embroidery machine to create your patch, you’ll need to select a fabric that can be easily hooped. Hooping allows you to securely hold the fabric in place while the embroidery machine works its magic.
- Matching the garment: If you’re creating a patch to mend or decorate a specific garment, try to select a fabric that matches the material and color of the garment. This will help the patch blend seamlessly with the surrounding fabric.
- Consider the usage: Think about how and where you plan to use your patch. If it will be exposed to a lot of wear and tear or frequent washing, choose a fabric that can withstand these conditions.
By considering these factors, you’ll be able to choose the perfect fabric for your patch and ensure that it lasts for years to come.
Step 4: Sew a Hoop
Once you have digitized and printed your design, it’s time to sew it onto a fabric. Here’s how:
- Choose a soft fabric sheet that will serve as the base for your patch. You can use various textiles, but make sure they are strong enough to withstand wear and tear.
- Cut out a canvas or other sturdy material that matches the size of your design.
- Place the fabric sheet flat on a table or any other flat surface.
- Put the canvas cut-out on top of the fabric sheet, ensuring that it is centered correctly.
- Secure the fabric and canvas together using pins or other adhesive surfaces.
- Thread your sewing machine with the color of thread that matches your design.
- Sew around the outline of your design using a straight stitch or any other stitch pattern that you prefer.
- Make sure to sew all the way around the design to ensure it is properly sealed.
- Once the sewing is complete, remove any excess fabric around the design.
- You can now affix the patch onto your desired garment or accessory.
- Using an adhesive backing or other sticky surfaces, adhere the patch to the garment or accessory.
- Apply pressure to ensure a strong bond between the patch and the surrounding fabric.
- Allow the adhesive to dry and set for the recommended time.
By following these steps, you’ll be able to create your own custom patches to personalize your clothing, bags, or other items. Make sure to take your time and have fun with the process!
Step 5: Use heat sealing to put it in place
Once you have created your patch, the next step is to affix it onto the fabric or garment you want to use it on. Heat sealing is a popular method for this purpose, as it provides a secure and long-lasting bond.
Here’s how you can use heat sealing to attach your patch:
- Cut a piece of adhesive heat seal patch sheet that matches the size of your patch.
- Place the patch on a flat work surface and lay the heat seal sheet on top, ensuring that the adhesive side is facing down.
- Turn on your heat sealing machine and set it to the appropriate temperature and timeline. Refer to the manufacturer’s instructions for guidance.
- Place the fabric or garment that you want to attach the patch onto in the hoop of the heat sealing machine.
- Position the patch with the heat seal sheet on top onto the desired area of the fabric or garment.
- Press the heat sealing machine onto the patch and fabric or garment, applying firm pressure. Ensure the patch is positioned correctly.
- Hold the heat sealing machine for a few seconds, as directed by the manufacturer, to allow the adhesive to fully bond the patch to the fabric or garment.
- Remove the heat sealing machine and let the fabric or garment cool down. Avoid touching the patch during this time to ensure a strong bond.
- Your patch is now securely affixed to the fabric or garment using heat sealing. It can withstand normal wear and tear without coming off easily.
Using heat sealing to attach patches can save you time and effort compared to sewing them on. It is a popular method in the embroidery and patch-making world for this reason. Just make sure to follow the necessary steps and take care to affix the patch correctly.
Whether you’re creating patches for your own use or to give to friends and family, heat sealing is a reliable technique for affixing them onto various surfaces. So go ahead, give it a try, and watch your me-made patchs come to life!
Step 6 Cut your patch
Once you’ve digitized your design and selected the fabric for your patch, it’s time to cut it out. This step is crucial to ensure that your patch will fit correctly on your garment.
Use sharp fabric scissors to carefully cut around the embroidered design. Take your time and make small, precise cuts to maintain the integrity of the patch. It’s important to cut along the outer edges of the design without cutting into the embroidered area.
If you’re creating a custom patch at home, you may want to use a template or stencil to guide your cutting process. This will help you achieve clean, straight lines and ensure that your patch looks professional.
Be sure to save any excess fabric for future patch-making. You never know when you’ll need an extra patch or want to create matching patches for friends and family.
If you’re using a patch-making machine, follow the instructions provided by the manufacturer to cut your patch. Typically, you’ll need to place a sheet of heat-seal adhesive onto your fabric before turning it over and adhering it to a sticky surface, like a hoop.
Once your patch is cut, you’re ready to affix it to your garment. In the next step, we’ll cover how to properly attach your patch to ensure it stays in place, whether you’re using a sewing machine or heat-sealing it.


