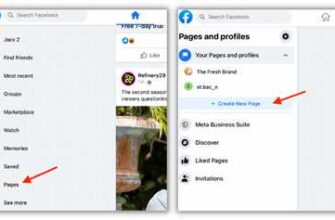

If you are passionate about sharing your thoughts and ideas with the world, starting a blog is a great option. Creating a blogging account is an easy process that can be done in just a few steps. In this article, we will guide you through the process of signing up for a blogging account and getting started with your first post.
Step 1: Sign up for a blogging account
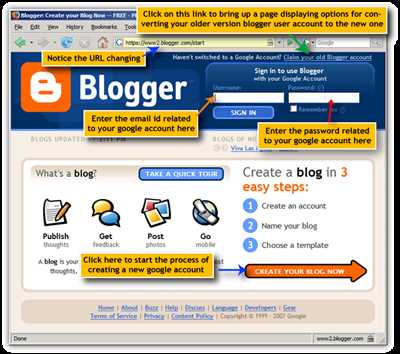
To create a blogging account, you need to go to blogger.com and click on the “Create Your Blog” button. If you already have a Google account, simply click on “Sign In” and enter your login credentials. If you don’t have a Google account, you can click on “Create Account” and follow the instructions to create one.
Step 2: Choose a title and address for your blog
Once you are logged in, you will be prompted to choose a title and address for your blog. The title should reflect the content of your blog and the address will be the URL where your blog can be accessed. Make sure to choose something catchy and relevant to your blog’s topic.
Step 3: Select a template for your blog
After choosing the title and address, you can select a template for your blog. Blogger provides a wide range of templates that you can choose from. Take your time to browse through the options and find a template that you like. Don’t worry if you don’t find the perfect template right away, as you can always change it later.
Step 4: Start writing your first blog post
Once you have completed the initial setup, it’s time to start writing your first blog post. To do this, simply click on the “New Post” button in the dashboard. A draft of your post will open, and you can begin writing your content. Make sure to write in a clear and concise manner, and use appropriate tags to categorize your post.
Step 5: Preview and publish your blog post
After you have finished writing your post, you can preview it to make sure everything looks good. If you are satisfied with the content and the formatting, you can click on the “Publish” button to make your post live. Congratulations, you have just published your first blog post!
Step 6: Manage your blog
Once your blog is up and running, you can manage it by going back to the dashboard. From there, you can view and edit your posts, change the settings of your blog, and check the traffic and statistics. Blogger provides a user-friendly interface that makes it very easy to manage your blog and keep track of its performance.
Creating a blogging account is a simple and straightforward process that anyone can do. If you’ve always wanted to start a blog, now is the time to take action. Follow the steps outlined here, and you’ll be well on your way to creating a successful blog that will attract readers and help you share your ideas with the world.
Sources: blogger.com, blogger.com/how-to
Blogspot Login- How to Signup for Blogger Account

If you’re looking to start a blog and share your thoughts with the world, creating a blogging account is the first step. One of the most popular platforms for blogging is Blogger, which is owned by Google and provides a user-friendly interface for managing your blog.
To get started, follow these simple steps:
- Go to www.blogger.com and click on the “Create Your Blog” button.
- Sign in with your Google account or create a new one if you don’t have an account yet.
- Once you’re signed in, click on the “New Blog” button to create your blog.
- Choose a title for your blog and a URL address. Make sure the URL address is relevant to your blog’s theme and easy to remember.
- Select a template for your blog. Blogger provides a variety of templates to choose from, so take your time to find the one you like.
- Click on the “Create blog!” button to create your blog.
Once you’ve created your blog, you can start writing your first blog post. To do this, follow these steps:
- Click on the “New post” button in the top-right corner of the Blogger dashboard.
- Give your post a title that accurately represents its content.
- Write your blog post in the content area. You can format your text, add images, and make other adjustments using the toolbar at the top of the content area.
- If you’re not ready to publish your post yet, you can save it as a draft and come back to it later.
- Once you’re done writing your post, click on the “Publish” button to make it live on your blog.
Managing your blog and setting the appropriate settings can be done through the Blogger dashboard. From there, you can view and edit your published posts, customize your blog’s design, and manage various other aspects of your blog.
Creating and managing a blog through Blogspot is very easy, even if you don’t have any prior experience. Once you’ve signed up and started your blog, you can focus on creating high-quality content and engaging with your readers. Happy blogging!
Creating your blog
If you are getting started with blogging, the first step is to create your blog. Here, we will guide you through the easy steps to create your blogging account using Blogger.com or Blogspot.com.
1. Open the Blogger.com or Blogspot.com website in your browser.
| 2. Click on the “Create Your Blog” or “Get Started” button. |
| 3. Next, you will see the signup/login page. If you already have a Google account, you can simply login with that. If not, click on the “Create Account” button to signup for a new account. |
| 4. Make sure to provide an appropriate username, password, and email address while signing up. |
| 5. Once you are logged in, click on the “Create New Blog” or “New Blog” button. |
| 6. Here, you need to give a title to your blog, choose a blog address (URL), and select a template for your blog. Don’t worry, you can always change these settings later. |
| 7. After filling in the required information, click on the “Create Blog” or “Finish” button. |
| 8. Congratulations! You have successfully created your blog. Now, you can start writing your first post by clicking on the “New Post” button. |
| 9. In the post editor, you can write the title and content of your blog post. You can format the text, add images, and customize the layout as per your preferences. |
| 10. Once you are done writing your post, you can either save it as a draft or directly publish it. You can also preview your post to see how it will look like once it’s published. |
That’s it! You’ve just created your blog and written your first post. Now, you can manage your blog, view your published posts, and make any necessary changes using the blogger.com or blogspot.com platform.
2 – Getting started
To create a blogging account on platforms like Blogspot or Blogger, you need to follow a few simple steps. First, go to the appropriate website which is either blogger.com or blogspot.com. If you don’t have an account already, click on the “Sign Up” button to create a new account. It’s easy and just requires you to provide your email address and choose a login password.
Once you have your account, open the blogging platform and click on “Create a new blog”. Here, you will have to choose a title for your blog. Make sure it is catchy and reflects the content you plan to write about. Next, you will be prompted to choose an address for your blog. This will be the URL that others can use to view your blog. You can use the templates provided by the platform or customize it with your own design.
After you have set up the appropriate settings, you are ready to start blogging. Click on “New Post” to create your very first post. Write your content in the designated area. You can add images, format text, and check for any spelling or grammar mistakes using the tools provided. If you don’t want to publish the post yet, you can save it as a draft and come back to it later.
Managing your blog is also very easy. Once you have published a post, you can check the view count and comments. If you want to edit the post, simply click on “Edit” and make the necessary changes. You can also add tags or categories to make it easier for others to find your content.
So, getting started with creating a blogging account is as simple as following these steps. Just make sure you have a clear idea of what you want to write about and the purpose of your blog. Once you have everything set up, all you have to do is write and manage your blog efficiently.
Steps To Create A Blog Through Blogger

If you would like to create a blog, follow these steps to create one through Blogger:
- Open your web browser and go to www.blogger.com
- Once the page is open, click on the “Create Your Blog” button.
- If you already have a Google account, simply login with your existing account. If you don’t have one, click on the “Sign Up” button to create a new account.
- After logging in or signing up, you’ll be directed to the “Create a New Blog” page.
- Here, you can choose an appropriate title for your blog and an available web address (e.g. YourBlogName.blogspot.com).
- Next, select a template for your blog. Blogger provides a variety of templates to choose from.
- Once you are done with selecting a template, click on the “Create Blog!” button.
- Now, you have successfully created your blog! You can start writing your first blog post by clicking on the “New Post” button.
- When you are writing your post, make sure to write a catchy and engaging title and your desired content.
- After writing your post, click on the “Preview” button to check how your post will appear to viewers.
- If everything looks good, click on the “Publish” button to make your post live on your blog.
- Alternatively, if you’re not ready to publish your post yet, you can click on the “Save” button to save it as a draft for later.
- Once you’ve followed these steps, your blog is up and running on the web! You can view your blog by going to YourBlogName.blogspot.com.
Creating a blog through Blogger is very easy and provides a great platform to get started with blogging. So, don’t waste any more time and create your own blog today!
Sources
When it comes to creating a blog account, there are a few sources you can refer to for guidance and assistance. Here are some of the sources you can check out:
| 1 | Blogger.com | Blogger.com is a popular platform for creating blogs. It is very easy to sign up for an account, and they provide you with various templates to choose from. Once you have a Blogger account, you can start writing and editing your blog posts. |
| 2 | Blogspot.com | Blogspot.com is the domain address commonly used by Blogger accounts. If you have already created a blog on Blogger, your blog’s address will most likely end with blogspot.com. |
Signing up for a Blogger account:
To create a Blogger account, follow these steps:
-
Go to www.blogger.com
-
Click on the “Create Your Blog” button
-
Fill in the appropriate information like your email, password, and display name
-
Click on the “Next” button
-
Choose a title and address for your blog. The address you choose will determine the URL of your blog (e.g., yourblogname.blogspot.com)
-
Select a template for your blog from the available options
-
Click on the “Create blog!” button
Managing your blog:
Once you have created your blog, you can start managing it. Here are a few things you can do with your Blogger account:
-
Write new blog posts: Click on the “New Post” button to create a new blog post. You can write and edit your content right there in the Blogger interface.
-
Check your blog’s view: Click on the “View Blog” button to see how your blog looks to the readers. This will open your blog in a new tab or window.
-
Edit drafts: If you don’t want to publish a blog post immediately, you can save it as a draft and come back to it later for further editing.
-
Set up the appropriate settings: Go to the “Settings” section in your Blogger account to manage the various options and settings for your blog.
Using the sources mentioned above, you can create a blog account, write content, manage your blog, and make sure everything is set up just the way you like it. Happy blogging!