Creating a transparent signature can prove to be an essential task in various contexts. Whether you need it for digital documents or to save your signature and use it across different platforms, knowing how to create a transparent signature is certainly a valuable skill.
One basic idea to create a transparent signature is by using an image editor like Apowersoft’s Signature Creator. This easy-to-use tool allows you to remove the background color from your signature and save it with transparency. It ensures that your signature can be placed on any background without any issues.
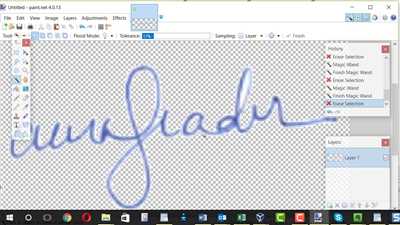
If you have a physical copy of your signature, you can scan it using a scanner or take a photo with a digital camera. Next, open the scanned image in an image editor like Photoshop. Within Photoshop, you can use a variety of tools and filters to remove the white background of the signature. One effective method is to use the “Magic Eraser” tool and set the tolerance levels to remove the white pixels around the signature. Ensure that you save the image file in a format that supports transparency, such as PNG.
Alternatively, if you don’t have access to Photoshop or find the process too complicated, you can use online image resizer tools that offer a feature for removing the white background. These tools often have a “Remove Background” or “White Isolation” feature that allows you to create a transparent signature with just a few clicks. You simply upload the scanned signature and select the white isolation filter or value matrix to remove the white pixels from the image.
Whichever method you choose, make sure to take your time and be careful with the eraser or transparency process. Double-check that the selected area is the signature itself and not any part of the background. This will ensure that your transparent signature looks professional and can be easily applied to any document or image you require.
Creating a Digital Signature in Photoshop
If you want to create a digital signature for your scanned documents in Photoshop, follow these easy steps:
- Scan your signature: Begin by scanning your signature using a scanner or capturing it with a camera.
- Open the scanned file in Photoshop: Open the scanned signature in Photoshop by selecting “Open” from the File menu.
- Remove the background: Use the eraser tool or the background eraser tool to remove the background of the scanned signature. Make sure to save the file with a transparent background.
- Create transparency: To create transparency in the signature, go to the “Layer” menu and select “Layer Style.” From the options, choose “Blending Options” and adjust the opacity slider to your desired transparency level.
- Save the transparent signature: Save the signature with transparency as a PNG file to maintain the transparency.
By following these steps, you can create a basic digital signature in Photoshop. If you’re not comfortable using Photoshop or don’t have access to it, there are also alternative software options available. Apowersoft Online Image Resizer or Transparent Signature Creator are two easy-to-use tools that you can try.
Remember, when creating a digital signature, it’s important to make sure the background is removed and the signature is saved with a transparent background. This ensures that the signature can be easily placed within any document or context without the white background. Now that you know how to create a transparent signature in Photoshop, you can guard your documents and sign them digitally with ease.
How to create a signature scanner and remove white background for transparency

Creating a basic signature for documents is a common task, but if you want your signature to have transparency, the process becomes a bit more complex. In this context, we’ll walk you through the steps to create a transparent signature by removing the white background.
First, you’ll need to have a scanner at hand to scan your signature onto your computer. Make sure you’re using a scanning program that allows you to select the transparency option. If you’re not sure, you can try using the default scanning program on your computer or search for a free scanner app online.
When scanning the signature, make sure to select the option for transparent background or remove the white background. This will ensure that the background color is not included in the scanned image.
Once the scan is complete, you’ll need to open the scanned image in an image editing software. Adobe Photoshop is a popular choice, but there are also free and easy-to-use alternatives available such as Apowersoft’s Online Image Resizer or the GIMP software.
In the image editing software, use the eraser tool or a white isolation filter to remove the white background from the signature. Set the value matrix to remove white and adjust the levels if necessary to ensure a clean removal of the white background.
After you’ve removed the white background, save the signature in a file format that supports transparency, such as PNG or GIF. This will preserve the transparency of the signature.
Now you have a digitally-created signature with a transparent background. You can use this signature in various documents without the white background interfering with the context of the document.
Remember, if you don’t have a scanner, or you’re not comfortable with the scanning process, you can always use a digital signature creator. These tools allow you to create signatures directly using your computer or mobile device, eliminating the need for a scanner and the process of removing the white background manually. Just make sure to select a tool that supports transparency for the signature.
Next time you’re in need of a transparent signature, now you know how to create one using a scanner and remove the white background. Follow these steps and guard your document’s integrity with a transparent signature.
Apowersoft Background Eraser
If you’re looking for a digital tool to remove the background from your signatures and create transparent files, Apowersoft Background Eraser is the perfect solution for you. This easy-to-use tool allows you to process your signatures in just a few simple steps, giving you the freedom to use them in any context you desire.
Apowersoft Background Eraser provides a selection of white isolation filters, which sets the value matrix within a white background, thus creating a transparent signature. This tool is specifically designed for anyone who needs to remove the white background from their scans or documents, making it an ideal choice for creating digital signatures.
One of the main features of Apowersoft Background Eraser is its ability to remove the background with just a few clicks. Simply open the tool and select the signature file you want to work with. Next, choose the “Background Eraser” option and let the tool do its magic. Within seconds, you’ll have a transparent signature ready to use.
In addition to its easy-to-use interface, Apowersoft Background Eraser also provides a basic imageresizer function. This allows you to resize your signatures as needed, saving you time and ensuring the perfect fit for your documents or projects.
If you’ve tried using Photoshop or other similar software to remove the background from your signatures, you know how time-consuming and complex the process can be. With Apowersoft Background Eraser, you don’t have to worry about advanced color matrix or transparency levels. The tool takes care of all the technicalities, allowing you to focus on the creative aspect of your work.
In conclusion, Apowersoft Background Eraser offers a user-friendly solution for creating transparent signatures. Whether you need to remove the white background from your scanned documents or you’re looking to create an individual signature file, this tool is here to guard you from any complexity. Give it a try and streamline your signature creation process.
ImageResizer
If you’re looking for an easy-to-use tool to create transparent signatures, ImageResizer is a great option. With this tool, you don’t need to have advanced knowledge of Photoshop or use a scanner to create your transparent signature. ImageResizer allows you to remove the background from your signature file directly within its interface, making the process quick and efficient.
Here’s how you can use ImageResizer to create a transparent signature:
Step 1: Open ImageResizer and select your signature file.
Step 2: Use the basic eraser or color selection tools to remove the white background from your signature. If you’re not sure which tool to use, ImageResizer has a “white isolation” filter that can be applied to automatically remove the white background.
Step 3: Once you’ve removed the white background, save your image in a format that supports transparency, such as PNG or GIF.
That’s it! With ImageResizer, you can easily create transparent signatures for your digital documents. Whether you’re looking to add a personal touch to your emails or create professional-looking documents, ImageResizer is a great tool to have in your arsenal. Give it a try the next time you need to create a transparent signature!
Easy-to-use Transparent Signature Creator
If you’re looking for a quick and easy way to create a transparent signature for your digital documents, then you’ve come to the right place. With the basic features of an image resizer and background removal process, you can save time and effort when creating a transparent signature.
There are several tools available that can help you achieve this, but the one we recommend is the Apowersoft online signature creator. This tool is not only easy-to-use but also provides a variety of options to customize your signature.
To start the process, open the Apowersoft signature creator. Within the tool, you’ll find options to select your signature in color, white, or from an image file. If you have a physical copy of your signature, you can use a scanner to convert it into a digital format. From there, follow the steps below:
- Open the Apowersoft signature creator and select the “Remove Background” option.
- Upload your signature image and wait for the background removal process to complete.
- Once the background is removed, you can adjust the transparency levels to your preference.
- Save your transparent signature in a format that is suitable for your needs.
It’s important to note that not all scans are perfect, and sometimes the background removal process may not remove all the unwanted elements. If this happens, you can try using the eraser tool within the Apowersoft signature creator to manually remove any remaining traces of the background.
Another idea you can try is using Photoshop or a similar image editing software to remove the background. This will give you more control over the process and ensure that the transparency is accurate.
Creating transparent signatures can be a time-consuming task, especially if you don’t have the right tools. With the Apowersoft signature creator, you’re sure to create professional-looking transparent signatures in no time. So why wait? Give it a try and see the difference it makes!