

If you’re a teacher or an instructor and you want to create quizzes for your students, Google Quiz is a great tool to make the process easier. With this feature, you can create multiple-choice quizzes with various types of questions, such as paragraph, multiple-choice, and fill-in-the-blank. You can also add images, links, and further descriptions to your questions. The best part is that Google Quiz allows you to automatically grade the quizzes and provide feedback to your students.
To start creating a quiz, open Google Forms and click on the “+” icon to start a new form. From the menu that appears, choose the option “Quiz” and then click on “Done” to create the form. You can now start adding questions to your quiz. For each question, you can choose the question type, add answer choices, and set the correct answer. You can also add explanations for both correct and incorrect answers.
Once you have added all the questions, you can customize the quiz further by editing the form settings. In the settings menu, you can choose whether or not to show the correct answers and points. You can also set a time limit for the quiz, add a description or introductory message, and add custom feedback for each question.
After you are satisfied with the quiz, you can preview it to see how it will appear to your students. If everything looks good, you can then share the quiz with your students by providing them with the link to the form. Alternatively, you can embed the quiz on your website or share it through Google Classroom or other messaging platforms.
When students take the quiz, their answers will be automatically graded and their grades will appear on the “Responses” page. You can view the individual responses for each student and provide personalized feedback if needed. You can also export the responses to a Google Sheet for further analysis or grading.
In case you want to add more questions to the quiz or edit the existing ones, you can easily do so by re-opening the form and making the necessary changes. You can also duplicate the quiz if you want to create a similar one with some minor modifications.
Overall, Google Quiz is a powerful tool for creating and administering quizzes to your students. It saves you time and provides you with valuable features to make the grading process easier. So give it a try and see how it can enhance your teaching experience!
- How to Add Points to Google Forms
- How to Put Correct Answers in Google Forms
- Step 1: Make your Google Form a quiz
- Step 2: Add questions to your form
- Step 3 Open up the answer key
- Step 4: Add a feedback message for correct and incorrect answers
- Step 5: Click “Done”
- Add Explanations to Answers
- Choose correct answers
- Video:
- How to Create Quiz Question Paper on Google Forms With Time Limit
How to Add Points to Google Forms
If you’re creating a quiz with Google Forms, you may want to assign points to each question to give your students a grade. In this article, we’ll explain how to add points to your Google Forms quiz.
Step 1: Start by creating your quiz using Google Forms. You can choose from several question types, such as multiple-choice, short answer, or paragraph. Depending on the type of question, you can also add optional explanations or feedback for the correct and incorrect answers.
Step 2: Once you’ve added all your questions and answer choices, go to the top right-hand corner of the screen and click on the “Send” button. In the drop-down menu, select the “Link” option.
Step 3: In the pop-up window that appears, click on the “Shorten URL” button if you want to use a shortened link to share your quiz. After that, click “Copy” to copy the link.
Step 4: Now, you can go to your preferred platform or website to share the quiz with your students. They can simply click on the link to start the quiz.
Step 5: After the respondents finish the quiz, their responses will appear in the Google Forms response section. You can manually grade the quizzes by adding points to each question. On the response page, click on the “3-dot” menu icon and choose the “Grade” option.
Step 6: In the grading interface, you can assign points to each question depending on the value you want to give them. You can also choose to add further explanations or feedback for the correct and incorrect answers.
Step 7: Once you’re done grading all the quizzes, you can click “Done” to finalize the grading. Google Forms will then calculate the total points for each student and provide you with the final grades.
By following these steps, you can easily add points to your Google Forms quiz and ensure that your students receive the appropriate grade for their responses.
How to Put Correct Answers in Google Forms
If you want to assign grades to your students for their responses on Google Forms quizzes, you will need to put the correct answers in the form. This will allow Google Forms to automatically grade the quizzes based on the correct answers. Here’s how you can do it:
- Start by creating a new Google Form or open an existing one that you want to add correct answers to.
- On the top right-hand corner of the screen, click on the three vertical dots menu icon, and select “Settings”.
- In the settings page, click on the “Quizzes” tab. Depending on the type of form you are using (such as multiple-choice, short answer, etc.), you will see different options for assigning correct answers.
- For multiple-choice questions, click on the drop-down menu under “Answer key” and select the correct answer.
- For other question types, such as short answer or paragraph, you can manually assign the correct answer by typing it into the “Answer Key” field or selecting it from a list.
- After adding the correct answer, you can also assign a point value for each question. This will determine how many points the question is worth towards the overall grade.
- If you want to provide further explanations or feedback for the correct and incorrect answers, you can click on the “Answer key” tab and add messages for each option.
- Once you have added the correct answers and any optional messages, click on the “Done” button to finish editing the quiz.
When students respond to the quiz and submit their answers, Google Forms will automatically grade the responses depending on the correct answers you have assigned. The grades will be displayed to the students on a separate page after they submit the form, and you can also view the grades in the response summary.
You can also choose to only show the correct answers after the students have submitted the form by selecting the “Only after ‘Submit’ is clicked” option in the settings.
By following these steps, you can easily put correct answers in your Google Forms quizzes and streamline the grading process.
Step 1: Make your Google Form a quiz
In Google Forms, you have the ability to turn your form into a quiz, allowing you to assess the knowledge of your students or gather feedback. To do this, follow the steps below:
- Select or create the form you want to turn into a quiz.
- Click on the Settings gear icon located in the top-right corner of the screen.
- In the Settings menu that appears, click on the Quizzes tab.
- Toggle the switch that says “Make this a quiz” to turn on the quiz features.
- For each question, you can choose the correct answer by clicking on the Answer Key button.
- If you want, you can choose to give partial credit by adding different values to each option in a multiple-choice question.
- You can also add feedback, both for correct and incorrect answers. This can be done by clicking on the Answer Key button and then clicking on the Add answer feedback option.
- Depending on the type of question you’re adding, there are several question types to choose from, such as multiple-choice, checkboxes, short answer, and more.
- You can assign points to each question by clicking on the Answer Key button and then entering the point value in the Points field.
- For further customization, you can edit the description of the form by clicking on the Form description field.
- Once you’re done creating your quiz, click on the Next button to move on to the next question.
- When you’ve added all the questions you want, click on the Preview button to see how your quiz will appear to students.
- If everything is right, click on the Assign button in the top-right corner to assign the quiz to your students.
Note that if you don’t want the quiz to be graded automatically, you can choose the option “Release score” in the Settings menu. This will allow you to manually assign grades to each student.
By following these steps, you can easily create a quiz using Google Forms and take advantage of its features to assess your students’ knowledge and gather feedback.
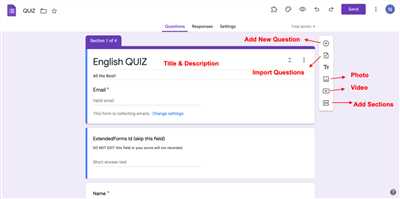
Step 2: Add questions to your form
To create a quiz using Google Forms, you’ll need to start by adding questions to the form. Here’s how to do it:
- Open Google Forms by going to the Google Forms website and signing in with your Google account.
- Click on the “+” icon in the lower right-hand corner to create a new form.
- Type a quiz title or description into the “Untitled form” field at the top. This will help you and your students identify the quiz.
- Click on the “+ Add question” button to start adding questions to your quiz.
- In the question type drop-down menu, choose the type of question you want to add. You can choose from several different question types, including multiple choice, checkbox, short answer, and more.
- Once you’ve chosen a question type, a new field will appear where you can enter the question text.
- Next, enter the answer choices for multiple choice or checkbox questions. For other question types, skip this step.
- If you want to assign points to the question, click on the “Answer key” button and select the correct answer(s). You can also choose to assign partial credit or add feedback for correct and incorrect answers.
- If you want to further explain the question or provide additional instructions, you can add a description or paragraph using the “Add description” button.
- After creating a question, click on the “Done” button to finish. You can then repeat these steps to add more questions to your quiz.
- If you want to rearrange the order of the questions, click on the three-line icon next to a question and drag it to the desired position.
- You can preview your quiz by clicking on the eye icon in the top right corner of the page. This will allow you to see how your quiz will appear to respondents.
Remember, Google Forms only allows 5 question types for quizzes: multiple choice, checkbox, dropdown, short answer, and paragraph. The answers for these question types will only appear as text, so keep that in mind when creating your questions.
- To add a multiple choice question: click on the “Multiple choice” option in the question type drop-down menu. Then, enter the question and provide answer choices. Assign the correct answer by selecting the corresponding radio button.
- To add a checkbox question: click on the “Checkbox” option in the question type drop-down menu. Enter the question and provide answer choices. Select the correct answer(s) by checking the corresponding checkboxes.
- To add a dropdown question: click on the “Dropdown” option in the question type drop-down menu. Enter the question and provide answer choices. Select the correct answer by choosing it from the drop-down menu.
- To add a short answer question: click on the “Short answer” option in the question type drop-down menu. Enter the question and leave the answer field blank, as respondents will type their answer manually.
- To add a paragraph question: click on the “Paragraph” option in the question type drop-down menu. Enter the question and leave the answer field blank, as respondents will type their answer manually. You can specify the expected length or format in the question description.
Once you have added all the questions to your quiz, you can move on to the next step to customize the appearance and settings of your Google Form quiz.
Step 3 Open up the answer key
Once you have set up the multiple-choice questions for your quiz, it’s time to add the answer key. The answer key is where you will specify the correct answers for each question and assign point values to them.
To open up the answer key, click on the “Answer key” tab in the right-hand corner of the screen. This will open a drop-down menu with further options.
If you have already added multiple-choice questions to your form, you will see a list of those questions in the answer key. If this isn’t the case, then you can start by adding the questions to the answer key by typing them into the text field.
For each question, you can select the correct answer from a drop-down menu and assign a point value to it. You also have the option to add explanations or feedback for both correct and incorrect answers, which will be shown to respondents after they complete the quiz.
Once you have added the answers and assigned point values, click on the “done” button to save your changes. You can always go back and edit the answer key later if you want to make any further adjustments.
It’s important to note that in Google Forms, you can only assign points to multiple-choice questions. If you have other question types, such as short answer or paragraph, you will need to manually grade those answers.
That’s it! You have now set up the answer key for your quiz. Next, you can preview how the quiz will look to respondents by clicking on the “Preview” button. You can also customize the settings for your quiz, such as the time limit and the number of attempts allowed.
Adding an answer key is a crucial step in creating a Google Quiz. It ensures that the correct answers are recorded and that respondents receive the appropriate feedback. Take some time to carefully review your answer key before launching your quiz to ensure accuracy.
Step 4: Add a feedback message for correct and incorrect answers
Once you have finished creating your quiz questions, you can further enhance the experience for your students by adding feedback messages for both correct and incorrect answers. This feature allows you to provide explanations or additional information to help students understand why their answers were right or wrong.
- Select the quiz in which you want to add feedback messages.
- Click on the “Edit” button to open the quiz settings page.
- In the top right corner, click on the drop-down menu next to the “Done” button and select “Settings”.
- In the “Form settings” tab, scroll down to the “Respondents can see” section and select “Correct answers” from the drop-down menu. This will make the correct answer choice(s) appear on the form once the quiz is submitted.
- Scroll further down to the “General” section and check the box next to “Points”. This will assign a point value to each question.
- Scroll to the bottom of the page and click on the “Save” button.
- Click on the “Preview” button to see how your form will look like to the students.
- Click on the “Answer key” tab to add feedback messages for each question.
- For multiple-choice questions, click on the “Add answer feedback” button next to each answer choice. In the pop-up window, you can enter feedback messages for both correct and incorrect choices.
- For fill-in-the-blank and short answer questions, you can simply type in the feedback messages in the “Answer feedback” field.
- Once you have added the feedback messages for all the questions, click on the “Done” button to finish editing your quiz.
By adding feedback messages, you not only help your students understand the right and wrong answers, but you also provide them with further explanations and insights into the topic. This can greatly enhance their learning experience and improve their overall understanding.
Step 5: Click “Done”
After you have created all the questions and added their answers in the previous steps, you can now click on the “Done” button to finish creating your quiz.
Once you click “Done,” the quiz will be created and you will be redirected to the edit page. Here, you can make further adjustments or add any additional features you may want to include in your quiz.
In the edit page, you can select the type of quiz you want to create. Depending on the case, you can choose from multiple-choice, paragraph, or short answer type quizzes. You can also add explanations or feedback for the correct and incorrect answers to provide further information to the respondents.
After selecting the quiz type and adding any desired features, you can go ahead and assign the quiz to your students. You can do this by sharing the quiz link or embedding it on your websites or pages. Additionally, you can also choose to have the grades for the quiz be automatically calculated or manually graded.
Before you assign the quiz, it’s a good idea to preview it to see how it will appear to the students. You can do this by clicking on the “Preview” icon in the top right-hand corner of the page.
Once you have previewed the quiz and are satisfied with how it looks, you can assign it to your students. They can then start answering the questions and submit their responses.
When the respondents have completed the quiz, you can view their answers and manually grade them if needed. This can be done by clicking on the “Responses” tab.
Depending on the quiz settings you chose, the grades for each question will appear and you can choose to grade them accordingly. You can also add further explanations or feedback for each question to provide additional information to the students.
After you have reviewed all the responses and graded them, you can finish the quiz by clicking on the “Finish” button. This will finalize the quiz and the grades will be recorded.
With the step-by-step process explained above, you will be able to easily create and manage your quizzes using Google Forms. It’s a versatile and user-friendly tool that can be helpful for educators, trainers, or anyone looking to create interactive quizzes.
Add Explanations to Answers
When creating a quiz with Google Forms, you have the option to add explanations to the answers. This feature allows you to provide additional information or clarify the correct answer for your students.
To add explanations to your answers, follow these steps:
- Create a new form or open an existing quiz in Google Forms.
- Click on the question you want to add explanations to, or create a new question.
- In the right-hand side of the screen, you will see the question settings. Click on the “Answer Key” tab.
- In the “Answer Key” tab, click on the “Add Answer Feedback” button.
- A text field will appear where you can enter the explanation for that specific answer. You can also choose to add a link if you want to provide further resources or references for your students.
- Once you have added the explanation, click on the “Done” button.
After adding explanations to your answers, when students respond to the quiz, they will see the message you have provided. This can help them understand why a particular answer is correct or incorrect.
It is important to note that this feature is only available for certain question types, such as multiple choice or checkboxes. For other question types, such as short answer or paragraph, you can manually add explanations in the description field.
Depending on your settings, students may be able to see the explanations immediately after submitting the quiz or only after you have finished grading their responses.
Adding explanations to your answers can be a valuable tool to enhance the learning experience for your students and provide them with valuable feedback. Make sure to take the time to add explanations for your quiz questions and help your students improve their understanding of the material.
Choose correct answers
When creating a quiz in Google Forms, you have the option to add multiple-choice questions. This allows your students to select one or more correct answers from a list of choices.
To add this type of question, start by clicking the “+ Add question” button on the right-hand side of the screen. In the question form, you will see a drop-down menu where you can choose the question type. Select “Multiple choice” from this menu.
After adding your question description and any optional features, click the “+ Add option” button to add the choices for your question. You can add as many choices as you like, depending on the case, and mark several of them as correct by selecting the checkboxes next to them.
Keep in mind that each choice has a value of 1 point, so if you want to assign different point values to each choice, you will have to manually grade the quiz later.
Once you’re done adding the choices, click “Done” to finish creating the question. The question and options will appear on the page.
When respondents open the quiz, they will see the question with the choices. They can select one or multiple options, depending on what you have chosen. After selecting their choices, they can click the “Submit” button to send their response.
If they select a correct option, a message will appear on the screen confirming their choice. If they select an incorrect option, a message will appear stating that their answer is incorrect and that they should try again.
If you want to provide feedback for each choice, you can add messages for correct and incorrect answers. These messages will appear after the respondent selects an option. To do this, click the three dots icon next to each choice and select “Add feedback.” You can then type your feedback message in the text field that appears.
Remember to preview your quiz to see how it will look for your students. If everything looks good, you can then distribute the quiz using the links or embed it into websites.
That’s it! By choosing the correct answers in the multiple-choice questions, you can make sure that only the right choices are awarded points and provide further instruction or feedback to your students.