

Creating a slideshow with your pictures is a great way to share your memories on Facebook. With the help of Facebook’s slideshow maker, you can easily upload and design a slideshow without wasting time on complicated editing. It’s easy and fun, so there’s no reason to miss out on this great feature.
When creating a slideshow on Facebook, the first step is to pick the photos or videos you want to include. You can choose from your own photos or select from the wide selection of images available in the Facebook community. After you’ve made your selection, you can move on to the next step of the slideshow creation process.
Facebook offers many great options for creating stunning slideshows. After selecting your photos, you can preview the slideshow and edit it to your liking. With just a few clicks, you can add text, choose a nice cover photo, and even pick the music for your slideshow. Moreover, you can choose the visibility options for your slideshow, whether it’s for your friends, family, or the public.
After everything is set, you can click the “Create Slideshow” button and your slideshow will be created. It’s that easy! Now you can share your slideshow with your Facebook friends and everyone will be able to enjoy your photos and videos. Facebook’s slideshow function is a great way to keep your memories alive and share them with others.
So, if you’re looking for an easy way to create stunning slideshows on Facebook without wasting time on complicated video editing, then follow these steps and start making your own Facebook slideshows today!
- How to Make a Stunning Cover Slideshow for Your Facebook Page
- Part 1 How to make a slideshow video on Facebook
- Create a Facebook slideshow on iPhone/Android
- Create a Facebook slideshow on computer Facebook slideshow ads
- Best Slideshow Maker you shouldn’t miss
- Community QA
- After you create a slideshow for Facebook here’s how to upload and share it
- Sources
- Videos:
- How to create a slideshow in FB?
How to Make a Stunning Cover Slideshow for Your Facebook Page
Creating a slideshow for your Facebook page’s cover is a great way to showcase your creativity and attract more attention from the Facebook community. With the newly introduced slideshow feature, you can easily create a stunning cover slideshow with photos that you have taken with your iPhone/Android or uploaded from your computer.
Here’s how you can make a beautiful cover slideshow for your Facebook page:
| Step 1: | Create a new album or choose an existing album where you have all the pictures you want to include in your slideshow. Make sure the album’s visibility is set to “Public” so that everyone can enjoy your slideshow. |
| Step 2: | Go to your Facebook page and click on “Change Cover” located at the top of your page. |
| Step 3: | Choose the “Upload Photos” option. Then, select the album you created or the existing album with the photos you want to use for your slideshow. |
| Step 4: | After selecting the album, you will see the pictures available for your selection. Pick the ones you want to include in your slideshow. You can choose up to 5 pictures for your cover slideshow. |
| Step 5: | Once you have made your selection, click on “Next” to move to the next step. |
| Step 6: | In this step, you can edit the order of the pictures, add a nice transition effect, and even choose the duration each picture will be shown. Take your time to make sure your slideshow looks perfect. |
| Step 7: | Click on “Preview” to see how your slideshow will look like on your profile. If you’re satisfied with the result, click on “Save” to apply the slideshow as your Facebook page cover. |
| Step 8: | Now, everyone visiting your Facebook page will see the stunning slideshow you have created. You can share it with your family and friends, and they won’t miss anything! |
Remember, the slideshow feature is not available for personal profiles yet, so you can only use it for your Facebook pages. Keep in mind that the slideshow will also be shown on mobile devices, so make sure it looks great on both desktop and mobile.
With this easy-to-use slideshow maker, you shouldn’t waste any more time creating boring cover images for your Facebook page. Take your photos or videos, follow these steps, and create a stunning slideshow that will attract more attention to your page and make it stand out from the crowd. It’s a great way to showcase your creativity and make a lasting impression on your audience. So, go ahead and make the most out of this new feature!
Part 1 How to make a slideshow video on Facebook
Facebook offers a great option for sharing your pictures with friends and family through slideshow videos. Slideshows are a fun and creative way to showcase a collection of photos, and Facebook’s slideshow maker is a handy tool for creating stunning videos.
Creating a slideshow video on Facebook is easy. Here’s a step-by-step guide on how to do it:
| Step 1 | Open your Facebook profile or page. |
| Step 2 | Click on the “Photo/Video” option to upload photos for your slideshow. |
| Step 3 | Choose the photos you want to include in your slideshow from your computer or phone’s camera roll. |
| Step 4 | After selecting the photos, click on the “Create Slideshow” option. |
| Step 5 | Name your slideshow and click “Next” to proceed. |
| Step 6 | You will now be taken to the slideshow editor, where you can edit the order of the photos, add captions, choose the duration of each slide, and pick a music track from the available options. |
| Step 7 | Preview your slideshow video to make sure everything looks nice. |
| Step 8 | Once you’re happy with the slideshow, click on the “Create Slideshow” button. |
| Step 9 | Your slideshow video will be created, and you can choose the visibility options for who can see it. You can keep it visible to everyone or limit it to a specific audience. |
| Step 10 | Click on “Save” to finalize the creation of your slideshow video, and it will be shared with your friends and community. |
That’s it! You have successfully created a slideshow video on Facebook. Now you can enjoy sharing your memorable moments with others in an engaging and visually appealing way.
Create a Facebook slideshow on iPhone/Android
If you want to showcase a series of photos on your Facebook profile or page, creating a slideshow is a great option. With a slideshow, you can easily share a collection of photos with your friends, family, or the Facebook community. Moreover, it’s an easy and fun way to take your Facebook presence to the next level.
To create a slideshow on Facebook, you shouldn’t waste time uploading each photo individually. Instead, you can use the Facebook slideshow maker available on the iPhone/Android app. Here’s how:
1. Open the Facebook app on your iPhone/Android device.
2. Go to your profile or the Facebook page where you want to create the slideshow.
3. Click on the “What’s on your mind?” function, which is located at the top of your news feed or your profile/page’s timeline.
4. In the new menu that appears, click on the “Create a Slideshow” option.
5. Pick a name for your slideshow. It’s important to choose a name that accurately represents the content of your slideshow.
6. After naming your slideshow, you can start choosing the photos that you want to include. You can select photos from your phone’s gallery or choose from the available options provided by Facebook.
7. Facebook offers a wide selection of designs and templates for your slideshow. Pick the one that best matches the mood and purpose of your slideshow.
8. Customize your slideshow by editing the order of the photos, adding captions, or adjusting the visibility and sharing options.
9. Once you’ve finished creating your slideshow, preview it to make sure everything looks nice and cohesive.
10. Finally, share your slideshow by clicking on the “Post” button. The slideshow will be shown on your profile or page, and you can also choose to run it as an ad to reach a wider audience.
That’s it! Now you know how to create a stunning Facebook slideshow on your iPhone/Android device. By making use of this feature, you can share your favorite memories, promote your business, or engage with your audience through the power of visuals. Have fun creating amazing slideshows on Facebook!
SOURCES:
– WikiHow (https://www.wikihow.com/Create-a-Slideshow-on-Facebook)
– Facebook Help (https://www.facebook.com/help/125364064871691)
Create a Facebook slideshow on computer Facebook slideshow ads
Creating a slideshow on Facebook is a great way to share your photos and videos with friends and family. Moreover, Facebook slideshow ads are a powerful option for businesses to showcase their products or services. If you want to create a stunning slideshow, follow these easy steps.
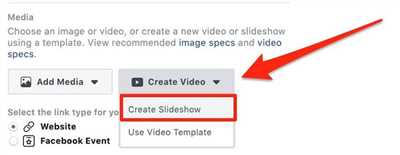
Step 1: Open Facebook on your computer and go to your profile page. From there, click on “Create” and choose the “Slideshow” option.
Step 2: Here’s where you can make use of various options for designing your slideshow. You can pick photos and videos from your camera roll, upload a video from your computer, or choose from the options available in the community library.
Step 3: After choosing the photos or videos, you should move to the next part, where you can edit the slideshow. You can add a title, choose the duration of each slide, pick a nice cover image, and select a music track from the library or upload your own.
Step 4: Preview your slideshow to make sure everything looks good. You can go back and edit any part if needed.
Step 5: After finalizing the design, choose the visibility of your slideshow. You can decide who can see it, whether it’s just your friends or the public.
Step 6: Give your slideshow a name and click on “Create” to start the slideshow creation process.
Step 7: While the slideshow is being created, you can keep track of its progress through the status bar. Please note that if you have a long slideshow or many photos and videos, it might take some time to finish.
Step 8: Once the slideshow is complete, it will be shown on your profile page. Friends and family can then enjoy and interact with your slideshow by clicking or swiping through the different slides.
Step 9: Moreover, if you’re using Facebook slideshow ads, they will be shared with your targeted audience. This can help increase your brand visibility and reach more potential customers.
Creating a Facebook slideshow on your computer is an easy and fun way to share your memories or promote your business. Whether you’re making a slideshow for personal or professional purposes, make sure to follow these steps to take full advantage of the slideshow maker. Don’t miss out on a great opportunity to engage with your audience!
Best Slideshow Maker you shouldn’t miss
Facebook Slideshow Maker offers an easy and user-friendly interface that allows you to create amazing slideshows without any hassle. Whether you’re a beginner or an expert, this slideshow maker has everything you need to make your slideshow stand out from the rest.
Creating a slideshow with Facebook Slideshow Maker is simple. First, you need to upload the photos or videos you want to include in your slideshow. You can pick from a selection of photos from your profile, a great family photo, or even pictures taken with your phone’s camera. After choosing the photos, you can name your slideshow and edit the photos if needed.
Once your photos are ready, you can move on to the next step – selecting a design for your slideshow. Facebook Slideshow Maker offers a wide selection of design options to choose from. You can preview each design and pick the one that best fits the theme of your slideshow.
After choosing the design, you can move on to the next step – adding music to your slideshow. Facebook Slideshow Maker allows you to upload your own music files, or you can choose from a variety of free music tracks available. This adds a nice touch to your slideshow and makes it more enjoyable to watch.
Once you have completed all the steps, you can click on the “Create Slideshow” button. Facebook Slideshow Maker will then process your slideshow and generate a preview for you to see how it looks. If you’re happy with the preview, you can click on the “Share” button to let your friends and the Facebook community enjoy your creation.
One great feature of Facebook Slideshow Maker is its visibility options. You can choose to keep your slideshow private or make it visible to everyone. This gives you full control over who can see your slideshow and ensures that it is only shared with the people you want.
In conclusion, Facebook Slideshow Maker is the best slideshow maker you shouldn’t miss. It offers an easy and user-friendly function for creating stunning slideshows without any hassle. Whether you’re using a computer or an iPhone/Android device, Facebook Slideshow Maker is available for everyone. So, don’t waste any more time and start creating amazing slideshows to share with your friends and family on Facebook.
For more information on how to create a slideshow on Facebook, you can check out the wikiHow page or other reliable sources.
Community QA
Have questions about creating a Facebook slideshow? Check out these commonly asked questions from the community:
- How do I create a slideshow on my Facebook page?
- Go to your Facebook page and click on “Create a Post”.
- Choose the “Slideshow” option from the menu.
- Select the photos or videos you want to include in your slideshow.
- Arrange the order of the photos or videos.
- Add text, music, and any other desired effects to your slideshow.
- Preview your slideshow by clicking on “Preview”.
- If you’re satisfied with the preview, click on “Create Slideshow” to publish it.
- How do I upload photos to Facebook from my iPhone/Android?
- Open the Facebook app on your iPhone/Android.
- Click on the camera icon at the top of the News Feed.
- Choose the photos you want to upload from your camera roll.
- Add a description or any other information you’d like to include.
- Select the audience for your post (friends, public, etc.).
- Click on “Post” to upload the photos to your Facebook timeline.
- How do I make a slideshow my cover photo on Facebook?
- Go to your Facebook profile and click on “Update Cover Photo”.
- Choose the “Create Slideshow” option from the menu.
- Select the photos or videos you want to include in your slideshow.
- Arrange the order of the photos or videos.
- Add text, music, and any other desired effects to your slideshow.
- Preview your slideshow by clicking on “Preview”.
- If you’re satisfied with the preview, click on “Save” to set it as your cover photo.
- How do I keep my Facebook slideshow pictures from being seen by friends?
- After creating your slideshow, click on the audience selector next to your name.
- Select “More Options” from the drop-down menu.
- Choose the desired visibility option for your slideshow (e.g., only me, friends, specific friends).
- Click on “Done” to save the changes.
To create a slideshow on your Facebook page, please follow these simple steps:
To upload photos from your iPhone/Android to Facebook, follow these steps:
To make a slideshow your cover photo on Facebook, follow these steps:
To keep your Facebook slideshow pictures from being seen by your friends, you can adjust the visibility settings. Follow these steps:
That’s it for the community Q&A! If you have any more questions or need further help, feel free to ask.
After you create a slideshow for Facebook here’s how to upload and share it
Creating slideshows on Facebook is a great way to share your photos and videos with friends and the wider community. Once you’ve designed a stunning slideshow, here’s how you can upload and share it:
- First, make sure you have all the necessary photos and videos for your slideshow prepared on your computer or camera.
- Next, log in to your Facebook account and go to your profile page.
- Click on the “Create” button at the top of the page and select the option to create a slideshow.
- Give your slideshow a name and click “Next” to move on to the next step.
- Now it’s time to choose the photos and videos you want to include in your slideshow. Facebook will provide you with options to select from your camera roll, albums, or recent uploads.
- After you’ve made your selection, click “Next” to proceed to the next step.
- Facebook will automatically generate a preview of your slideshow, allowing you to see how it will look before you upload it. Take this opportunity to review the slideshow and make any necessary edits.
- Once you’re satisfied with the preview, click on the “Upload” button to start the upload process.
- While the slideshow is uploading, Facebook will provide options to add captions, select a cover image, and choose the best thumbnail for your slideshow.
- After the upload is complete, you can add a description to your slideshow if you wish.
- Finally, click on the “Share” button to publish your slideshow on Facebook.
After you’ve shared your slideshow, it will be visible to your friends and the wider Facebook community. They can like, comment, and share your slideshow, helping to spread your content even further.
Remember, creating a nice slideshow on Facebook is easy and doesn’t require any special design or technical skills. With the help of Facebook’s slideshow maker, you can quickly and easily turn your photos and videos into a visually stunning creation.
So don’t waste any more time clicking through pictures one by one. Use Facebook’s slideshow function to make the most out of your photos and videos, and share your moments with friends and the Facebook community.
Sources
When it comes to creating stunning slideshows on Facebook, you have many options to choose from. Here are some of the best sources you can use:
| Facebook Slideshow Maker | Facebook offers its own slideshow creation tool called “Facebook Slideshow Maker”. With this tool, you can easily create a slideshow by selecting pictures or videos from your computer or your Facebook page. It’s an easy and fun way to display your best photos and share them with your friends and family. Moreover, you can add music to your slideshow and customize its design by choosing from a selection of nice themes and editing options. |
| WikiHow | If you need more help with creating slideshows on Facebook, you can check out WikiHow’s step-by-step guide on how to do it. There you will find detailed instructions and screenshots to guide you through the entire process. It’s a great source for learning everything you need to know about creating stunning slideshows on Facebook. |
| Ads Manager | If you’re looking to create a slideshow as part of an advertising campaign on Facebook, you can use the Ads Manager tool. Ads Manager allows you to create slideshows from a selection of pictures or videos, and it offers additional options for targeting your audience and managing your ads. |
These are just a few sources that can help you with creating slideshow on Facebook. Make sure to choose the one that best fits your needs and start making stunning slideshows for everyone to see!


