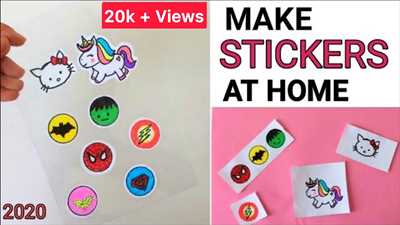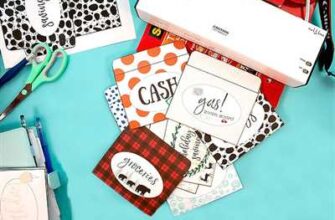
If you’re a fan of stickers, you know that they come in all shapes, sizes, and designs. But what if you want something truly unique, something that stands out from the rest? Well, the answer is simple: make your own stickers at home!
There are different methods you can use to make stickers, but one of the most popular is the “print-then-cut” technique. This involves designing your sticker on a computer, printing it out, and then cutting it to the desired shape. You can use a regular printer for this, but if you want more control and precision, you can invest in a machine like the Cricut Explore or the Silhouette Cameo.
Once you have your design ready, you can print it out on sticker paper. This paper is specially made for creating stickers and has a sticky back, so you can easily peel and stick your creations on any surface you like. Just make sure to select the right settings on your printer and use a high-quality sticker paper for the best results.
When it comes to cutting out your stickers, you have a few options. If you have a cutting machine like the Cricut or the Silhouette, you can simply load your printed design into the machine and let it do the work for you. These machines are precise and can cut even the most intricate designs with ease. If you don’t have a cutting machine, don’t worry–you can still create fantastic stickers with just a pair of scissors or a craft knife. Just be careful and take your time to cut along the lines of your design.
Once your stickers are cut, it’s time to peel off the backing and stick them on whatever you want! Whether you’re decorating your notebooks, personal belongings, or just adding some fun to your everyday life, homemade stickers are a great way to express your creativity. So go ahead, gather your materials, and start creating beautiful stickers that truly belong to you!
Make Stickers From Scratch Without a Machine

If you want to make your own stickers at home but don’t have a cutting machine, you’re in luck! There are still plenty of ways to create unique stickers without fancy equipment. In this article, we’ll show you how to make stickers from scratch using simple materials you probably already have.
To start, you’ll need a few basic supplies:
| – | Printer |
| – | Sticker paper |
| – | Scissors or craft knife |
Once you have all your materials ready, it’s time to get creative with designing your stickers. You can use any design software or even draw them by hand. Make sure the design is clear and well-marked, as it will be your guide for cutting.
Print the designs on sticker paper, making sure to select the appropriate paper type on your printer settings. Wait–what is “print-then-cut”? It’s a process where you print your design first and then use a cutting method to cut around the printed design.
If you don’t have a sticker printer, you can print your designs on regular paper and then use adhesive spray or glue to stick them onto the sticker paper. Just be careful when applying the adhesive to avoid any excess and make sure it’s evenly spread across the whole design.
Once your designs are printed, it’s time to cut! Use scissors or a craft knife to carefully cut around each design. If you’re using a craft knife, make sure to protect your work surface with a cutting mat or thick cardboard.
Gently peel off the backing of each sticker, one at a time, and stick them onto your belongings or wherever you like. You can also store them in a clear bag or container for later use.
Don’t limit yourself to just one style or design. Feel free to experiment with different ideas and themes. You can also add your own personal touch by coloring or decorating the stickers after printing and cutting.
Now, you have an easy and fun way to make stickers from scratch without a machine. Get creative and start making stickers that belong uniquely to you!
Sources:
Wait–what is “print-then-cut” on a Cricut machine
If you’re new to the world of crafting and making stickers at home, you may have come across the term “print-then-cut” when researching or using a Cricut machine. But what exactly does it mean?
Well, “print-then-cut” is a feature or a process that allows you to create stickers or other designs using a combination of printing and cutting. With this feature, you can design and print your stickers at home, and then use your Cricut machine to precisely cut them out.
So how does it work? First, you’ll need a printer and a Cricut machine, such as the Cricut Explore or Cricut Maker. The printer is used to print your designs on printable materials, such as sticker paper or printable vinyl. Make sure to select the appropriate settings on your printer for printing on these materials.
Once you have your printed designs, you’ll need to load them into your Cricut machine. The Cricut machine has a special “print-then-cut” mode that allows you to open and select your designs from the design space software. You can also use the Cricut Design Space software to design your stickers or choose from pre-designed templates.
After selecting your design, you’ll need to load the printable material into your Cricut machine. The machine will then use advanced cutting technology to precisely cut around the printed design, giving you perfectly shaped stickers. You can use a scraper tool or a CutterBee knife to gently peel the stickers off the cutting mat.
The “print-then-cut” process is great for creating stickers or designs with intricate or complex details that would be difficult to cut by hand. It’s also a time-saving option if you have a large quantity of stickers to make. Plus, you can experiment with different materials and designs to create unique stickers that reflect your style or fit a specific theme.
So, the next time you want to make stickers at home, don’t fussy cut them with scissors or rely solely on pre-cut sticker sheets–try using the “print-then-cut” feature on your Cricut machine. It’s a fun and versatile method that opens up more possibilities for your sticker-making endeavors!
How to Fussy Cut
If you want to create unique stickers at home, fussy cutting is a technique that can give your stickers a custom look. Fussy cutting involves carefully cutting around a specific design element in a pattern or image, such as flowers or characters, and using the cutout as a sticker. Here’s how you can do it:
1. Select the stickers or patterns you want to fussy cut. Look for designs that have clear and distinct elements that you want to use as a sticker.
2. Gather your materials. You’ll need scissors, a craft knife (such as a Cutterbee), a cutting mat, and the stickers or patterns you want to fussy cut.
3. If you’re using stickers, gently peel them from the backing and place them on a clean, flat surface. If you’re working with paper patterns or images, print them out on your printer without the “print-then-cut” option, so you have full control over the size and placement of the design elements.
4. Use a pencil or pen to mark the area you want to cut out. This will help you stay on track and avoid accidentally cutting something you want to keep.
5. With your scissors or craft knife, carefully cut around the design element you want to use as a sticker. Take your time and be precise to get a clean cut.
6. Once you have your cutout, gently peel it from the surface or backing material.
7. If you want to add more dimension to your sticker, you can use an emery board or sandpaper to lightly scratch the back of the cutout. This will help the adhesive stick better when you’re ready to use the sticker.
8. Finally, place your custom fussy cut sticker wherever you’d like! It can be a fun addition to your planner, notebook, or any other item you want to personalize.
Remember, fussy cutting is not limited to stickers. You can also use this technique for creating custom decorations, gift tags, or even unique pieces of art. The possibilities are endless!
So, why wait–what are you waiting for? Grab your scissors, gather your materials, and start making your own fussy cut stickers today!
Sources
If you want to make stickers at home, you will need a few key sources. First and foremost, you’ll need a printer. Having a printer will allow you to print your sticker designs onto printable sticker paper. There are various types of printable sticker paper available, so make sure to select the one that suits your needs best.
Next, you’ll need a cutting process. One popular method is called “print-then-cut,” which involves printing your stickers and then cutting them out using scissors or a cutting machine like the Cricut. If you’re using a cutting machine, you may need to mark the outline of your stickers using registration marks.
If you’re fussy about your stickers or want to create a more intricate design, you can try hand-cutting them. Using a craft knife or a cutterbee, you can carefully cut around your design to create custom shapes.
Finally, once your stickers are cut, you’ll need a surface to stick them to. Whether it’s a notebook, laptop, or any other belongings, make sure the surface is clean and clear of any dust or oil. Gently peel off the backing of your stickers and apply them to the desired surface. Press down firmly to ensure they stick well.
With these sources and a bit of creativity, you can make your own stickers at home. Now, it’s time to get started and let your ideas and style shine through!

