Welcome to the world of app development! Creating your own app can be a very exciting and fulfilling endeavor. With millions of applications available in various app stores, it’s easy to get inspired and come up with a unique idea for your own app.
In this article, we will guide you through the process of creating a new app. Let’s start with the basics. First, you need to decide what type of app you want to create. Is it a game, a utility app, a social networking app, or something else entirely? The choice is yours!
Once you have decided on the type of app you want to create, you can start working on the development process. There are different ways to develop an app, depending on your skills and preferences. You can use APIs and core functions to build your app from scratch, or you can use existing frameworks and platforms like Shopify or ChatGPTs to simplify the development process.
During the app development process, you will need to connect your app to various sources of data and assets. This can be done using APIs and other tools provided by different platforms. You will also need to set up user prompts, notifications, and other features to ensure that your app meets the needs of your users.
Once your app is ready, you can test it to make sure it works smoothly and delivers a seamless user experience. If everything looks good, you can then package your app for distribution. This typically involves creating an app archive and submitting it to the app store or other distribution channels. The entire process may seem daunting at first, but with the right guidance and resources, you can create an app that stands out from the rest!
In conclusion, creating a new app is an exciting journey that requires careful planning, development, and testing. By following the steps outlined here and exploring other resources and tools available to developers, you can turn your app idea into a reality. So, start brainstorming, building, and designing your app today!
- Create an app
- Can I deliver my app information using the App Store Connect REST API
- Download assets
- Build your app
- Creating an App of a Specific Type
- Step 1 Choosing the Type of App
- Step 2 Setting up the name and email address of your app
- Sources
- Videos:
- How to create an app in just 5 minutes without coding | Tamil | Free | Android | Apple
Create an app
Creating a new app can be a very exciting project. There are different types of apps you can build, depending on your goals and the scope of your work. In this article, I will explain how to create an app using Shopify as an example.
First, you will need to create a Shopify store if you don’t already have one. You can sign up for a free trial or choose a paid plan. Once you have your store set up, you can start building your app.
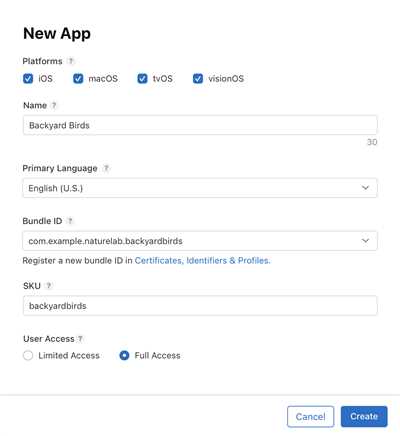
Start by giving your app a name and an address. The name will be displayed to users, so make sure it is catchy and easy to remember. The address is where users will be able to download your app.
Next, you will need to connect your app to the Shopify API. This will allow your app to access and interact with the data in the Shopify store. To connect to the API, you will need to provide some information and follow the authentication prompts.
Once your app is connected to the API, you can start building its core functionality. This could include features like showing product information, delivering electronic assets, or setting up a chat function. The possibilities are endless, and you can tailor your app to meet the specific needs of your users.
During the app development process, you may need to work with other developers or use third-party assets. Shopify provides a robust ecosystem of developers and resources that can help you along the way. You can find thousands of apps and hundreds of sources of information to assist you in creating your app.
After you have completed the development of your app, you can archive it and give it a final check. Make sure everything is working properly and that your app meets the requirements you set out to achieve.
Once your app is ready, you can submit it for review to the Shopify App Store. This is where users can discover and download your app. Shopify will review your app and ensure that it meets their guidelines and policies.
Once your app is approved, it will be available for users to download and use in their own Shopify stores. This can be a very exciting moment, as you see your hard work come to life and become accessible to others.
In conclusion, creating an app can be a complex but rewarding process. By following the steps outlined above and using platforms like Shopify, you can build an app that is user-friendly and delivers the functionality you desire.
Can I deliver my app information using the App Store Connect REST API
Yes, you can deliver your app information using the App Store Connect REST API. This API allows developers to programmatically manage their apps and app-related data. It provides a way to interact with the App Store Connect platform and automate various tasks related to app creation, configuration, and management.
The App Store Connect REST API provides a set of endpoints that you can use to create, update, and retrieve information about your apps. For example, you can use the API to create new app records, upload app assets such as screenshots and app icons, configure app metadata like the app name and description, manage app versions and builds, and retrieve analytics data.
To start using the App Store Connect REST API, you will need to authenticate your requests and obtain an access token. You can do this by following the API’s authentication process, which involves obtaining a JSON Web Token (JWT) and exchanging it for an access token.
Once you have the access token, you can use it to make requests to the API’s various endpoints. For example, you can use the API to create a new app by sending a POST request to the “https://api.appstoreconnect.apple.com/v1/apps” endpoint with the necessary app information in the request body.
The API provides a comprehensive set of endpoints and functions that allow you to manage your app information programmatically. Whether you want to create a new app, update existing app information, or retrieve analytics data, the App Store Connect REST API has got you covered.
Download assets
Once you’ve created and configured your new app, it’s time to download the necessary assets to start building. These assets will give you the foundation you need to work with and tailor to your specific project.
In order to download the assets, you’ll need the following information:
- The API address that your app will be using
- The type of assets you want to download, like the core bits of the app or additional resources
- Your user credentials, like your username and password, prompted during the setup process
With these details in hand, you’re ready to download the assets. Here’s a step-by-step guide to help you with the process:
- Connect to the API using the provided address.
- Choose the type of assets you want to download, whether it’s the entire app archive or specific files.
- Provide your user credentials, like your username and password, when prompted.
- Start the download and wait for it to complete.
Once the download is complete, you will have all the necessary assets on your local machine. This allows you to work on the development of your app offline, without needing a constant internet connection.
If you’re using Shopify for example, you can download the assets through their API. Other app development platforms may have their own methods and procedures for asset download.
Downloading the assets gives you the freedom to work on your app at your own pace, making changes and modifications as you see fit. It also allows you to have a backup of your app’s resources in case anything goes wrong.
So make sure to download the assets and have them safely stored in your development environment. This way, you can confidently proceed with the next steps in building your new app!
Build your app
To create your own app, you will need to follow a step-by-step process that involves different stages and choices. Let’s break down the core steps you’ll need to take to build your app:
Step 1: Start by connecting with your target audience. Think about what problem your app will solve and who will benefit from it. Understanding your users’ needs will help you define the scope of your app.
Step 2: Once you have a clear idea of your app’s purpose, you can start working on its development. You can choose to develop your app from scratch or use existing sources and frameworks to expedite the process. Depending on the type of app you want to create, there are thousands of resources available for developers.
Step 3: In the development process, you need to configure the app’s functionality and settings. You will have to decide on features such as user authentication, notifications, and data storage. This step will define how your app will work and what it will offer to users.
Step 4: Design the user interface of your app. This step is crucial, as it will determine how your users interact with your app. Consider the visual appeal, ease of use, and accessibility of your app’s interface. You can use design assets or hire a designer to create a unique and engaging user experience.
Step 5: Once you’ve built your app, you need to test it thoroughly to ensure it functions properly. Test on different devices and platforms to catch any bugs or issues. You can use platforms like Shopify or other app development tools to test your app efficiently.
Step 6: After testing, you can archive or publish your app. Archiving the app will allow you to keep a backup copy of your project. If you choose to publish it, you can make it available for download on app stores. The publishing process may require you to provide additional information, such as app descriptions, screenshots, and terms of use.
Step 7: Once your app is available for download, promote it. Use different marketing strategies to reach your target audience and increase app downloads. You can leverage social media, email marketing, and other channels to spread the word about your app and attract users.
Step 8: As your app receives feedback and gathers user data, you can make updates and improvements. Listen to user suggestions and keep your app up to date with the latest trends and technologies. This continuous improvement process will help you deliver a better app experience.
Remember, creating an app is a process that requires time, effort, and dedication. Following these steps and seeking advice from other developers can help you build a successful app that meets your goals and satisfies your users.
David Gewirtz/ZDNet explained, for example, that app developers like ChatGPTs use different prompts to explain how the app works to users. Instead of giving a lengthy, detailed explanation, the app prompts the user to ask specific questions. Then, the app meets the user’s scope using bits of information from an API.
Creating an App of a Specific Type
Creating a new app requires a well-defined process to ensure that it meets the desired specifications. In this article, we will explain the step-by-step process of creating an app similar to the example of “ChatGPTs”, an electronic chatbot app.
Step 1: Conceptualization
Start by defining the scope and purpose of the app. For our example, let’s say we want to create a chatbot app that uses AI to deliver smart responses to user queries.
Step 2: Gathering Information
Next, collect all the necessary information and data required for the app. This includes different sources such as APIs, assets, or even the core functionalities of existing apps. For instance, we can use the Shopify API to connect the app to a Shopify store and retrieve product information.
Step 3: Design and Development
In this step, start building the app using the gathered information. Create the necessary functions, set up the app’s core features, and ensure that all the required prompts and rest endpoints are in place. For example, if the app needs to send notifications, set up the appropriate prompts and APIs to enable the functionality.
Step 4: Testing and Refinement
Once the app development is complete, it’s important to thoroughly test it to ensure it works as expected. Test the app under different scenarios and make any necessary refinements based on the test results. This iteration process may involve hundreds or even thousands of iterations to polish the app.
Step 5: Packaging and Distribution
When the app is ready, it needs to be packaged and distributed. Create an archive of the app’s bits, give it a unique name, and then store it in a suitable location for users to download and install. This could be a dedicated app store or a website.
Step 6: Maintenance and Updates
Finally, ongoing maintenance and updates are crucial for any app’s success. Regularly monitor the app’s performance, listen to user feedback, and make necessary updates to address any issues or add new features. This ensures that your app stays up-to-date and continues to meet the user’s needs.
Following this process, you can create an app of a specific type, like the “ChatGPTs” electronic chatbot app. Remember that the process may vary depending on the type of app you want to build, but these steps should give you a good starting point.
Step 1 Choosing the Type of App
When creating a new app, the first step is to determine what type of app you want to create. This choice will ultimately determine the functionality and purpose of your app. There are many different types of apps you can choose from, each with its own unique features and characteristics.
For example, if you want to deliver notifications to users, you might choose to create a mobile app. Mobile apps can be downloaded and installed on smartphones, allowing you to send push notifications directly to users’ devices. On the other hand, if you want to create an online store, you might consider using an e-commerce platform like Shopify. This type of app allows you to create a fully functional online store where users can browse products, add items to their cart, and make purchases.
Before you make a decision, it’s important to understand the requirements and limitations of each app type. For instance, if you choose to create a mobile app, you will need to have knowledge of mobile app development and be familiar with the programming languages used for mobile app development, such as Java or Swift.
Once you have chosen the type of app you want to create, you can move on to the next step, which is setting up your development environment. This process will vary depending on the app type you choose. For example, if you are creating a web app, you will need to set up a server and connect it to your domain name. On the other hand, if you are creating a mobile app, you will need to download the necessary development tools and frameworks.
In conclusion, the first step in creating a new app is choosing the type of app you want to create. This decision will influence the entire development process, so it’s important to choose a type that meets your goals and objectives. By understanding the different types of apps available and the requirements of each, you can make an informed decision and start building your app.
| Key Points: |
|---|
| – Consider the purpose and functionality you want your app to have |
| – Research and understand the requirements of different app types |
| – Choose a type of app that aligns with your goals and objectives |
| – Prepare to set up your development environment based on the chosen app type |
Step 2 Setting up the name and email address of your app
Once you have created a new project for your app, the next step is to configure the name and email address. This step is important as it helps identify your app and establish communication channels with your users.
To explain how this works, let’s use an example. Imagine you want to create a new app, and you have chosen the name “MyApp”. In order to set up the name and email address, you need to provide some information that will be displayed to the users.
First, you will need to decide on the name of your app. This can be anything you want, as long as it meets certain requirements. For example, it should be unique and not already in use by other apps.
Once you have chosen the name, you can move on to setting up the email address. The email address will be used to send notifications and other important information to the users of your app. It is important to choose an email address that is professional and relevant to your app.
To prompt the user for this information, you can use a function like prompt() in JavaScript. This function allows you to give the user a text box where they can enter the desired name and email address. For example:
 let appName = prompt("Please enter the name of your app:");
 let emailAddress = prompt("Please enter the email address for your app:");
By using prompts like these, you can gather the necessary information from the user and store it in variables like appName and emailAddress.
It’s worth noting that the process of setting up the name and email address may be different depending on the development platform or tools you are using. For example, if you are building an app using Shopify, you may need to connect to the Shopify API to access the necessary information.
Once you have the name and email address, you can use them to create an email archive or send notifications to the users of your app. This will ensure that you can communicate with them effectively and provide any updates or support they may need.
In the next step, we will show you how to set up the rest of the app, including the core functionality and any additional features you want to include.
Now, download the required assets for your app. For example, if you are using ChatGPTs, you can download the ChatGPTs API assets from the GitHub repository mentioned in the terms of use.
Sources
When you start a new app development project, you’ll need to work with different sources to gather the information and assets needed. Here, we’ll explain some of the sources you can use to create your app.
– Prompts: One of the first sources you can use is prompts. They provide you with specific information or ask questions on what you would like your app to look like or what kind of functionality it should have.
– APIs: APIs, or Application Programming Interfaces, are a core source of data for many app developers. APIs allow you to connect your app to a third-party service or platform, like Shopify, to access and store data.
– Other apps: Looking at other apps can also be a great source of inspiration and guidance. You can explore similar apps in the app store or download them to see how they work and what features they offer.
– Documentation: Documentation provided by different platforms or services can give you a detailed explanation of how to integrate certain features or use specific functions. Developers often refer to documentation to understand the scope and capabilities of a platform or service.
– Online resources: There are hundreds of online resources available that can help you with different aspects of app development. Websites like Stack Overflow, GitHub, and developer forums can provide code snippets, tutorials, and troubleshooting tips.
– Experts: Connecting with experienced app developers or seeking advice from professionals in the field can give you valuable insights and guidance during the app development process.
– Archive and chatbots: Archive platforms like GitHub and chatbots like ChatGPTs can be used as additional sources of information. They store discussions, code examples, and previous projects that can help you in building your own app.
– External sources: External sources like blogs, articles, and news platforms can provide you with the latest trends and updates in the app development world. Websites like ZDNet, David Gewirtz’s blog, and tech publications can keep you informed about new technologies and industry best practices.
– User feedback: Once your app is in development or launched, user feedback becomes an important source of information. Listening to user feedback can help you improve your app’s functionalities and user experience.
By utilizing these different sources, you can gather the necessary information, design assets, and development resources to create your app.