Have you ever wondered how those eye-catching holographic labels are made? With the rise of Pinterest and its abundance of mesmerizing holographic designs, it’s no surprise that many people are eager to try their hand at creating their own holographic stickers. If you’re one of those individuals who loves the futuristic and shimmering effect of holographic labels, then this tutorial is for you!
Before we dive into the step-by-step process, let’s first understand what holographic labels are and what materials are used to make them. Holographic labels are stickers that have a holographic or iridescent effect, giving them an illusion of depth and movement when light reflects off them. These labels are commonly used for security purposes, as they are difficult to replicate. They can also be used for branding, packaging, or simply to add a touch of uniqueness to everyday items.
So, how can you make your own holographic labels? Don’t worry, you don’t need any fancy equipment or a dedicated printer. In fact, you can create them using a regular printer and materials that are easily available. The key ingredient for creating holographic labels is holographic sticker paper. This specialty paper has a holographic design or a reflective background that creates the illusion of depth and movement. You can find holographic sticker paper in various colors and designs to suit your preferences.
Once you have the holographic sticker paper, you can start designing your labels. If you have design software like Adobe Photoshop or Illustrator, you can create your own custom designs. Alternatively, you can use design templates available on platforms like Cricut or Pinterest. These platforms offer a wide range of design options that you can easily customize to suit your needs. Remember to leave empty spaces in your design if you want the holographic effect to show through.
When your design is ready, you can print it on the holographic sticker paper using a regular printer. Make sure to adjust your printer settings to achieve the best results. Now comes the fun part – cutting out your holographic labels! You can use a pair of scissors or a cutting machine like a Cricut to carefully cut out each sticker. If you’re using a machine, be sure to follow its instructions for cutting holographic materials.
And voilà! You’ve successfully made your own holographic labels. Now you can stick them on your favorite items, whether it’s on notebooks, laptops, water bottles, or even on your phone case. The holographic effect will instantly elevate the look and make your belongings stand out.
Remember to save your design files and keep the remaining holographic sticker paper for future projects. With this simple tutorial, you can explore different holographic designs and unleash your creativity. So go ahead and start creating your own holographic labels to add a touch of magic to your everyday life!
- How to Make a Holographic Sticker
- Leave empty spaces on your design
- Design Your Stickers
- Autocollants hologrammes de sécurité – en quoi sont-ils différents
- What is a security hologram?
- Comment sont fabriqués les autocollants hologrammes de sécurité
- Materials to Make Holographic Stickers on a Cricut
- Want to remember this? Save this Holographic Sticker Tutorial to your favorite Pinterest Board
- Video:
- Waterproof PET 3D holographic sticker paper for inkjet printing
How to Make a Holographic Sticker
If you want to add a touch of sparkle and uniqueness to your favorite items, holographic stickers are a great option. These stickers feature a hologram effect that reflects light in different colors and patterns. In this tutorial, we will guide you on how to make your own holographic stickers.
Materials You Will Need:
- Empty sticker sheets
- Holographic film
- Cricut machine or printer
- Scissors or cutting tool
- Design software or pre-made holographic designs
Step 1: Design your holographic sticker
Start by creating or finding a design that you want to turn into a holographic sticker. You can use design software to create your own, or find pre-made holographic designs on websites like Pinterest. Remember to leave empty spaces in your design for the holographic effect to shine through.
Step 2: Print or cut your design
If you have a printer, you can print your holographic design directly onto the sticker sheets. Otherwise, use a cutting tool or a Cricut machine to cut your design out of the holographic film and stick it onto the sticker sheets.
Step 3: Apply the holographic film
Peel off the backing of the holographic film and carefully apply it to the sticker sheets, making sure there are no air bubbles. Press down firmly to ensure a secure bond between the film and the sticker sheets.
Step 4: Cut out your holographic stickers
Using scissors or a cutting tool, carefully cut out your holographic stickers along the edges of the design. Take your time to ensure clean cuts and smooth edges.
Step 5: Admire your holographic stickers
Now, you have your very own homemade holographic stickers! Stick them on your favorite items, such as laptops, notebooks, or phone cases, to add a unique and eye-catching effect. Enjoy the beautiful play of light and colors that the holographic stickers bring.
It is worth noting that holographic stickers are not only aesthetically pleasing but also provide an added layer of security. The hologram effect makes it difficult for counterfeiters to replicate the stickers, ensuring the authenticity of your belongings.
So, why not start making your own holographic stickers today? Experiment with different designs and materials to create stickers that reflect your style and personality. Have fun and let your creativity shine!
Leave empty spaces on your design
When creating holographic labels, it’s important to leave empty spaces or “negative spaces” on your design. These empty areas will allow the light to pass through and reflect off the holographic materials, creating a stunning luminous effect.
If you’re using a printer to make your holographic stickers, remember to set the background color of your design as grey. This will help to give the hologramme effect to your stickers. You can also use different shades of grey to create a more dynamic holographic effect.
Empty spaces can be strategically placed throughout your design to accentuate certain elements or create a sense of depth. Whether you’re using design software like Adobe Illustrator or a Cricut machine, make sure to save your design as a PNG file with a transparent background to preserve the empty spaces.
By leaving empty spaces, you’re allowing the holographic materials to shine and showcase their unique properties. It also adds a touch of sophistication and elegance to your holographic labels. So, the next time you’re creating holographic stickers, don’t forget to leave empty spaces and let the lumière do its magic!
Design Your Stickers
When it comes to making holographic labels, the design is an essential part of the process. Whether you want to create stickers for personal use or business purposes, the right design can make all the difference.
Start by thinking about what you want your holographic stickers to look like. Do you have a specific shape or image in mind? Consider using design software like Adobe Photoshop or Illustrator to bring your ideas to life. Remember to keep in mind the size and shape of the stickers, as well as any specific requirements you have.
Next, choose the colors you want to use for your holographic stickers. Holographic materials often have a metallic or rainbow-like effect, so think about whether you want to incorporate these elements into your design. Consider using a grey or empty background to make the holographic effect stand out even more.
If you’re unsure about what design to use, it can be helpful to do some research for inspiration. Pinterest is a great platform to find different holographic sticker designs. Create a board and save your favorite designs for reference. Comment on the designs you like and leave feedback on why they caught your eye.
Once you have your design ready, it’s time to think about the materials you’ll need. Holographic stickers are often made with special holographic films or papers that can be purchased online or at specialty craft stores. You’ll also need a printer that is compatible with these materials.
If you have a Cricut or other cutting machine, it can be used to cut out the stickers once they are printed. This will give your holographic labels a professional and precise finish.
When designing your stickers, don’t forget to consider their purpose. Are they meant to be used for decorative purposes, or do they also need to serve a functional role? If they are intended for security reasons, you may want to incorporate specific design elements that will make them harder to counterfeit.
Qu’est-ce qu’un hologramme ? C’est un autocollant fabriqué avec des matériaux spéciaux qui sont utilisés pour créer un effet de holographiques is breathtaking. Vous pouvez également trouver ces autocollants sur le marché. Les autocollants holographiques sont souvent utilisés pour des raisons de sécurité, mais ils peuvent également être utilisés pour créer différents effets lumineux et attrayants.
Designing your holographic stickers can be a fun and creative process. Just remember to take your time, experiment, and let your imagination run wild. With the right design, your holographic labels will surely stand out in any setting.
Autocollants hologrammes de sécurité – en quoi sont-ils différents
Les autocollants et les stickers holographiques de sécurité sont des élements de design très populaires sur le marché. Ils sont également utilisés pour leur effet de sécurité car les hologrammes sont uniques et difficiles à reproduire. Comment sont-ils fabriqués ? Qu’est-ce qui rend les autocollants holographiques différents des autres types d’autocollants ? Dans ce tutoriel, nous vous expliquerons en quoi les autocollants hologrammes de sécurité sont différents et comment les fabriquer avec votre imprimante-laser ou votre Cricut.
Pour commencer, réfléchissez à votre design holographique. Vous souhaitez utiliser un hologramme avec une lueur holographique ou préférez-vous un autocollant holographique avec un fond gris ? Si vous choisissez un fond gris, cela peut aider à mettre en valeur les espaces vides et à donner un aspect plus professionnel. Utilisez votre logiciel de conception préféré pour créer votre design holographique.
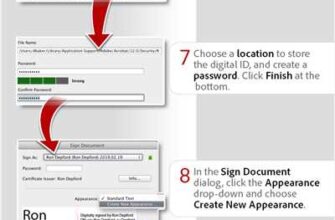
Ensuite, choisissez les matériaux pour créer vos autocollants holographiques de sécurité. Vous avez besoin d’une imprimante-laser, de papier holographique et d’un tableau holographique. Assurez-vous d’utiliser des matériaux de qualité pour obtenir les meilleurs résultats.
Une fois que vous avez tout le matériel, commencez par imprimer votre design holographique sur le papier holographique à l’aide de votre imprimante-laser. Assurez-vous de suivre les instructions du fabricant pour obtenir les meilleurs réglages d’impression. Une fois que l’impression est terminée, laissez-la sécher complètement avant de continuer.
Ensuite, placez votre autocollant holographique imprimé sur le tableau holographique. Assurez-vous que le côté adhésif de l’autocollant est en contact avec le tableau holographique. Appuyez fermement pour vous assurer que l’autocollant adhère correctement au tableau.
Une fois que vous avez fixé l’autocollant sur le tableau holographique, découpez-le en suivant les contours de votre design. Vous pouvez utiliser des ciseaux ou un cutter pour cela. Veillez à ne pas laisser de bords rugueux et à découper avec précision.
Et voilà ! Vous avez maintenant créé vos propres autocollants holographiques de sécurité uniques. Vous pouvez les utiliser pour ajouter une touche spéciale à vos produits, emballages, cartes de visite et bien d’autres choses encore. N’oubliez pas de les stocker dans un endroit sûr pour les protéger de tout dommage.
Avec les autocollants holographiques de sécurité, vous pouvez facilement créer des designs accrocheurs qui se démarqueront des autres. Que vous les fabriquiez pour un usage personnel ou commercial, les autocollants hologrammes de sécurité sont un excellent moyen de faire ressortir vos produits et de leur donner une apparence haut de gamme.
N’oubliez pas de suivre notre tutoriel pour créer vos propres autocollants holographiques de sécurité et laissez libre cours à votre créativité !
What is a security hologram?
A security hologram is a type of holographic sticker that is used for authentication and security purposes. These holograms are designed to be difficult to replicate, making them a popular choice for protecting products, documents, and other valuable items from counterfeiting.
Security holograms are made using special materials and a unique design that creates a holographic effect. When light is shone on the hologram, it diffracts and creates a three-dimensional image or pattern that appears to be floating above the surface.
The holographic effect is achieved by using a laser beam to create an interference pattern on a photosensitive material. This pattern is then transferred onto a thin film or foil, which is then attached to an adhesive backing to create the holographic sticker.
Security holograms can be found in various forms, including labels, stickers, and even ID cards. They are commonly used on currency, credit cards, passports, and other important documents to prevent forgery.
So, what makes security holograms different from regular holographic stickers? The main difference lies in their purpose and design. Security holograms are specifically designed to be tamper-evident, with features such as serial numbers, barcodes, or custom designs that are difficult to reproduce.
In summary, security holograms are a specialized type of holographic sticker used for security and authentication purposes. They are made using unique materials and designs that create a holographic effect when light is shone on them. These holograms can be found on various items to prevent counterfeiting and protect against tampering.
Comment sont fabriqués les autocollants hologrammes de sécurité
Les autocollants holographiques de sécurité sont des autocollants spéciaux conçus pour offrir une protection et une sécurité supplémentaires. Ils sont utilisés dans une variété de domaines tels que la lutte contre la contrefaçon, l’identification des produits authentiques et la protection de la marque.
Alors, comment sont fabriqués ces autocollants hologrammes de sécurité? Voici un tutoriel étape par étape pour vous montrer comment créer votre propre design d’autocollants holographiques avec votre imprimante Cricut:
| Étape 1 | Commencez par trouver un design holographique que vous souhaitez utiliser. Vous pouvez rechercher des idées sur Pinterest et sauvegarder vos favoris. |
| Étape 2 | Ouvrez votre logiciel de conception Cricut et créez un nouveau projet. Assurez-vous d’utiliser un fond gris pour votre design holographique, car cela aidera à créer un effet holographique plus réaliste. |
| Étape 3 | Utilisez les différentes formes et motifs disponibles dans le logiciel pour créer votre design holographique. Vous pouvez également ajouter du texte et des images selon vos besoins. |
| Étape 4 | Lorsque votre design est prêt, assurez-vous de remplir tous les espaces vides avec des motifs holographiques. Cela aidera à renforcer l’effet holographique. |
| Étape 5 | Une fois votre design finalisé, utilisez votre imprimante Cricut pour imprimer le design sur des autocollants holographiques spéciaux. Assurez-vous d’utiliser les bons matériaux pour obtenir les meilleurs résultats. |
| Étape 6 | Après avoir imprimé les autocollants holographiques, découpez-les en utilisant votre machine Cricut ou simplement des ciseaux. Veillez à suivre les lignes de découpe pour obtenir les autocollants de la forme souhaitée. |
| Étape 7 | Une fois les autocollants découpés, vous pouvez les utiliser comme bon vous semble. Ils peuvent être utilisés pour sécuriser des produits, sceller des emballages ou simplement ajouter une touche d’originalité à vos projets. |
Voilà comment sont fabriqués les autocollants hologrammes de sécurité. En suivant ce tutoriel, vous pourrez créer vos propres autocollants holographiques uniques et personnalisés. N’oubliez pas d’expérimenter avec différents designs et matériaux pour obtenir des résultats encore plus innovants!
Materials to Make Holographic Stickers on a Cricut
When it comes to creating holographic stickers with your Cricut machine, you’ll need a few key materials to ensure a successful and stunning end result. Here are the materials you’ll need:
1. Holographic Sticker Paper: This is the essential material that will give your stickers their holographic effect. Look for high-quality holographic sticker paper that is specifically designed to be used with Cricut machines. It’s important to choose a sticker paper that will produce vibrant colors and a reflective holographic finish.
2. Cricut Machine: Your Cricut cutting machine will be the main tool used to cut out and create your holographic stickers. Make sure your machine is in good working condition and properly set up before starting your project.
3. Design Software: To create your holographic sticker design, you’ll need design software that is compatible with your Cricut machine. Popular design software options include Cricut Design Space, Adobe Illustrator, and CorelDRAW. Use this software to create a design with an empty background and your holographic elements as the focal point.
4. Printer: Although not required, if you want to save time and ink, you can print your designs on a printer before cutting them with your Cricut machine. This is especially useful if your design includes intricate details or complex shapes.
5. Cricut Mat: Your Cricut machine comes with a cutting mat that secures your materials in place while they are being cut. Choose a mat with a suitable level of stickiness that will keep your holographic sticker paper in place during the cutting process.
6. Cricut Tools: Use Cricut tools, such as weeding tools and spatulas, to help remove your holographic stickers from the cutting mat and clean up any excess material.
7. Protective Coverings: Once your holographic stickers are cut and ready to be used, consider applying a protective covering like laminate or clear vinyl to ensure durability and to keep your stickers looking their best.
Remember, the materials used to make holographic stickers can vary, and there are different types of holographic sticker paper available on the market. It’s always a good idea to read through the instructions provided with your chosen materials and consult tutorials or blogs for tips and tricks on how to achieve the best holographic effect with your Cricut machine.
Want to remember this? Save this Holographic Sticker Tutorial to your favorite Pinterest Board
If you’re interested in learning how to make your own holographic stickers, it’s important to know what holographic stickers are and how they can be used. Holographic stickers are made using a special type of material that creates a unique visual effect when light hits it. These stickers are commonly used for design purposes, as well as for security measures.
To make holographic stickers, you will need various materials such as a holographic sticker sheet, a printer or a Cricut machine, and a design of your choice. Start by creating your design on your preferred design software and then print it on the holographic sticker sheet. Make sure to leave empty spaces or a grey background in your design, as these areas will reflect the holographic effect.
Once your stickers are printed, carefully cut them using scissors or a cutting machine like the Cricut. Peel off the paper backing and stick the holographic stickers to any surface you want. These stickers can be used on different items like notebooks, laptops, or even to decorate your walls.
Holographic stickers not only add a touch of style and uniqueness to your belongings, but they also provide an extra layer of security. Holographic stickers are commonly used to authenticate products and can help deter counterfeit items in the market. They are also used for brand identification and can act as a seal of approval for companies.
If you want to remember this holographic sticker tutorial for future reference, be sure to save it to your favorite Pinterest board. Additionally, feel free to leave a comment if you have any questions or want to share your own experiences with holographic stickers.