

If you’re looking for a way to create stunning photo compositions, then you might want to consider using the Diptic application. Diptic is an easy-to-use tool that allows you to combine multiple images into a single frame. This is especially useful when you want to create a grid-like layout for your photos.
One of the best features of Diptic is its ability to evenly crop and scale your images, regardless of their size or aspect ratio. This means that even if you have photos of different heights and widths, Diptic will automatically adjust them to fit into the layout grid. This eliminates the need for additional editing or resizing steps.
When you open Diptic on your iPhone, you’ll see a screen with controls and options to create your layout. You can choose from various grid patterns, such as the classic “grid” or a more creative arrangement. By following a few simple steps, you can place your photos into the grid, adjust their size, and even add padding/margin between them.
For example, let’s say you want to create a layout with two columns and three rows. Using the “grid” pattern, you can easily calculate the number of image frames you need and how much space they should occupy. Diptic will show you a preview of your layout, so you can make adjustments as needed.
Once you have your layout set up, you can add your photos to the frames by selecting them from your photo library. Diptic will automatically scale and fit each photo into its designated frame. You can then further customize your composition by adjusting the size and position of each image within its frame.
In conclusion, Diptic is a powerful tool that allows you to create beautiful photo layouts without the need for any other apps or editing software. Whether you’re a professional photographer or just a hobbyist, Diptic can help you showcase your work in a visually appealing and creative way. So why wait? Start highlighting your favorite photos today!
- How to layout a ‘grid’ of images in the center of the screen
- Adding an Image Layout Frame
- Make a Photo Grid with Any Number of Rows and Columns
- Step 1: Choose the number of rows and columns.
- Step 2: Calculate the grid dimensions.
- Step 3: Build the grid.
- Step 4: Adjust the grid layout (optional).
- Steps to build a photo grid
- FAQ
- How can I combine two pictures into a side by side arrangement
- How do I create a side by side photo using the Photos application
- Is there a way to place two pictures next to each other on an iPhone without using an additional app?
- Which application is capable of creating side by side photo compositions
- You’re almost there
- Sources
How to layout a ‘grid’ of images in the center of the screen
When it comes to creating a grid of images in the center of the screen, there are a few different approaches you can take. In this article, we will focus on one of the most common methods using HTML and CSS.
To start, you will need to have some images that you would like to arrange in a grid. These can be photos, screenshots, or any other type of image that you want to display. The number of images you have will determine the size and arrangement of your grid.
One way to create a grid is to use a combination of HTML and CSS. You can use the HTML
- and
- tag, you can place an
object-fit: cover;property to make sure each image fills the available space, and thewidthandheightproperties to set the dimensions of each thumbnail.By default, the grid will be aligned to the left side of the screen. If you want to center it, you can use the
justify-content: center;andalign-items: center;properties on the- tag. This will center the grid horizontally and vertically on the screen.
- Open the Photos application on your smartphone or computer.
- Select the two photos that you want to display side by side.
- Click on the “Create” or “Edit” button, which is usually represented by a plus sign icon.
- In the editing interface, look for a collage or grid layout option. This layout will allow you to place the two photos side by side.
- Choose the layout pattern that best suits your need. A grid layout with two columns and one row is ideal for side by side photos.
- Drag and drop the selected photos into the photo slots on the layout. Make sure to position them next to each other.
- Adjust the size of the photos by scaling or cropping them if necessary.
- Add any additional effects or filters that you may want to apply to the photos.
- Review the layout to see if any adjustments need to be made. You can rearrange the photos or change their size if needed.
- Once you are satisfied with the layout, save or export the final image.
- First, make sure the photos you want to place side by side are of similar sizes or aspect ratios. This will ensure a more aesthetically pleasing layout.
- Next, create a container element for your photos. You can use a element with a specific ID or class to easily target it with CSS later.
- Within the container element, create two separate
src) of each- Add CSS styles to the container element to control the layout of your photos. You can use CSS properties like
display: inline-block;to make the photos appear side by side.- If you want the photos to be displayed next to each other evenly, you can also use CSS properties like
width: 50%;to make each photo take up half of the container’s width.- To avoid any cropping or resizing of your photos, you can set the CSS property
object-fit: cover;for the- Finally, save your HTML file and open it on your iPhone’s web browser to see the complete layout of your photos without using any additional apps!
By using the steps outlined above, you can easily create a side-by-side layout for your photos on your iPhone. This method works without the need for any additional apps or pre-cropping of your photos, allowing you to showcase them in their original size and quality.
Please note that this method can be applied not only to iPhones but also to Android devices and other platforms that support web browsing. The key is to use HTML and CSS to create the desired layout for your images, regardless of the device you’re using.
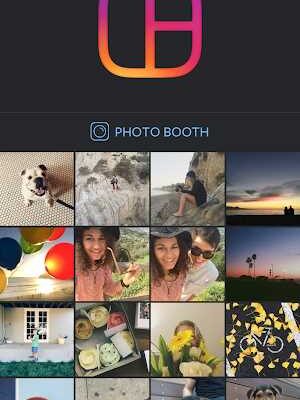
Which application is capable of creating side by side photo compositions
When it comes to creating side by side photo compositions, there are a number of applications that allow you to do so. One popular application is Instagram, which allows you to arrange your photos in a grid layout. You can upload multiple photos and use the built-in layout options to create a visually pleasing composition.
In addition to Instagram, there are other applications that are capable of creating side by side photo compositions. Some examples include InLayout, Photo Grid, and Layout from Instagram. These applications provide various features and options to help you arrange your photos in a desirable way. Whether you want to create a grid, a collage, or a slideshow, these applications can help you achieve the desired arrangement.
When creating side by side photo compositions, there are some things you should keep in mind. First and foremost, you should consider the aspect ratio of your photos. If the aspect ratio of your photos doesn’t match the layout you’re trying to create, you might end up with cropped or distorted images. To avoid this, you can use applications or editing tools that allow you to resize or crop your photos to fit the desired layout.
Another important aspect to consider is the number of photos you want to include in your composition. If you have a large number of photos, you might want to use an application that allows you to create multiple rows or columns of photos. This way, you can spread your photos evenly across the layout and create a visually balanced composition.
One common approach to creating side by side photo compositions is to place the photos next to each other horizontally in a row. You can use an application that provides options for adding padding/margin between the photos to create some space and avoid a cluttered look. Additionally, you can use frames or badges to add a decorative element to your photos and make them stand out.
On the other hand, if you prefer a vertical arrangement, you can place the photos one above the other in a column. Again, you can use an application that allows you to add padding/margin between the photos to create some space and make the arrangement visually appealing.
When building your side by side photo composition, you should also consider the screen size and resolution of the device on which the composition will be viewed. The layout should be responsive and adjust to different screen sizes to ensure that your photos are displayed properly on any device.
In conclusion, there are several applications available that are capable of creating side by side photo compositions. Whether you want to create a grid, a collage, or a slideshow, these applications provide the necessary tools and features to help you achieve the desired arrangement. Consider the aspect ratio of your photos, the number of photos you want to include, and the screen size of the device on which your composition will be viewed to create a visually pleasing layout.
You’re almost there
By following the steps above, you have learned how to create compositions and arrange your photos using various layouts and frames. However, if you want to take your photo arrangement to the next level, there are a few more things you can do.
First, consider the size and number of your images. If you have two photos of different sizes, you can create a diptic by combining them into one frame. This can be done by creating a new image view and setting the appropriate padding/margin to place the two images side by side. You can also crop or resize your images to fit into a specific area or frame.
Next, think about the arrangement of the images. Do you want them to be evenly spread across the screen or prefer a specific pattern, like a grid? Some apps allow you to add grid controls that will automatically align your photos in a grid-like pattern. You can also manually arrange them by adding additional padding/margin to each image view.
Furthermore, you can highlight a specific photo by adding a border, shadow, or highlighting effect to it. This can be done using CSS or by applying filters to the image itself.
Lastly, don’t forget about the FAQ section! If you’re unsure about how to use certain features or controls in your photo layout app, check the FAQ section for more information. This can help you make the most out of your app and explore its capabilities.
So, you’re almost there! By combining all these tips and tricks, you can create stunning photo layouts that will impress your friends and followers on Instagram or any other platform. Just remember to have fun and let your creativity flow!
Sources
If you want to learn how to layout photos in an application, there are some apps that can help you with this. Some popular apps for iPhone include Diptic and Grid. These apps allow you to combine multiple photos into a grid or a pattern, allowing you to place frames of any size and shape on top of the photos, highlighting each image. They also have additional features such as adding badges or even creating a complete layout for you.
When creating a layout, you should first decide the size and number of images you want to display. If you’re using Diptic, for example, you can choose between different layouts such as rows, columns, or grids. You can also specify the number of rows and columns, and the spacing between the images. Diptic will then automatically calculate the size of each image based on the available area and the number of images.
Another option is to use an Android app such as Photo Grid or Layout from Instagram. These apps have similar features to Diptic and can help you create a layout with ease.
Of course, you can also build your own layout using HTML and CSS. For this, you can use a combination of HTML elements such as divs and imageviews. By using CSS, you can control the size and position of each image, and even add padding/margin to create a spacing between the images.
When creating your own layout, you should keep in mind that the size of the images should be proportional to the available area. If you’re using a large image on a small area, it might be scaled down and seem ugly. On the other hand, if you’re using a small image on a large area, it might be stretched and lose quality. Therefore, it’s important to choose the right size and scale your images accordingly.
By following these steps and using the mentioned apps or building your own layout, you can create a visually appealing photo layout that evenly spreads your photos across the screen or any other area you choose.
 If you are looking to create a website, W3Schools is
 Making purple icing might seem like a daunting task
 Coconut oil has gained popularity in recent years due
 If you own a local business, having an online presence
 If you’ve ever wondered whether it’
 Learn How Budget Binders Can Help You Take Control of Your Finances and Achieve Your Financial GoalsCreating a budget and setting financial goals can sometimes
 Bittersweet how sorrow can be, full of emotions and
 Creating a website that automatically adjusts and scales
- Within the container element, create two separate
Once you have created your grid layout, you can add any additional styling or functionality that you want. For example, you can add borders, badges, or other decoration to each thumbnail. You can also add hover effects or click events to create a more interactive experience.
Of course, this is just one example of how to create a grid layout for your images. There are many other ways to achieve a similar effect, such as using a grid framework or a specific application or library. It all depends on your specific needs and the tools you are comfortable using.
Now that you know how to create a grid of images in the center of the screen, you can start experimenting and building your own grid arrangements. Don’t be afraid to try different configurations and styles to find what works best for your application or website. With a little bit of practice, you will be able to create beautiful and functional grids that showcase your images in the best possible way.
Stay creative and have fun!
Adding an Image Layout Frame
When it comes to creating compositions with multiple photos, there are many apps and tools available that can help you. One popular application is Diptic, which allows you to combine photos into a layout arrangement. However, sometimes these apps don’t have the flexibility or controls you need to create the exact layout you want.
If you’re looking to add an image layout frame to your photos without using these apps, there’s a simple solution you can try. By using image views and grids, you can create your own layout that is almost capable of everything these apps can do.
First, you’ll need to calculate the size of each image view. You can do this by dividing the width or height of the area you want to use by the desired number of rows or columns. For example, if you’re creating a layout for an iPhone screen, which is 375 pixels wide, and you want 3 columns, each image view should be 125 pixels wide. Of course, you can adjust these numbers to fit your needs.
Next, you’ll create the grids using the calculated image view dimensions. Each grid cell will be an image view that will contain your photo. You can use the “grid” layout in HTML with the appropriate number of rows and columns, or you can create the grid programmatically if you’re using a custom application.
Once the grids are in place, you can add your photos to each image view. Depending on the application or framework you’re using, you may need to adjust the size or scale of the image to fit the image view properly. This step will ensure that your photos are displayed correctly within the layout.
Adding an image layout frame can help to highlight the individual photos and give them a polished look. You can also add borders, badges, or other visual elements to enhance the overall composition.
By following these steps, you will be able to create your own image layout frame without relying on external apps or tools. This method allows you to have complete control over the layout and ensures that your compositions look exactly as you envision them. Additionally, it gives you the flexibility to create unique layouts that go beyond what pre-designed apps can offer. So, next time you’re creating a photo layout, think about adding an image layout frame to make your photos shine!
Of course, there are many other sources and applications that can help you with creating image layouts, such as Instagram’s grid layout feature or the ability to create photo grids in Photoshop. These options may be suitable for different scenarios or preferences, so feel free to explore them as well.
If you’re interested in learning more about creating image layouts or have any questions, you can check out our FAQ section or reach out to our support team.
Make a Photo Grid with Any Number of Rows and Columns
Creating a photo grid is a great way to showcase multiple images in a visually appealing arrangement. Whether you’re highlighting your travel pictures or creating a complete composition of your favorite Instagram photos, a photo grid layout can make them look even more stunning.
The good news is that you don’t need to be an HTML expert to create a photo grid. There are many apps and online tools available that can help you build grids with different numbers of rows and columns. In this FAQ, we’ll show you how to make a photo grid using Diptic, an app capable of creating grids with any number of photos.
Step 1: Choose the number of rows and columns.

Decide how many rows and columns you want in your photo grid. For example, if you want to create a square grid with 2 rows and 2 columns, you will have 4 image thumbnails in total.
Step 2: Calculate the grid dimensions.
Next, calculate the width and height of each grid area. If you’re using Diptic, taking a screenshot of your Diptic screen might help with these calculations. Diptic will evenly place and size your images within the grid, so all you need to do is provide the total width and height of the grid area without worrying about individual image dimensions.
Step 3: Build the grid.
In Diptic, follow the app’s controls to select the number of rows and columns you determined in step 1. Diptic will automatically create the grid with evenly sized frames for your photos.
Step 4: Adjust the grid layout (optional).
If the default grid layout isn’t exactly what you want, you can adjust the padding/margin between images or even the width and height of each individual grid area in Diptic. This way, you can customize the arrangement to your liking.
Remember that when creating a photo grid, it’s important to think about the overall composition. A grid with too many images might look cluttered, while a grid with too few images might seem incomplete. Finding the right balance is key.
Additionally, consider the size of your images. If your photos are large, the grid might look crowded. In this case, you can use apps like Diptic to resize and crop your images before placing them in the grid.
By following these steps, you can easily create a stunning photo grid with any number of rows and columns. The possibilities are almost endless, and the end result will be a beautiful arrangement of your pictures for everyone to enjoy!
Steps to build a photo grid
To create a photo grid, follow the steps below:
Step 1: Calculate the number of columns
First, decide on the number of columns you want in your grid layout. This will depend on the size of your photos and the available space on your screen. For example, if you’re using a large application like Instagram on your iPhone, you can have up to three columns.
Step 2: Decide on the size of each photo
Next, think about how large you want each photo to be. Consider the aspect ratio of your pictures and how they will fit into the layout. You can use an image editing app to crop and scale the photos to the desired dimensions.
Step 3: Arrange the photos vertically and horizontally
Place the imageviews into a ‘grid’ frame, with each photo aligned horizontally and vertically. Use the appropriate controls and padding/margin values to achieve an even spacing between the photos.
Step 4: Add additional controls and features
Depending on the application or layout, you can add additional features such as captions, thumbnails, or highlight effects to make the grid more visually appealing.
Step 5: Build the grid layout
Combine the above steps to build the complete photo grid layout. Make sure to test the grid on different screen sizes and devices to ensure it looks good and functions properly.
Frequently Asked Questions (FAQ)
Q: Can I create a photo grid with any number of columns?
A: Of course! The number of columns is not fixed, and you can create a grid layout with any number of columns that suits your needs.
Q: What if my photos aren’t all the same size?
A: No worries! You can still create a grid with unevenly sized photos. You can either adjust the size of each photo individually or use a layout that allows for variable photo sizes.
Q: Is there an app or tool that can help me build photo grids?
A: Yes, there are many apps and tools available that are capable of creating photo grids. You can search for “photo grid” applications or look for tutorials on how to use image editing software to create grids.
By following these steps and considering the tips above, you can easily build a visually appealing and organized photo grid for your website, application, or social media feed.
FAQ
Q: How can I layout photos in a visually appealing way?
A: There are several ways to layout photos. One popular approach is to use frames or a grid pattern. You can place your photos into imageviews and then arrange them in rows and columns. This will create a clean and organized composition.
Q: How do I calculate the size and placement of the photos?
A: You can use the following steps to calculate the size and placement of the photos. First, determine the size of the screen or area you are working with. Next, decide how many rows and columns you want in your grid. Then, calculate the width and height of each imageview by dividing the screen size by the number of rows and columns. Finally, place the imageviews on the screen, making sure they are evenly spaced and aligned.
Q: Can I combine different layouts in one arrangement?
A: Yes, you can combine different layouts to create a unique and interesting arrangement. For example, you can place two photos side by side and then add a third photo below them. You can also mix and match different sizes and orientations to create a dynamic composition.
Q: Are there any apps or tools that can help me with photo layout?
A: Yes, there are several apps and tools available for both Android and iPhone that can assist you with photo layout. Some popular options include Diptic, Instagram, and Adobe Photoshop Express. These apps offer features such as grids, frames, and additional controls to help you create stunning photo compositions.
Q: What should I avoid when laying out photos?
A: There are a few things you should avoid when laying out photos. First, don’t make your imageviews too large or too small, as this can make the layout look unbalanced. Second, avoid cropping the photos in a way that cuts off important details or subjects. Lastly, be cautious when using badges or highlighting on photos, as it can distract from the overall composition.
Q: I’m not a professional designer. How can I learn more about photo layout?
A: Even if you’re not a professional designer, there are still resources available to help you learn more about photo layout. You can explore online tutorials, watch videos, or read articles on the topic. Additionally, studying and analyzing well-designed compositions in magazines, books, and websites can also provide inspiration and guidance.
Q: Is there a preferred way to display photos vertically or horizontally?
A: There isn’t a definitive rule on whether photos should be displayed vertically or horizontally. It depends on the content and the desired effect. Some compositions may look better with vertically arranged photos, while others may benefit from a horizontal layout. Ultimately, the choice should be based on what you think looks visually appealing and enhances the storytelling of the photos.
How can I combine two pictures into a side by side arrangement
If you want to combine two pictures into a side by side arrangement, there are several ways you can achieve this. One method is by using a diptych, which is a single artwork containing two images side by side. This can be done using HTML and CSS.
First, you need to decide on the size of the diptych. You can set the width and height in pixels to match the dimensions of your images. If the images have different sizes, you can either scale them to fit or crop them to the same size.
To create the diptych layout, you can use a table with two columns, where each column will contain one of the images. You can use the HTML
tag to create the table structure. Inside each table cell, you can place an
To align the images side by side, you can set the CSS property
display: inline-block;for the table cells. You can also add some padding or margin to create space between the images.Here’s an example of how the HTML code for the diptych layout might look:


By adjusting the size, padding, and margin of the table cells, you can create different layouts and compositions for your images. You can also experiment with adding additional controls or badges to highlight certain areas or features of the images.
Keep in mind that this is just one way to combine two pictures into a side by side arrangement. There are many other techniques and tools available that you can explore to achieve the desired effect. Always remember to consider the aspect ratio and size of your images to ensure they fit nicely into the chosen layout.
If you’re building an application or website, there are also frameworks and libraries available that can help you create more advanced and responsive layouts for your images. Some popular options include Bootstrap for web development and the native layout capabilities of iOS and Android for mobile applications.
Just make sure to test your layout on different screen sizes and devices to ensure it looks good and functions properly. You don’t want your combined pictures to appear too large or small, and you also don’t want the layout to break or become ugly.
In conclusion, combining two pictures into a side by side arrangement can be done using HTML and CSS. By learning and applying some basic layout techniques, you can create visually pleasing compositions that showcase your photos in a beautiful way.
How do I create a side by side photo using the Photos application
Creating a side by side photo using the Photos application is a great way to showcase two photos together for comparison or storytelling. Here are the steps to create this layout:
By following these steps, you can easily create a side by side photo using the Photos application. This layout is perfect for highlighting the differences between two images or telling a story with related photos.
Is there a way to place two pictures next to each other on an iPhone without using an additional app?
Yes, there is! One way to accomplish this is by using HTML and CSS to create a simple layout for your photos. By following the steps below, you can achieve a side-by-side arrangement for your pictures without the need for any additional apps.
tags to create a unordered list of image thumbnails, and use CSS to style and arrange them. First, you should calculate the size of each thumbnail that you want to display. For example, if you have 12 images and you want to arrange them in 3 columns and 4 rows, you should divide the width of your screen by 3 to get the width of each thumbnail, and divide the height of your screen by 4 to get the height of each thumbnail.
Next, you can use CSS to style the
- and
tags to create the grid layout. You can use the display: grid; property to create a grid container, and the grid-template-columns property to specify the number of columns you want. For example, if you have 3 columns, you can use grid-template-columns: repeat(3, 1fr);. Inside each