

If you’re looking for a way to collect data, receive feedback, or create quizzes, Google Forms is the application for you. This powerful tool is a part of Google Docs and is free to use. In this article, we will explore the advanced features and tips that will make it easier for you to create and use Google Forms.
One of the many great features of Google Forms is the branching logic option. This allows you to create a quiz or survey where the next question depends on the answer to the previous question. For example, if a user answers “yes” to a question, you can send them to a specific question or page, and if they answer “no,” they can be directed to a different question or page. This makes it easier to create quizzes or surveys that adapt to the thoughts and answers of the user.
An alternative to branching logic is the conditional logic feature. This allows you to validate the answers of the users and show or hide specific questions or sections based on their answers. For example, if a user selects a specific option from a drop-down menu, you can choose to show them a follow-up question or hide it, depending on their selection. This level of detail and customization makes Google Forms a powerful tool for creating quizzes, surveys, or any type of form you may need.
When you start creating your form, you can choose from a variety of templates or start from scratch. Google Forms also provides options for design customization, such as the ability to add a custom theme or background image. Once your form is ready, you can send it to your desired audience. Google Forms allows you to send the form via email, publish it as a web document, or embed it on a website. You can also choose to restrict access by requiring the user to sign in with their Google account, ensuring maximum security for your data.
After users have submitted their responses, Google Forms stores the data in a spreadsheet. This makes it easy for you to view and analyze the data, as well as share it with others. You can view the responses in detail, filter and sort the data, create charts or graphs to visualize the information, and even generate a summary report. Google Forms also has built-in functions for data validation and the ability to automatically grade quizzes. This saves you time and effort, as it eliminates the need to manually check and grade the responses.
In conclusion, Google Forms is a versatile and user-friendly tool that offers a wide range of functions for creating and using forms, quizzes, and surveys. Whether you’re a teacher looking to create quizzes for your students, a business owner collecting feedback from customers, or just someone who wants to gather opinions for a personal project, Google Forms has the features and options you need. So why wait? Start using Google Forms today and experience the convenience and ease it provides for all your form creation and data collection needs.
- How to Add Office Use Section to Google Forms to allow review and validate user data
- The advanced functions of Google Forms creation
- Creating pages with sections
- Create logic branching for conditional questions
- Choose a response destination
- Create a document with form responses
- Auto-grade your Google Forms quizzes
- Receive email notifications on form submission
- Google Tips –
- Video:
- Google Forms Advanced Tutorial
How to Add Office Use Section to Google Forms to allow review and validate user data
If you’re looking for ways to make the data collection process easier and more efficient for your office, Google Forms is a great solution. With its user-friendly interface and powerful features, Google Forms allows you to create and design forms to gather information from users. However, if you need to review and validate the data before final submission or want to add an office use section for internal documentation, there are a few extra steps you can take.
One way to enable review and validation of user data is by adding an “Office Use” section to your Google Form. This section can be used by the reviewer to give their thoughts on the answers provided by the user and to validate the data submitted. Here’s how you can do it:
- Open the Google Form that you want to add the office use section to.
- Click on the “Add section” option at the bottom of the form to create a new section.
- Give the new section a title, such as “Office Use” or “Internal Documentation”.
- Add the necessary questions or prompts in this section to allow the reviewer to provide their feedback and validate the data.
- To make sure that this section is only visible to the reviewer and not to the form respondent, you’ll need to use conditional logic. Click on the three dots at the bottom-right corner of the section and choose “Go to section based on answer”. Select the question from the previous section which will determine whether the reviewer should see this section or not.
- If you want to add an extra level of security to the office use section, you can choose to require the reviewer to sign in with their Google account before accessing it. To do this, click on the settings icon at the top-right corner of the Google Form, go to the “General” tab, and enable the “Limit to 1 response” option. This will prompt the reviewer to sign in before they can access the form.
- Once the office use section is enabled and the reviewer has provided their feedback and validated the data, you can choose how you want to receive the form response. By default, Google Forms will send you an email for each new response, but you can also choose to have the responses saved to a Google Sheets spreadsheet or integrate with other Google Docs or third-party applications.
Adding an office use section to your Google Form not only helps with the review and validation process but also gives you a way to document your internal thoughts and collaborate with other team members. It’s a valuable feature that makes Google Forms more than just a form creation and data collection tool – it becomes a powerful collaboration and data management platform.
So, if you’re looking to add an office use section to your Google Form to allow for review and validation of user data, follow the steps above and take advantage of the many features and options available in Google Forms.
The advanced functions of Google Forms creation
Google Forms is a powerful tool for creating surveys, questionnaires, and other types of forms. While it’s easy to use, there are many advanced functions that can enhance your form creation process. In this article, we will explore some of these advanced features and how they can make form creation easier and more efficient.
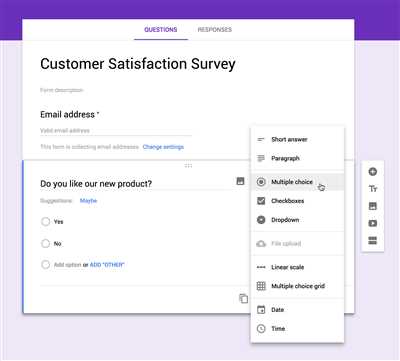
Branching: One of the key features of Google Forms is the option to create branching questions. This means that depending on the answer given, the user will be directed to a specific section of the form. To enable this feature, just choose the “Go to section based on answer” option when creating a question. It’s a great way to guide respondents through a form and provide a more personalized experience.
Auto-grade: If you’re creating a quiz or a form that requires grading, Google Forms has a built-in auto-grade feature. You can give each question a point value and set an answer key. Once the user submits the form, Google Forms will automatically calculate and provide a grade. This is especially useful for educators and anyone who needs to review submissions quickly.
Collaboration: Google Forms allows for collaborative form creation, which means that multiple users can work on the same form simultaneously. This feature is particularly handy when creating forms with a team or when you want to gather input from others. Just make sure that everyone has access to the form and they can start editing right away. It’s a great way to save time and improve the quality of your form.
Conditional questions: Another advanced feature is the ability to create conditional questions. This means that based on a previous response, certain questions will be shown or hidden. To enable this feature, go to the “Advanced settings” section of your question and choose the “Go to section based on answer” option. It’s a powerful way to tailor the form based on the user’s input.
Advanced security: Google Forms provides several security features to protect your form and its responses. You can enable CAPTCHA to prevent spam submissions and also limit the form to a certain number of responses. Additionally, you can choose to collect email addresses to ensure that only specific users can access and submit the form.
Integration with other applications: Google Forms can easily integrate with other Google applications like Google Sheets and Google Docs. This makes it convenient to collect form responses directly into a spreadsheet for further analysis or use the responses to generate a document or report. It’s a versatile option that allows you to streamline your workflow.
Alternative ways to receive responses: Besides receiving form responses via email, Google Forms also provides alternative ways to receive responses. You can embed the form on a website or share the form link. This allows you to reach a wider audience and collect responses from various sources.
These are just some of the many advanced functions that Google Forms offers. With these features, form creation becomes more detailed, personalized, and efficient. Whether you’re a professional, student, or someone who wants to gather information, Google Forms provides the tools you need to create versatile and interactive forms.
Creating pages with sections
When creating a Google Form, you can use the “Sections” feature to create pages with different sections. This allows you to organize your form and make it easier for users to navigate.
To create pages with sections, start by clicking on the “Add section” button on the right side of your form. You can add as many sections as you need. Each section can have its own title and description.
Once you have created multiple sections, you can use the branching feature to make certain sections appear based on the user’s answers. This makes your form more interactive and personalized for each user.
Creating pages with sections is especially useful for quizzes and surveys. You can use the “Quiz” feature to auto-grade quizzes and provide immediate feedback to users. You can also use the “Destination” option to send users to different sections or pages based on their answers.
Here’s a quick overview of the steps to create pages with sections:
Step 1: Click on the “Add section” button to create multiple sections.
Step 2: Use the branching feature to make certain sections appear based on the user’s answers.
Step 3: Enable the “Quiz” feature to auto-grade quizzes and provide immediate feedback.
Step 4: Use the “Destination” option to send users to different sections or pages based on their answers.
By using the “Sections” feature, you can create more detailed and interactive forms that meet your specific needs. Whether you’re creating a quiz, survey, or application form, adding sections will help you collect the data you need and organize it effectively.
When creating your form, don’t forget to validate and edit your questions. You can use features like conditional formatting to ensure that users only provide valid answers.
Another advanced feature of Google Forms is the ability to collaborate with others. You can give different levels of access to collaborators, allowing them to view or edit the form, or even limit their access to just viewing the responses.
Lastly, make sure to keep the security of your form in mind. Google Forms automatically saves responses to a Google Spreadsheet, but you can also choose to send responses to an alternative destination like Google Docs or a file.
With Google Forms, you have many ways to create pages with sections and customize your form to meet your specific needs. Take advantage of these features and explore the different possibilities for your forms!
Create logic branching for conditional questions
Logic branching in Google Forms allows you to create conditional questions that will be displayed based on the user’s response to a previous question. This advanced feature is particularly useful when you want to personalize the form based on the specific needs or characteristics of each respondent.
Here are two ways to enable logic branching in your Google Forms:
- Edit a question: When creating or editing a question, click on the three dots in the bottom right corner of the question box. Then, select “Go to section based on answer”. This will open a new section where you can add the conditional question that will be displayed based on the user’s response.
- Create a section: If you haven’t yet added the question, you can create a new section specifically for the conditional question. To do this, click on the three lines icon in the top right corner of the form editor and select “Add section”. In the new section, you can add the conditional question and set the logic branching options.
Setting up logic branching in Google Forms is fairly straightforward, but here are some tips to help you along the way:
- Make sure that logic branching is enabled by going to the settings menu in the top right corner of the form editor. Under the “Quizzes” tab, check the box for “Make this a quiz” and select your desired options.
- If you want to send email notifications for form responses, be aware that logic branching may affect the notifications you receive. Check the “Email notifications for new responses” box in the settings menu to ensure you receive all relevant responses.
- Keep in mind that logic branching may not work as expected if you have enabled features like randomize question order or limit response options.
- If you’re creating a quiz and want to add a grade to the form submission, remember to enable the “Grade this section” option for each section where you have enabled logic branching.
- Remember that logic branching cannot be used in conjunction with file upload questions.
Logic branching not only makes the creation of advanced forms easier, but it also allows for a more personalized user experience. By incorporating logic branching into your forms, you can tailor the questions and sections based on the responses given, making the form more intuitive and relevant to the respondents. So, if you haven’t tried logic branching before, give it a go and see how it can enhance your forms!
Choose a response destination
When creating a Google Form, one of the most important decisions you need to make is choosing a response destination. This determines where the answers submitted by users will be stored and how you can access and review them.
Google Forms offers several ways to handle response destinations depending on your needs:
1. Google Sheets: This is the default option and it allows you to store all the responses in a Google Sheets spreadsheet. This is a great choice if you want to analyze the data in detail, auto-grade quizzes, or share the data with others.
2. Google Forms: If you want an alternative to Google Sheets, you can choose to store the responses within the Google Forms application itself. However, keep in mind that with this option, the data cannot be easily manipulated or exported to other programs.
3. Email notifications: If you prefer to receive the responses directly in your email, you can choose this option. Google Forms will send you an email each time a user submits a response, including all the answers provided.
4. Google Drive: When using this option, the responses will be stored in a Google Drive folder as individual documents. This is useful if you want each response to be saved as a separate file.
5. Other: If you have a specific application or platform you want to integrate with, you can also choose an alternative response destination by using the Google Forms API or other features that allow you to fetch and store the data in your desired format.
Remember that depending on the type of form you are creating, some response destinations may not be available. For example, if you enable features like branching or conditional logic, you may be limited to using Google Sheets as the response destination.
When designing your form, make sure to choose the response destination that best suits your needs. Think about how you will use the data, who needs access to it, and what level of detail you require. This decision will greatly affect the way you review and analyze the responses.
Here’s a quick overview of the steps to choose a response destination:
- Click on the “Responses” tab at the top of your Google Form.
- Click on the three vertical dots above the form and select “Response destination.”
- Choose the option that suits your needs (Google Sheets, Google Forms, Email notifications, Google Drive, or Other) from the drop-down menu.
- Make sure to read and edit the “Question and response editing” settings to configure how users can interact with the form.
- Click on “Save” to apply the changes.
By following these tips and taking the necessary security and submission review functions into account, you’ll be able to create and use Google Forms with confidence.
Create a document with form responses
If you’re using Google Forms to collect data and want to keep a record of all the responses, you can easily create a document that automatically captures and organizes the information for you.
Google Forms has a built-in feature that allows you to send form responses to a connected Google Docs file of your choice. This is a great way to create a neatly organized document that contains all the details submitted through your form.
To enable this feature, start by creating your form in Google Forms. Once you’ve designed your form with all the questions and sections you want, click on the “Responses” tab at the top of the page. From there, click on the three-dot menu in the upper-right corner of the page and select “Create a new spreadsheet”.
This will create a new Google Sheets file where all the responses from your form will be collected. Each form submission will be recorded as a new row in the spreadsheet, with each question’s answer in a separate column. This makes it easy to read and review the data, especially if you’re receiving many submissions.
If you want to make your document more advanced, you can use Google Sheets functions to auto-grade quizzes, apply conditional formatting, or perform other data manipulation tasks. You can also choose to receive email notifications whenever someone submits a form response.
If you prefer an alternative to Google Sheets, you can also choose to have form responses sent directly to a connected file in Google Docs. This can be useful if you’re using Google Docs for collaborative writing or as an office application. Just make sure the “Destination” for your form responses is set to “Google Docs” in the form settings.
With this feature enabled, each form submission will create a new section in your Google Docs file, creating a well-organized document that contains all the responses. This is particularly handy if you’re using Google Docs for detailed reports, applications, or any other document that requires a structured format.
To add more advanced features to your form, such as logic or multiple pages, you can use the “Sections” and “Question” options in Google Forms. This allows you to create more complex forms that validate user input or give them different sets of questions based on their previous answers.
Whether you’re using Google Forms for a simple survey or a detailed application process, the ability to create a document with form responses is a useful and time-saving feature. It ensures that you have all the data you need in one place and makes it easy to review and analyze the information.
So, next time you start a new Google Form, don’t forget to enable the option to create a document with form responses. It’s a simple step that can save you a lot of time and effort in organizing and managing your data.
Auto-grade your Google Forms quizzes
If you’re using Google Forms to create quizzes, there’s an alternative to manually grading each quiz. Here’s a step-by-step guide on how to auto-grade your Google Forms quizzes:
- Create a quiz in Google Forms, adding all the final quiz questions you want to include.
- Use the advanced options in the Form settings to choose the “Quizzes” option, which should be enabled. This will allow you to auto-grade the responses.
- Next, click on the “Responses” tab in your form and click on the spreadsheet icon. This will give you an organized spreadsheet of all the quiz responses.
- From the spreadsheet, you can review the data and grade the quiz responses.
- If you want to send the graded quiz to someone, you can use the “File” menu and click on “Email collaborators” to send an email with a link to the quiz results.
By following these steps, you can auto-grade your Google Forms quizzes and make the process much easier. Here are some additional tips and features to consider:
- Create sections in your form to organize the quiz questions. This will make it easier to navigate and review the quiz.
- Use the validation options to make sure the answers provided by the user are correct.
- Add conditional branching to your quiz questions. This will allow you to direct the user to different sections depending on their responses.
- Enable notifications to receive an email whenever someone completes your quiz.
- Consider using the “Go to section based on answer” option to create a more dynamic quiz experience for the user.
- Don’t forget to click on the “Edit after submit” option if you need to make changes to your form after it has been submitted.
- Ensure the security of your quiz by choosing the appropriate options in the Form settings, such as allowing only users with your organization email to respond.
With these tips and features, you can make the most out of Google Forms and easily auto-grade your quizzes. Auto-grading can save you time and effort, especially for larger quizzes or surveys. So start using the auto-grade feature in Google Forms and take advantage of all the advanced options available!
Receive email notifications on form submission
When working with Google Forms, it’s important to have a way of receiving notifications when someone submits a response. This can be useful for a variety of reasons, such as keeping track of user feedback, monitoring quiz results, or receiving new survey responses. Fortunately, Google Forms provides several ways to enable email notifications, ensuring that you don’t miss any important submissions.
There are two main options for enabling email notifications on form submission:
- Using Google Forms’ built-in email notifications feature
- Linking the form to a Google Sheets file and using the Sheets email notifications feature
If you want to receive email notifications directly from Google Forms, you can do so by following these steps:
- Open your form in Google Forms
- Click on the “Settings” gear icon located in the top-right corner
- Select the “Email notifications” tab
- Toggle the switch to enable email notifications
- Enter the email address where you want to receive the notifications
- Click “Save”
By enabling email notifications in Google Forms, you’ll receive an email every time someone submits a response. This makes it easy to keep track of new submissions without having to constantly check the form.
Alternatively, you can link your form to a Google Sheets file and use the Sheets email notifications feature. This allows you to receive email notifications whenever a new response is added to the Google Sheets file.
To link your form to a Google Sheets file and enable email notifications, follow these steps:
- Create a new Google Sheets file or open an existing one
- In the Google Sheets file, click on “Add-ons” in the menu bar
- Search for “Google Forms” in the add-ons store and install it
- Authorize the add-on to access your Google Sheets file
- In the sidebar that appears, select your form from the dropdown menu
- Enable the “Email notifications” feature
- Enter the email address where you want to receive the notifications
- Click “Save settings”
By linking your form to a Google Sheets file and enabling email notifications, you’ll receive an email every time a new response is added to the Google Sheets file. This can be a good alternative if you prefer working with spreadsheets or if you want more advanced features, such as conditional logic or auto-grading.
Overall, Google Forms offers several options for receiving email notifications on form submission. Whether you choose to receive notifications directly from Google Forms or through a linked Google Sheets file, you can ensure that you stay informed about new responses and take any necessary actions.
Google Tips –
If you are looking for ways to make your Google Forms creation easier and more efficient, here are some tips and features you should take advantage of:
1. Auto-grade quizzes: Use the “Quizzes” option to automatically grade the responses and give feedback to the users.
2. Logic branching: Create conditional sections or questions based on user responses to customize the flow of the form.
3. Notifications: Enable email notifications to receive alerts whenever someone submits a form.
4. Reviewer access: Share the form with a reviewer who can see the responses and provide feedback before the final submission.
5. Advanced security options: Use the “Data Validation” feature to validate the responses and ensure data accuracy.
6. Collaboration: Collaborate with others in real-time by sharing the form and working together to design and review.
7. File upload option: Add a file upload question to allow users to submit documents or files along with their responses.
8. Destination options: Choose where the responses will be stored – in a Google Sheets spreadsheet or a linked Google Docs document.
9. Design customization: Use the available options to personalize the look and feel of your form with themes and customization tools.
10. Review individual responses: Have the option to review individual responses or all responses as a whole.
These Google Forms tips and features will surely make your form creation process more efficient and effective. Take advantage of them to create user-friendly and interactive surveys or quizzes.