If you’re an avid photographer or simply someone who loves editing pictures, then you must have come across the need to make the background of a photo transparent. Transparent backgrounds are incredibly useful when you want to apply an image onto another picture, removing any unwanted borders or changing the overall look. While some photo editing software may require multiple complex steps or even a fee, Photopea offers a simple and free alternative. It supports the best method for making transparent backgrounds, making the task a breeze.
In order to get started with removing the backgrounds, you will need to open the image you want to make transparent in Photopea. It’s a free online editing tool that works just like Photoshop, so you don’t have to download or install anything on your device. Once you have the image open in Photopea, you can zoom in or out to get a better view of the object or area you want to select for cutting out.
Next, you should make sure the correct tool is selected for the job. Photopea has a variety of selection tools, but the best one for removing backgrounds is the Magic Wand tool. With this tool, simply click on the part of the image you want to select and Photopea will automatically create a selection around it. If the area is not fully selected, you can adjust the tolerance option to include more or fewer pixels in the selection.
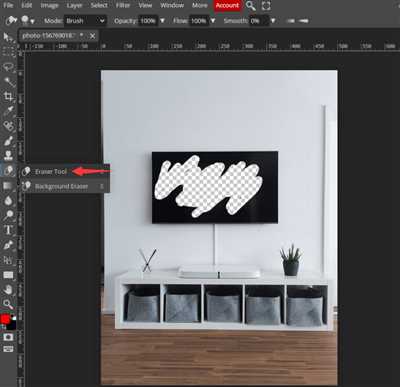
Once you have the desired part of the image selected, you can go ahead and remove the background to make it transparent. Photopea offers multiple methods for removing backgrounds, one of which is the Magic Eraser tool. With a single click, this tool will remove the selected part of the image and make the background transparent. Alternatively, you can use the Brush tool to manually remove the background, erasing it bit by bit.
After you’ve removed the background and made it transparent, you can apply the image with the transparent background onto another picture or use it in any way you like. Photopea allows you to save the image as a PNG file, which supports transparency. You can then download the image and use it in other editing software, such as Fotor or MagicPic, for further enhancements or combinations.
With Photopea’s user-friendly interface and efficient tools, removing backgrounds and making transparent images has never been easier. Whether you’re a professional photographer or just someone who wants to have some fun with editing, Photopea can save you time and effort when it comes to creating stunning images with transparent backgrounds.
Layers
When working with images in Photopea, it’s important to understand the concept of layers. Layers are like transparent sheets that can be stacked on top of each other in order to create a composite image. Each layer can contain different elements or modifications to the image.
In Photopea, you can find the Layers panel on the right side of the workspace. It allows you to manage all the layers in your project. You can add, edit, delete, arrange, and apply various effects to individual layers.
Let’s say you have an image that you want to make transparent. One way to do this is by using the Magic Eraser tool. Select this tool from the toolbar, and then click on the area of the image that you want to remove the background from. Photopea will automatically remove the background using some predefined options in the Magicpic panel.
If you want to remove the background from multiple pictures at once, Photopea supports the bulk Magic Eraser tool. This allows you to quickly remove the backgrounds from multiple images with just a few clicks.
Another option for making an image transparent is to use the Object Selection tool. This tool allows you to select a specific object in the image and then apply transparency to the selected area. To use this method, open the image in Photopea, select the Object Selection tool from the toolbar, and then click and drag to create a selection around the object you want to make transparent.
Once the object is selected, you can apply transparency to it by adjusting the Opacity slider in the Layers panel. A lower opacity value will make the object more transparent, while a higher value will make it more opaque.
If your image has multiple layers, you can also adjust the transparency of individual layers. Simply select the layer you want to adjust in the Layers panel and then adjust the Opacity slider as desired.
Additionally, Photopea includes a handy Zoom tool that allows you to zoom in and out of your image for a closer look. This can be particularly useful when working with small details or fine-tuning the transparency of specific areas.
In conclusion, layers are an important part of Photopea and provide a flexible and powerful way to work with images. Whether you’re making a single cutout, applying transparency to an object, or changing the transparency of multiple layers, Photopea has the tools and support you need to create professional-looking images with ease.
Select Background
One of the key features of Photopea is its ability to easily select and remove backgrounds from images, making them transparent. This can be particularly useful when working on projects that require isolating objects and placing them onto different backgrounds.
To select a background in Photopea, follow these steps:
- Open an image: Start by opening the photo you want to work on in Photopea. You can either upload an image from your computer or use the “Open URL” option to work with an online image.
- Select the object: Once your image is loaded, use the selection tool to carefully outline the object you want to separate from its background. Photopea supports various selection tools, such as the Magic Wand, Quick Selection, or Lasso, allowing you to choose the method that works best for your image.
- Refine the selection: After making the initial selection, you might want to refine it further by using the selection brush or applying a feather or border effect to ensure a clean cutout.
- Remove the background: Once your selection is complete and refined, go to the “Layers” panel and click on the “Mask” option. This will remove the background, making it transparent and isolating the selected object.
- Apply transparency: If necessary, you can further adjust the transparency of the object by toggling the opacity of the layer or using the “Layer Style” options.
While Photopea is a popular and powerful tool, it’s not the only option for removing backgrounds and making images transparent. There are other free alternatives, including online tools like Fotor and MagicPic, that offer similar functionality. However, Photopea’s support for layers and its wide range of selection tools make it a reliable choice for many designers and photographers.
With the ability to easily remove backgrounds and make images transparent, Photopea simplifies the process of isolating objects and changing backgrounds, saving both time and effort.
So, whether you’re looking to remove the background from a single image or make multiple pictures with transparent backgrounds, Photopea’s selection tools and transparency options can help you achieve the desired result.
Border
When working with transparent images in Photopea, you may sometimes need to add a border around the image to make it stand out or to give it a finished look. Adding a border can be a simple but effective way to enhance the appearance of your image.
To create a border in Photopea, follow these steps:
- Open the image that you want to add a border to in Photopea. If you’re working with multiple layers, make sure the layer you want to add the border to is selected.
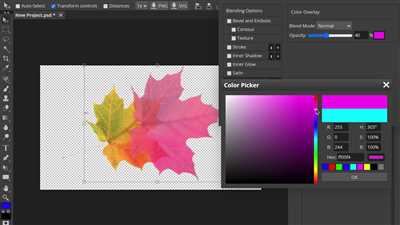
- Select the “Brush” tool from the toolbar. This tool allows you to apply paint strokes to your image.
- Get the color that you want your border to be. You can do this by using the color picker tool or choosing a color from the color palette.
- Zoom in on the part of the image where you want to add the border. This will make it easier to apply the border accurately.
- Click and drag your mouse to draw a border around the image. You can adjust the hardness and size of the brush to achieve the desired effect.
- Once you’re happy with the border, you can adjust its thickness by changing the brush size or modifying the opacity of the brush strokes.
- When you’re done, you may want to save your image as a PNG file to preserve the transparency of the background.
Adding a border is a quick and easy way to make your image stand out or to create a professional-looking effect. It works especially well with images that have transparent backgrounds, as it helps to define the edges of the picture. By following the steps outlined above, you can apply a stylish and attractive border to your images in Photopea.
Part 3 Best Alternative to Photopea–Bulk Remove Background with Single Click
If you are looking for the best alternative to Photopea that meets your needs of bulk removing backgrounds with a single click, Magicpic is the perfect solution for you. Magicpic is a free online tool that offers a magic method to remove backgrounds from multiple images at once. Unlike Photopea, which requires you to manually select and remove the background using the brush tool, Magicpic simplifies the process by automatically changing the background to transparent with just one click.
When making a selection in Magicpic, you can open multiple images at once and apply the same background removal method to all of them. This saves you time and effort, especially when dealing with a large number of pictures that require background removal. Magicpic supports various image formats, including PNG, JPG, and GIF.
To remove the background using Magicpic, follow these steps:
- Open Magicpic in your web browser.
- Click on the “Open Image” button and select the images from which you want to remove the background.
- Once the images are loaded, zoom in or out to better view the pictures.
- Select the “Remove Background” option from the menu.
- Use the Magic tool to select the object or area you want to keep.
- Magicpic will automatically remove the background and replace it with transparency.
- Review the results and make any necessary adjustments.
- Click on the “Download” button to save the images with the transparent background.
Magicpic provides a user-friendly interface that allows you to easily select and remove backgrounds from images. The tool works well with most pictures, but some complex or hard-to-select backgrounds may require manual adjustments using the brush tool. Magicpic offers this option as well, allowing you to fine-tune your selection.
In conclusion, if you need an efficient and convenient alternative to Photopea for bulk removing backgrounds with a single click, Magicpic is the ideal choice. With its magic method and support for multiple image layers, Magicpic will help you quickly and effortlessly remove backgrounds from your photos.
Free Get Images with Transparent Background
Making images with transparent backgrounds can be a crucial step when working with graphic design, web development, or any creative project that needs to blend images seamlessly. Usually, it can be hard to find images with transparent backgrounds, but with the right tools, it becomes much easier.
One of the best tools to create transparent backgrounds is Photopea. It is a free alternative to Photoshop that supports layers, making it possible to remove backgrounds and make images transparent. Here is a step-by-step guide on how to use Photopea to get images with transparent backgrounds:
- Open Photopea in your browser and open the image you want to work on. You can also drag and drop the image directly into the Photopea interface.
- Select the Magic Wand tool from the toolbar on the left. This tool allows you to make a selection based on color similarity.
- Click on an object or a part of the image that you want to make transparent. The Magic Wand tool will automatically select all pixels with similar colors.
- Adjust the tolerance option in the top toolbar if needed. A higher tolerance value will select more colors, while a lower value will select fewer colors.
- Use the Zoom tool to zoom in on the selection for more precision. You can find the Zoom tool in the toolbar on the left.
- Once you have the selection, go to the top menu and choose Edit > Cut. This will remove the selected part from the image.
- Go to the top menu again and choose File > Download. This will save your image with a transparent background to your computer.
If you have multiple images that require transparency, Photopea also supports bulk processing. Instead of selecting one image at a time, you can select multiple images and apply the same method to remove the background and make them transparent.
An alternative to Photopea is Fotor, which also has a tool for removing backgrounds and making images transparent. However, Photopea is usually considered the best option because of its extensive features and support for layers.
With Photopea’s magic tool and easy-to-use interface, getting images with transparent backgrounds is a breeze. Whether you are a designer, web developer, or just need transparent images for your project, Photopea will help you achieve the desired results quickly and efficiently.
Method 2: Make Part of an Image Transparent Using Fotor
If you want to make only a specific part of an image transparent, Fotor is one of the best free online tools you can use. Fotor is a user-friendly photo editing tool that allows you to remove backgrounds and make parts of an image transparent with ease.
Here’s how you can use Fotor to make part of an image transparent:
- First, open Fotor in your web browser. It usually requires no download or registration, and you can simply access it by visiting the Fotor website.
- Next, select the “Edit a Photo” option on the Fotor homepage. This will open the Fotor editor, where you can make various edits to your images.
- Now, choose the image you want to edit by either uploading it from your computer or selecting it from Fotor’s library of free images.
- Once your image is open in the editor, you can start making it transparent. In the menu on the left, there is a “Cutout” tool that you should click on.
- With the “Cutout” tool selected, you can now start removing the background from your image. Simply use the brush tool to select the parts you want to make transparent. Fotor’s cutout tool supports zoom and other functions to make the process easier.
- After you have carefully selected the part of the image you want to make transparent, click on the “Apply” button. Fotor will work its magic and remove the selected part, making it transparent.
- Finally, save your edited image by clicking on the “Save” button. You can choose the format and quality that best suits your needs. Your image will now have a transparent background in the selected area.
Using Fotor is a great alternative to Photopea for making part of an image transparent. It’s a simple and intuitive tool that gets the job done without the need for complex manual processes. Give it a try and see how it works for you!
Sources
- Photopea – a free online photo editing tool that supports transparent backgrounds and allows you to remove the background of an image.
- Photoshop – a popular paid alternative to Photopea that also has the option to make transparent backgrounds.
- Fotor – another free online photo editor that supports transparency and allows you to remove the background of an image.
- Magicpic – a free online tool that specializes in removing backgrounds from images.
Some other alternative options for making transparent backgrounds include:
- Using the Magic Wand tool in Photopea to select and remove the background.
- Using the Quick Selection tool in Photopea to make a precise selection around the object and remove the background.
- Using the Lasso tool in Photopea to manually select and remove the background.
When making a transparent background, it is usually best to use the “Magic” or “Magic Cutout” tool in Photopea, as it automatically detects and removes the background for you.
To remove the background of a single photo in Photopea, open the image in the program and use the selection tool to select the object you want to keep. Then, click on the “Delete” button or press the “Delete” key to remove the selected area.
If you are working with multiple pictures and want to remove the background from all of them at once, you can use the “Bulk” option in Photopea. Simply select all the images you want to edit and click on the “Bulk” button. From there, you can choose the method you want to use for removing the backgrounds and apply it to all the selected images.
Another method for changing the background to transparency in Photopea is by using layers. Open the image in Photopea and create a new layer. Then, use a brush or the selection tool to select and remove the background from the new layer. Finally, merge the layers to get the transparent background.
It is worth mentioning that Photopea also supports other methods for removing backgrounds, such as using the “Mask” tool or the “Pen” tool. These tools provide more control and precision, but may require more time and effort to achieve the desired results.