
Removable decals are a popular choice for those who want to add a personal touch to their walls, windows, or any smooth surface. Whether you’re looking to decorate a child’s room, add some flair to your office, or simply want to change up the look of a space, removable decals are a quick and easy way to do so. With their easy application and clean removal, they offer a temporary solution that allows you to change the look of a space whenever you please.
Making your own removable decals is easier than you may think. One option is to create a design on your computer using a digital image or with the help of graphic design software. This design will serve as the template for your decal. Once you have your design ready, you will need to print it onto a special type of vinyl material that is suitable for removable decals. These materials are typically available from a variety of manufacturers and can be purchased online or at your local craft store.
Before you begin the installation process, it’s important to ensure that the surface you plan to apply the decal to is clean and smooth. Use a high-quality cleaning product to remove any dust or debris that may be present. This will ensure that the decal adheres properly and will also make it easier to remove later on.
When applying the decal, it’s best to start from the top and work your way down. Peel off the backing paper from the decal and carefully position it on the surface. Use a squeegee or a credit card to smooth out any air bubbles and ensure a tight bond between the decal and the surface. Take your time and follow the manufacturer’s instructions for the best results.
If you decide to remove the decal later on, the process is just as easy. Gently peel the decal off the surface, starting from one corner and working your way across. If any residue remains, you can use a heat gun or a hairdryer to loosen the adhesive and make it easier to remove. Be sure to test the heat on an inconspicuous area first to prevent any damage to the surface.
Removable decals are a versatile and fun way to add a personal touch to any room or space. Whether you’re looking for temporary wall decor or a way to shield your windows from prying eyes, removable decals offer a wide range of possibilities. So go ahead, get creative, and make your space truly one of a kind!
- HOW TO MAKE REMOVABLE VINYL DECALS
- How to Make Any Sticker a Removable Sticker
- What Is the Process for Making a Removable Wall Decal
- Design
- Printing
- Installation
- Alternatives to Wall Stickers
- What is the best wall décor for children’s bedroom walls
- What are the best door stickers for children’s bedroom doors
HOW TO MAKE REMOVABLE VINYL DECALS
Removable vinyl decals are a great way to add a personal touch to your home or office space. Whether you want to decorate your walls, doors, cabinets, or any other smooth surface, removable vinyl decals offer a quick and easy way to change up your décor. Here is how you can make your own removable vinyl decals:
- Gather your materials: To make removable vinyl decals, you will need a vinyl printer, adhesive vinyl sheets, a cutting tool (such as a craft knife or a vinyl cutter), and transfer tape.
- Create your design: Use digital design software to create your desired image or text for the decal. Consider the size and placement of your decal, along with the colors and fonts you want to use.
- Print and cut the decal: Once you have finalized your design, print it onto the adhesive vinyl sheet. Then, use the cutting tool to carefully cut around the edges of your design, ensuring that you leave a small border around the image.
- Prepare the surface: Before applying the decal, clean the surface where you want to place it. Remove any dust or dirt to ensure a smooth application.
- Apply the decal: Peel off the backing of the decal, exposing the adhesive side. Place the decal on the desired surface, starting at the top and working your way down. Use a squeegee or your hand to press down the decal and remove any air bubbles.
- Use transfer tape: To ensure a smooth and precise installation, use transfer tape. Place the transfer tape over the decal, pressing it firmly against the vinyl. Then, carefully peel off the backing of the transfer tape, allowing the decal to stick to the surface.
- Remove the transfer tape: Once the decal is applied, slowly peel off the transfer tape, starting from one corner and pulling it back at a 45-degree angle. This will ensure that the decal sticks to the surface without any issues.
- Enjoy your removable vinyl decal: Your removable vinyl decal is now installed and ready to be enjoyed! It can be easily removed or repositioned whenever you want a change in your décor.
Making your own removable vinyl decals gives you the flexibility to transform any room or space without the commitment of permanent stickers or paint. You can choose from a wide range of designs and sizes, allowing you to create a unique and personalized look. So, why not give it a try and add a touch of creativity to your walls, doors, or cabinets?
How to Make Any Sticker a Removable Sticker
When it comes to decorating your walls, doors, or windows, removable stickers can be a great option. They allow you to add a personal touch to your living space without the commitment of permanent decals. Not only are removable stickers easy to apply, but they are also simple to remove when you want to change up your decor.
If you have a favorite sticker that you want to make removable, there are a few steps you can follow. First, ensure that the surface where you plan to stick the decal is clean and smooth. This will help the sticker adhere properly. If you are applying the sticker to a window, door, or other smooth surface, make sure to wipe it down with a mild cleaning solution and dry it thoroughly.
Next, you’ll need to gather the necessary materials and tools. In addition to the sticker you want to make removable, you will also need some heat, such as a hairdryer, and a piece of plastic or a shield to protect the surface you are working on. Having a digital image of the sticker can also come in handy for reference during the process.
To begin, carefully peel the sticker from its backing, taking care not to tear it. If the sticker is larger than you want it to be, you can trim it down to the desired size. Once you have the sticker ready, place it face down on a clean surface.
Now, start heating the sticker from above using the hairdryer on low heat. Move the hairdryer back and forth over the sticker, heating it evenly. This will help loosen the adhesive and make the sticker easier to remove in the future. Be sure not to get too close to the sticker or overheat it, as this can damage both the sticker and the surface it is applied to.
Once you’ve heated the sticker, carefully peel it off the surface using your fingers. It should come off easily, leaving no residue behind. If there are any stubborn areas, you can use the plastic or shield to gently lift them off.
After removing the sticker, you can now decide where you want to stick it as a removable decal. Clean and prepare the new surface using the same steps mentioned above. Then, simply apply the sticker to the desired location, pressing it down firmly to ensure proper adhesion.
When it comes time to remove the sticker, you can easily peel it off without damaging the surface or leaving any residue. Depending on the manufacturer’s instructions and the materials used, some stickers may be more easily removable than others. However, following the above process should help make any sticker a removable sticker.
Removable stickers are a great choice for children’s bedrooms or rental homes where you want to add some personal touch without causing any permanent damage. They are also popular among designers who like to frequently change the look of their space.
Before purchasing any sticker, it’s important to know if it is indeed removable. Read the product description or contact the seller to ensure that it can be easily removed without any issues.
Now that you know how to make any sticker a removable sticker, you can get creative and start decorating your space with ease!
What Is the Process for Making a Removable Wall Decal
The process for making a removable wall decal is relatively simple and can be done by anyone, regardless of their artistic abilities. Here is a step-by-step guide to help you with the installation process:
Step 1: Choose the Right Design
First, you need to choose the design you want for your removable wall decal. There are many options available, from digital printing to vinyl stickers. Consider the size and color of the decal and how it will look in your bedroom or any other desired location.
Step 2: Prepare the Wall
Before installing the decal, you should clean and ensure that the wall is smooth and free from any dust or debris. Also, make sure that the paint on the wall is dry and in good condition.
Step 3: Peel and Stick
Once the wall is ready, carefully peel off the backing from the decal. Start from one corner and slowly work your way across the entire piece. Smooth out any air bubbles as you go to ensure a seamless installation.
Step 4: Remove Any Air Bubbles
If you notice any air bubbles after applying the decal, you can use a credit card or a similar object to gently push them out. Be careful not to damage the decal while doing this.
Step 5: Follow the Manufacturer’s Instructions
Every decal may have different instructions, so it’s essential to read and follow the manufacturer’s recommendations carefully. Some decals may require heat for proper installation, while others can be applied easily without any extra steps.
Step 6: Enjoy and Remove When Needed
Once your decal is installed correctly, you can enjoy its presence in your space. Removable decals are great because you can easily remove them when you want to change your décor or move the decal to another location.
Step 7: Consider Alternatives
If you’re not comfortable with the installation process or want a temporary solution, there are alternatives available. Temporary wall decals, nametags, or posters may be easier to install or remove.
Overall, the process of making a removable wall decal is relatively quick and straightforward. By following the steps above and considering all the aspects, you can create a beautiful piece of art that will enhance your living space.
Design

When it comes to the design of removable decals, there are several aspects to consider. First and foremost, you want the design to be smooth and temporary, making it easy to remove without leaving any residue. You should also consider applying a sticker shield or laminate to protect the design from wear and tear.
Depending on your needs, there are different materials you can use for your decals. Vinyl is a popular choice as it is durable and easy to work with. For a digital print, you can choose from a variety of materials such as paper, fabric, or even magnetic materials.
Once you have chosen your design and materials, the next step is to install the decal. Before applying, make sure the surface is clean and free of any dust or dirt. This will ensure that the decal sticks properly and lasts longer. It is also important to note that some decals, such as nametags or children’s décor, may require different installation methods.
When applying the decal, start from one corner and slowly peel away the backing, making sure to smooth out any bubbles or wrinkles as you go. If the decal is larger, you may want to have someone help you to ensure a smooth and even application.
One of the best things about removable decals is that they can be easily removed whenever you want to change your décor. Simply peel the decal off from one corner and gently pull it away from the surface. If there is any adhesive residue left behind, you can use a mild adhesive remover to clean it off.
When choosing a design for your decals, the options are endless. You can create your own unique design or use pre-made templates. Just make sure to find a design that matches your style and complements the space where you plan to install it.
It’s also worth noting that decals are not just for walls. You can use them on windows, doors, cabinets, and more. Depending on the surface and the manufacturer’s recommendations, you may need to take some additional steps or use different tools for the installation.
When it comes to making removable decals, digital printing is often the best option. This allows for high-quality images and custom designs. However, if you prefer a more traditional look, you can also consider painting or hand-drawing your design. Just keep in mind that these methods may be more time-consuming and less precise.
Whether you’re decorating your home, office, or any other space, removable decals are a quick and easy way to add a personal touch. With their versatility and ease of use, they are a popular choice among homeowners and designers alike.
Printing
When it comes to making removable decals, printing is a crucial step. You want to ensure that the image you choose is of high quality and will adhere properly to the surface you are applying it to.
First, you should know that there are two main ways to print decals: digital printing and screen printing. Depending on your design and the product you are making, you may choose one over the other. Digital printing is quick, easy, and allows for a high level of detail, making it ideal for intricate designs. On the other hand, screen printing is best for larger pieces and ensures vibrant colors and long-lasting results.
Before you begin printing, make sure you have all the necessary materials. You will need a printer, high-quality decal paper, and the image you want to print. It’s also a good idea to have some tools on hand, such as a ruler, scissors, and a heat source like a hairdryer.
When selecting the image for your decal, keep in mind that children’s decals are likely going to be removed more often, so choose a design that is both appealing to kids and easy to peel off. For decals in a bedroom or living room, you may want to opt for a more permanent design.
Once you have everything ready, follow these step-by-step instructions:
- Open the image you want to print on your computer.
- Ensure that the image is the right size for your decal and that it will fit the space you have in mind.
- Print the image onto the decal paper according to the printer’s instructions. Be sure to choose the proper settings for the best results.
- Allow the printed decal to dry completely before moving on.
- Clean the surface where you will be applying the decal. Use a mild cleaning solution and a smooth cloth to ensure a clean and dust-free area.
- Peel off the backing of the decal, revealing the sticky face.
- Position the decal on the desired spot on the wall or other surface.
- Using a ruler or similar tool, smooth the decal onto the surface to ensure that it adheres properly.
- If you encounter any bubbles or wrinkles, carefully peel back the decal and reapply, smoothing as you go.
- Once the decal is in place, use a heat source like a hairdryer to gently warm the surface. This will help the decal adhere even better.
- Allow the decal to set for at least 24 hours before letting children or pets touch it.
When it comes time to remove the decal, you’ll be pleased to know that most removable decals can be easily peeled off without leaving any residue behind. Simply start at one corner and slowly peel back, keeping the decal parallel to the surface. If any adhesive remains, use a mild cleaning solution and a smooth cloth to remove it.
Printing your own removable decals gives you the freedom to choose the designs you want and customize your living space. Whether you’re decorating a child’s room, adding some flair to a cabinet door, or simply want temporary wall decor, removable decals are a great choice for designers and homeowners alike.
Installation
Once you’ve purchased your removable decals, it’s time to install them. Here are some step-by-step instructions to guide you through the process:
- First, clean the surface where you want to apply the decal. Take a soft cloth and wipe away any dust or dirt. This will ensure that the decal sticks properly.
- If you’re applying the decal to a wall, make sure the wall is smooth and dry. Any bumps or moisture can affect the installation process.
- Next, peel off the backing from the decal, being careful not to touch the sticky side. This will reveal the adhesive.
- Line up the decal with the desired location and slowly apply it from top to bottom. Start from one corner and press down firmly as you go along. Use a credit card or a similar tool to smooth out any bubbles or wrinkles.
- If you’re applying the decal to a window, open the window and clean both sides thoroughly. This ensures that the decal will adhere properly and not be affected by the outside elements.
- For cabinet doors or other surfaces, it’s best to remove them from the piece of furniture before applying the decal. This will allow for easier installation and ensure a smooth finish.
- Depending on the size of the decal, you may need assistance in aligning and applying it. Enlist the help of a friend or family member for larger decals.
- Once the decal is applied, give it a quick once-over and make sure it looks how you want it to. If there are any bubbles or wrinkles, gently lift up the decal and reapply it.
- Removable decals are perfect for children’s rooms or rental properties, as they can easily be removed without damaging the wall or leaving behind any sticky residue.
- When it’s time to remove the decal, heat can help loosen the adhesive. Use a hairdryer on a low heat setting and apply it to the decal for a few seconds. Then, slowly peel the decal off from one corner.
- If you’re looking for alternatives to removable decals, vinyl stickers or nametags are also great options. They can be used to label items or add a personal touch to any room.
Installing removable decals is a quick and easy process that can completely transform the look of your space. Whether you’re adding a pop of color above a window or applying a larger piece to a bedroom wall, these decals are a versatile and temporary solution for your décor needs.
Alternatives to Wall Stickers
While wall stickers are a popular choice for adding decorative flair to your home, there are several alternatives you can consider if you’re looking for something different. Depending on your preferences and the characteristics of the space you’re decorating, here are a few options to explore:
| Doors | One option is to choose removable decals for doors. This can be a great way to add some personality to an otherwise plain door. You can either purchase decals specifically designed for doors or use wall stickers that are suitable for this application. |
| Cabinet doors and windows | If you’re looking to spruce up your kitchen or bathroom, consider applying removable decals to cabinet doors or windows. This can instantly transform the look of the room and give it a fresh and modern appearance. |
| Temporary nametags | Another alternative is to use removable decals as temporary nametags. This can be especially useful for events or gatherings where you want to avoid confusion or make it easier for people to find their designated areas. |
| Heat shield | Some removable decals are designed to be heat resistant, making them a great option for using on kitchen backsplashes or other areas that may come into contact with heat or steam. Make sure to follow the manufacturer’s instructions for applying these decals correctly. |
| Vinyl paint stencils | If you’re feeling crafty, you can also try using vinyl paint stencils to create your own designs on walls or furniture. This gives you more control over the design and allows for a unique and personalized look. |
Regardless of what alternative you choose, there are a few aspects to consider. First, make sure the surface where you’re applying the decal is clean and smooth. Dust or dirt may interfere with the adhesive. Additionally, you’ll want to ensure that the decal is properly removed if you decide to change it or if you’re using it temporarily.
When purchasing a decal, look for high-quality materials and a reputable manufacturer. This will ensure that the product is durable and long-lasting. Also, consider the installation process and the tools you may need. Some decals may require heat application or a specific technique for proper installation.
In conclusion, wall stickers are not your only option when it comes to decorating your space. Exploring alternatives such as door decals, cabinet door/window decorations, temporary nametags, heat-resistant shields, or vinyl paint stencils can add a unique touch to your décor. Just make sure to follow the instructions provided by the manufacturer and choose the right decal for the surface you’re working with.
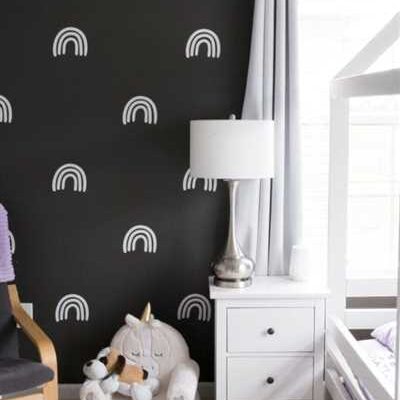
What is the best wall décor for children’s bedroom walls
When it comes to decorating a child’s bedroom, there are many options to choose from. One popular choice is removable decals. These decals are easy to apply and remove, making them perfect for a child’s ever-changing tastes and preferences.
Removable decals are a great way to add a touch of creativity and personalization to a child’s bedroom without the commitment of permanent paint or wallpaper. They come in a variety of designs and styles, so you can find something that matches your child’s interests and personality.
When choosing removable decals for your child’s bedroom, it is important to ensure that they are made from high-quality materials. Look for decals that are made from vinyl, as this material is durable and will withstand wear and tear. It is also important to choose decals that are easy to remove, so you can change them whenever your child’s tastes change.
There are a few ways to apply removable decals to your child’s bedroom walls. First, you should clean the walls thoroughly to remove any dust or dirt. Next, carefully peel the backing off of the decal and position it on the wall. Use a credit card or squeegee to smooth out any air bubbles or wrinkles. Finally, remove the top layer of the decal and your child’s personalized design will be revealed.
What makes removable decals so great for children’s bedrooms is the ability to easily remove them when you want to change up the décor. Simply peel the decal off the wall, starting from the corner and pulling slowly. If there is any residue left behind, you can use a mild soap and water mixture to remove it.
Designers and manufacturers of removable decals recommend choosing a decal size that fits the space you have in mind. Consider measuring the wall or area where you want to place the decal, and choose a size that will work well in that space. It’s also a good idea to consider the overall design and color scheme of the room, and choose a decal that complements the existing décor.
When it comes to removable decals for children’s bedrooms, the options are endless. You can find decals featuring popular characters from movies and TV shows, cute animals, sports themes, and more. You can even have custom decals made with your child’s name or a favorite quote.
In addition to removable decals, there are also other alternatives for wall décor in children’s bedrooms. Paint is a popular choice, as it allows for a wide range of colors and designs. However, painting can be a time-consuming process and may require some skill. Wallpaper is another option, but it can be difficult to remove and may not be suitable for all walls.
Overall, removable decals offer a quick and easy way to decorate a child’s bedroom walls. They are a versatile and affordable option that can be easily changed to suit your child’s evolving tastes. Plus, they are a great way to add a personal touch and make the room feel more like their own. So, why not give removable decals a try and see how they can transform your child’s bedroom?
What are the best door stickers for children’s bedroom doors

When it comes to decorating a child’s bedroom, wall stickers or decals are a popular and fun choice. They can be easily applied to any smooth surface, such as a door, window, or cabinet, and are removable, so you can change them whenever you want. In this article, we will discuss the best door stickers for children’s bedroom doors and provide some tips on how to choose and install them.
One of the best materials for door stickers is vinyl. Vinyl decals are durable, versatile, and can adhere to various surfaces. They come in a wide range of designs and sizes, allowing you to find the perfect image or design for your child’s bedroom. Vinyl decals are also easy to clean, so you won’t have to worry about them getting dirty or dusty.
Before purchasing door stickers, it’s important to consider the size of the door and the design you want. Measure the dimensions of the door, paying attention to the width and height, as well as any obstacles such as doorknobs or nametags. This will help you choose the right size decal that will fit perfectly on the door. Additionally, consider the overall theme or decor of the room, as you want the sticker to complement the existing design.
When applying the decal to the door, make sure the surface is clean and free from any dust or dirt. Use a damp cloth to wipe down the door and let it dry completely before proceeding. Follow the manufacturer’s instructions for installation, as some decals may require a specific method for best results. Generally, start from the top or one side and slowly peel off the backing while pressing the decal onto the door. Smooth out any bubbles or wrinkles as you go along.
If you ever want to remove the decal, vinyl stickers can be easily peeled off without leaving any residue or damaging the door. However, it’s always a good idea to test a small, inconspicuous area first to ensure there won’t be any issues. In some cases, permanent stickers or decals may require additional steps to remove, such as using a heat gun or adhesive remover.
Overall, removable door stickers are a great way to add a touch of creativity and fun to a child’s bedroom. They allow for easy customization and can be changed as the child’s interests evolve. Whether you choose cartoon characters, animals, or other playful designs, make sure to select high-quality stickers from reputable manufacturers to ensure they will last and look good for years to come.