If you’re not already using YouTube to create and share video content, you’re missing out on a huge audience and a powerful platform. With over 2 billion monthly active users, YouTube is the second largest search engine after Google, and a channel on this platform can help you reach audiences that you might not be able to target through other media accounts.
Creating a YouTube channel is a straightforward process that doesn’t require any technical stacks. All you need is a Google account, and you’re good to go. Follow these steps to create your own channel and start sharing your brand with the world.
Step 1: Create a Google Account
If you don’t already have a Google account, go to the Google account creation page and sign up for one. This is a simple process that can be completed in a matter of minutes.
Step 2: Go to YouTube
Once you have your Google account set up, go to YouTube and click on the “Sign In” button in the top right corner of the page. Enter your Google account credentials to access YouTube.
Step 3: Create Your Channel
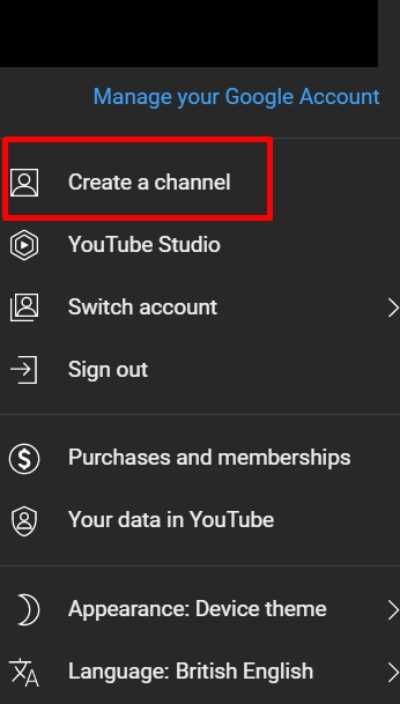
Click on your profile image, located in the top right corner of the page, and then click on the gear icon to access your YouTube settings. In the settings menu, click on the “Create a Channel” link, and follow the prompts to create your channel.
After completing these steps, your channel will be created, and you can start customizing it with a channel name, description, and an optional channel art (a featured image that will appear at the top of your channel).
Step 4: Verify Your Account
In order to access certain features and to help prevent spam, YouTube requires users to verify their account. To verify your account, you’ll need to provide a phone number where you can receive a verification code. Follow the prompts on the screen to complete the verification process.
Step 5: Customize Your Channel
Once your account is verified, you can start customizing your channel further. Add a profile picture, create channel art, and select a channel theme and color scheme to make your channel visually appealing. You can also add links to your website and social media accounts in the “About” section of your channel.
Now that your YouTube channel is set up, you’re ready to start creating and uploading your own videos. Don’t forget to use YouTube’s cards and end screens to engage with your audiences and promote other videos on your channel.
Creating a YouTube channel doesn’t cost anything, and it can be a powerful tool for individuals, brands, and even nonprofits to support a cause and reach a wide audience. So, if you’re passionate about creating video content, don’t hesitate – create your own YouTube channel today!
- How to create a YouTube channel for your brand in 5 steps
- YouTube Nonprofit Program Features
- Not Activated
- Activated
- Link Anywhere cards
- Dedicated technical support
- Type the characters letters and numbers from the colored box into the Word Verification field
- How to create a YouTube channel if you don’t already have a Google account
- 2 Use Stack Browser
- Video:
- Youtube Channel Kaise Banaye | youtube channel kaise banaen 2023 | how to create a youtube channel
How to create a YouTube channel for your brand in 5 steps
If you’re a brand looking to expand your online presence and connect with audiences on a more personal level, creating a YouTube channel is a great strategy. YouTube is a highly popular platform that allows you to share videos, engage with your viewers, and showcase your brand’s unique personality. Follow these 5 steps to create a YouTube channel for your brand:
Step 1: Sign up for a YouTube account
The first step is to create a Google account if you don’t already have one. You can do this by going to the Google Account creation page in your browser. Once you have a Google account, navigate to YouTube and click on the “Sign In” button located in the top right corner of the homepage. Then, enter your Google account credentials to sign in to YouTube.
Step 2: Create a new channel
After signing in to YouTube, click on your profile picture or avatar in the top right corner of the screen. This will open a drop-down menu. From the menu, select “Create a channel” and follow the prompts to set up your new channel. Choose a name and image that represent your brand and click “Create” to finalize the process.
Step 3: Customize your channel
Once your channel is created, navigate to the “Customize Channel” option in the YouTube Studio. Here, you can add a channel trailer, create playlists, and upload a channel icon and banner image that visually communicate your brand’s message. Take advantage of YouTube’s features to make your channel visually appealing and unique.
Step 4: Verify your channel
To gain access to additional features on YouTube, such as the ability to upload custom thumbnails and enable livestreaming, you’ll need to verify your channel. Click on the settings icon in the top right corner of the YouTube Studio, then click on “Channel” in the left sidebar. From the Channel settings, select “Status and features” and click on “Verify” next to your channel name. Follow the steps to complete the verification process.
Step 5: Start creating and uploading videos
Now that your channel is set up and verified, it’s time to start creating and uploading videos. Use a video editing program to craft high-quality content that aligns with your brand’s messaging and appeals to your target audience. Don’t forget to optimize your video titles, descriptions, and tags with relevant keywords to increase discoverability.
Creating a YouTube channel for your brand is a cost-effective way to reach a wider audience and boost your brand’s visibility. Follow these 5 steps, and you’ll be on your way to becoming a successful YouTube content creator.
YouTube Nonprofit Program Features
If you’re a nonprofit organization looking to create a dedicated YouTube channel, the YouTube Nonprofit Program offers a number of features that can support your cause and help you reach your audiences.
- Account Activation: The first step is to create a YouTube account and get it verified. Once your account is activated, you can begin using the features specific to the YouTube Nonprofit Program.
- Linking to Google for Nonprofits: To be a part of the YouTube Nonprofit Program, you’ll need to link your YouTube account to Google for Nonprofits. This will provide you with additional benefits and access to different tools.
- Creator and Brand Verification: As a verified nonprofit, you’ll have a special verification badge that adds credibility to your channel. This lets viewers know that you’re a trusted organization.
- Stacking YouTube Cards: Nonprofits can use YouTube Cards to promote their cause and raise awareness. You can stack up to 5 cards on your videos, each with a different call to action.
- Colored Channel Image: Nonprofits featured in the YouTube Nonprofit Program can customize their channel image with a colored overlay. This helps your channel stand out and showcases your cause.
If you don’t have a YouTube channel yet, don’t worry! The YouTube Nonprofit Program provides step-by-step guidance on how to create one.
By taking advantage of these features, you’ll be able to reach more people and drive support for your cause. You’ll also be able to use YouTube’s technical and community support to address any issues or questions you may have along the way.
So, if you’re a nonprofit organization looking to create a YouTube channel, the YouTube Nonprofit Program has the tools, support, and features you need to make an impact. Don’t wait any longer, get started today!
Not Activated
If you’re reading this section, it means that your YouTube channel is not activated yet. Don’t worry, we’ll walk you through the steps on how to get it up and running!
The first step is to ensure that you have a Google account. If you don’t already have one, you can create it for free. Once you have your Google account, you can proceed to the next step.
To activate your YouTube channel, go to the YouTube homepage and click on the “Sign In” button located at the top right corner of the screen. Enter your Google account credentials and click “Sign In”.
After signing in, you’ll come across a page that shows all your accounts linked to your Google account. Look for the “Create a new channel” link and click on it.
Next, you’ll come to a page where you can choose the type of channel you want to create. If you’re a creator or a YouTuber, select the “Creator” option. If you’re a nonprofit organization and want to create a channel for nonprofits, select the “Nonprofit” option.
Once you’ve selected the type of channel, you’ll need to fill in some information such as your channel name, description, and image. You can also add a featured video if you have one.
After filling in the necessary details, click on the “Create” button to create your channel. At this point, your channel is technically created, but it’s not yet activated.
To activate your channel, you’ll need to go through a verification process. This is to ensure that you’re a real person and not a bot. You’ll receive a verification code either through a phone call or a text message.
Enter the verification code in the field provided, and click on the “Verify” button. If you don’t receive the verification code, click on the “Resend” button to resend the code.
If everything goes smoothly, your channel should now be activated! You can start creating and uploading videos to share with your audience.
Keep in mind that if you’re using a browser that doesn’t support some of the technical features required by YouTube, you may encounter some issues during the activation process. In that case, try using a different browser or update your current browser to the latest version.
That’s it! Now you’re ready to take over YouTube and create amazing content anywhere in the world. Don’t forget to promote your channel on social media and other platforms to reach more audiences. Happy creating!
Activated
If you already have a Google account, you’re just a few steps away from activating your YouTube channel. The first thing you’ll need to do is create a YouTube account using your existing Google account. If you don’t have a Google account yet, you can easily create one on the Google sign-up page.
Once your YouTube account is created, you can start customizing your channel. You have the option to add a profile picture, banner image, and channel description to make your channel stand out. If you’re using YouTube for a brand or a nonprofit, you’ll also have access to additional features like verification and using a custom URL link.
To activate your YouTube account, follow these steps:
- Sign in to your Google account on YouTube.
- Click on your profile image in the top right corner.
- In the drop-down menu, click on the “Settings” option.
- In the left sidebar, click on the “Channel Status and Features” option.
- Scroll down to the “Channel features” section.
- In the “Monetization” box, click on the “Enable” button.
By enabling monetization, you’ll be able to earn money from your YouTube channel through ads and other features. However, keep in mind that there are certain requirements and guidelines you need to meet before you can start earning money, such as having at least 1,000 subscribers and 4,000 watch hours in the past 12 months.
Activating your YouTube account also gives you access to a dedicated support program for creators, which includes technical support and other resources to help you grow your channel.
Once your YouTube account is activated, you can start creating and uploading videos to share with your audience. Remember to optimize your videos with relevant titles, tags, and descriptions to attract more viewers. You can also consider using colored cards and end screens to engage your audience and promote other videos or playlists.
Whether you’re a nonprofit organization, a brand, or an individual creator, activating your YouTube channel is an important step to take advantage of all the features and opportunities YouTube has to offer. So don’t wait any longer – click that “Enable” button and dive into the world of YouTube!
Link Anywhere cards
Link Anywhere cards is a feature available to YouTube creators that allows you to link to any external website or destination from your video. This feature is part of the YouTube Cards program, which lets you create interactive cards that provide additional information or media to your audiences.
To create Link Anywhere cards, you’ll need to follow some specific steps:
- First, you must have a YouTube channel. If you don’t have one already, you can create a new channel by following the steps outlined in the YouTube Creator Academy.
- Next, you need to verify your channel. This is a technical requirement, and it ensures that you have a dedicated channel for your content. To verify your channel, click on your profile image in the top right corner of the YouTube homepage, then click on “YouTube Studio.” In the left sidebar, click on “Settings” and then “Channel” to access the verification options. Follow the instructions to verify your channel.
- Once your channel is verified, you can activate the YouTube Cards feature. To do this, go to your YouTube Studio, click on “Videos” in the left sidebar, then select the video you want to add the Link Anywhere card to. In the video details section, click on the “Cards” tab. From there, click on “Add Card” and select “Link” as the card type.
- In the “Link” field, you can type or paste the URL of the website or destination you want to link to. You can also add a customized title and message for the card.
- If you want to highlight the Link Anywhere card, you can add a colored image or a brand logo. Click on the “Add Image” button and select the image you want to use. You can also choose the position of the image on the card.
- Finally, click on “Create card” to finish creating the Link Anywhere card. The card will appear in the video at the specified time and can be clicked by viewers to access the linked website or destination.
It’s important to note that there are some limitations and costs associated with using Link Anywhere cards. For example, the Link Anywhere feature may not be available for all YouTube accounts, particularly for non-verified or non-profit accounts. Additionally, if you link to a website that has a Google AdSense program, you may incur costs for clicks on the card.
However, even if you don’t have access to the Link Anywhere cards, you can still use other YouTube Cards features to enhance your videos. YouTube Cards provide a variety of interactive options, such as link cards, playlist cards, and poll cards, to engage your viewers and promote your brand or media.
Don’t miss out on the opportunities that Link Anywhere cards and other YouTube Cards features can provide to your channel. Start using them today to create more engaging and interactive content!
Dedicated technical support
If you’re a YouTube creator, you know how important it is to have a dedicated technical support team to help you with any issues or questions you may have.
With YouTube, you have access to a wide range of support options to ensure that your channel is running smoothly. Whether you’re a brand new creator just starting out or you already have a large following, there are technical support resources available to help you.
If you’re a nonprofit or a cause-related creator, YouTube offers dedicated support through its YouTube Nonprofit Program. This program provides technical support for nonprofits and cause-related creators, helping them use YouTube to further their missions and reach wider audiences.
For YouTube creators in general, there are several steps you can take to access technical support. First, make sure you have a Google account that is linked to your YouTube channel. This will allow you to access the YouTube Help Center, where you can find articles and tutorials on how to use the various features of the platform.
In addition to the Help Center, YouTube also has a dedicated YouTube Creator Support team that you can reach out to for assistance. This team is available to help with technical issues, channel verification, and more. They can be reached through the YouTube Help Center by clicking on the “Contact Support” link.
If you’re a YouTube creator with over 5,000 subscribers, you may also be eligible for additional support features, such as the “Featured On” box. This box allows you to showcase your featured content and link to other social media accounts or websites.
One important aspect of technical support is ensuring that you have verified your YouTube channel. Verification helps to establish your brand and build trust with your audience. To verify your channel, you’ll need to have at least 100 subscribers and a channel icon and art. Once you meet these requirements, you can go to your YouTube Studio, click on the settings tab, and select “Channel” from the left-hand column. From there, you can click on the “Verify” button and follow the steps to complete the verification process.
In summary, having dedicated technical support is essential for any YouTube creator. Whether you’re a nonprofit, cause-related creator, or simply want to create a channel for your brand, YouTube has the resources and support you need to succeed. Take advantage of the technical support options available, such as the YouTube Help Center, Creator Support team, and verification process, to ensure that your channel is running smoothly and attracting the right audiences.
Type the characters letters and numbers from the colored box into the Word Verification field
To create a YouTube channel, you need to have an activated Google account. If you don’t have one already, you can create a new account by following these steps:
- Go to the Google Account creation page.
- Click on “Create account”.
- Type in your personal information, including your name, email address, and password.
- Complete the verification process by typing the characters, letters, and numbers from the colored box into the Word Verification field.
- Click on “Next” to create your Google account.
Once you have your Google account, you can create a YouTube channel by linking it to your account. Here’s how:
- Go to the YouTube homepage.
- Click on the profile icon in the top right corner and select “Settings”.
- Click on “Create a channel”.
- Choose “Use a business or other name” if you want to create a channel for a cause, nonprofit, or your own dedicated channel. Choose “Use a custom name” if you want to create a channel for personal use.
- Type the name of your channel into the right field.
- Click on “Create” to create your YouTube channel.
Once your YouTube channel is created, you can start uploading videos and using the features available for creators. YouTube provides a variety of features to support creators, including the ability to add tags, create playlists, and engage with your audiences through comments and live streaming.
Don’t worry about technical aspects, as YouTube takes care of the media hosting and streaming for you. All you need to do is focus on creating great content for your channel.
It’s important to note that YouTube also offers a program called YouTube Nonprofits, which provides additional features and support for nonprofit organizations. If you’re a nonprofit, you can apply to join the program and take advantage of the benefits it offers.
Creating a YouTube channel doesn’t have to cost you anything. YouTube offers its services for free, although there may be some optional paid features or advertising options available if you choose to use them.
So, why wait? Start creating your YouTube channel now and share your cause, ideas, and creativity with audiences everywhere!
How to create a YouTube channel if you don’t already have a Google account
If you don’t already have a Google account, you can still create a YouTube channel. Follow these steps to get started:
| Step 1: | Open your browser and go to the YouTube website. |
| Step 2: | Click on the “Sign In” link at the top right corner of the page. |
| Step 3: | Below the sign-in box, you’ll see a link that says “Create account”. Click on it. |
| Step 4: | Fill out the required information in the sign-up field. This includes your first and last name, a username, a password, your phone number, and your current email address. You’ll also have to type a word or a series of numbers and letters from a colored box to verify that you’re not a robot. |
| Step 5: | Read and accept the terms of service and privacy policy. |
| Step 6: | Click on the “Next” button to proceed. |
| Step 7: | You’ll be asked to provide a phone number for verification. This step is a security measure to prevent spam accounts. |
| Step 8: | After your account is activated, you can go back to the YouTube website and click on the “Sign In” link again. |
| Step 9: | Fill in your email address and password in the sign-in box, then click on the “Sign In” button. |
| Step 10: | On the top right corner of the page, click on your profile picture and select “Create a channel” from the drop-down menu. |
| Step 11: | Choose a channel name that represents you or your brand. You can also add a channel icon and channel art to make your channel look more professional. |
| Step 12: | Click on the “Create” button to create your YouTube channel. |
That’s it! Now you have your own YouTube channel and you can start creating and uploading videos to share with audiences all over the world. If you need any technical support or have any other questions, YouTube has a dedicated support program for creators and nonprofits.
Remember, YouTube offers many features that can help you grow your channel and support a cause. You can use YouTube cards and end screens to promote other videos or external websites. You can also activate YouTube’s monetization program to earn money from ads on your videos.
Creating a YouTube channel is easy and doesn’t cost anything. So don’t wait any longer – create your YouTube channel today and start sharing your content with the world!
2 Use Stack Browser
If you’re a YouTube creator, there are many features and tools that you can use to support your channel. One of these tools is called Stack Browser. Stack Browser is a program created by YouTube to help you manage your account and access additional features.
When you create a YouTube channel, you’ll have the option to link your account to Stack Browser. This will allow you to use the browser to access your YouTube account and perform various actions. Stack Browser is especially useful for creators who have multiple YouTube channels or who manage accounts for other individuals or organizations.
To use Stack Browser, you’ll need to first activate the program. This can be done by going to the YouTube Creator Studio and clicking on the “Stack Browser” link in the left sidebar. From there, follow the steps to activate the browser on your account.
Once Stack Browser is activated, you can use it to perform a wide range of actions. For example, you can use it to create and manage playlists, upload videos, edit video details, and engage with your audience. Stack Browser also has a dedicated “Creator Studio” where you can access analytics and manage your channel settings.
In addition to these features, Stack Browser also provides support for nonprofit organizations. If you’re a nonprofit creator, you can access the “Nonprofit” section in the browser, which provides additional tools and features to help you promote your cause. You’ll also have the option to enable donation cards and apply for the YouTube Nonprofit Program.
One of the key features of Stack Browser is the ability to create “stacks.” Stacks are like folders where you can organize your videos, playlists, and other media. You can create stacks based on categories, themes, or any other criteria that you choose. Stacks can be colored and featured on your channel, making it easier for audiences to find the content they’re interested in.
When using Stack Browser, it’s important to note that there are some limitations. For example, you can’t upload videos that are longer than 15 minutes directly from the browser. However, you can still upload longer videos by using other methods, such as the YouTube Studio mobile app.
In conclusion, Stack Browser is a powerful tool for YouTube creators. It provides access to many features and tools that can help you manage your channel and engage with your audience. Whether you’re a brand, a nonprofit, or a dedicated YouTube creator, Stack Browser is an essential program to have.