

Enamel is a fascinating material that has been used for centuries to create beautiful and durable designs. It simply glitters with its vibrant colours and captivating shine. Enamel is commonly used in jewelry making, particularly for clasps, pins, and other attachments. It comes in various options, from clear top coats to customized colours and even glow-in-the-dark enamel. In this guide, we will take you through the process of making enamel jewelry and provide tips on how to achieve top quality results.
Enamelling is an art form that requires precision and attention to detail. The process starts with creating the artwork, which can be done using various materials such as gold, iron, or even ceramics. Once the design is finalized, the enamel is mixed into a special paste-like consistency called “enamel slip.” This slip is then carefully applied to the individual lines and areas of the artwork, creating a smooth and even surface. The enamel is then fired in a kiln at high temperatures, causing it to melt and fuse with the underlying metal or ceramic.
There are many ways to achieve different colours and effects with enamel. One popular option is to use multiple layers of enamel, each firing and fusing with the previous one. This creates depth and richness in the finished piece. Another option is to use sunken enamel, where the enamel is cut into the metal or ceramic to create recessed areas. This technique adds dimension and a unique touch to the design.
Enamel jewelry has been a choice for people who love unique and customized pieces. Manufacturers have also come up with new ways to make enamel pins more appealing. For example, some pins have glitter or other special effects added to the enamel, making them truly eye-catching. Others have attachments, such as clasps or military-inspired pin backs, to ensure the pin stays securely in place.
If you’re thinking of making enamel jewelry, there are a few tips to keep in mind. First, make sure you have all the materials you need before you start the process. Enamelling can be a time-consuming and delicate art, so being prepared is key. Second, always follow the manufacturer’s instructions and guidelines when it comes to firing temperatures and times. This will ensure that the enamel fuses correctly and produces the desired results. Finally, don’t be afraid to experiment with different colours and techniques. Enamel offers a wide range of options, and exploring them can help you discover new and exciting ways to make your jewelry stand out.
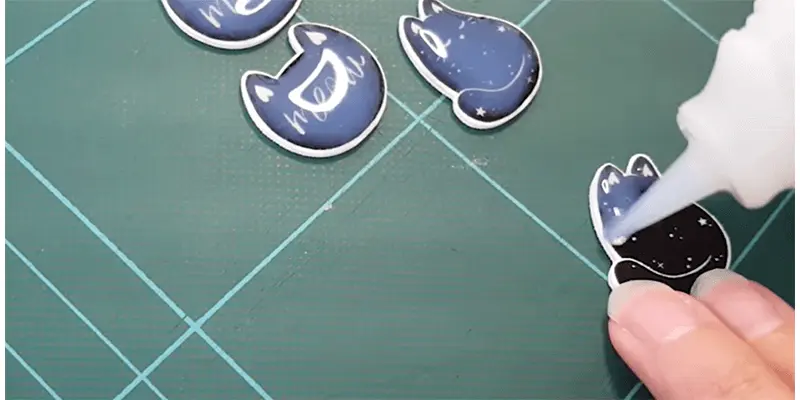
Enamel Pin How To Guide
If you’re into accessories and jewelry, you may have noticed the surge in popularity of enamel pins. These small, colorful pins have become a top choice for fashion-forward individuals who want to add a unique touch to their outfits. If you’ve ever wondered how enamel pins are made, this guide will help you understand the process and give you tips on how to make your own customized enamel pins.
Enamel pins are made using a special enamelling process that involves fusing colored glass powders onto metal. The most commonly used metal is iron, as it is durable and easy to work with. To start the process, you will need several materials, including metal blanks, enamel powders, a kiln or torch, and pin clasps. You can choose from a variety of enamel powders and colors, such as glitter or glow-in-the-dark options, to create the desired effect for your pin.
The first step in making an enamel pin is to design your artwork. This can be done using digital software or hand-drawn on paper. Once you have your design, you can transfer it onto a metal blank. The design is then cut into the metal using a special cutting tool, creating the outline for the enamel to fill.
Next, the enamel powders are mixed with water to create a paste-like consistency. The paste is then carefully applied to the cut-out design, making sure to fill all the lines and shapes. The pin is then placed into a kiln or heated with a torch, allowing the enamel to melt and fuse with the metal. This process is repeated several times until the desired color and finish are achieved.
Once the enamel has been fired and cooled, the pin is ready for the finishing touches. This includes attaching the pin clasp to the back of the pin, ensuring that it can be easily attached to clothing or accessories. Some manufacturers also offer additional options, such as sunken or raised areas on the pin, adding texture and depth to the design.
Enamel pins come in a wide range of designs, from simple and minimalist to intricate and detailed. They can be customized to feature any artwork, logo, or design you can imagine. The enamel pins can also be plated with top-quality materials, such as gold or ruthenium, to give them a premium look and feel.
When it comes to making enamel pins, there are a few tips to keep in mind. First, make sure you know what kind of pin attachment you want to use. There are various options, including butterfly clasps, rubber or PVC backs, or even magnetic attachments. Each has its own pros and cons, so choose the one that fits your needs and aesthetic preferences.
It’s also important to consider the overall design of your pin. Keep in mind that enamel can bleed and mix, so it’s best to use clear lines and colors that won’t blend together. If you plan to use glitters, be sure to use them sparingly so that they don’t overpower the rest of the design.
If you’re looking for inspiration, there are plenty of enamel pin designs available online. You can find them on websites like Etsy, where artists from all over the world sell their unique creations. This can help you get an idea of what’s popular and what kind of designs people are drawn to.
Now that you know the basics of making enamel pins, you’re ready to dive into this creative and rewarding art form. Whether you’re making pins for yourself or to sell, the possibilities are endless. So gather your materials, let your creativity shine, and make the most out of this wonderful craft!
What you need for enamel jewelry making

If you’re interested in making enamel jewelry, there are a few key things you’ll need to get started. Enamel is a special type of glass that is used to give jewelry a beautiful and colorful finish. It can be used to add depth and character to a piece, making it truly unique. Here’s a guide on what materials and tools you’ll need to start making enamel jewelry:
- Enamel powders: Enamel powders are the main materials used in the enameling process. There are many different colors and types of enamel powders available to choose from, so you can create customized designs that suit your personal style.
- Kiln: A kiln is used to heat and melt the enamel powders onto the jewelry. It’s important to use a kiln that is specifically designed for enameling, as the temperatures needed can be quite high. There are various options available, including electric kilns and gas-fired kilns.
- Enamel brushes: Enamel brushes are used to apply the enamel powders onto the jewelry. They are specially designed with soft bristles to ensure a smooth and even application. Brushes come in different sizes to accommodate different designs and lines.
- Enamel pins and clasps: Enamel pins and clasps are used to attach the finished enamel jewelry to clothing or other accessories. They come in various styles and designs, so you can choose the ones that best suit your artwork.
- Iron, gold, or other metal base: Enamel jewelry is typically made on a metal base, such as iron or gold. This provides a stable foundation for the enamel and ensures a quality finished product.
When making enamel jewelry, it’s important to follow the proper steps and techniques to achieve the desired results. There are various ways to apply the enamel powders, such as using stencils or simply freehand pouring. Each method has its own unique effect, so feel free to experiment and find the one you like best.
Some tips to keep in mind when making enamel jewelry:
- Make sure the surface of the metal base is clean and clear of any dirt or oils before applying the enamel.
- If you’re using multiple colors, allow each layer to dry before adding the next one to prevent the colors from mixing.
- Consider adding special effects like glow-in-the-dark powders or glitters to make your enamel jewelry stand out.
- Keep in mind that enamel will shrink slightly when heated, so take this into account when cutting or designing your piece.
- Once the enamel has been applied and heated, it’s important to let it cool completely before handling or packaging the jewelry.
Enamel jewelry making is a fun and creative process that allows you to express your individual style. Whether you’re a beginner or an experienced jeweler, there are plenty of resources and manufacturers out there to help guide you through the enameling process. So why not give it a try and see what beautiful designs you can create with enamel?
How to make customized enamel pins
Enamel pins are a popular form of personal expression and can be a fun way to showcase your individual style. Whether you want to create pins for personal use or to sell, this guide will provide you with the information you need to get started.
1. Design your pins: The first step in making customized enamel pins is to design your artwork. You can do this using a graphic design software or by hand. Be creative and come up with a design that represents your unique style. Think about what colors, glitters, or even glow-in-the-dark options you would like to incorporate into your pins.
2. Choose your materials: Once you have your artwork ready, you’ll need to choose the materials you’ll be using. Enamel pins are typically made using either soft enamel or hard enamel. Soft enamel pins have recessed lines that create a dimensional effect, while hard enamel pins have a smooth, glass-like surface. Choose the type of enamel that suits your design best.
3. Find a manufacturer: Next, you’ll need to find a manufacturer who specializes in making enamel pins. Look for a company that offers high-quality products and has a good reputation. There are many manufacturers online that cater to custom pin orders, so do some research to find the one that’s right for you.
4. Get your artwork ready: Once you’ve chosen a manufacturer, you’ll need to prepare your artwork for production. This typically involves converting your design into a digital format that the manufacturer can use. They will often provide templates or guidelines that you can follow to ensure that your artwork is print-ready.
5. Choose the pin attachment: There are different types of pin attachments you can choose from, such as butterfly clasps, military clasps, or even magnets. Consider the style and purpose of your pins when making this choice. Keep in mind that some attachments may require an additional cost.
6. Get them made: Once your artwork and pin specifications are ready, you can send them off to the manufacturer. They will take care of the rest, including the manufacturing process and shipping. Be sure to communicate any special requests or instructions to ensure the final product is exactly what you want.
7. Enjoy your customized pins: Once you’ve received your pins, you can enjoy wearing them or selling them. They make great accessories for jackets, bags, or hats, and can also be used as jewelry. The possibilities are endless!
Making customized enamel pins is a creative and rewarding process. Whether you’re looking to express yourself or create a unique product to sell, this guide should help you get started. Remember to have fun with the design process and don’t be afraid to experiment with different materials and colors. Happy pin-making!
Special enamel options
In addition to the standard enamel options available, there are several special options that can enhance the design and appeal of enamel jewellery. These special enamel options include:
| Option | Description |
|---|---|
| Cutting | Enamel can be cut into specific shapes and sizes, allowing for intricate designs and detailed artwork. |
| Iron | Iron enamel is known for its durability and strength, making it a popular choice for pins and clasps. |
| Colors | Enamel comes in a wide range of colors, allowing for endless possibilities in design and creativity. |
| Glitters | Enamel can be packed with glitters, giving it a sparkly and eye-catching appearance. |
| Glow-in-the-dark | Enamel can be made to glow in the dark, adding a unique and captivating element to the design. |
| Customized | Enamel can be customized to match specific requirements, such as color schemes or logo designs. |
These special enamel options are often used by jewellery manufacturers and artists to create top-quality enamel pieces. Whether you’re looking for a pin, a pendant, or any other type of enamel jewellery, these options can help you create a one-of-a-kind piece that stands out among the rest. If you’re unsure about which option to choose or how to incorporate it into your design, don’t hesitate to seek guidance from experts in the field.
It’s important to note that the process of enamelling can be complex and requires skill and precision. If you’re not familiar with the process, it’s best to leave it to the professionals. They have the expertise and knowledge to ensure the enamel is applied correctly and the finished product is of the highest quality.
Enamel jewellery has been a popular choice among people for centuries, and there’s no doubt that it will continue to be a beloved art form. With the wide range of special enamel options available, there’s something for everyone’s taste and style. So, if you’re looking to add a touch of elegance and sophistication to your jewellery collection, consider exploring the world of enamel.
Top tips on how to enamel jewellery
Enamel jewellery is a beautiful and unique form of wearable art. The process of enamelling involves fusing powdered glass onto metal to create colorful and durable designs. If you would like to try your hand at enamelling, here are some top tips to help you get started:
1. Know your materials: Enamel can come in a variety of forms, including powders, pastes, and liquid resins. Each option has its own advantages and techniques, so familiarize yourself with what would work best for your designs.
2. Prepare your metal: Before adding enamel, make sure your metal is clean and free of any oils or residue. A quick wipe with rubbing alcohol or other suitable cleaning agent will help ensure a good bond between the enamel and metal surface.
3. Choose your colors: Enamel is available in a wide range of colors, from bright and bold to soft and subtle. Consider your design and the desired effect you want to achieve when selecting your enamel colors.
4. Apply thin layers: Rather than applying a thick layer of enamel, it is best to apply several thin layers. This helps to prevent cracks and allows for the colors to blend and react with each other when heated.
5. Use the right tools: Enamelling requires a few specialized tools, such as kilns, tweezers, and sifters. Invest in quality tools that are designed for enamelling to ensure accurate and precise application of the enamel.
6. Experiment with techniques: Enamelling offers a wide range of techniques, including cloisonné, champlevé, and plique-à-jour. Try different techniques and explore new ways to use enamel in your jewelry designs.
7. Consider the firing process: Enamel is typically fired in a kiln, but there are other options available, such as torch firing or using a hot plate. Research the different firing methods and choose the one that works best for your setup and materials.
8. Finishing touches: Once your enamel has been fired and cooled, you can add additional embellishments, such as glitters or gold lines. These finishing touches can enhance the overall look of your jewellery and give it a unique touch.
9. Pay attention to safety: Enamelling involves working with high temperatures and potentially hazardous materials. Always follow safety guidelines and work in a well-ventilated area to protect yourself from fumes and heat.
10. Practice and have fun: Enamelling is a skill that takes time to master, so don’t be discouraged if your first attempts don’t turn out perfect. Keep practicing and experimenting, and most importantly, enjoy the process of creating beautiful enamel jewellery!
Источники
There are several sources that can help you in making enamel jewelry. One option is to buy enamel materials from specialized retailers like Galaxy Enamelling. They offer a wide range of enamel colors, packed in small containers, and also provide clasps and attachment options for jewelry making. When buying enamel materials, it’s important to know what you need for your particular designs. You can choose from a variety of colors, including clear enamel, glitters, and glow-in-the-dark options.
If you are looking to make your own enamel from scratch, there are other sources that can guide you through the process. Enamelists like Ruth Ball or Helen Mary van Seters have written books on the subject, providing detailed step-by-step instructions and tips on enamelling. These books are a great resource for beginners and experienced enamelists alike.
If you prefer video tutorials, there are also online platforms like YouTube where you can find helpful videos on enamel making. Some channels, like “Enamel Jewelry School”, offer free tutorials on various enamelling techniques and designs. These videos can be a valuable source of inspiration and guidance when you’re working on your enamel artwork.
In addition to retail stores and educational materials, you may also consider joining an enamel art community or attending workshops and classes. These provide opportunities to learn from other enamel artists, share experiences, and get feedback on your work. Websites like The Enamelist Society or Enamelworksupply.com can help you find workshops and connect with other artists in your area.
Finally, if you’re interested in high-quality enamel jewelry, you can look for reputable manufacturers who specialize in enamel work. They may offer a range of unique enamel designs, using top materials, like gold or iron. Some manufacturers even provide customized options, allowing you to create one-of-a-kind enamel pieces for yourself or as gifts. Check out their websites or visit local jewelry stores to see their collections and inquire about the enamel-making process they use.
With these sources and options, you have all the information you need to start making your own enamel jewelry. Whether you choose to buy materials, learn from books or videos, or seek guidance from experienced enamelists, there are plenty of resources available to help you on your enamel-making journey.


