

In today’s fast-paced world, effective communication is key. With the increasing influx of email, it can be challenging to stay organized and keep track of important conversations. That’s where Gmail’s group feature comes in handy. By creating groups, you’ll be able to efficiently manage your emails and ensure that no important content gets lost in the chaos.
Creating groups in Gmail is a simple process that can save you a lot of time in the long run. To start, go to the left-hand menu and click on the “Contacts” label. From there, select the contacts you want to add to a group. You can either select them individually or use the Ctrl key to select multiple contacts at once.
Once you’ve selected the contacts, click on the “Groups” button at the top of the page. A menu will appear, and you’ll have the option to either add the selected contacts to an existing group or create a new one. If you’re adding them to an existing group, simply click on the group name and the contacts will be added automatically. If you want to create a new group, click on the “Create a new group” option and follow the prompts.
One of the benefits of creating groups in Gmail is that it allows you to easily send emails to multiple contacts at once. Instead of manually entering each recipient’s email address every time you want to send a group email, you can simply enter the name of the group in the “To” field, and Gmail will automatically populate the rest. This not only saves you time, but it also ensures that you don’t accidentally leave anyone out.
- Key Benefits of Group Email
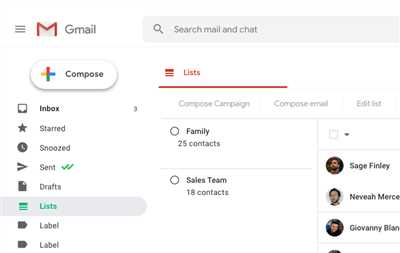
- Creating Contact Groups
- Adding Contacts to Contact Groups
- Deleting Contacts From Contact Groups
- Second Way of Creating a Contact Group
- Working With Groups
- Creating Groups
- Adding Contacts to Groups
- Sending Emails to Groups
- Benefits of Working With Groups
- Deleting Groups & Contacts
- Key Sequences
- Sources
Key Benefits of Group Email
In today’s fast-paced work environment, efficient communication is crucial. One key way to ensure effective communication is by grouping emails. With Google’s Gmail, you have the option to create labeled groups for your contacts, making it easy to send emails to multiple recipients at once.
The first benefit of group email is the time saved. Instead of manually adding each contact one by one, you can simply select the group you created and all the contacts within that group will receive the email. This saves you valuable time that can be better spent on other tasks.
A second benefit is the organization of your email content. By creating labeled groups, you can easily categorize your contacts and keep track of different projects or teams. This simplifies your email management and makes it easier to find specific emails when you need them.
Another key benefit of group email is the ability to save and share email sequences. If you have a regular communication sequence that you send out, you can save it as a template and quickly send it to selected groups. This ensures consistency in your communication and saves you from repetitive typing.
Group email also allows for better collaboration. When working on a project with a group of people, you can easily send updates, share files, and discuss ideas by emailing the group. This streamlines the communication process and keeps everyone on the same page.
In summary, there are several key benefits to using group email in Gmail. It saves you time by allowing you to send emails to multiple recipients at once. It helps you stay organized by categorizing your contacts and email content. It allows for easy sharing of email sequences and promotes collaboration. By utilizing this feature, you can enhance your productivity and efficiency in the workplace.
Creating Contact Groups
One of the key features of Gmail is its ability to help you organize and manage your emails. One way to do this is by creating contact groups. Contact groups allow you to group together specific contacts, making it easier to send emails to multiple recipients at once.
To create a contact group in Gmail, you’ll first need to open the left-hand menu. You can do this by clicking on the “Menu” button at the top left of the screen. From there, you’ll see a list of options, and you’ll want to select “Contacts”. This will take you to your Gmail contacts page.
Once you’re on the contacts page, you can start creating your contact groups. First, select the contacts you want to add to the group by clicking on their names or using the checkboxes next to each contact. Then, click on the “Labels” button at the top of the page and choose “Create label”. This will open a dialog box where you can enter a name for your group.
After you’ve created the label, you can assign it to the selected contacts by checking the box next to the label name. This will add the label to each contact, effectively grouping them together. You can repeat this process to create multiple groups, ensuring that each contact is assigned to the appropriate group.
Once you’ve created your contact groups, you can easily send emails to them. When composing a new email, simply start typing the name of the group in the “To” field, and Gmail will suggest the group for you to select. This saves you time and ensures that your communication reaches the right recipients.
In addition to simplifying email communication, creating contact groups has many other benefits. For example, you can use groups to filter and organize your incoming emails. You can also use groups to quickly delete or archive multiple emails at once. This can be especially useful when working with regular sources of content or sequences of emails.
Overall, creating contact groups in Gmail is a simple and effective way to stay organized and streamline your email communication. Take advantage of this feature and make your Gmail experience even more efficient.
Adding Contacts to Contact Groups
In Gmail, creating contact groups is a useful way to organize and manage your contacts. By adding contacts to contact groups, you can easily send emails to specific groups of people, ensuring effective communication.
To add contacts to contact groups, follow these steps:
- Open Gmail and click on the “Contacts” option, located on the left-hand side of the screen.
- In the Contacts menu, you’ll see a list of all your contacts. Select the contacts that you want to add to a group.
- Once you’ve selected the contacts, click on the “Label” icon above the contacts list. This will open a drop-down menu.
- In the drop-down menu, click on the “Create label” option. This will open a pop-up window where you can specify the name of the new contact group.
- Enter the desired name for the contact group and click “OK”. The new contact group will be created, and the selected contacts will be added to it.
Now, when you need to send an email to a specific group of contacts, you can simply select the contact group instead of individually selecting each contact. This saves time and ensures that you don’t miss anyone when sending important emails.
Another key benefit of working with contact groups is that you can easily add or remove contacts from a group. If you need to add more contacts to a group, simply select the group and follow steps 2-5. Similarly, if you need to remove contacts from a group, open the group, select the contacts you want to remove, and click on the “Delete” icon (-) located on the top-right corner of the contacts list.
In summary, adding contacts to contact groups in Gmail is a convenient way to organize and work with your contacts. By creating and managing contact groups, you’ll have an efficient system for sending emails and ensuring effective communication.
Deleting Contacts From Contact Groups
When working with Gmail, you have the ability to create contact groups as a way to organize and label your contacts. This can be especially helpful when you need to send emails or communicate with a specific group of people on a regular basis. However, there may come a time when you need to remove contacts from a contact group. Here’s how you can do that:
- First, open your Gmail account and click on the “Contacts” option in the left-hand menu.
- When your contacts list opens, you’ll see a list of all the contact groups you have created. Click on the specific group from which you want to delete contacts.
- Once you have selected the group, a list of contacts within that group will be displayed. From here, you can either select contacts individually or use the shift key to select a range of contacts.
- To delete the selected contacts from the group, click on the “More” button, represented by three vertical dots. Then, click on the “Remove from group” option.
- A confirmation prompt will appear, asking if you want to remove the selected contacts from the group. Click “OK” to confirm the deletion.
By following these steps, you can easily remove contacts from a contact group in Gmail. This ensures that your contact groups remain up to date and reflect the communication sequences and key relationships you have created. Whether you’re adding, deleting, or editing your groups, Gmail’s contact management features provide a seamless way to organize your contacts for efficient and effective communication.
Second Way of Creating a Contact Group
An alternative method for creating a contact group in Gmail is through the left-hand menu. This method can be useful if you have a large number of contacts and want to quickly group them together for easier communication.
To create a contact group using this method, follow these steps:
- From your Gmail inbox, click on the “Mail” tab to open your email.
- On the left-hand side of the screen, you’ll see a menu with different options. Scroll down until you find the “Contacts” option and click on it.
- You’ll be taken to the Contacts page, where you can manage your contacts. On this page, you’ll see a list of your contacts and a toolbar at the top.
- To create a new contact group, click on the “Labels” button in the toolbar. It looks like a small tag with a “+” sign on it.
- A pop-up window will appear, allowing you to create a new label for your contact group. Enter a name for the group, such as “Work Contacts” or “Friends,” and then click “Create.”
- Once you’ve created the label, you can start adding contacts to the group. To do this, select the contacts you want to include by clicking on the checkboxes next to their names.
- After selecting the contacts, click on the “Labels” button again and choose the label you just created. This will add the selected contacts to the group.
- Now, whenever you want to send an email to this group, you can simply type the label name in the “To” field, and Gmail will automatically fill in the email addresses for all the contacts in the group.
Using contact groups in Gmail can save you time and ensure that your communication is more organized. It allows you to quickly select a group of contacts without having to manually enter each email address. Whether you’re working on a regular basis with a specific set of contacts or need to group them together for a specific project or event, this second method of creating contact groups in Gmail provides a key way to efficiently manage your contacts and improve your email workflow.
Working With Groups

In Gmail, groups can help you organize your contacts and streamline your communication. By creating groups, you’ll have an easier way to send emails and ensure that the right content reaches the right people. Here’s how to work with groups in Gmail:
Creating GroupsTo create a group, go to the left-hand menu in your Gmail account. Click on the “Contacts” option, then click on the “Labels” tab. From there, select “Create Label” and enter a name for your group. Once the group is created, you can add contacts to it. | Adding Contacts to GroupsTo add contacts to a group, go to the “Contacts” tab in Gmail and select the desired contacts. Then, click on the “Label” key icon at the top of the screen and choose the group you want to add the contacts to. This way, you can easily manage and categorize your contacts based on specific criteria. |
Sending Emails to GroupsWhen composing an email, you can simply type the name of the group in the “To” field. Gmail will recognize the group and automatically send the email to all the contacts in that group. This saves you time and eliminates the need to manually select each contact. | Benefits of Working With GroupsWorking with groups in Gmail offers several benefits. Firstly, it allows you to easily manage and organize your contacts, making it easier to find and communicate with specific people or teams. Secondly, it saves you time by allowing you to send emails to multiple contacts at once. Finally, it ensures that important information reaches the right people and reduces the chance of missing out on important communication. |
Deleting Groups & ContactsIf you no longer need a group, you can easily delete it by going to the “Contacts” tab and selecting the group. From there, click on the label key icon and choose “Remove Label”. This will delete the group, but not the contacts associated with it. To delete contacts, simply select them and click on the trash bin icon. | Key SequencesTo work with groups quickly, Gmail provides key sequences. For example, if you want to add a contact to a group, you can select the contact and press “Shift + G” to open the group menu. Then, you can use the keyboard to select the desired group and press “Enter” to add the contact. Similarly, you can use key sequences to remove contacts from groups or delete groups and contacts. |
Sources
When it comes to grouping emails in Gmail, there are several sources you can use. Each source has its own benefits and can work in a different way. Here are a few options you can consider:
1. Labels: Labels are like folders for your emails. You can create a label for a specific contact or topic and then assign it to relevant emails. This way, you’ll be able to easily find and organize your emails.
2. Groups: You can create groups in Gmail to manage your contacts. This is especially useful when you want to send an email to multiple people at once. By adding contacts to a group, you can quickly select the group as the recipient instead of adding each contact individually.
3. Sequences: Email sequences are a key feature of Gmail for managing email communication. With sequences, you can set up a series of emails to be sent to a specific contact over a period of time. This can be useful for creating automated follow-ups or delivering content in a structured manner.
4. Gmail menu: The left-hand menu in Gmail provides quick access to different categories of emails, such as Primary, Social, and Promotions. Emails are automatically sorted into these categories based on their content. You can also create your own custom categories to further organize your inbox.
Using these sources, you can ensure that your emails are grouped in a way that makes sense to you. By organizing your emails, you’ll save time and have a more efficient way of managing your communication in Gmail.


