
Creating an app bundle is an essential step in the process of running and testing your Android applications. An app bundle is a compiled package of all the files, resources, and sources needed to run your app on various devices. By generating an app bundle, you can store all the necessary files in one place and easily upload them to the app store.
To generate an app bundle, you first need to have Android Studio installed on your computer. Once you have it set up, you can start by clicking on “Build” in the top menu bar and then selecting “Build Bundle(s) / APK(s).” This action will trigger Android Studio to compile your app and generate the necessary files.
The generated file is called an AAB (Android App Bundle) file. This file contains your app’s code, resources, and configuration files. It is like a signed and optimized version of your app, ready to be uploaded to the app store. To generate a debug AAB file, you can simply click on the “Build Bundle(s) / APK(s)” option. However, if you want to create a signed AAB file for release, you will need to go through the signing process.
Signing your app is an important step because it ensures that the app comes from a trusted source and has not been tampered with. By signing your app, you create a unique SHA1 signature that is associated with your app’s package. This signature is then used to verify the app when it is installed on a device.
To sign your app, you need to have a keystore file. A keystore is a secure file that stores the cryptographic keys needed to sign your app. If you don’t have a keystore file, you can easily create one by clicking on “Build” and then selecting “Generate Signed Bundle / APK.” This action will open a pop-up window where you can choose to create a new keystore or use an existing one.
Once you have a keystore file, you can sign your app by clicking on “Build” and selecting “Generate Signed Bundle / APK” again. This time, choose the “Android App Bundle” option and provide the necessary signing information, including the keystore file and its password. Android Studio will then generate a signed AAB file that can be uploaded to the app store.
Now you have a complete app bundle ready to be tested and uploaded. You can use this bundle to test your app on different devices by simply installing it on each device. To do this, connect the device to your computer, enable USB debugging, and then click on “Run” in Android Studio. Your app will be automatically installed on the connected device, allowing you to test it in a real-world environment.
In summary, creating an app bundle is a crucial step in the app development process. It involves compiling all the necessary files and resources into a single package, generating a signed AAB file, and testing the app on different devices. By following these steps, you can ensure that your app is ready for distribution and delivers a seamless user experience on various Android devices.
How to test aab file on Android device

Once you have created the app bundle (AAB) files for your Android apps, you will need to test them on an actual Android device. Testing the AAB file helps ensure that your app works correctly on different devices and that there are no issues or bugs that need to be fixed before launching it to the public.
To test the AAB file on an Android device, follow the steps below:
| Step 1 | In Android Studio, make sure you have the necessary signing keys and certificates for your app. These are required to generate the compiled and signed APKs from the AAB file. |
| Step 2 | Click on “Build” in the menu bar, then select “Generate Signed Bundle / APK” to trigger the app bundle generation process. |
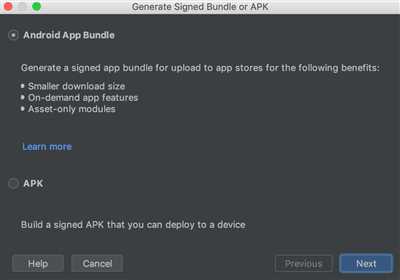
| Step 3 | In the “Generate Signed Bundle or APK” pop-up window, select “Android App Bundle” and click “Next”. |
| Step 4 | Choose the “Bundle file” option and provide the path to your AAB file. Make sure the “Build Type” is set to “Release”. |
| Step 5 | In the next step, select the signing configuration you have set up for your app. If you have not set up a signing configuration, you will need to do so before continuing. |
| Step 6 | Android Studio will then generate a signed APK file for each device configuration (ABI) specified in the AAB file. These APK files are stored in a directory called “apks” within the same directory as the AAB file. |
| Step 7 | Connect your Android device to your computer using a USB cable. |
| Step 8 | Enable USB debugging on your Android device. To do this, go to “Settings” > “Developer options” > “USB debugging”. |
| Step 9 | In Android Studio, click on “Run” from the menu bar and then select your connected device from the list of available devices. |
| Step 10 | Android Studio will install the app bundle on your device and run it. You can now test and debug your app on the actual device. |
By following these steps, you can successfully test your AAB file on an Android device. This ensures that your app is working as intended and helps you identify any issues that need to be fixed before releasing it to users.
How to Generate Signed AAB File in Android Studio
Creating an Android App Bundle (AAB) is a necessary step when you want to publish an app on the Google Play Store. In this guide, we will walk you through the process of generating a signed AAB file in Android Studio.
Before we begin, make sure you have the necessary prerequisites:
| Android Studio | – | The IDE used for Android app development. |
| Keystore File | – | A file used for signing your app. If you don’t have one already, you can create it using the keytool command. |
| Keystore Password | – | The password associated with the keystore file. |
| Key Alias | – | The name you gave to your key when creating the keystore file. |
| Key Password | – | The password associated with your key. |
Now that you have the necessary tools and information, follow these steps to generate a signed AAB file:
- Open your project in Android Studio.
- Click on “Build” from the top menu, then select “Generate Signed Bundle / APK”.
- A pop-up window called “Generate Signed Bundle or APK” will appear. Select “Android App Bundle” and click “Next”.
- In the next step, make sure “Release” is selected for the build variant and click “Next”.
- Now you need to select your keystore file. Click on the “Choose existing…” button and browse to the location where your keystore file is stored. Select it and click “Next”.
- Provide the required keystore information: Key store password, Key alias, and Key password. Then, click “Next”.
- In the next step, choose the destination folder where you want your AAB file to be generated. You can also opt to sign your AAB file for release on Google Play, which would trigger the app signing process. Click “Finish” to generate the signed AAB file.
After completing these steps, Android Studio will compile your app and generate the signed AAB file. This file can then be uploaded to the Google Play Store to distribute your app to various devices running Android.
In addition to generating a signed AAB file, Android Studio also generates universal APKs (APKs that contain code and resources for all device configurations) in the /app/build/outputs/apk/release directory. These APKs can be used for local testing or as a fallback option if your AAB file encounters any issues.
And that’s it! You’ve successfully generated a signed AAB file in Android Studio. Now you can proceed to upload it to the Google Play Store and reach a wide audience with your app.
Sources

- Android Studio: To create an app bundle, you first need to have Android Studio installed on your device. Android Studio is an integrated development environment (IDE) for Android app development.
- App Signing: After you have developed your app, you need to sign it. This is done to ensure the integrity and authenticity of the app. The signed app bundle is called an Android App Bundle (AAB).
- Keystore: To sign the app bundle, you need a keystore file. The keystore file contains a secret key called a “SHA1” that is used to generate a digital signature. The keystore file and the SHA1 are stored securely and should not be shared.
- Generating App Bundle: In Android Studio, you can generate an app bundle by following these steps:
- Open your project in Android Studio.
- Click on “Build” in the top menu.
- Select “Generate Signed Bundle / APK”.
- Choose “Android App Bundle” and click “Next”.
- Select the keystore file and enter the necessary information.
- Click “Finish” to generate the app bundle.
- Uploading to Google Play Store: Once you have generated the app bundle, you can upload it to the Google Play Store. The Google Play Store will generate the necessary APK files from the app bundle. These APK files will be compiled and stored on the Google Play Store.
- Testing on a Device: Before uploading the app bundle to the Google Play Store, it is recommended to test it on a device. You can do this by:
- Connecting your device to your computer.
- Enabling USB debugging on your device.
- Running the app bundle on your device by clicking on “Run” in Android Studio and selecting your connected device.
- Triggering Split Install: Once the app bundle is uploaded to the Google Play Store, the installation files (APKs) will be downloaded and installed on the user’s device. This is done automatically by the Google Play Store during the app installation process.