

If you’re a marketer or a business owner, you know how important it is to reach your target audience online. One powerful way to do that is through remarketing ads. Remarketing allows you to show tailored ads to people who have already visited your website or interacted with your brand in some way. By keeping your brand in front of them, you can increase the chances of them coming back to complete a purchase or take another desired action.
So, how do you create remarketing ads? Here are 5 common steps to guide you:
- Step 1: Open an Account with a Remarketing Platform – To start creating remarketing ads, you’ll need to open an account with a remarketing platform. One popular platform is Facebook Ads Manager, which allows you to create ads that appear on Facebook, Instagram, and other websites.
- Step 2: Choose the Right Remarketing Audiences – Before launching your remarketing campaigns, you’ll need to create custom audiences based on specific criteria. For example, you can create an audience of people who have added items to their shopping cart but didn’t complete the purchase.
- Step 3: Create Compelling Ads – Once you have your audiences set up, it’s time to create the actual ads. Make sure your ads are visually appealing, have a clear call-to-action, and include a smartly written headline and ad copy. You can also use a dynamic remarketing campaign to show personalized ads to users based on the specific products they viewed on your website.
- Step 4: Set Your Bidding and Budget – When creating your remarketing campaigns, you’ll need to choose how much you’re willing to pay for each click or impression. You can set a daily or lifetime budget to control your spending.
- Step 5: Launch and Measure Your Remarketing Campaigns – After completing the previous steps, it’s time to launch your remarketing campaigns. Monitor the performance of your ads and make any necessary adjustments to improve your results.
Remarketing ads can be a powerful tool for reaching your target audience and driving conversions. By using the right platform, selecting the best audiences, creating compelling ads, and monitoring your campaigns, you’ll be on your way to reaching the right people at the right time with the right message.
- The Remarketing Guide for Dummies
- Before you start
- Where do Smart Shopping ads appear
- Creating Retargeting Ads on Facebook and Instagram in 5 Steps
- 1 Link Your Advertising Account With Business Manager
- 2 Create a Custom Audience
- 3 Choose a URL and a Data Collection Time
- 4 Measure Your Users Before Launching Your Campaign
- Video:
- The Ultimate Facebook Ads Retargeting Campaign You Need to 2X Your ROAS or Reduce Lead Cost
The Remarketing Guide for Dummies
Remarketing is a powerful tool that allows you to show targeted ads to people who have previously visited your website or interacted with your brand. By launching a remarketing campaign, you can reach out to these potential customers again and encourage them to take the desired action.
Here are the steps to create effective remarketing ads:
Step 1: Choose a Remarketing Platform
Before you can start creating remarketing ads, you need to choose a platform to work with. There are several options available, such as Google Ads, Facebook Ads, and AdRoll. Select the platform that best fits your business goals and target audience.
Step 2: Install the Remarketing Code
To measure the results of your remarketing efforts, you need to add a small piece of code called a remarketing tag or pixel to your website. This code will track the visitors who didn’t convert into customers and add them to your remarketing audience list.
Step 3: Create Remarketing Audiences
Once the code is installed, you can create specific audiences based on the actions people took on your website. For example, you can target users who added items to their cart but didn’t complete the purchase. This audience is highly likely to convert if you show them tailored ads.
Step 4: Launch Remarketing Campaigns
Now that you have your remarketing audiences, it’s time to create and launch your remarketing campaigns. Choose the right ad format and bidding strategy that aligns with your goals. You can also set a specific budget and schedule for your campaigns.
Step 5: Measure and Optimize
After your campaigns are running, keep a close eye on the performance metrics. Measure the results and make adjustments accordingly. Test different ad creatives, messaging, and targeting options to find what works best for your audience.
Remember these important things:
– Remarketing works best when you have a significant number of website visitors.
– It’s also possible to create custom remarketing lists based on specific actions or data from your customers.
– Always keep your ads relevant and engaging to increase the chances of conversion.
– Be wise about ad frequency to avoid annoying your audience.
By following this remarketing guide for dummies, you can effectively reach out to your potential customers and increase your advertising ROI. Start creating smart remarketing campaigns and show your ads to the right people at the right time!
Before you start
Before you launch your remarketing ads, there are a few important things to consider:
- Make sure you have an active Facebook Ads Manager account.
- Open your Facebook Ads Manager account and create a new campaign.
- Choose the objective for your remarketing campaign. The most common objective is “Traffic”.
- Next, select the audience for your campaign. You can create a custom audience based on specific criteria, such as website visitors or people who added items to their cart but didn’t make a purchase.
- Choose the number of days you want your remarketing ads to appear to your audience. It’s best to keep this number relatively low, usually between 2 and 5 days.
- Set your bidding strategy. You can choose between automatic bidding or manual bidding. Automatic bidding will let Facebook optimize the price to get you the best results.
- Create your ad. You can choose from a variety of ad formats, such as single image, carousel, or collection. Make sure to include a compelling headline and description, and adwisely choose the URL you want to link to.
- Measure your results. Once your ads are running, keep an eye on the performance metrics in the Ads Manager. This will help you see how well your ads are performing and make any necessary adjustments.
By following these steps, you will be able to reach your target audience and effectively retarget your website visitors. Keep in mind that remarketing ads can be very powerful, but it’s important to create ad campaigns that are relevant and appealing to your customers. Also, don’t forget to consider the browsing habits of your users and select the right platforms, such as Facebook and Instagram, for displaying your ads.
Where do Smart Shopping ads appear
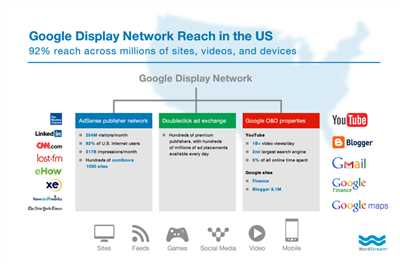
Smart Shopping ads are a type of advertising campaign that allows marketers to reach a specific audience of potential customers who have visited their website or performed specific actions within a certain time frame. These ads appear on the Google Display Network, which includes a vast number of websites and apps where users spend their time browsing and performing various activities.
When you create a Smart Shopping campaign, Google uses machine learning algorithms to automatically choose the best combination of advertising assets (images, text, and more) to show to your target audience. This means that your ads can appear on websites and apps that are most relevant to your audience, increasing the chances of them clicking on your ads and making a purchase.
In addition to appearing on the Google Display Network, Smart Shopping ads can also appear in Google search results and on YouTube, as well as on social media platforms like Facebook and Instagram. This allows you to reach your audience wherever they spend their time online, maximizing your chances of capturing their attention and driving them to your website.
When creating a Smart Shopping campaign, you can choose specific audiences to target based on their browsing behavior and actions they have taken on your website. For example, you can target visitors who have added items to their cart but didn’t make a purchase, or users who have shown interest in specific products or categories. This level of targeting ensures that your ads are shown to the right people at the right time, increasing the likelihood of them converting into customers.
In order to measure the performance of your Smart Shopping ads and track the results, you can use the Google Ads Manager or the Facebook Ads Manager. These tools provide detailed insights and data on how well your ads are performing, including metrics like impressions, clicks, conversions, and more. By analyzing this data, you can make informed decisions about your advertising strategy and optimize your campaigns for better results.
Overall, Smart Shopping ads are a powerful tool for marketers looking to reach a specific audience and drive them to take action. By leveraging the power of machine learning and targeting capabilities, you can create effective and engaging ads that appear in the right places at the right time, increasing your chances of converting visitors into customers.
Creating Retargeting Ads on Facebook and Instagram in 5 Steps

Retargeting, also known as remarketing, is a smart advertising strategy that allows you to reach out to people who have already visited your website or performed specific actions on it. By showing ads to these users on Facebook and Instagram, you can keep your business at the top of their minds and encourage them to take further action.
If you’re new to retargeting ads on Facebook and Instagram, don’t worry! This guide will take you through the process step-by-step, making it easy even for beginners. By following these 5 steps, you’ll be able to launch your own retargeting campaign and reach potential customers with relevant ads.
Step 1: Open a Facebook Business Manager Account
Before you can start creating retargeting ads on Facebook and Instagram, you’ll need to have a Facebook Business Manager account. This account will serve as your central hub for managing and measuring your ad campaigns. If you don’t already have an account, you can easily create one by visiting the Facebook Business Manager website.
Step 2: Install the Facebook Pixel or the Facebook SDK
To track the activities of visitors on your website, you’ll need to install the Facebook Pixel or the Facebook Software Development Kit (SDK). These tools will help you collect valuable data about website visitors, such as the pages they visit, the products they add to cart, and the actions they take. Once you’ve installed the pixel or SDK, it will start gathering data that you can later use for targeting your ads.
Step 3: Create a Custom Audience
Now that you have the necessary tools in place, it’s time to create a custom audience. This audience will consist of people who have visited your website or performed specific actions on it. To create a custom audience, go to Facebook Business Manager and navigate to the “Audiences” section. There, you can choose from a number of options, such as website traffic, app activity, or customer file, to define your audience based on the actions they’ve taken on your website.
Step 4: Choose the Right Ad Format and Campaign Objective
Before launching your retargeting campaign, you’ll need to choose the right ad format and campaign objective. Facebook and Instagram offer a variety of ad formats, such as image ads, video ads, carousel ads, and collection ads. You’ll also need to define the objective of your campaign, which could be driving website traffic, increasing conversions, or generating leads. Choose the ad format and campaign objective that best align with your business goals and the preferences of your target audience.
Step 5: Launch and Measure Your Retargeting Campaign
The final step is to launch your retargeting ads on Facebook and Instagram and measure their performance. Make sure to set a budget for your campaign and define the duration you want your ads to run. Monitor the results closely and make adjustments if needed. Keep in mind that it may take some time to see the full impact of your retargeting ads, so be patient and give your campaign a few days to show meaningful results.
By following these 5 steps, you’ll be able to create effective retargeting ads on Facebook and Instagram that reach the right audience at the right time. Remember to use the data you collect to refine your targeting and ad creative, and don’t be afraid to experiment with different strategies to see what works best for your business. With time and effort, retargeting ads can become a powerful tool for driving conversions and growing your customer base.
1 Link Your Advertising Account With Business Manager
If you’re ready to start launching remarketing campaigns, the first step is to link your advertising account with Business Manager. This is a very important and specific step that you must complete before you can start creating and running your remarketing ads.
By linking these two accounts, you’ll be able to access all the necessary tools and features that you’ll need to work on your remarketing campaigns. It will also make it easier for you to keep track of your campaigns and measure their performance.
Here’s how you can link your advertising account with Business Manager:
- Open Business Manager and go to the Business Settings.
- Click on “Accounts” in the left-hand menu.
- Choose “Ad Accounts.”
- Click on “+ Add” and select “Add an Ad Account.”
- Enter the advertising account ID or the URL of the specific Facebook ad account you want to link.
- Click “Add Ad Account.”
- Follow the instructions to complete the linking process.
Once you’ve linked your advertising account with Business Manager, you’ll be able to create remarketing campaigns and target specific audiences. You can also create custom audiences based on website visitors, app users, and even a specific customer list.
Remarketing is a smart way to reach out to users who have already shown interest in your products or services. By showing them ads that complement their previous browsing and purchasing behavior, you can increase the chances of getting them back to your website.
When creating your remarketing ads, it’s important to choose the right audience, optimize your bidding strategy, and measure the results. Be sure to keep an eye on how your ads are performing and make any necessary adjustments along the way.
By following these steps and using the right targeting and ads, you can create successful remarketing campaigns that will bring back visitors and turn them into loyal customers. Remember to always test different variations of your ads and ad formats to find the best performing ones.
If you’re new to remarketing or want a quick guide on how to create remarketing ads, you can check out our “Remarketing Ads for Dummies” guide, where we provide step-by-step instructions and tips for creating effective remarketing campaigns on Facebook and Instagram.
With the right approach and data-driven decisions, you can achieve great results with your remarketing campaigns. Take the time to plan, execute, and measure your campaigns adwisely to maximize your ROI.
2 Create a Custom Audience
Creating a custom audience is an essential step in setting up your remarketing ads. This allows you to target specific users based on their actions and behavior on your website, providing you with a more targeted and effective advertising campaign.
To start creating a custom audience, you need to have a Facebook Ads Manager account. If you don’t have one, open an account and then follow these steps:
- Go to Ads Manager and click on the “Audiences” tab.
- Click on “Create Audience” and select “Custom Audience” from the drop-down menu.
- You can choose from various types of custom audiences, such as website visitors, app users, customer file, or engagement on Facebook or Instagram. For this guide, we’ll focus on creating a website custom audience.
- Select the “Website Traffic” option.
- Choose the criteria for your custom audience. You can create an audience based on all website visitors, people who visited specific web pages, visitors who haven’t visited in a certain number of days, or even people who have added items to their cart but didn’t make a purchase.
- Specify the time period for your audience. You can choose from 1 to 180 days.
- Optionally, you can add additional rules to further refine your audience.
- Click on the “Create” button to save your custom audience.
Once your custom audience is created, you can use it for your remarketing campaigns. These types of campaigns are set up as separate ad sets within your Facebook Ads Manager. You can choose the custom audience you just created as the targeting option for these ad sets.
Remarketing ads are a smart way to reach people who have already shown interest in your business. By showing ads to people who have visited your website or taken specific actions, you increase the chances of capturing their attention again and driving them to perform the desired action, such as making a purchase or signing up for your services.
When creating your ad, you can also choose a specific URL, which will be shown to users who are part of your custom audience. This can be a landing page, a product page, or any other page that you want to direct them to. By linking your ad to a specific URL, you can further increase the chances of conversion.
Remarketing campaigns typically have lower costs per click and higher conversion rates compared to other types of campaigns. This is because you are targeting users who are already familiar with your brand or have shown interest in your products or services.
It’s important to keep in mind that remarketing ads can be seen not only on Facebook but also on other websites. Facebook has a network called the Audience Network that allows your ads to appear on a network of websites and apps. This increases the visibility of your ads and gives you more opportunities to reach your target audience.
Measuring the performance of your remarketing ads is also crucial. By analyzing the results, you can identify which audiences and ads are performing the best. This will help you optimize your campaigns and ensure that you’re getting the most out of your advertising budget.
In some cases, you may want to create multiple custom audiences to target different segments of your audience. For example, you can create a custom audience for users who have visited your website but haven’t made a purchase, and another audience for users who have already made a purchase. This way, you can tailor your ads and messaging to each specific segment, increasing the chances of converting them into customers.
To sum it up, creating a custom audience is a crucial step in launching your remarketing campaigns. By targeting specific users based on their actions and behavior, you can reach people who are already interested in your business, increasing the chances of converting them into customers. Make sure to follow the steps outlined above to create your custom audience and start reaping the benefits of remarketing.
3 Choose a URL and a Data Collection Time
Once you have set up your remarketing campaigns and defined your target audience, it’s time to choose the URL that you want to use in your ads. This is the specific webpage on your website where you want your ads to appear to people who have already visited your site.
When choosing a URL, it’s important to consider what action you want your audience to take. Are you trying to drive sales? Increase website traffic? Encourage newsletter sign-ups? Select a URL that aligns with the goals of your remarketing campaign.
Additionally, you’ll need to decide how long you want to collect data on your website visitors before showing them your remarketing ads. This time frame, known as the data collection time or cookie window, allows you to target people based on their browsing habits and actions on your site.
The data collection time can vary depending on your business and advertising goals. Some common time frames include 30 days, 60 days, and 90 days. Keep in mind that the longer the data collection time, the more information you will have about your audience’s behavior, but it may also limit the number of people you can target.
Before launching your remarketing campaigns, it’s essential to work with your ad manager or advertising platform to ensure that the URL and data collection time are set up correctly. This step is crucial for measuring the success of your campaigns and optimizing your ad spend.
To create a custom audience for your remarketing campaigns, start by opening your Facebook Ads Manager account. From there, click on the “Audiences” tab, then select “Custom Audiences”. Next, click on the “Create a Custom Audience” button and choose the “Website Traffic” option.
In this step, you can specify the URL or URLs where your audience should come from. You can enter specific URLs or use rules such as people who visited specific web pages, people who visited but did not purchase, and more.
Once you have chosen your URL and set your data collection time, you’re ready to launch your remarketing campaigns and start showing ads to people who have already shown interest in your products or services.
| Key Points: |
|---|
| – Choose a URL where you want your ads to appear to your target audience. |
| – Consider the action you want your audience to take when selecting a URL. |
| – Decide on the data collection time or cookie window that aligns with your advertising goals. |
| – Work with your ad manager or advertising platform to ensure the URL and data collection time are set up correctly. |
| – Create a custom audience in your Facebook Ads Manager account, specifying the URL and audience criteria. |
| – Launch your remarketing campaigns and start showing targeted ads to your audience. |
4 Measure Your Users Before Launching Your Campaign
Before you launch your remarketing campaign, it’s important to measure your users to ensure that you’re targeting the right audience and getting the best possible results. This step is crucial in creating successful remarketing ads.
1. Open your Facebook Ads Manager or AdWisely account and choose the campaign you want to measure.
2. Start by measuring the number of visitors to your website. This will give you an idea of how many people you can potentially reach with your remarketing ads.
3. Measure the number of users who added items to their cart but didn’t make a purchase. This will help you understand how many potential customers you can target with your ads to encourage them to complete their purchase.
4. Measure the number of users who clicked on your ads and went on to visit other pages on your website. This will give you an indication of how well your ads are performing in terms of getting users to explore more of your website.
5. Measure the number of users who clicked on your ads and then left your website. This will help you determine if your ads are successfully driving users to take the desired action.
In addition to measuring user behavior on your own website, you should also measure the performance of your ads on external websites, such as Instagram. By tracking the number of users who clicked on your ads and the actions they took on these external websites, you can gain insights into the effectiveness of your remarketing campaigns across different platforms.
By measuring your users before launching your remarketing campaign, you can make data-driven decisions to optimize your targeting and maximize your results. It will also help you identify any common issues or areas for improvement in your campaign strategy.
Remember, remarketing is a smart advertising tactic that enables you to reach your target audience where they are most likely to be – browsing the web. By showing ads to users who have already shown interest in your business, you can increase the chances of them coming back for their next purchase.
So, don’t just create remarketing ads blindly. Measure your users, understand their behavior, and make informed decisions to achieve the best possible campaign outcomes.