

Are you tired of using standard envelopes and want to add a personal touch to your mails? Making your own envelopes is a creative craft that allows you to design unique envelopes that reflect your personality. In this guide, we will show you step-by-step instructions on how to make an A5 envelope, perfect for sending special letters, invitations, or cards.
Materials you will need:
- A sheet of A4 size paper
- Scissors
- Ruler
- Pencil
- Glue or double-sided tape
Step 1: Measuring and Cutting the Paper
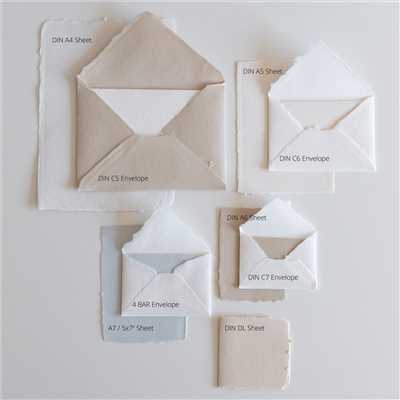
Start by placing your A4 size paper on a flat surface. Measure and mark the dimensions of an A5 size envelope using a ruler and pencil. The A5 size is half of an A4 size, so the dimensions should be 14.8 cm x 21 cm (5.8 in x 8.3 in).
Once you have marked the dimensions, use scissors to carefully cut along the lines. You should now have a piece of paper in an A5 size.
Step 2: Folding the Envelope
Next, place the paper in a vertical orientation in front of you. Take one end of the paper and fold it towards the center, aligning the edges. Press firmly to create a crease. Repeat this step with the other end of the paper, so that both ends meet in the center.
Now, take the bottom edge of the paper and fold it upwards, again aligning the edges. Press firmly to create a crease. This will be the bottom flap of your envelope.
Finally, take the top edge of the paper and fold it downwards, slightly overlapping the bottom flap. Press firmly to create a crease. This will be the top flap of your envelope.
Step 3: Adding Glue or Double-Sided Tape
Open the folded paper, and you will see four flaps. Apply glue or double-sided tape along the side edges of the bottom flap, making sure not to apply it on the top flap. The side flaps will be secured to this bottom flap, creating the sides of your envelope.
Step 4: Folding and Securing the Sides
Fold the left and right side flaps towards the center, one over the other, and press firmly to secure them to the bottom flap. The glue or tape will hold them in place.
Now, fold the bottom flap upwards and press firmly to seal the envelope. The top flap will naturally tuck under the bottom flap to close the envelope. You can add a small dot of glue or tape to secure the top flap if you want extra reinforcement.
Step 5: Finishing Touches
Your DIY A5 envelope is now complete! You can insert your letter, card, or invitation inside. If you want to add a return address or decorative elements, you can do so before sealing the envelope.
Feel free to get creative with your envelope design by using patterned or colored paper, adding stickers, or drawing your own art. The possibilities are endless!
Now that you know how to make an A5 envelope, you can easily personalize your mail and make it more special. Have fun crafting!
Envelope Size Guide
If you’re going to make your own envelope, it’s important to know the right size for what you want to send. This envelope size guide will give you step-by-step instructions on how to fold and craft an envelope that is designed to fit a standard A5 piece of paper.
Step 1: Start with a clear piece of paper that is slightly larger than your A5 paper. This will ensure that the envelope will close properly and that your A5 paper will fit inside.
Step 2: Fold the paper in half along the shorter edge. This will create a crease down the center of the paper.
Step 3: Open the folded paper and fold the top 2 corners down to meet the center crease. This will create a triangle shape at the top of the paper.
Step 4: Return the corners to their original positions and fold the bottom edge of the paper up to meet the center crease. This will create a long rectangular shape.
Step 5: Fold the paper in half along the center crease. This will create a smaller rectangular shape with an open flap on one side.
Step 6: Use glue or clear tape to seal the two open sides of the envelope together. Make sure to apply the glue or tape along the seams to ensure that the envelope is secure.
Step 7: Insert your A5 paper into the envelope and close the flap. Your homemade A5 envelope is now finished and ready to be sent in the post!
What are you waiting for? Gather your materials and follow this handy envelope size guide to make your own A5 envelope today!
What do you want to do
If you want to make a standard size A5 envelope, follow these step-by-step instructions:
Step 1: Measure and cut
Start by measuring and cutting a piece of craft or decorative paper that is 6 inches by 8.5 inches in size. This will be the base of your envelope.
Step 2: Fold the sides
Place the paper horizontally on a flat surface. Then fold the left and right sides towards the center, so that they meet in the middle.
Step 3: Arrange the corners
With the folded sides in place, arrange the corners of the paper so that they slightly overlap in the center. This will create flaps for closing the envelope.
Step 4: Glue or seal the flaps
Apply glue or use an adhesive of your choice to seal the flaps together. Make sure the flaps are firmly secured and allow the glue to dry completely.
Step 5: Insert your content
Once the glue is dried, you’re ready to insert your content into the envelope. Place your letter or card inside, making sure it fits comfortably.
Step 6: Close and finish
To close the envelope, fold the bottom flap up and then fold the top flap down and over it. Press gently to create a clean and secure closure.
By following these instructions, you should have a beautifully designed A5 envelope that is ready to be sent in the mail or given as a gift.
Instructions
Here’s a step-by-step guide on how to make a standard A5 envelope:
| Step 1: | Start by choosing the paper you want to use for your envelope. A standard A5 size is 8.27 x 5.83 inches. |
| Step 2: | Take a piece of paper and fold one edge along the clear guideline to meet the right edge of the paper. Then, unfold it. |
| Step 3: | Repeat step 2 along the other side, folding the left edge of the paper to meet the right edge. Unfold it again. |
| Step 4: | Now fold the top and bottom edges of the paper to meet the center fold line that you created in steps 2 and 3. |
| Step 5: | Next, fold the paper in half along the center fold line, with the open edges on the outside. |
| Step 6: | To create the envelope flap, fold down one of the upper corners of the folded paper at a slight angle. Repeat this step with the other upper corner. |
| Step 7: | Apply glue to the inside of the folded-down corners, and press them firmly onto the inside of the envelope to secure the flap. |
| Step 8: | You can now insert your craft or post inside the envelope from the open end. Once you have added what you want, fold the flap back up to close the envelope. |
| Step 9: | Your A5 envelope is now finished and ready to be used! |
Arrange One Piece of Paper
Before you begin making your A5 envelope, you’ll need to arrange one piece of paper. Follow the steps below to ensure your envelope turns out just right:
- Start with a standard A5 size piece of paper, which measures 148 mm x 210 mm (5.8 in x 8.3 in).
- Place the paper in front of you with the 210 mm (8.3 in) edge facing you. This will be the top of your envelope.
- Fold the paper in half vertically, aligning the edges to create a crease in the center. Unfold the paper to reveal the crease.
- Now fold the bottom edge of the paper up to meet the center crease. This will be the bottom of your envelope.
- Return to the top edge of the paper and fold it down to slightly overlap the bottom edge. This will create the flap of your envelope.
- Slide your finger along the folded edges to create sharp creases.
- If desired, you can add a strip of glue along the edges of the flap to secure it in place.
- Your A5 envelope is now ready for use! You can insert your letter or other materials into the envelope and close it by tucking the flap inside.
These instructions are designed for a standard A5 size envelope. If you’re using different paper dimensions, be sure to adjust the size and folds accordingly. Now you know how to make an A5 envelope from one piece of paper!
Fold in Three Corners
To make an A5 envelope, you’re going to need a piece of paper that is sized appropriately. A standard A5 envelope is designed to fit an A5 sheet of paper, which measures 148 mm x 210 mm (5.8 in x 8.3 in). With that size in mind, let’s get started on folding the envelope.
Step 1: Take your piece of paper and place it in front of you with one of the long edges facing you. This will be the bottom edge of the envelope.
Step 2: Fold the bottom edge up towards the top edge, making a fold that is slightly shorter than the desired size of the envelope. This will create a flap at the top of the envelope.
Step 3: Next, fold in the two bottom corners of the paper towards the center. The points of these corners should meet slightly above the bottom edge of the paper.
Step 4: Return to the top edge of the paper and fold it down towards the bottom edge, tucking it under the two folded corners. This will create the main body of the envelope.
Step 5: Glue or use adhesive to secure the seams along the sides and bottom of the envelope. Make sure to leave the top flap unglued so that you can insert and remove items from the envelope.
Step 6: If you want to add a return address or any other information, this is the time to do it. Use a pen or marker to write the necessary details on the front of the envelope.
Now, you have successfully folded an A5 envelope by following these clear step-by-step instructions. The envelope is designed to meet the standard size of an A5 sheet of paper, allowing you to insert your documents or letters inside.
Glue the Seams
Once you have folded the paper along the clear instructions provided in step 1, you will need to glue the seams to make sure the envelope is secured.
Start by arranging the three sides of the envelope, with the flap on the right and the other two sides folded inward. Insert one piece of glue along the edges of the folded sides.
Next, fold the flap over and press it firmly onto the glued edges to seal the envelope. Make sure that the corners are aligned and meet perfectly.
If you want to add a personal touch, you can use craft glue or a glue stick to attach decorative elements such as ribbons or stickers on the front of the envelope.
Once you have glued all the seams, let the glue dry for a few minutes before using the finished envelope. This will ensure that the envelope is secure and the glue is fully dried.
Note that the size of the envelope may slightly differ from a standard A5 envelope due to the folding and gluing process.
That’s it! You have successfully made an A5 envelope by following this step-by-step guide. Now you can use it to send your letters or cards to your loved ones. Enjoy crafting!
Add the Insert

Once you have finished folding the envelope, it’s time to add the insert. The insert is a piece of paper that you can use to write a letter or insert a card. Here are the steps to add the insert:
1. Take a piece of paper that is slightly smaller than the size of the envelope. If you are using a standard A5 envelope, the insert should be smaller than A5 size.
2. Fold the paper in half lengthwise. This will create a crease down the center.
3. Open the folded paper and then fold the top and bottom edges towards the center crease. The edges should meet at the crease.
4. Return the paper to the folded position and place it inside the envelope. The insert should fit snugly inside the envelope.
5. If you want to secure the insert in place, you can use a small amount of glue along the outer edges of the insert. This will keep it from sliding around inside the envelope.
Now you have the insert in place and your envelope is ready to go. You can write a letter, insert a card, or use it for any other purpose you have in mind. The clear instructions and step-by-step guide will help you make the perfect envelope for your craft or any other post you have in mind. Have fun making your own envelopes!
How to Make an Envelope – Step by Step
Making your own envelope can be a fun and creative way to personalize your cards and letters. Whether you’re going for a standard size or a custom one, this step-by-step guide will show you how to make an envelope from a piece of paper.
- Start with a piece of paper that is slightly larger than the size you want your envelope to be. A standard size is 8.5 x 11 inches.
- Fold the paper in half diagonally, bringing one corner to meet the opposite corner.
- Open up the paper and fold the two outer corners to meet at the center point.
- Fold the bottom edge of the paper up so that it meets the center point.
- Fold the top edge down so that it slightly overlaps the bottom fold. This will create the envelope’s flap.
- Use a glue stick or craft glue to secure the side seams of the envelope.
- Insert your card or letter into the envelope, making sure it fits snugly.
- Fold the flap over the top of the envelope and press it down to close it.
- If you want to add a decorative touch, you can use a sticker or a seal to hold the flap in place.
And there you have it! Follow these instructions step by step, and you’ll have a handmade envelope ready to send. Now, you can return the favor and send someone a special card or letter in your unique envelope.
Step 1
To make a standard size A5 envelope, begin by selecting a piece of paper that is designed for crafting or envelope making. This piece of paper should be slightly larger than the finished envelope size that you want.
- Place the paper in front of you, with the printed or designed side facing down.
- Fold one of the shorter sides of the paper to meet the opposite shorter side. This will create a crease in the middle.
- Open up the paper. Fold one of the longer sides to meet the crease in the middle.
- Return the paper to the original position with the printed or designed side facing down.
- Take the bottom edge and fold it up to meet the top edge. The bottom edge should slightly extend beyond the top edge.
- Add glue or use double-sided tape to secure the bottom edge to the top edge.
- Now you should have a folded paper with three open sides and one closed side.
- To make the envelope more secure, you can glue or tape the two side seams together.
- Insert your letter or card into the envelope.
- Close the envelope by folding down the top flap. You can use glue or tape to secure the flap, if desired.
Congratulations! You have successfully made an A5 envelope. You can now use it to send your mail or use it for any craft project you have in mind.
Sources:
- Caylin’s Craft
- WikiHow
Step 2
Now that you have your paper cut to the right size, it’s time to fold it and create the envelope. You’ll need a ruler and a bone folder or a scoring tool to help you make clean and precise folds.
1. Start by placing the paper with the design side facing down. Fold the paper in half horizontally, from edge to edge. Use the ruler to make sure the fold is straight and firm.
2. Next, unfold the paper and lay it flat on the table. Fold the bottom edge up to meet the center crease you just made. Use the ruler to ensure the fold is straight and crisp. This will form the bottom flap of the envelope.
3. Now, fold the top edge of the paper down to meet the bottom edge. The top edge should overlap the bottom edge slightly. This will create the top flap of the envelope.
4. Return to the center crease and fold the right corner of the paper towards the center. The fold line should meet the center crease. Repeat this step for the left corner of the paper. These folds will form the side flaps of the envelope.
5. Open up the right flap and apply a thin line of glue along the folded edge. Press the flap back down to secure it in place. Repeat this step for the left flap. Make sure the glue is dry before moving on to the next step.
6. Finally, flip the envelope over and fold the bottom flap up and over the side flaps. The bottom flap should be slightly shorter than the side flaps to allow for easy insertion of the contents. Use the bone folder or your finger to make a crisp fold along the bottom edge of the envelope.
And voila! You now have a beautifully crafted A5 envelope ready for you to use.
It’s important to note that the instructions above are for a standard A5 envelope size. If you want to make an envelope for a different size, you can adjust the measurements accordingly. Additionally, you can get creative and use different types of paper or add embellishments to personalize your envelopes.
Step 3
Take the fourth piece of A5 paper and fold it in half. This will be the inside piece of the envelope.
Put glue along the bottom half of the folded edge.
Insert this piece into the other three pieces, making sure the folded edge meets the bottom edge of the other pieces.
Close the envelope by folding the top flap down and using glue to secure it in place.
Now you have a finished A5 envelope that is designed to fit a standard A5 size paper.
Follow these clear instructions, and you’ll have a crafty envelope in no time!
Step 4:
Now that you have the main piece of paper folded and sealed, it’s time to add the final touches to your envelope.
1. Take one of the corners of the folded paper and fold it towards the center, aligning it with the bottom edge of the envelope. Repeat this step for the other three corners.
2. Fold the bottom flap of the envelope up and slightly over the folded corners, creating a neat and finished edge. Use glue or tape to secure the flap in place.
3. Return to the top edge of the envelope and fold it down, aligning it with the bottom edge. This will create a slight overlap of the flaps.
4. To close the envelope, apply glue or tape along the inside seams of the overlapping flaps. Press the seams together firmly to ensure a secure closure.
5. If you want to add a decorative touch to your envelope, you can glue or tape a strip of paper along the edge where the flaps meet. This can serve as a guide for where to insert the contents of the envelope.
6. Your A5 envelope is now complete! It is a standard size for mailing letters and other paper crafts. You can now use it to send out your letters or store important documents.
Remember to be clear and precise when folding and gluing, as this will ensure that your envelope is sturdy and secure.
Sources:
- Caylin, How to make an envelope, Craft Little Word
- https://www.craftlittleword.com/how-to-make-an-envelope/
Step 5
Once you have folded and glued all the necessary seams, you are now going to close the envelope. Take the flap that you previously designed and add a clear glue line along the right edge of the flap. Then, insert the flap inside the envelope, making sure that all the corners and points meet and align. Press down firmly on the flap to secure it in place.
Now you have a finished A5 envelope! You can use it to mail letters, invitations, or any other paper crafts that you want. Just fold your paper to the A5 size, follow these step-by-step instructions, and you’ll have a custom envelope!
Step 6

Once you have folded in the three sides of your envelope and added glue to secure the seams, it’s time to return to the top flap. This flap is designed to meet the folded edge of the envelope and close it up.
You should take your A5 paper piece and fold down the top flap slightly. Then, keeping the other sides of the envelope in place, insert the right flap into the left flap to create a secure closure.
Make sure that the corners of the top flap meet the points of the two other flaps. This will help to keep your envelope well-sealed.
If you’re not sure what each step entails, you can consult online craft sources or follow the written instructions carefully. The key is to arrange the flaps and edges correctly so that the envelope will meet standard A5 envelope size dimensions.
By following these steps, you can make your own A5 envelope in no time. Just remember to be mindful of the measurements and fold lines, and you’ll have a finished envelope ready to post or use for any of your crafting needs.
Finished
Congratulations! You have successfully made your own A5 envelope. Now it’s time to put it all together and close it up.
– First, arrange your paper so that the printed or decorative side is facing down.
– Fold the paper in half, bringing the shorter edges together to meet. Use your fingers to press along the fold and make it clear and crisp.
– Open up the fold and then fold the right edge of the paper to meet the center crease you just made.
– Do the same with the left edge of the paper, folding it to meet the center crease as well.
– Next, fold the top edge of the paper down to meet the bottom edge, aligning them to create the envelope’s flap.
– Apply a small amount of glue along the inside edges of the left and right sides of the bottom part of the folded paper. Press firmly to adhere the seams together.
– Once the glue is dry, fold the flap back over the envelope and insert it into the opening.
– To close your envelope, you can either use glue to seal the flap shut or use a craft punch tool to create a decorative closure.
– If you want your envelope to have a more standard post size, you can use scissors to trim the edges slightly to meet the desired size.
And there you have it! A beautifully crafted A5 envelope that you made yourself. Now you can use it for sending letters, cards, or any other items you want to send through the mail.
Follow these step-by-step instructions and refer back to this guide whenever you need to make another A5 envelope. Enjoy your crafting!
Sources:
1. caylin.art – “How to Make an A5 Envelope from a Piece of Paper”
2. instructables.com – “How to Make an Envelope from a Standard Sheet of Paper”
3. wikihow.com – “How to Fold and Insert a Letter Into an Envelope”
4. thesprucecrafts.com – “How to Make an Envelope”
Sources
Here are some sources you can use to make your own A5 envelope:
| 1. Craft Paper Make sure you have a piece of craft paper that is sized appropriately for an A5 envelope. |
| 2. Scissors You’ll need a pair of scissors to cut out the envelope template. |
| 3. Glue Use glue to secure the corners and seams of the envelope. |
| 4. Ruler Use a ruler to measure and fold the paper accurately. |
| 5. Template Find a standard A5 envelope template online or create one yourself. |
Follow the instructions below to make your A5 envelope:
- Start with a piece of A5-sized paper. If you don’t have A5 paper, you can cut a larger piece of paper to size.
- Fold the paper in half lengthwise. This will create a crease along the center of the paper. Unfold the paper after making the crease.
- Take one corner of the paper and fold it to the center crease. Repeat this step with the opposite corner, so that the two corners meet at the center.
- Return the folded corners back to their original positions.
- Add glue to the edges of the folded corners to secure them in place.
- Place the template on top of the folded paper, making sure the edges align. Use the template as a guide to make fold lines on the paper.
- Fold the paper along the fold lines, then add glue to secure the flaps in place.
- Insert the word or craft you want to send inside the envelope.
- Close the envelope by folding the top flap down and gluing it to the back of the envelope.
- Your A5 envelope is now finished and ready to use!
By Caylin from Instructables.com;


