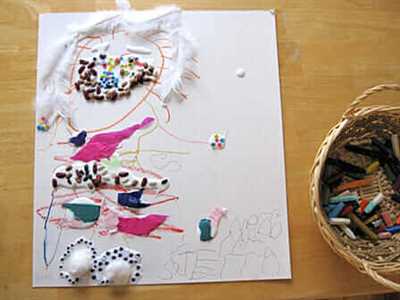
Collage is a versatile medium that allows artists to create unique and visually stunning compositions by combining different materials and techniques. If you’ve ever wanted to try your hand at collage-making, this article will help guide you through the process step-by-step.
First, gather your supplies. You’ll need a variety of materials such as papers, photos, tissue paper, and store-bought templates. The type of materials you use will depend on the style and effect you want to achieve. Collage-makers often select high-quality papers in different colors and textures to add depth and dimension to their creations. You can easily find these supplies online or at your local art supply store.
Next, start by selecting a base for your collage. This can be a piece of wood, a canvas, or a sheet of quality paper. The key is to choose a sturdy material that will be able to hold the weight of the items you’ll be gluing onto it. Once you have your base, you can begin to arrange and glue your cuttings or photos onto it.
The most crucial part of collage-making is the composition. Georges Braque, the pioneering 20th-century artist, once said, “Cubism is nothing more than the realization that collages can be submitted to the same laws as painting when it comes to 7.” Take your time to experiment with different arrangements and placements of your materials. Play around with overlapping shapes, colors, and textures to create visually interesting and dynamic compositions.
If you want to add more depth and texture to your collage, you can try using different techniques and tools. For example, you could use tissue paper to create a “bleeding” effect by layering it over your cuttings and applying water with a brush. Another technique you can try is using knives or scissors to create intricate and precise cuttings.
Remember, there are no rules when it comes to collage-making – it’s all about experimenting and letting your creativity flow. Don’t be afraid to mix different styles and mediums to create your unique art form. Whether you’re a novice or an experienced artist, making collages can be a fun and rewarding way to express yourself. So gather your supplies, unleash your imagination, and start creating your own masterpiece!
- How to Collage- Part 2- Intro to Collage Making Tools & Supplies
- Easily Create Photo Collage Art Online in Your Style
- Intro to Online Collage Making
- The Most Used Online Collage Makers
- Selecting Photos and Effects
- Creating Your Collage
- Submitting Your Art
- Collage
- Supplies and Tools
- How to Make a Collage
- 7 Bleeding Tissue Paper Art
- Video:
- How to Make Collage Paper – PART 1 – Art Tutorial
How to Collage- Part 2- Intro to Collage Making Tools & Supplies
In Part 1 of this series, we discussed the basics of collage making and explored different techniques for selecting and arranging materials. Now, in Part 2, we will dive deeper into the world of collage making tools and supplies.
When it comes to creating collages, you will need a few essential tools and supplies. Here is a list of some commonly used items that can help you bring your collage ideas to life:
| Tools | Supplies |
| Scissors | Papers of various colors, textures, and weights |
| Craft knives | Gluing medium (e.g., glue stick, Mod Podge) |
| Rulers | Templates or stencils |
| Photos or images | Wood or canvas as a base |
| Markers or pens | Store-bought or handmade collage materials |
| Paintbrushes | Tissue paper or papiers-mâchés |
These tools and supplies can be easily found at your local art supply store or online. It’s important to select high-quality materials to ensure the longevity and visual effect of your collages.
Now that you have your collage-making arsenal ready, let’s explore some tips and techniques to help you create stunning compositions:
- Start by selecting a theme or style for your collage. This will help guide your material choices and create a cohesive look.
- Collect papers, photos, and other materials that fit your chosen theme. Don’t be afraid to experiment with different textures and colors.
- Cuttings from magazines, newspapers, or your own drawings can all be used as collage materials.
- Try incorporating various techniques, such as tearing, folding, or layering papers, to add depth and dimension to your collages.
- Experiment with different gluing mediums and find the one that works best for your style and preferred visual effects.
- Consider using templates or stencils to create precise shapes or patterns in your collages.
- Don’t limit yourself to traditional collage materials – think outside the box and explore unconventional items that can add a unique touch to your artwork.
With the right tools, supplies, and techniques, you’ll be well on your way to creating beautiful and captivating collages. In the next part of this series, we will delve deeper into the process of creating a collage from start to finish. Stay tuned!
Easily Create Photo Collage Art Online in Your Style
If you’re an artist or just someone who enjoys creating art, you might love the idea of making a collage. Collages are a form of art where various materials, such as paper and photos, are cut and arranged to create beautiful compositions. They can be made using different mediums, like papiers collés (collage with papers) or collage with wood. While traditional collages require time and supplies, you can easily create photo collage art online in your own style.
Intro to Online Collage Making
Thanks to advancements in technology, you no longer need physical supplies like knives, papers, and glue to create a collage. With online collage makers, you can select from a wide range of tools and templates to help you bring your artistic vision to life. These tools are user-friendly and require no previous experience in art-making.
The Most Used Online Collage Makers
When it comes to creating collages online, there are several popular platforms available. Some of the most commonly used ones include:
- Adobe Spark: Adobe Spark offers a simple and intuitive interface that allows you to create stunning collages using your own photos.
- Canva: Canva provides a wide range of templates and effects to make your collages unique and visually appealing.
- BeFunky: BeFunky offers a variety of tools and features to help you easily create beautiful collages.
- PicCollage: PicCollage is a popular app that allows you to create collages using photos, stickers, and text.
- Fotor: Fotor is an online photo editing tool that also offers collage-making capabilities.
These platforms have user-friendly interfaces, allowing you to easily upload your photos, select layouts and effects, and create your own unique collage art.
Selecting Photos and Effects
When creating a photo collage, one of the most important parts is selecting the photos you want to use. You can choose photos that are related to a specific theme or tell a story. Try experimenting with different combinations to see what looks best for your style.
Additionally, you can enhance your collage by adding effects. Some online collage makers offer various effects, such as filters, text overlays, and frames. These effects can help create a cohesive and visually appealing composition.
Creating Your Collage
Once you’ve selected your photos and effects, it’s time to start creating your collage. Most online collage makers provide drag-and-drop functionality, allowing you to easily arrange and resize your photos. You can also add text, stickers, and other elements to enhance your collage.
Experiment with different layouts and compositions to find a style that speaks to you. Don’t be afraid to try new things and think outside the box. Collage-making is a form of artistic expression, so let your creativity shine.
Submitting Your Art
Once you’re satisfied with your collage, you can save it and share it with others. Many online collage makers allow you to directly download your creation in high-quality formats, such as PNG or JPEG. You can also share your art on social media platforms or submit it to online art communities to showcase your talent.
Whether you’re an experienced artist or just starting out, creating photo collage art online is a fun and accessible way to express your creativity. With the right tools and a little bit of imagination, you can easily bring your artistic vision to life.
Collage
Collage is a popular art form that allows artists to create unique compositions by combining various materials. It is a versatile medium that can be used to make art easily and expressively. Whether you want to create a photo collage or a mixed media piece, collage offers endless possibilities for artistic expression.
One of the key elements of making a collage is selecting the right materials. Artists often use papers, photos, and other printed materials, as well as wood and fabric to create their collages. They can also use store-bought templates or create their own. If you are looking for a specific style, you can also select tissue paper or papiers découpés for unique effects.
Supplies and Tools
To start creating your collage, you will need a few basic supplies and tools. Scissors or craft knives are essential for cutting out your desired images and shapes. Gluing supplies, such as glue sticks or adhesive tape, will be used to assemble your collage. Additionally, if you are working with wood or other surfaces, you may need nails or a hammer for extra support.
How to Make a Collage
Creating a collage can be a fun and rewarding experience. Here is a step-by-step guide to help you get started:
- Gather your materials: Select the papers, photos, and other items you want to include in your collage.
- Prepare your base: Choose a sturdy surface like a canvas or wood panel to serve as the foundation for your collage.
- Cut and arrange: Use scissors or craft knives to cut out your desired images, shapes, and cuttings. Arrange them on your base to create your desired composition.
- Glue it together: Once you are satisfied with your arrangement, start gluing the pieces onto your base. Be mindful of the desired placement and be careful not to use too much glue, as it can cause the paper to wrinkle or create a bleeding effect.
- Add finishing touches: If desired, you can enhance your collage with additional materials or effects such as paint, markers, or other embellishments.
- Let it dry: Allow your collage to dry completely before handling or displaying it.
As you can see, making a collage is a creative and enjoyable process. It allows artists to experiment with different materials, textures, and compositions to create unique and personal artworks. So gather your supplies, unleash your imagination, and start making your own collage today!
7 Bleeding Tissue Paper Art
If you’re an art maker or someone who loves to create beautiful compositions, you’ve probably heard of bleeding tissue paper art. This unique medium combines the use of tissue paper and water to create stunning and vibrant effects in your artwork.
Bleeding tissue paper is a type of art supply that is designed to bleed its color when it comes into contact with water. This makes it perfect for creating watercolor-like effects in your artwork. It’s a popular choice among artists who want to add a splash of color to their collages, paintings, and other art pieces.
Here are 7 bleeding tissue paper art techniques you can try:
- Wood Grain Art: To create a wood grain effect, first, select a piece of wood as your canvas. Then, cut out various shapes and sizes of bleeding tissue paper in different wood-like colors. Using a damp sponge or brush, lightly wet the wood and start gluing the tissue paper cuttings onto the wood. As the paper bleeds and dries, it will create a realistic wood grain effect.
- Photo Art: Select a photo you want to work with and print it out on high-quality photo paper. Cut out various shapes and sizes of bleeding tissue paper in colors that complement the photo. Using water and a brush, lightly wet the photo and start gluing the tissue paper cuttings onto the photo. As the paper bleeds and dries, it will create a unique effect that adds depth and texture to the photo.
- Collage Art: Collage art is a great way to use bleeding tissue paper. Cut out various shapes and sizes of bleeding tissue paper in a style and color palette that you like. Then, start layering and gluing the tissue paper cuttings onto a canvas or a piece of paper. You can also use store-bought templates to help you create different shapes and patterns in your collage.
- Georges Seurat Art: This technique is inspired by the pointillism style of the famous French artist Georges Seurat. Cut out small circles or dots from bleeding tissue paper in different colors. Then, use a damp brush or sponge to lightly wet your canvas or paper. Start gluing the tissue paper circles or dots onto the wet surface, creating a pointillism-like effect as the colors bleed and blend together.
- American Flag Art: For a patriotic artwork, cut out various sizes of bleeding tissue paper in red, white, and blue. Using water and a brush, lightly wet your canvas or paper. Then, start gluing the tissue paper cuttings onto the wet surface, arranging them in the pattern of the American flag. As the paper bleeds and dries, it will create a unique and colorful representation of the flag.
- Making Your Own Templates: If you want to create specific shapes or patterns, you can make your own templates using cardstock or heavy paper. Simply cut out the desired shape or pattern and use it as a guide to cut out the bleeding tissue paper. This will help you create more precise compositions in your artwork.
- Online Resources: If you’re looking for inspiration or want to learn new techniques, there are many online resources available. Websites, blogs, and video tutorials provide step-by-step instructions and ideas for creating bleeding tissue paper art. Take advantage of these resources to expand your artistic skills and explore new possibilities with this unique medium.
With the help of bleeding tissue paper, you can easily create stunning and vibrant effects in your artwork. Whether you’re making collages, paintings, or other art pieces, this medium can add a pop of color and a touch of uniqueness to your creations. So gather your supplies, select your colors, and start experimenting with bleeding tissue paper art today!