Are you looking for a fun and creative home activity? If so, then making seed paper is the perfect project for you! This DIY craft combines the art of paper-making with the joy of planting, allowing you to create unique and plantable pieces of paper. In just a few simple steps, you can make your own seed paper and watch it sprout into a beautiful garden.
So, how does this process work? Well, it’s easier than you might think. The first step is to gather all the materials you will need. These include paper scraps, a blender, water, wildflower seeds, a bucket or large bowl, and a mould. You can use any type of paper scraps, like old newspaper or junk mail. The wildflower seeds will add a touch of nature to your paper, while the mould will help shape it.
Now that you have all the materials, it’s time to get started. First, tear the paper into small pieces and place them in the blender. Add water and blend until you have a thick and pulpy mixture. Transfer this mixture to a bucket or large bowl. Next, add the wildflower seeds and mix them in gently. You don’t want to blend them too much or they might get damaged.
Once everything is well mixed, you can start shaping the paper. Place the mould on a flat surface and scoop some of the paper mixture onto it. Press it down firmly with your hands, making sure that it sticks together. Leave it to dry for about 2-3 days. Slowly and carefully remove the paper from the mould. It should now be fully dry and ready to use.
And there you have it – your very own homemade seed paper! Now, you can use this plantable paper for a variety of purposes. You can write notes or letters on it, cut it into different shapes, or use it as wrapping paper. When you’re ready to plant it, simply place the seed paper in the ground and cover it lightly with soil. Water it regularly and watch as the seeds sprout and grow into beautiful wildflowers. Please note that it may take some time for the seeds to sprout, so be patient and keep taking care of your garden.
This fun and eco-friendly project is a great way to add a personal touch to your gifts or to simply enjoy the therapeutic process of making paper. Plus, it’s a wonderful way to make use of paper scraps that would otherwise end up in the trash. So, gather your materials and get started on your seed paper-making adventure today!
How To Make Plantable Seed Paper At Home
If you have a garden and you’re looking for a fun and creative activity to do, making plantable seed paper is a great idea. Not only is it a quick and easy project, but it also allows you to create personalized seed paper that can be used to grow wildflowers or vegetable plants.
To make plantable seed paper at home, you will need a few simple materials. Here’s a list of what you’ll need:
| 1. | Some scrap paper |
| 2. | A blender or food processor |
| 3. | A bowl or bucket |
| 4. | A flat surface to press the paper, like a clean towel or piece of fabric |
| 5. | A wooden stick or spoon |
| 6. | Some seeds of your choice |
Here’s a step-by-step guide on how to make plantable seed paper:
- In a blender or food processor, blend the scrap paper into small pieces until it becomes pulp-like.
- Transfer the paper pulp into a bowl or bucket, and add enough water to cover it. Let it soak for about 30 minutes.
- After soaking, stir the mixture well with a wooden stick or spoon to break up any clumps.
- Place a flat surface, like a clean towel or piece of fabric, onto a table. Then, place a thin layer of the paper pulp onto the fabric and spread it out evenly.
- Press the paper pulp down firmly with your hands or a spoon to remove any excess water.
- Once the paper is evenly pressed, sprinkle some seeds of your choice onto the surface of the paper. You can use wildflowers or vegetable seeds, depending on what you want to grow.
- Use the spoon or your hands to gently press the seeds into the paper, making sure they are well embedded.
- Leave the paper to dry for a few days, preferably in a warm and dry place, before removing it from the fabric.
- Once the paper is fully dry, you can cut it into smaller pieces or shapes if you wish.
Now you have your own homemade plantable seed paper! To plant it, simply place the seed paper in the soil, cover it lightly, and water it regularly. With time, the paper will break down and the seeds will sprout, giving you a beautiful garden of wildflowers or vegetables.
Please note that the types of seeds you use will determine how long it takes for the paper to fully break down and the seeds to sprout. Some seeds may take longer than others, so be patient with the process.
This activity is not only a fun and creative way to recycle old paper, but it also promotes sustainability and adds a unique touch to your gardening experience. So why not give it a try and enjoy the beauty that your homemade plantable seed paper will bring to your garden?
You will need
To make seed paper, you will need:
- A bowl
- Your choice of seeds
- Sprout paper or regular paper
- A mould in the shape you are looking for
- A piece of screen or fine mesh
- A bucket with water
If you don’t have sprout paper, you can make your own by using regular paper and some water. Just tear the paper into small pieces and place them in a bowl. Add enough water to cover the paper, and let it sit for about 30 minutes. Then, transfer the paper and water to a blender and blend until it forms a pulp.
After you have your paper pulp ready, you can start making your seed paper. Here is a step-by-step guide:
- Tear the sprout paper or regular paper into small pieces.
- Soak the paper pieces in water for about 30 minutes or until they are fully saturated.
- Transfer the soaked paper to a blender and blend it on a low setting until it becomes a smooth pulp.
- Place the mould on a flat surface and slowly pour the paper pulp into it. Spread it evenly using a spatula or your fingers.
- If you want to add more seeds to your plantable paper, this is the time to do it. Sprinkle the seeds evenly on top of the paper pulp and gently press them into the pulp with your fingers.
- Once you have added the seeds, place a piece of screen or fine mesh on top of the mould to help with the pressing process.
- Use a sponge or cloth to press the paper pulp down, removing as much water as possible.
- After most of the water is removed, carefully lift the screen or mesh and place it on a drying rack or a flat surface to dry.
- Let the paper dry for about 24 hours or until it is completely dry and firm.
- Once the paper is dry, you can remove it from the mould and cut it into smaller pieces or shapes.
- You can now plant your homemade seed paper in your garden or give it as a gift. Just place it on top of some soil, lightly cover it with more soil, and water it regularly. Soon, you will see your wildflowers or vegetable plants sprouting from the paper!
These are just some ideas for making seed paper at home. You can get creative with different types of seeds, shapes, and sizes. The possibilities are endless!
Please note that the seeds used in the paper-making process will most likely sprout slower than if they were planted directly in the ground. So be patient and give them some time to grow.
Activity Make Seed Paper
Are you looking for a fun and eco-friendly activity to do at home? Why not try making seed paper! With just a few materials and some seeds, you can create your own plantable paper.
Here’s what you’ll need:
- 3-4 pieces of scrap paper
- A bowl of warm water
- Vegetable or flower seeds
- A free bucket or container (for the paper-making process)
Step 1: Tear the scrap paper into small pieces and place them in the bowl of warm water. Let it soak for at least 30 minutes.
Step 2: After the paper has soaked, use a blender or food processor to blend it until it reaches a smooth consistency. Add more water if needed.
Step 3: Transfer the pulp to your bucket or container. This will be your paper-making mixture.
Step 4: Spread out a piece of fine mesh or nylon screen over a flat surface. Place the screen on top of the bucket and slowly pour the paper-making mixture onto it. Use your hands or a sponge to spread the mixture evenly and press out any excess water.
Step 5: Sprinkle the seeds onto the wet paper, pressing them gently so they stick well. You can use any type of seeds you want, but wildflowers are a popular choice for creating a colorful and plant-friendly paper.
Step 6: Let the paper dry fully. This can take anywhere from a few days to a week, depending on the weather and humidity. Make sure to place the paper in a well-ventilated area.
Once your seed paper is fully dry, you can cut it into smaller pieces and use it as plantable cards or gift tags. To plant the paper, simply place it in soil, add some water, and watch as the seeds begin to sprout.
This activity is a great way to teach kids about recycling and the importance of taking care of our environment. Plus, it’s a fun and creative project that can be enjoyed by people of all ages. So why not give it a try!
More Seed Paper Garden Ideas
Now that you know how to make your own seed paper, it’s time to get creative with different ways to use it in your garden. Here are some ideas to inspire you:
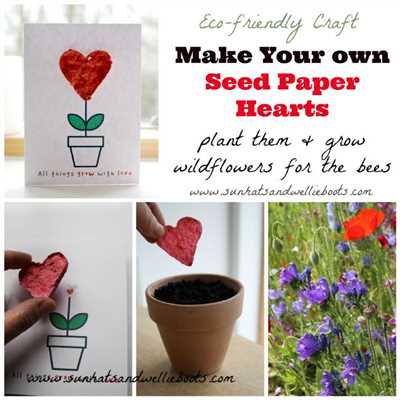
- Plantable Cards: Instead of buying traditional greeting cards, make your own plantable cards using seed paper. Write your message on the paper, and when the recipient is done reading, they can plant the card and watch it sprout into beautiful flowers or herbs.
- Seed Bombs: A fun activity for kids and adults alike! Mix seeds of different types with shredded seed paper, clay, and compost. Roll the mixture into small balls and let them dry. Then, simply toss the seed bombs into a designated area in your garden or a vacant lot, and watch as wildflowers start to bloom.
- Seed Tape: If you’re looking to plant rows of vegetables, seed tape will make the task much easier. Simply lay the seed paper on the soil where you want the plants to grow, and lightly cover with soil. The seed paper will slowly dissolve, and the seeds will sprout right where they need to be.
- Plant Markers: Make your own decorative plant markers by cutting small pieces of seed paper and writing the names of your plants on them. Attach them to sticks and place them in the soil next to each plant. This not only helps you identify your plants, but also adds a whimsical touch to your garden.
- Gift Wrap: Instead of using traditional wrapping paper, wrap your gifts with seed paper. The recipient can then plant the wrapping paper and enjoy a second gift of flowers or herbs.
These are just a few ideas to get you started. Get creative and think about how you can incorporate plantable seed paper into more of your gardening activities. The possibilities are endless!
Types of Seeds Used to Make Plantable Paper
When making seed paper, you will need seeds that are suitable for sprouting and growing. There are various types of seeds that can be used to create plantable paper, each offering its own unique benefits and contributions to the environment.
1. Wildflowers Seeds: If you are looking to create a vibrant, colorful garden, using wildflower seeds is a great choice. With a mixture of various flower seeds, your plantable paper will leave your garden looking beautiful and attract a diverse range of pollinators.
2. Vegetable Seeds: For those who want to grow their own vegetables at home, vegetable seeds are the perfect choice. By using plantable paper embedded with vegetable seeds, you can easily transfer the paper to your garden or pot, and watch as your vegetables start to sprout.
3. Herbs Seeds: If you enjoy having fresh herbs in your kitchen, you can use herbs seeds to make plantable paper. With this type of seed, you can create paper that will allow you to grow herbs such as basil, rosemary, and parsley right at home, ensuring a fresh supply for your cooking.
4. Other Seeds: Though wildflower, vegetable, and herb seeds are commonly used, you have the option to experiment with other types of seeds as well. For example, you can use tree seeds to create paper that will eventually grow into trees, or you can use grass seeds to make plantable paper for your lawn or outdoor spaces.
When choosing the seeds for your plantable paper, it’s important to consider the specific requirements of each type. Some seeds may need more time to germinate, while others may sprout more quickly. By understanding what each seed needs in terms of planting and growing conditions, you can ensure that your plantable paper will be successful.
Remember, using high-quality seeds is essential for a successful paper-making activity. By using seeds that are fresh and viable, you can guarantee that your plantable paper will have the best chance of fully sprouting and growing into healthy plants. So why not give this eco-friendly and creative project a try, and enjoy the beauty and benefits of plantable paper in your garden.
Step 1: Gather the Materials You’ll Need
To make seed paper at home, you’ll need a few basic materials:
- A bowl or bucket to mix the paper pulp
- Some scrap paper or used envelopes that will be recycled
- A blender or food processor to break down the paper
- A mould or frame that will give the paper its shape
- A sponge or cloth to press out excess water
- Seeds of your choice (wildflowers, vegetable types, or any other plantable seeds)
Please note that the size of your bowl or bucket will determine how much paper you can make at once, so choose accordingly.
Once you have all of these materials ready, you can move on to the next step.
Step 2
In this step, you will need to prepare the plantable paper mixture. Here are the instructions:
- Take the pieces of paper you collected from Step 1 and tear them into smaller pieces. Place these torn pieces in a bucket or a bowl.
- Add water to the bowl or bucket until it covers the paper pieces. Leave them to soak for about 30 minutes. This will help soften the paper and make it easier to blend.
- After 30 minutes, transfer the soaked paper pieces into a blender or a paper-making mould. Add more water to the blender or mould if needed.
- Blend the paper pieces until you get a pulp-like consistency. You can make the paper pulp as smooth or as chunky as you like, depending on the texture you want for your seed paper.
- Once the paper pulp reaches the desired consistency, you can add some seeds to it. Choose the types of seeds you want to plant, be it vegetable or wildflowers. Add the seeds into the paper pulp and gently mix them in. Please note that some seeds might sprout more quickly than others, so you may want to choose seeds that have similar germination times.
Using a mould or your hands, shape the paper pulp into small, thin sheets. Make sure the sheets are even and not too thick, otherwise, they may take longer to dry. Leave the sheets to dry naturally or use a hairdryer to speed up the process. Once fully dry, your seed paper is ready to be used for planting in your garden or as a fun and creative activity with your kids!
Step 3
Transfer the plantable paper to a flat surface.
If you made the paper using a mould and deckle, carefully remove the deckle and leave the paper on the mould. Otherwise, gently peel the paper from the surface on which you made it and place it on a flat surface.
Take a bowl of water and slowly submerge the plantable paper in it. Soak the paper for about 5 to 10 minutes, or until it becomes fully saturated.
While the paper is soaking, take a bucket or a similar container and fill it with water. This will be used to wet the seeds later on.
After the paper has soaked, take it out of the water and place it on a clean, absorbent surface. Blot the paper gently to remove any excess water, but be careful not to tear the paper.
Decide which types of seeds you want to use for your plantable paper. You can use a mixture of flower seeds, vegetable seeds, or even wildflower seeds – it’s up to you! Take a small spoon or your fingers and scatter the seeds evenly across the surface of the wet paper.
Lightly press the seeds into the paper, making sure they stick well. The seeds need to be in contact with the wet paper to sprout, so be sure to press them down gently.
Once you have scattered and pressed the seeds onto the paper, take the bucket of water you prepared earlier and slowly pour it over the paper. You want to wet the seeds without washing them away, so pour the water slowly and evenly over the surface of the paper.
Allow the paper to dry completely. This may take a few days, depending on how much water was used and the weather conditions. Make sure the paper is fully dry before moving on to the next step.
Congratulations! You have successfully made your own seed paper. Now you can plant it in your garden or give it away as a unique and eco-friendly gift.
Please note: Though the seed paper is plantable and will produce beautiful flowers or vegetables, it is still paper and will eventually break down. The seeds will sprout and grow, but the paper itself will deteriorate over time. If you’d like to save your seed paper for future use, store it in a cool, dry place until you’re ready to plant it.
Step 4
Once your seed paper has dried, it’s time to make it into plantable seed paper! Here’s how:
- Take your dried seed paper and tear it into smaller pieces. You can make them any size you like, but smaller pieces are easier to work with.
- If you have some wildflowers or other types of seeds that you’d like to use, mix them with the torn paper pieces. You can use as many seeds as you want, depending on how much you want your paper to sprout.
- In a bowl or bucket, mix some vegetable or garden soil with water to create a wet, muddy mixture.
- Place your torn paper pieces with seeds into the muddy mixture and gently stir them around. Make sure all the pieces are well-coated with the muddy mixture.
- Using a spoon or your hands, transfer the seed-coated paper pieces onto a flat surface like a tray or a piece of parchment paper. Flatten them out and remove any excess water.
- Leave your seed paper out to dry fully. This can take anywhere from a few days to a week, depending on the weather and humidity. Make sure to place it in a warm and dry location.
- Once your seed paper is completely dry, you can cut it into any shape or size you like. You can also hole punch it and thread a string through to make plantable gift tags or ornaments.
- Now your plantable seed paper is ready! Simply find a spot in your garden where you want the seeds to grow, stick the paper into the ground, and cover it lightly with soil. Make sure to water it regularly, and soon you’ll see your wildflowers or other plants sprouting from the paper!
Please note that though this activity is a fun and creative way to make plantable seed paper at home, it may not guarantee a full sprout of all the seeds. Some seeds may not germinate, and the success of your plantable seed paper will depend on various factors like the quality of seeds used, growing conditions, and more. Experiment with different ideas and enjoy the process of making your own plantable seed paper!