Are you tired of using the same labels as everyone else? Do you want a more affordable and unique way to label your products, containers, or address envelopes? Then it’s time to learn how to make your own labels!
There’s a wide variety of materials and options to choose from when it comes to DIY label-making. Whether you like the convenience of pre-designed templates or want to create custom labels from scratch, there’s a label maker out there that will help you bring your vision to life.
One of the first things to consider when making your own labels is the material you want to use. From paper to waterproof materials and everything in between, there’s a wide range of options available. Depending on what you’re labeling, you’ll want to select a material that complements the product and is durable enough to withstand any wear and tear.
Once you’ve picked your material, you can start designing your label. There are several software programs and online tools that you can use to create and print your labels. Some label makers even offer the option to download templates that you can customize to fit your needs.
When designing your label, you can play around with colors, fonts, and graphics to make it stand out. You can also consider adding your logo or a unique image to make your labels even more personalized. The possibilities are endless!
After you’ve created your label design, it’s time to set the margins and print your labels. Most label makers will have an option to adjust the margins, so you can fit multiple labels on a single sheet. This way, you can save paper and be more efficient when printing in larger quantities.
Once your labels are printed, all that’s left to do is place them on your containers, products, or envelopes. You can either peel and stick them, or use a glue stick for a more secure hold. The choice is yours!
So, why settle for generic labels when you can make your own? Get creative and start label-making today. It’s fun, affordable, and a great way to organize and update your space!
- These DIY Labels Will Make Organizing More Affordable
- Set up and print a page of the same label
- More Great Features of the Label Maker
- Pick Your Label Material
- Paper Labels
- Waterproof Labels
- Clear Labels
- Custom Labels
- Consider The Use
- Do Something Different
- Complement The Container
- 18 Select the “Margins” update then select “Custom Margins”
- Sources
- Videos:
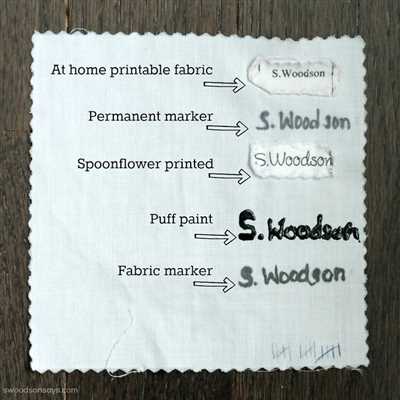
- Make your own Clothing Labels: DIY Fabric Labels
These DIY Labels Will Make Organizing More Affordable
If you’re looking to create your own labels for organizing, there are plenty of options to choose from. Labeling is a great way to keep track of items and make your space more efficient. In this article, you’ll learn about different DIY label-making methods that are affordable and easy to use.
One option is to use templates found online. There are many websites that offer free label templates that you can customize to fit your needs. Simply open the template in the program of your choice and update the text with the labels you want. Then, print the sheet onto sticky paper or a waterproof material for long-lasting labels that will withstand wear and tear.
If you prefer a more hands-on approach, you can create your own labels using basic materials. Pick up some paper, scissors, and a word processing program. Measure the containers or items that you want to label and design the labels accordingly. Then, print them out and cut them to size. You can use adhesive or tape to secure the labels onto your containers, shelves, or address books.
For those who want a professional look without the cost, consider investing in a label maker. These devices allow you to select from a range of fonts, sizes, and colors to create custom labels. Some label makers even have templates built-in, making it easier than ever to create professional-looking labels for your products or files. Simply type in the text, select the design and formatting options, and print the labels. It’s that easy!
If you’re not sure where to start, there are plenty of DIY label-making resources available online. Websites like Avery and Canva offer free label templates and design tools that you can download and use. These templates provide a starting point for creating your own labels and can be customized to fit your needs. Whether you’re looking for something fun and colorful or simple and elegant, you’re sure to find a template that suits your style.
When it comes to labeling, there’s no right or wrong way to do it. The most important thing is to find a method that works for you and helps you stay organized. Whether you prefer DIY labels or professional options, the key is to make sure your labels are clear, easy to read, and durable. With these DIY label-making methods, you can create affordable labels that complement your space and make organizing a breeze.
Set up and print a page of the same label
When it comes to labeling products or organizing your containers, creating custom labels can be a great option. Not only will it help you keep things organized, but it will also give your products a professional and personalized look. If you’re looking to make your own labels, here’s how you can set up and print a page of the same label using simple and affordable tools.
- Choose the right label maker: To create your own labels, you will need a label maker. There are many options available in the market, so pick the one that suits your needs the best. Make sure it has features like customizable templates and the ability to print on different materials such as paper or waterproof label sheets.
- Download and open label maker software: Once you have chosen your label maker, download and open the software that comes with it. This software will provide you with the necessary tools to design and print your labels.
- Select the label template: In the label maker software, select the template that is the right size for your labels. Most label makers offer a wide range of templates to choose from.
- Customize your labels: Now comes the fun part – customizing your labels! Use the tools provided by the software to add text, graphics, and colors that complement your product or container. Update the design according to your preferences.
- Set up the page and margins: Before printing, make sure to set up the page and margins in the label maker software. Adjust the margins to ensure that your labels will fit properly on the label sheet.
- Print your labels: Once you’re happy with the design and the page setup, it’s time to print your labels. Load the label sheet into your printer and hit the print button. Make sure you have enough label sheets to print as many labels as you need.
Note: It’s always a good idea to do a test print on regular paper before using your label sheets. This way, you can check if the labels are aligned correctly and make any necessary adjustments.
With these simple steps, you can easily set up and print a page of the same label using your own label maker. Whether you’re labeling products for sale or organizing your containers at home, DIY labeling is a cost-effective and efficient way to get the job done.
More Great Features of the Label Maker
When it comes to making your own labels, the possibilities are endless with the Label Maker. Not only can you create beautiful labels with ease, but this tool also offers a range of great features to make your labeling process even more efficient and tailored to your needs.
- Waterproof Labels: The Label Maker allows you to select waterproof materials for your labels. This means that you can use them on containers that may come in contact with liquids without worrying about the labels getting ruined.
- Different Label Templates: With the Label Maker, you have the flexibility to choose from a variety of label templates. Whether you need address labels, container labels, or custom labels for your products, you can easily find the perfect template to suit your needs.
- Custom Margins: The Label Maker lets you set custom margins for your labels. This feature ensures that your labels are printed with enough space around them, allowing you to achieve the desired look.
- Update and Print: Once you’ve created your labels, you can easily update and print them whenever needed. Whether you want to make changes to the text or update the design, the Label Maker makes it simple to do so.
- Affordable DIY Option: Using the Label Maker saves you money on purchasing pre-made labels. Instead, you can print as many labels as you need on affordable materials, making it a cost-effective solution for your labeling needs.
- Compatibility with Different Printers: The Label Maker is compatible with most printers, so you don’t have to worry about whether your printer will work with it. Simply pick the template, print the labels, and you’re good to go.
- Complement Your Containers: The Label Maker allows you to create labels that complement your containers perfectly. Whether you’re organizing your pantry or packing for a move, you can customize the labels to match the style and color scheme of your containers.
- Learn from Templates: The Label Maker offers a wide range of template options to help you get started. If you’re unsure about how to design your labels, you can download and use these templates as a guide to create professional-looking labels.
- Print Different Labels on the Same Sheet: The Label Maker enables you to print different labels on the same sheet. This feature is great when you have multiple labeling needs and want to save time and resources.
No matter what you need labels for, the Label Maker has the tools and features to assist you. Whether it’s for home organization, office use, or personal projects, you can rely on this versatile tool to create high-quality labels customized to your preferences.
Pick Your Label Material
When it comes to making your own labels, the first thing you need to consider is the material you want to use. The material you choose will depend on the look and feel you want for your labels, as well as the purpose they will serve. Here are some options to consider:
Paper Labels
Paper labels are the most common and affordable option. They come in various colors, sizes, and shapes, allowing you to find the perfect fit for your products. Paper labels are versatile and easy to print on using regular printers. However, note that they are not waterproof and may not hold up well in moist environments.
Waterproof Labels
If you want your labels to be more durable and resistant to water, consider using waterproof materials. These labels are perfect for products that will be exposed to moisture or outdoor elements. Waterproof labels are usually made from vinyl or polyester and can withstand conditions that regular paper labels cannot.
Clear Labels
If you want your label to look more professional and blend seamlessly with the container, consider using clear labels. These labels are transparent, allowing the product to show through. Clear labels are a great choice for labeling glass or transparent containers. They can be printed using regular printers and are available in different shapes and sizes.
Custom Labels
If you want a truly unique label design, you can create a custom label using a label maker. There are many label maker tools and software available that allow you to design your own labels from scratch. You can pick from various templates, add your own text and graphics, and even select the material to print on. With a label maker, you have full control over the look and feel of your labels.
Whatever material you choose, make sure to pick one that complements your products and the image you want to portray. Take into consideration the durability, look, and functionality of the material to ensure your labels serve their purpose effectively. And don’t forget to update and print your labels using the correct margins to avoid any issues.
Now that you know more about the different label materials available, you can select the one that will work best for your labeling needs. Whether you’re organizing your home or creating labels for your business, using the right material will ensure your labels look professional and serve their purpose effectively.
Consider The Use
When creating your own labels, it’s important to consider the use you will have for them. From organizing your products to labeling containers, you want to make sure that the labels you create will complement their intended purpose.
First, think about the type of label you want to make. There are many options available, from DIY label makers that you can download and print on your own, to custom printing services that offer a wide range of materials and designs to choose from. Consider what features are important to you, such as waterproof materials or the ability to select and print your own designs.
If you’re looking for a more affordable option, you can create your own labels using templates that are available online. These templates allow you to customize the design and text on the label, and then print them out at home. Just make sure to check the printer settings and set the margins correctly, so that your labels come out looking great.
When considering the use of your labels, also think about the different containers or products you will be labeling. Some containers may require a waterproof or durable material, while others may need labels with a specific size or shape. It’s important to choose the right materials and design to ensure that your labels will adhere properly and stay in place.
Another factor to consider is the type of information you want to include on your label. For example, if you’re using labels for packaging, you may want to include the product name, address, or a note about the contents. If you’re using labels for organizing, you may want to include categories or color-coding to help you stay organized.
One great use for custom labels is for addressing envelopes or packages. You can create a design with a full-page label sheet, then just print and stick it on the envelope or package. This is a great way to add a personalized touch to your mail and make it stand out.
Whatever the use may be, it’s important to consider the materials and design options available when creating your own labels. There are many resources and tutorials online that can help you learn more about the different label makers and printers available, as well as provide tips and ideas for creating your own unique labels.
Remember, labels can be more than just a word on a piece of paper. They can help you organize, decorate, and personalize your belongings. So take some time to consider the use, and make your labels something that you’ll be proud to display!
Do Something Different
Creating your own custom labels can give your products a unique and personalized look. Whether you’re using them to label containers, address printed materials, or even to complement the design of your webpage, custom labels can really make a statement.
One of the most affordable and versatile ways to create custom labels is by using label maker software. These programs offer a full range of features, including the ability to select different templates, colors, and materials. You can even choose waterproof paper or materials that will withstand wear and tear.
If you want to take your label design to the next level, consider using DIY label printers. These devices allow you to print your labels right at home or in your office, giving you complete control over the design and printing process. You can easily create custom labels with the exact look you’re going for.
When designing your custom labels, there are a few things to keep in mind. First, make sure to measure the dimensions of the containers or products you’ll be labeling. This will help you set the margins and ensure that your labels fit correctly.
Next, consider the color scheme and overall look you want your labels to have. You can use the same color palette as your branding or experiment with different combinations. Whatever you do, make sure the labels are easy to read and clearly convey the necessary information.
There are plenty of free templates available online that you can download and use as a starting point. These templates will help you get a feel for different label designs and give you some inspiration for your own creations.
Remember, when it comes to designing your own labels, the sky’s the limit. You can be as creative as you want and experiment with different fonts, graphics, and layouts. The goal is to create something that stands out and catches people’s attention.
So, if you’re tired of the same old labels and want to do something different, don’t be afraid to get creative and make your own unique labels. Whether you’re organizing your packing supplies, printing address labels, or just adding a personal touch to your products, custom labels will help you stand out from the crowd.
Complement The Container
If you’re a DIY enthusiast or you have products that need labels, you’re in the right place. Here, you’ll find everything you need to create your own labels. And the best part is, it’s affordable and easy to do!
First, pick a container that you want to label. It can be anything, from a water bottle to a storage box. Then, select a label template that you like and download it. There are plenty of options available, so you’ll definitely find something that suits your needs.
Once you have the template downloaded, open it in a design software or word processor. You can use popular programs like Microsoft Word or a free online label maker. Update the text on the labels to whatever you want them to say.
Now, let’s talk about the materials. You can use regular printer paper, but if you want something more durable, consider using waterproof label sheets. They’re perfect for labeling containers that may come into contact with water or other liquids.
When you’re ready to print, note that some printers have specific settings for label paper. Make sure to select the right settings to get the best results.
Once the labels are printed, it’s time to place them on your containers. Peel off the backing and carefully stick the labels onto the containers, making sure they’re applied evenly and without any air bubbles.
With your custom labels in place, your containers will look organized and professional. Plus, if you ever need to update or change the labels, it’s as easy as making a new design and printing them again.
So go ahead and give it a try! Create your own labels and take your container organization to the next level. There are plenty of resources and tutorials available to help you along the way, so don’t hesitate to seek help if needed.
Note: If you don’t have access to a printer or prefer not to print your own labels, there are also affordable label-making services that you can use. They offer a wide range of materials, colors, and features to choose from, so you can still get custom labels without the hassle of printing them yourself.
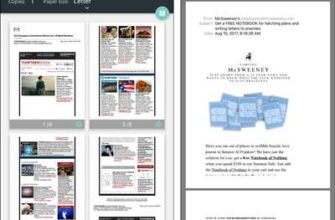
18 Select the “Margins” update then select “Custom Margins”
When it comes to making your own labels, one of the most important steps is selecting the right margins for your design. This will ensure that your labels fit properly on the sheet of paper or material you choose to use.
Here are the steps to follow:
- Open your label maker software or word processing program. There are many options available, both free and paid, so pick the one that best suits your needs.
- Look for the “Margins” or “Page Setup” feature in the program. This is where you will set the dimensions of your label sheet.
- Select the “Margins” option and then choose “Custom Margins”. This will allow you to input your own measurements.
- Here, you can enter the dimensions of your labels. Note that some label maker software or word processors may already have templates for popular label sizes, so you can choose one of those if it matches your needs.
- If you’re using a custom size, make sure to measure your labels and enter the width and height accurately. This will ensure that your labels are printed correctly.
- Once you have set the margins, you can also adjust other settings such as the color, font, and spacing of your labels. This is a great opportunity to get creative and design labels that complement your products or containers.
- If you’re printing labels on waterproof or special materials, make sure to select the appropriate material option in the settings. This will help ensure that your labels are durable and won’t smudge or fade over time.
- Consider downloading and using label templates from reliable sources online. These templates can help you save time and make the label creation process easier.
- After you have customized all the settings to your liking, you’re ready to print your labels. Make sure you have enough sheets of label paper or material before you start.
- If you have a printer that can print on both sides of the paper, consider printing on the back of the labels as well. This can provide additional space for instructions or more branding.
- Before printing a full sheet of labels, it’s a good idea to do a test print on a regular sheet of paper. This will allow you to check if everything looks as expected and make any necessary adjustments before using up your label paper.
- If you’re using a DIY label maker, be sure to follow the instructions provided by the manufacturer. They may have specific guidelines or features that are unique to their products.
By following these steps and customizing your labels, you’ll be able to create unique and professional-looking labels for all your organizational and labeling needs. Whether you’re using them for packaging, containers, or anything else, a well-designed label can make a great impression on your customers or recipients.
Sources
When it comes to making your own labels, there are several printed materials you can use to create custom labels for your containers. Here are some options:
1. DIY: If you’re looking for a more affordable option, you can try making your own labels using materials like paper, word processors, and printers. There are various templates available online that you can download and customize to create your labels. Just make sure that the paper you’re using is suitable for printing, and your printer is capable of producing high-quality labels.
2. Label makers: Label makers are a great option if you want ready-to-use labels without having to design them yourself. These devices allow you to select from a range of pre-designed templates and print them onto adhesive sheets or directly onto your containers. They’re easy to use and offer various features like waterproof labels, different material options, and the ability to print in full color. You can find label makers at most office supply stores or online retailers.
3. Custom label printing services: If you’re looking for something more professional, you can also use custom label printing services. These services will help you design and print high-quality labels that will complement your packaging perfectly. Just give them your design or specifications, and they will take care of the rest. This is a great option for those who don’t have the time or resources to create labels on their own.
Whatever method you choose, make sure to take note of the size and shape of your containers, as well as the material you want to use for your labels. Also, consider the color scheme and design of your labels to ensure they stand out and attract attention. Good luck with your labeling endeavors!