

If you’re an Android or iOS user, and you want to add a personal touch to your emails, creating a detailed and professional signature is a great way to do it. Not only does it give your emails a more polished look, but it also saves you the trouble of manually typing out your contact information every time you send an email. In this tutorial, we’ll show you how to create a signature in Gmail on both your mobile device and your desktop.
First, let’s go over how to add a signature on the Gmail mobile app. Open your Gmail inbox and tap on the hamburger menu icon located on the left side of your screen. Scroll down and tap on “Settings”, then select the email account that you want to add a signature to. Scroll down once again, and under the “Signature” section, enter the details you want to include in your signature. You can type out your name, title, phone number, email address, or any other information you find useful for your recipients to have. Once you’re done, tap on the save button to confirm your changes.
If you’re using Gmail on your desktop, the process of creating a signature is just as simple. Open your Gmail inbox, click on the gear icon located in the top right corner of your screen, and select “Settings” from the drop-down menu. Scroll down until you find the “Signature” section, and type out your signature in the text box provided. You can include the same information as mentioned before, or you can create a more clean and concise signature for a more professional look. Once you’re satisfied with your signature, scroll down to the bottom of the page and click on the “Save Changes” button.
What’s good about Gmail is that it allows you to have different signatures for each email account you have connected to your Gmail client, whether you’re using it on your mobile device or your desktop. You can also choose to manually insert your signature when composing emails, or have it automatically added to all outgoing emails. To do this, simply toggle the “Insert this signature before quoted text in replies and remove the “–” line that precedes it” option. This way, your signature will show up at the bottom of all your emails, making them look more professional and organized.
- How to create a professional email signature in Gmail
- What Is an Email Signature for Gmail
- Is your Gmail signature not showing on mobile
- How to add a signature to Gmail on Android
- How to add a signature to Gmail on iPhone
- Gmail signature desktop tutorial 💻
- Step 1: Open Gmail settings
- Step 2: Go to the “Signature” section
- Step 3: Create your signature
- Step 4: Save your changes
- Frequently Asked Questions (FAQs)
- Simple
- Detailed “How to Create a Signature in Gmail”
- For Desktop Users:
- For Mobile Users (Android/iPhone):
- Frequently Asked Questions
- Video:
- How to Create a PROFESSIONAL GMAIL EMAIL SIGNATURE In Only 3 MINUTES 2022/2023 (Working)
How to create a professional email signature in Gmail
Having a clean and professional email signature is key when it comes to presenting yourself and your business. Luckily, Gmail offers many features that make it simple to create a professional signature that will show up at the bottom of every email you send.
Here’s a step-by-step tutorial on how to create a professional email signature in Gmail:
Step 1: Open your Gmail inbox and click on the gear icon in the top-right corner. Then, select “Settings” from the dropdown menu.
Step 2: In the settings menu, scroll down until you find the section titled “Signature”. Here, you can add, edit, or delete your signature. Click on the radio button next to “No signature” to add a new signature.
Step 3: In the signature editor, you have the option to manually type your signature or use the formatting tools to customize it. You can also add links, images, or even your company logo.
Step 4: Once you’ve created your signature, click “Save Changes” at the bottom of the page. Your signature will now be automatically added to all outgoing emails.
Now, let’s address some of the most frequently asked questions about email signatures in Gmail:
Q: Can I have different signatures for desktop and mobile?
A: Yes, you can create separate signatures for different devices. In the settings menu, click on the “General” tab and scroll down to the “Signature” section. Click on the “Create new” button to add a new signature specifically for mobile devices.
Q: What if I want to manually add my signature to some emails but not others?
A: Gmail allows you to manually add or remove your signature for individual emails. When composing a new message, you’ll see a “Signature” button at the bottom of the compose window. Click on it to toggle your signature on or off.
Q: Is there a way to have a more detailed signature?
A: Yes, you can use the formatting tools in Gmail’s signature editor to create a more detailed and customized signature. You can add different font styles, colors, and even insert tables or bullet points.
Q: How do I add my signature to emails I forward or reply to?
A: By default, Gmail will automatically add your signature to emails you forward or reply to. However, if you don’t want your signature to appear in those emails, you can manually remove it by deleting the signature from the compose window before sending.
Remember, a good email signature is not only useful for showing your contact information but also for promoting your business. Make sure to keep it clean, professional, and up to date. Now, go ahead and create your perfect email signature in Gmail!
What Is an Email Signature for Gmail
An email signature is a text that is automatically added to the end of an email message. It usually contains the sender’s name, contact information, and any other relevant details. In Gmail, this signature appears at the bottom of every email you send from your inbox.
The email signature is a detailed and useful feature that can help you create a professional and personalized touch to your emails. Instead of manually typing your contact information every time, you can set up a signature in the Gmail settings to automatically add it to each email. This not only saves time but also ensures consistency in your emails, especially if you’re using Gmail on multiple devices.
Whether you’re using Gmail on a desktop or a mobile device like an iPhone or Android, the process of creating an email signature is simple. In the desktop version of Gmail, you can go to the settings and scroll down to the “Signature” section. Here, you can type or copy-paste your signature and make any changes you need. Gmail also allows you to add formatting and some more advanced features to your signature, like adding images or links.
On mobile devices, open the Gmail app and go to the settings. Scroll down and open the “Signature” section, and then type in your signature. The mobile version of Gmail may have some limitations compared to the desktop version, but you can still create a clean and professional signature.
For business purposes, having an email signature is essential. It provides a professional touch to your emails and also gives the recipient a quick and convenient way to contact you. In some cases, clients or customers may even ask you for your signature, so it’s important to have one ready to include in your emails.
What’s more, in a frequently asked questions or tutorial-type email, you can use your signature to show your expertise and provide a way for readers to ask any further questions they may have.
In conclusion, an email signature is a great feature offered by Gmail that allows you to add a professional touch to your emails. It’s easy to set up and can be used on both desktop and mobile devices. Whether you’re using Gmail for personal or business purposes, having a signature is not only good etiquette but also a handy tool to enhance your email communication.
Is your Gmail signature not showing on mobile
If you’re having trouble with your Gmail signature not showing on mobile devices, you’re not alone. Many Gmail users have come across this issue and have questions on how to fix it. Don’t worry, we’re here to help!
First, let’s make sure you have a signature set up in the first place. To create a signature in Gmail, open your settings and scroll down to the “Signature” section. Here, you can add a simple text signature or use the formatting options to create a more detailed and professional signature. You can also use HTML to add logos or links.
Now, if your Gmail signature is showing on your desktop but not on your mobile device, there are a few things you can try.
- Check your settings: Make sure that the signature option is enabled in your Gmail settings. You can do this by going to the settings menu and scrolling down to the “Signature” section. Ensure that the toggle switch is turned on.
- Save changes: After making any changes to your signature, make sure to click on the “Save Changes” button at the bottom of the settings page. This will save your signature and apply it to all your outgoing emails.
- Manually add the signature: Sometimes, Gmail may not automatically add your signature to all emails. In such cases, you can manually add your signature by clicking on the three dots (…) at the bottom of the compose window and selecting “Insert signature”.
- Check your mobile device settings: If you’re using the Gmail app on your mobile device, go to the app settings and ensure that the signature option is enabled. If you’re using the default email client on your device, check the settings there.
- What’s your email client: If you’re using an email client other than Gmail on your mobile device, the steps to add a signature may be different. Check the settings or help section of your specific email client for more information.
If you’ve tried all these steps and your Gmail signature is still not showing on mobile, it may be worth asking some more detailed questions to get to the bottom of the issue. What device and operating system are you using? Are you experiencing this issue with all your emails or only some? Have you made any changes to your Gmail settings or mobile device recently?
Remember, having a professional and clean signature is important for business emails. It not only shows that you’re a professional, but it also provides useful information to your recipients. So, if your Gmail signature is not showing on mobile, don’t hesitate to troubleshoot and find a solution that works for you.
How to add a signature to Gmail on Android
If you’re a business professional or use Gmail for most of your email correspondence, adding a signature can be a useful feature. Not only does it give your emails a clean and professional look, but it also saves you the trouble of manually typing your signature over and over again. In this simple tutorial, we’ll show you how to add a signature to Gmail on your Android device.
Step 1: Open the Gmail app
Scroll through your mobile device’s home screen or app drawer to find the Gmail app icon. Tap on it to open the app.
Step 2: Access the settings
Once you’re in the Gmail app, click on the three horizontal lines icon on the top left corner of the screen. This will open the sidebar menu.
Step 3: Go to the Settings
In the sidebar menu, scroll down until you see “Settings” and tap on it. This will open the Gmail settings page.
Step 4: Create a new signature
In the settings page, scroll down until you see the “Signature” section. Tap on it to create a new signature.
Step 5: Customize your signature
In the signature editor, type in your desired signature. You can also add formatting to make it more visually appealing. Once you’re done, tap on the “Save” button to save your changes.
Step 6: Test your signature
To check if your signature is working correctly, compose a new email and your signature should automatically appear at the end of your message.
Congratulations! You have now successfully added a signature to your Gmail on Android. Now, every time you send an email, your signature will automatically show up, giving your emails a professional touch.
If you have any questions or need a more detailed tutorial, feel free to ask your client or check the Gmail Help Center for more information.
How to add a signature to Gmail on iPhone
If you frequently use Gmail for business emails on your iPhone, it’s important to have a professional signature to add a personal touch to your messages. Adding a signature to your Gmail emails on iPhone is a simple process that can be done directly through the Gmail app.
To add a signature to Gmail on iPhone, follow these simple steps:
- Open the Gmail app on your iPhone. If you don’t have it installed, you can download it from the App Store.
- In the top left corner of the screen, tap the three horizontal lines to open the menu.
- Scroll down and tap on “Settings”.
- In the Settings menu, scroll down and tap on the email account you want to add a signature to.
- In the email account settings, scroll down and tap on “Signature”.
- On the Signature screen, type in your desired signature. You can use plain text or format it with different fonts and colors.
- Once you’ve created your signature, tap on the back arrow in the top left corner to save your changes.
Now, whenever you compose a new email on your iPhone, your signature will be automatically added to the bottom of the email. You can also manually edit or remove the signature for individual emails if needed.
It’s important to note that the process of adding a signature to Gmail on Android is very similar to the iPhone tutorial, so you can follow the same steps to add a signature on your Android device as well.
Adding a professional signature to your Gmail emails on iPhone is a useful feature that not only shows you are a detailed and organized business professional, but also saves you time by automatically adding your signature to every email you send. With a clean and good-looking signature, you can leave a professional impression on your clients and help establish credibility.
If you have more questions on how to add or create signatures in Gmail on your mobile device or desktop, Gmail also provides a tutorial on their website that gives a more in-depth explanation of the process and what you can use signatures for.
Gmail signature desktop tutorial 💻
If you’re wondering how to add a signature to your Gmail emails on a desktop device, this tutorial will show you a detailed step-by-step process. Creating a professional and good-looking signature can leave a lasting impression on your recipients. Moreover, it’s also useful for business purposes as it showcases your contact information and personal brand. So, let’s see how you can set up your signature in Gmail on your desktop version.
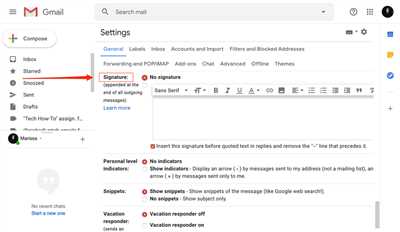
Step 1: Open Gmail settings
In your Gmail inbox, click on the gear icon, located in the top right corner of the screen. From the dropdown menu, select “Settings”.
Step 2: Go to the “Signature” section
Once you’re in the Settings menu, scroll down until you find the “Signature” section. It is located on the left side of the screen, below the “General” settings.
Step 3: Create your signature
In the “Signature” section, you’ll see a text box where you can type in your desired signature. Here, you can manually type your signature or make changes to the existing one. You can also add formatting, links, or even images to make your signature more appealing.
Step 4: Save your changes
After you’ve finished creating your signature, scroll down to the bottom of the page and click on the “Save Changes” button. Keep in mind that changes might not be visible immediately, so it’s a good idea to open a new email to see how your signature looks.
What’s great is that the signature you create here will show up not only on your desktop device but also on your mobile devices, such as Android or iPhone. So, you don’t need to create separate signatures for each device.
Frequently Asked Questions (FAQs)
1. Can I have multiple signatures in Gmail?
Yes, you can create multiple signatures in Gmail and choose which one to use for each email.
2. Can I show my signature only for new emails in Gmail?
Yes, there’s an option in the settings to show your signature only for new emails, leaving the replies and forwards clean.
3. Is creating a signature in Gmail only useful for business purposes?
No, even if you’re not using Gmail for business, having a professional signature can add a touch of completeness to your emails.
Now you know how to create a signature in Gmail on your desktop version. Follow these steps to add a professional touch to your email client. Start using this feature and make your emails stand out!
Simple
Creating a signature in Gmail is a simple task that can add a professional touch to your emails. Whether you use Gmail on your desktop or mobile device, adding a signature is a good way to save time by automatically showing your contact information at the end of each email.
If you’re using Gmail on a desktop client or on the web, you can manually add a signature by following these steps:
- Open your Gmail inbox.
- Click on the gear icon in the top right corner.
- In the dropdown menu, select “Settings”.
- Scroll down to the “Signature” section.
- Type in your desired signature.
- Make any changes to the text style or formatting if needed.
- Click “Save Changes” to apply your new signature.
On a mobile device, the process is also simple. Here’s how to add a signature on an Android or iPhone:
- Open the Gmail app on your mobile device.
- Tap on the three-line menu icon in the top left corner.
- Scroll down and select “Settings”.
- Select the email account you want to add a signature for.
- Scroll down to the “Signature” section.
- Type in your desired signature.
- Make any changes to the text style or formatting if needed.
- Tap “Save” to apply your new signature.
Having a signature is not only useful for business purposes, but it can also add a personal touch to your emails. It can include your name, job title, phone number, website, or any other information you want to include to make it more detailed.
Remember, a good signature is clean and professional, so it’s important to keep it simple and not overload it with too many features or changes. By following this simple tutorial, you can create a signature in Gmail that will show up automatically every time you compose a new email.
If you have any questions or need more detailed instructions, there is a frequently asked questions section on Gmail’s official website that can provide you with further information on how to create and use signatures.
Detailed “How to Create a Signature in Gmail”
Have you ever wondered how to add a signature to your Gmail email? Signatures are a useful way to save time by automatically showing important information about yourself or your business at the end of every message you send. In this tutorial, we will show you how to create a detailed signature in Gmail, both on your desktop and mobile device.
Adding a signature to your Gmail account is simple and can be done in just a few steps. Follow the instructions below to create a professional and personalized signature that will make your emails stand out:
For Desktop Users:
1. Open your Gmail inbox and click on the “Settings” gear icon on the top right corner of the page.
2. From the dropdown menu, select “See all settings”.
3. Scroll down to the “Signature” section.
4. In the text box provided, type in your desired signature. You can include your name, job title, contact information, and any other details you find relevant.
5. Use the formatting tools to customize the appearance of your signature. You can change the font, size, color, and add links if needed.
6. Once you’re satisfied with your signature, scroll down and click on the “Save Changes” button at the bottom of the page.
7. Your signature is now added to your Gmail account and will be automatically appended to the end of every email you send.
For Mobile Users (Android/iPhone):
1. Open the Gmail app on your mobile device.
2. Tap the three horizontal lines in the top left corner to open the menu.
3. Scroll down and tap “Settings”.
4. Select your email account if you have multiple accounts linked.
5. Tap on “Signature settings”.
6. Type in your desired signature in the text box. You can include the same details as mentioned earlier.
7. Once you’re done, tap on the back arrow to save your changes.
8. Your signature is now set and will automatically appear at the end of your emails.
By following these simple steps, you can create a detailed signature in Gmail, both on your desktop and mobile devices. Having a professional and informative signature is crucial for business or personal emails, as it adds a touch of credibility and makes it easier for recipients to contact you or find more information about you.
What’s more, Gmail also allows you to create different signatures for different email addresses, making it even more versatile and user-friendly. So go ahead and make the most out of this feature to enhance your email communication!
If you have any questions regarding signatures or any other Gmail features, feel free to ask. We’re here to help you get the most out of your Gmail experience.
Frequently Asked Questions
Here are some frequently asked questions about creating and using signatures in Gmail:
- What is a signature in Gmail?
- How do I add a signature to my emails?
- Can I create multiple signatures for different purposes?
- Is it possible to have a different signature on my mobile device than on my desktop?
- Are there any useful features or settings for signatures?
- Can I manually type my signature, or do I have to use the signature editor?
- How can I make my signature look more professional?
- What changes can I make to my signature settings?
- Is there a tutorial on how to create a signature in Gmail?
- What’s the difference between having a signature and not having one?
- Are signatures visible on both the sender’s and recipient’s inbox?
- Can I save multiple signatures and choose which one to use for each email?
- Are there any limitations on the type of content that can be included in a signature?
These are just some of the most frequently asked questions about signatures in Gmail. For more detailed information and step-by-step instructions, please scroll through our tutorial section.