

If you’re tired of the plain look of your laptop and want to add a personal touch, laptop stickers are a great way to go. With a wide variety of designs and sizes available, you can easily find the perfect sticker to enhance your laptop’s appearance. Creating your own laptop stickers is not only fun but also allows you to showcase your originality and creativity.
The first step in creating laptop stickers is to select the design or image you want to use. You can choose from a wide range of pre-made designs or create your own using graphic design software. Make sure the file or image you choose has a high resolution, as it will affect the quality of the final sticker.
After selecting the design, the next step is to choose the size and dimensions of your sticker. Laptop stickers come in various sizes, so pick one that will fit perfectly on the desired area of your laptop. It’s always a good idea to measure the laptop’s surface area to ensure a perfect fit.
Once you’ve set up the size and dimensions, it’s time to print the sticker. You can either use your own printer or opt for professional printing services. If you decide to print them yourself, make sure to use high-quality vinyl or paper material that will withstand everyday wear and tear without getting scratched or faded.
After printing the stickers, it’s crucial to carefully remove them from the sheets and apply them to your laptop. Clean the laptop’s surface first to ensure proper adhesion. Align the sticker on the desired area and press firmly to avoid any bubbles or creases. Always take your time during this step to ensure a smooth application.
Lastly, after you’ve applied the sticker, remember to keep your laptop clean and dry. Avoid scrubbing the area where the sticker is placed and don’t use harsh chemicals during the cleaning process. Taking care of your laptop and sticker will help them last longer.
In conclusion, creating laptop stickers is an easy and enjoyable process that allows you to give your laptop a personalized touch. With the help of helpful tips and tutorials, you can design and make your own unique stickers. Whether you’re using them for personal or business purposes, laptop stickers are a great way to show off your creativity and add a pop of color to your everyday life.
Custom Laptop Stickers
Designing custom laptop stickers is always a fun and creative way to add personalization to your laptop. Whether you want to showcase your favorite image, promote your business, or simply express your individuality, laptop stickers are a great way to do so.
Before you start creating your laptop stickers, there are a few things you need to consider. First, you’ll want to determine the dimensions and size of your sticker. You can find these dimensions by measuring the area you want to cover on your laptop. Keep in mind that laptops come in different sizes, so make sure to choose the right size for yours.
Once you have the dimensions, you can then move on to the design process. There are many design software options available, such as Adobe Illustrator or Photoshop, that you can use to create your custom laptop sticker. If you prefer a more traditional approach, you can also start by sketching your design on paper.
After you have created your design, you can then move on to selecting the material for your laptop sticker. Vinyl is a common choice for laptop stickers because it is durable and easy to remove without leaving any residue on your laptop. You can find vinyl sheets in various colors and finishes, so choose the one that best matches your design.
Once you have your design and materials ready, it’s time to print your laptop stickers. If you have access to a printer, you can print them yourself. Make sure to set up your printer correctly and use high-quality settings for the best results. If you don’t have a printer, you can also use online services like Redbubble, where you can upload your design and have your laptop stickers printed and shipped to you.
When printing your laptop stickers, you’ll want to make sure they are properly aligned. You can do this by creating a line or a guide on your design software and adjusting the position of your stickers accordingly. This will help ensure that your stickers look professional and well-placed on your laptop.
After printing, it’s important to let your laptop stickers dry for a few days to avoid smudging or scratching. Once they are dry, you can carefully remove them from the vinyl sheet and apply them to your laptop. Start by cleaning the surface of your laptop to remove any dust or dirt, then carefully place the sticker on the desired area. Use a card or a similar object to smooth out any air bubbles or wrinkles.
One last tip to keep in mind is that laptop stickers are a great way to express yourself, but make sure not to go overboard. Choose designs that best represent you or your business and avoid cluttering your laptop with too many stickers. Remember, less is more!
So now that you have all the information and helpful tips, start designing and creating your own custom laptop stickers. Have fun and enjoy the process of making something unique that reflects your personal style!
Helpful Tips for Laptop Stickers
If you’re in the business of creating laptop stickers, you probably already know the benefits of having an original design. But there are a few tips and tricks that can help make the process easier and ensure that your stickers are the best they can be.
1. Start with a sketch: Before you dive into creating your laptop sticker, take some time to sketch out your design. This will help you visualize what the final product will look like and make any necessary adjustments before you start working on the computer.
2. Select the right dimensions: Laptop stickers come in various sizes, so it’s important to select the right dimensions for your design. Consider the area of the laptop where the sticker will be placed and make sure the dimensions are appropriate for that space.
3. Use high-quality material: When it comes to laptop stickers, durability is key. Use a strong vinyl material that can withstand the wear and tear of daily use. This will ensure that your stickers last as long as possible without getting scratched or peeled off.
4. Keep it simple: While it can be tempting to create complex designs with intricate details, it’s best to keep your laptop sticker design simple. This will make it easier to print and ensure that the design stands out when applied to the laptop.
5. Make use of tutorials: If you’re new to creating laptop stickers, take advantage of the many tutorials available online. They can provide step-by-step instructions on how to create your own custom stickers using different software and tools like Wacom tablets.
6. Find the right printing setup: Once your design is ready, you’ll need to find a reliable printer to bring it to life. Look for a printer that specializes in custom stickers and can provide high-quality prints with vibrant colors.
7. Don’t forget about the background: When designing your laptop sticker, consider the color of the laptop itself. A sticker with a transparent background will look better on laptops of different colors, while a sticker with a solid background may look out of place on certain laptops.
8. Remove air bubbles: After applying your laptop sticker, use a small object like a credit card to smooth out any air bubbles. This will help the sticker adhere better and prevent it from peeling off over time.
9. Save your design files: Always make sure to save your design files, even after your laptop sticker has been printed. This way, you can easily make adjustments or create additional stickers in the future without starting from scratch.
Remember, these tips are just a starting point. The most important thing is to have fun and let your creativity shine through your laptop stickers!
What material is best
When it comes to creating laptop stickers, selecting the right material is essential. There are many options available, but the best material for laptop stickers is vinyl. Vinyl stickers have numerous benefits and are often the preferred choice for laptop sticker creation.
Vinyl stickers are made of a strong and durable material that can withstand everyday use. They are resistant to scratches and wear, ensuring that your laptop stickers will last a long time. Vinyl stickers also have a strong adhesive backing that allows them to stick well to the laptop surface without peeling off easily.
Another advantage of using vinyl material is that it is easy to work with. You can easily print your designs on vinyl sheets and cut them into the desired shape and size for your laptop stickers. Vinyl sheets are also available in a variety of colors, allowing you to create vibrant and eye-catching laptop stickers.
When designing your laptop stickers, it’s important to consider the size and dimensions of the stickers. The size of your stickers will depend on the area you want to cover on your laptop. It’s always helpful to create sketches or line drawings of your design to decide what dimensions would work best.
Once you have decided on the dimensions, you can start designing your laptop stickers. You can use design software like Adobe Photoshop or Illustrator to create your artwork, or you can use free online tools and tutorials. If you’re comfortable with drawing by hand, you can also use a Wacom tablet or other drawing tablet to create your designs.
After you have created your design files, you can then print them onto the vinyl sheets using a printer. Make sure to select the best quality and color settings for your printer to ensure that your laptop stickers come out looking vibrant and true to your original design.
When it comes to applying the stickers to your laptop, make sure to clean the surface well beforehand. Remove any dust or debris to ensure a smooth application. You can use a window cleaner or rubbing alcohol to clean the surface.
Peel off the backing of the vinyl sticker and carefully place it on your laptop, starting from one edge and smoothing it out as you go. If you make a mistake or need to reposition the sticker, vinyl stickers are easy to remove and reapply without leaving any residue behind.
In conclusion, when creating laptop stickers, vinyl is the best material to use. It offers durability, easy application, and a wide range of colors and sizes to choose from. Whether you’re a business looking to promote your brand or an individual wanting to personalize your laptop, vinyl laptop stickers will always be a great choice.
What size is best
When it comes to creating laptop stickers, finding the right size for your design is crucial. You want to make sure that your sticker fits well on the laptop without overpowering the entire area. Here are some tips to help you determine the best size for your laptop stickers:
1. Measure your laptop: Start by measuring the area where you intend to place the sticker. Take note of the dimensions and consider the shape of the laptop. This will give you an idea of how much space you have available for your design.
2. Look through available options: Many online platforms offer laptop stickers in various sizes and shapes. From round to rectangular, and everything in between. Take some time to browse through these options to get an idea of what would work best for your laptop.
3. Consider material and durability: If you prefer a more custom design, you can always create your own laptop sticker using vinyl sheets. Vinyl stickers are durable and can withstand scratches; they are easy to remove as well. Keep in mind that designing and printing custom stickers may take a bit more time and effort.
4. Check online tutorials: If you’re unsure about what size to choose, there are many tutorials available online that can guide you through the process. These tutorials often provide helpful tips and tricks to ensure your laptop sticker looks great.
5. Benefits of using laptop stickers: Laptop stickers not only add a personalized touch to your laptop but also promote your business or interests. They can be a great conversation starter and make your laptop stand out from the crowd.
After you’ve decided on the dimensions, make sure to save your design files properly. Keep backups of your sketches and shading, as well as the final image file. This will come in handy if you ever decide to get more laptop stickers printed in the future.
Overall, the best size for your laptop sticker will depend on your personal preference and the available area on your laptop. Just remember to select a size that is not too small, as it may be difficult to see from a distance. On the other hand, a size that is too large could overpower the laptop’s design or obstruct the view through the window.
Keep these tips in mind as you get started on designing your laptop sticker, and don’t be afraid to get creative!
Are these easy to remove
When it comes to laptop stickers, one of the most common concerns is whether they are easy to remove. Well, the good news is that laptop stickers are designed to be removable without leaving any residue or damaging the original surface of your laptop.
Most laptop stickers are made of high-quality vinyl material, which is strong enough to withstand everyday use and prevent scratches. This means that you can stick them on your laptop and keep them there for as long as you want, without worrying about them peeling off or getting damaged.
If you ever decide to remove the laptop stickers, you can simply peel them off gently without causing any harm. You can start by lifting a corner of the sticker and slowly peeling it back. It’s always best to remove laptop stickers slowly and carefully to ensure that you don’t damage the surface underneath.
One helpful tip is to use a hairdryer to warm up the laptop sticker if it’s having trouble coming off. The heat will make the adhesive less sticky, making it easier to remove. Just be careful not to overheat the laptop or apply too much heat in one area.
Another option is to use a sticker removal solution, which you can find at most office supply stores or online. These solutions are specifically designed to dissolve adhesive materials and make sticker removal easier. Simply follow the instructions on the product for the best results.
Overall, laptop stickers are designed to be easy to remove without causing any damage to your laptop. So, whether you’re using them for personal or business purposes, you can enjoy the benefits of custom laptop stickers without any worries. Just make sure to select the right size and design, and follow the proper techniques for sticker application and removal. With these tips, your laptop stickers will last a long time and keep your laptop looking stylish.
Will these get scratched up
One of the concerns when it comes to laptop stickers is whether they will get scratched up over time. This is a valid question to ask, especially if you’ve put in the effort to design and create custom stickers yourself. The good news is that there are tips and tricks you can follow to make sure your laptop stickers stay looking their best.
First, let’s talk about the materials. There are different types of materials available for laptop stickers, such as paper and vinyl sheets. Paper stickers are the easiest to create as you can simply print your designs on them. However, they may not be the most durable and are more likely to get scratched. Vinyl stickers, on the other hand, are more durable and can withstand wear and tear better.
When designing your laptop stickers, always keep in mind the size and shape of the area where you want to place them. It’s best to measure the dimensions of your laptop and select stickers that will fit well. You can also find many tutorials online on how to create laptop stickers for specific laptop models.
If you’re creating your own designs from scratch, it’s helpful to start with sketches and then use digital tools like Wacom tablets to bring your ideas to life. You can save your designs as image files with a transparent background, which will allow you to easily remove the background when you’re ready to print.
Now, let’s talk about printing. It’s recommended to use a high-quality printer to ensure that your laptop stickers come out clear and vibrant. If you don’t have a printer at home, you can always find online printing services that offer custom sticker printing.
After you’ve printed your stickers, you may want to give them some time to dry and set-up. This will help the ink adhere better to the material and make the stickers last longer. It’s also a good idea to cover your laptop with a clear vinyl sheet to protect the stickers from scratches and other damage.
Finally, always remember to clean your laptop surface before applying the stickers. Remove any dust or dirt that may be present, as this can affect how well the stickers stick to the laptop.
In summary, laptop stickers can get scratched up over time, especially if they’re made from less durable materials. However, by using high-quality materials and following some best practices in designing and applying the stickers, you can minimize the risk of scratches and keep your laptop looking great for years to come.
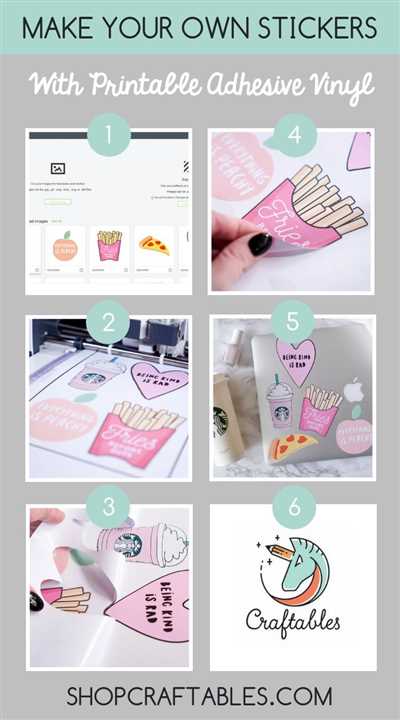
Sticker Tutorial: How to Make Custom Laptop Stickers
If you’re looking to add a personal touch to your laptop, custom laptop stickers are a great way to do so. With websites like Redbubble, you can easily make your own stickers and have them printed in various sizes. In this tutorial, we’ll walk you through the process of creating custom laptop stickers.
| Step 1: Sketch Your Design | Start by sketching out your design ideas on paper or using a Wacom tablet. This will help you visualize what your sticker will look like. |
| Step 2: Set Up the Design Area | Using design software like Adobe Illustrator, create a new document with the dimensions of the laptop sticker you want to make. Keep in mind the size of your laptop’s front cover or the area where you want to place the sticker. |
| Step 3: Create Your Sticker Design | Using the various tools available in the design software, start creating your sticker design. Play around with shapes, colors, shading, and line styles to make your sticker unique and eye-catching. |
| Step 4: Remove the Background | To make your sticker look more professional, remove the background from your design. This will allow the laptop color or any other background to show through the sticker. |
| Step 5: Save Your Design | Save your sticker design in a file format that is compatible with printing services, such as PNG or JPEG. This will ensure that your design looks its best when printed on vinyl. |
| Step 6: Select the Size and Material | When uploading your design to a website like Redbubble, you will be prompted to select the size and material for your laptop sticker. Choose the size that fits your laptop best and consider the benefits of vinyl material, which is durable, easy to apply, and resistant to scratches. |
| Step 7: Upload Your Files | Once you’ve selected the size and material, upload your sticker design files to the website. Depending on the website, you may need to choose any additional preferences, such as the finish or border color. |
| Step 8: Preview and Order | Before placing your order, make sure to preview how your laptop sticker will look. Adjust any settings if necessary and then proceed to order. Be aware that custom stickers may take a few days to produce and ship. |
| Step 9: Apply Your Sticker | Once your laptop sticker arrives, carefully peel off the backing and apply it to your laptop’s front cover or any other desired surface. Smooth out any air bubbles or wrinkles to ensure a strong adhesive. |
| Step 10: Enjoy Your Custom Laptop Sticker | Now that your custom laptop sticker is applied, enjoy the original touch it adds to your laptop. Your laptop will stand out and showcase your unique style and personality. |
Creating custom laptop stickers is an easy and fun way to personalize your laptop. With the right tools and a bit of creativity, you can make stickers that are truly one-of-a-kind. Follow this tutorial and let your imagination run wild!
Tips:
- Always keep the dimensions of your laptop in mind when designing your laptop stickers.
- If you’re not confident in your drawing skills, you can find many helpful tutorials and resources online.
- Get inspiration from other laptop stickers and designs, but make sure your design is original.
- Don’t limit yourself to just one design – create multiple stickers to switch them up from time to time.
- Save your sticker design files even after you’ve ordered them. You never know when you might want to make more stickers or modify the existing ones.
- Take care of your laptop stickers as they can last for a long time if properly maintained.
- Have fun and let your creativity shine!
The benefits of laptop stickers
Designing your laptop with stickers has become a popular trend in recent years. Laptop stickers are small adhesive decals that can be easily applied and removed from the surface of your laptop. They come in a variety of shapes, sizes, and designs, allowing you to select the ones that best fit your style and personality.
One of the main benefits of laptop stickers is that they give you the opportunity to make your laptop stand out from the crowd. With so many laptops available on the market, it’s easy for yours to get lost in the sea of identical machines. By adding custom stickers, you can give your laptop a unique and personal touch that reflects who you are.
Another benefit of laptop stickers is that they can help protect your laptop from scratches and damage. The adhesive material used to make laptop stickers is strong and durable, providing an additional layer of protection for your laptop’s surface. This is especially helpful if you often carry your laptop around with you or use it in crowded places where it’s more likely to get bumped or scratched.
Not only do laptop stickers protect your laptop, but they can also help you keep track of it. If you have a laptop that looks like everyone else’s, it can be easy to misplace or confuse it with someone else’s. By adding unique stickers to your laptop, you can easily spot it in a crowded room or identify it if it’s ever lost or stolen.
Additionally, laptop stickers are an easy and affordable way to update the look of your laptop without having to buy a whole new one. If you’re bored with the appearance of your laptop, simply remove the old stickers and replace them with new ones. This can give your laptop a fresh new look without the cost or hassle of buying a brand new device.
Finally, laptop stickers are a fun way to express your interests and hobbies. Whether you’re a fan of a particular TV show, band, or sports team, you can find laptop stickers that showcase your passion. This allows you to share your interests with others and strike up conversations with like-minded individuals.
In conclusion, laptop stickers offer a range of benefits, from personalizing your laptop to protecting it from scratches and making it easier to identify. They are easy to apply and remove, allowing you to update the look of your laptop whenever you want. So why not start designing your own laptop stickers and give your laptop a unique and personalized look?


