If you’re wondering what MS Forms are and how to create them, you’ve come to the right place. MS Forms are a powerful tool that allows you to create custom surveys, quizzes, and polls with ease. Whether you’re a student, a teacher, or an office professional, MS Forms can be used to collect responses, gather feedback, or even conduct evaluations.
One of the best things about MS Forms is that they offer a wide range of advanced features and customization options. You can choose from a variety of form types, such as surveys or quizzes, and customize the color, font style (italic or underline), and even add images to make your form visually appealing.
To get started, all you need to do is sign in with your Microsoft account and open MS Forms. From there, you can create a new form or choose from a template. You can also delete or preview forms, and all your forms will be automatically saved in your Microsoft account, so you don’t have to worry about losing your work.
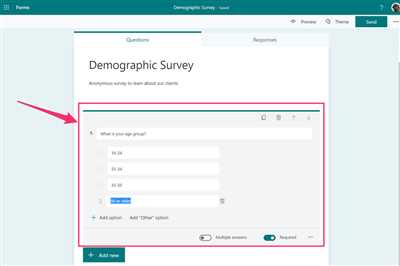
When creating a form, you can add various types of questions, such as multiple-choice, ranking, or open-ended questions. You can also set restrictions, such as requiring answers to be a certain number of characters or a valid email address. Additionally, you can choose to allow anonymous responses or restrict access to specific groups of people.
Another great feature of MS Forms is the ability to create quizzes. You can add points to each question and set a passing score. MS Forms will automatically grade the responses and provide you with a score. If you prefer, you can also manually review each response and provide feedback directly on the form.
MS Forms also offer a shortcut for creating surveys or quizzes from your OneNote notebook. Simply choose the Forms icon, and a new form will be created with the sections and questions already set up for you.
In conclusion, MS Forms is an incredibly versatile tool that can be used for various purposes, ranging from education to office work. This easy-to-use platform allows you to create professional and engaging forms that make collecting and analyzing data a breeze. So, why wait? Start using MS Forms today and experience the convenience and power it has to offer.
Creating a New Form
To create a new form in Microsoft Forms, follow these steps:
1. Open the Forms application from your Office.com dashboard or from your Office mobile app.
2. Click on the “New Form” button to start creating your form.
3. Give your form a name that will help you identify it easily.
4. Choose the type of form you want to create: survey, quiz, or poll.
5. Add questions to your form by selecting the appropriate question types from the options available. You can add multiple-choice questions, ranking questions, essay questions, and more.
6. Format your questions using options such as bold, italic, underline, and highlighting to make them stand out.
7. Use the advanced settings to add additional features to your form, such as branching logic, required questions, and character limits.
8. Preview your form to see how it will look to respondents.
9. Customize the theme of your form by choosing a color scheme that matches your branding or personal preference.
10. Select the start and end date for your form to control when respondents can submit their answers.
11. Choose whether you want respondents to provide their name and email or remain anonymous.
12. If you want to receive email notifications for each form submission, configure the notifications settings accordingly.
13. When you’re ready, click on the “Create” button to create your new form.
14. Your form will be stored in your Forms account and can be accessed from any device with an internet connection.
15. You can share your form with others by sending them the form link or embedding it on a webpage.
16. Entries submitted through your form will be automatically logged and stored in a workbook for easy review and analysis.
17. You can delete or edit your form at any time.
Note that Microsoft Forms is not limited to education or the workplace – it can be used for a variety of purposes such as surveys, feedback collection, event registration, and more.
Create a form with Microsoft Forms
Microsoft Forms is a powerful tool that allows you to create online surveys, quizzes, and feedback forms with ease. Whether you’re a student, teacher, or professional, Microsoft Forms offers a solution to your problem of collecting information and responses in a quick and efficient manner.
When creating a form with Microsoft Forms, you have the flexibility to choose the kind of form you want to create. You can create a survey, where respondents can select the answer that best fits their preferences or opinions, or you can create a quiz, where respondents need to provide correct answers to multiple-choice questions.
To get started, open an Office.com account and navigate to the Forms section. From there, you can start creating your form by adding questions and answer options. You can also add advanced features such as ranking or rating, where respondents can rank items or rate their satisfaction on a scale.
Forms also provide options such as restricting responses to a specific group or allowing anonymous submissions. You can also add logic, such as branching, which allows you to show or hide certain sections based on how respondents answer previous questions.
Once your form is created, you can preview it to see how it will look to respondents. You can also customize the look and feel of your form by selecting a color scheme or background image. Microsoft Forms also offers a shortcut to email or share your form with others, making it easy to gather responses.
When respondents submit their answers, Microsoft Forms automatically stores the responses for you. You can view the responses in real-time or export them to a format such as Excel for further analysis or reporting. Forms also provide the option to enable notifications, so you can receive an email whenever someone submits a response.
If you’re using Microsoft Forms for education purposes, you can also integrate it with other Microsoft tools such as Teams or OneNote. This allows you to easily share your form with students or colleagues and collect responses within a class or team context.
In conclusion, Microsoft Forms is a versatile and user-friendly tool that allows you to create forms, surveys, quizzes, and feedback forms with ease. Whether you’re looking to create a simple survey or a complex quiz, Microsoft Forms has all the features you need to make your form standout and collect the information you need. Start creating your form today and experience the ease and convenience that Microsoft Forms offers.
Start a new form
To start creating a new form on Microsoft Forms, follow these steps:
- Go to the forms.office.com website.
- Sign in with your Microsoft account or work or school account.
- Click on the “New Form” button.
- Give your form a name in the provided textbox. You can also add a description to provide more information about the form.
- Select the type of form you want to create. You can choose from options such as a survey, quiz, or poll.
- Choose a color theme for your form to add visual appeal.
- Add sections to organize your questions. This helps in categorizing questions based on specific topics or groups.
- Add questions to your form by clicking on the “Add question” button. You can choose from various question types such as multiple choice, text entry, ranking, and more.
- Customize the format of your questions. You can choose to underline, highlight, or italicize certain parts of the question to make it more noticeable.
- Set answer restrictions if needed. For example, you can restrict the number of characters allowed for a text entry question.
- Preview your form to see how it will appear to respondents.
- Once you are satisfied with the form, click on the “Send” button to share it with others. You can choose to email the form or get a link to share it.
- When respondents submit their entries, the responses will be automatically stored and can be accessed later.
- You can choose to create a form that allows anonymous responses or requires respondents to sign in.
- If you want to create more advanced surveys or quizzes, you can explore the “Advanced” options where you can add scoring, show/hide questions based on responses, and more.
- Microsoft Forms also provides notifications for new responses, making it easier for you to keep track of the feedback received.
- If you need to make any changes to your form, such as deleting a question or adding additional sections, you can always do so by opening the form in edit mode.
- Forms created on Microsoft Forms can be embedded on websites or shared as a standalone webpage.
- That’s it! Now you know how to start a new form on Microsoft Forms. Go ahead and create surveys, quizzes, polls, and more.
Add questions
When creating an MS Form, you can add various types of questions to collect the necessary feedback or information. Here are the steps to add questions:
- Open Microsoft Forms by visiting forms.office.com and sign in with your Microsoft account.
- Click on the “New Form” button to create a new form.
- Give your form a name and choose a color scheme that suits your preferences.
- Click on “Add question” to start adding a question to your form.
- Choose the type of question you want to add. There are various question types available, such as multiple choice, text, rating, and more.
- Enter the question prompt in the designated field. You can also add a description or additional instructions if needed.
- If necessary, you can set restrictions or add rules to the question, such as requiring a certain format for the answer or limiting the number of characters.
- For certain question types, such as ranking or survey, you can select the options or statements that will be ranked or rated by respondents.
- Repeat the process to add more questions to your form. You can add as many questions as needed.
- Once you have added all the questions, you can rearrange the order by dragging and dropping the questions or sections.
- You can also delete or edit any question by clicking the respective buttons next to each question.
Remember to save your form periodically to avoid losing any changes made. Once your form is complete, you can preview it to see how it will look to respondents. You can also choose to make your form anonymous or require respondents to sign in with their Microsoft accounts.
After you have published or shared your form, you will start receiving responses. The entries are stored in an Excel workbook or can be viewed directly on the form’s webpage. You can also choose to receive email notifications for each response or set up notifications for specific groups or sites.
That’s it! You have successfully created and added questions to your MS Form. Now you can start collecting valuable feedback, conducting quizzes, or gathering information for various purposes in a quick and convenient way.
Preview your form
Before you share your form with others, it’s important to preview it to make sure everything is just right. When you create a form in Microsoft Forms, you can easily preview it to see how it will look to survey participants or quiz takers.
To preview your form, follow these steps:
- Open Microsoft Forms on your computer or mobile device.
- Select the form you want to preview from your list of created forms.
- Click on the “Preview” button at the top of the page.
- A preview of your form will open in a new tab or window.
- From the preview, you can see how your questions, answer choices, and formatting will appear to respondents.
- If you have any advanced settings or restrictions, such as showing quiz score or feedback, you can also check those in the preview. This will give you an idea of what kind of notifications, ranking, or restrictions your participants will see.
- If a problem is affecting the way your form is displayed in the preview, you can go back to the form editor and make the necessary adjustments.
Please note that when you preview a form, it will not record any entries or submit any data. The preview is only for you to check the appearance and functionality of your form.
Once you are satisfied with the preview and have made any necessary changes, you can start sharing your form with others. You can choose to share it as a link, embed it on a webpage, or send it via email. Your form can be accessed by anyone with the link, and their responses will be stored in a Microsoft Excel workbook or in Microsoft Forms itself.
Creating a form in Microsoft Forms gives you the flexibility to make quizzes, surveys, or any kind of form you need for work or education. Whether you want to collect feedback, organize a vote, or gather information from a class, Microsoft Forms has all the features you need to create and customize your forms.
So, go ahead and create your form today. Preview it, make any necessary adjustments, and start collecting responses with ease!
How do I create an anonymous survey form
If you want to create an anonymous survey form using Microsoft Forms, follow these steps:
1. Open Microsoft Forms in your web browser. You can access it through Office.com or by searching for “Microsoft Forms” in your preferred search engine.
2. Click on “New Form” to start creating a new survey.
3. Choose a name for your survey form. This name will be displayed to the participants.
4. Add questions to your survey form by clicking on the “+” button. You can choose from a variety of question types such as multiple choice, text entry, rating, and more.
5. Customize the appearance of your survey form by selecting a theme color and applying formatting options such as bold, italic, and underline to highlight selected text.
6. Set any necessary restrictions such as requiring sign-in or limiting responses to a certain date range.
7. Use the “Preview” feature to check how your survey form will look like to respondents.
8. Once your survey form is created, Microsoft Forms will automatically generate a link that you can share with participants. You can also embed the form on websites or send it via email.
9. All responses from your anonymous survey form will be stored in a Microsoft Excel workbook. You can access and analyze the data by opening the workbook associated with your form.
10. If you want to receive notifications for new form entries, you can set up email notifications through the “Settings” tab of your form.
By following these steps, you can easily create an anonymous survey form using Microsoft Forms. Participants will be able to submit their responses without revealing their identity.
Email Notifications
When you create a form or quiz in Microsoft Forms, you have the option to receive email notifications for each response submitted. This can be helpful if you want to stay updated on the entries and responses received through your form or quiz.
To enable email notifications, open the form or quiz you want to work with. From the toolbar at the top, choose the “…” (ellipsis) button and select “Settings”. In the Settings pane, under the “Responses” section, you will find the “Email notifications” option. Toggle this option to “On” to start receiving email notifications.
Once email notifications are enabled, you will receive an email for each response that is submitted. The email will contain information such as the date and time the response was submitted, as well as the answers provided. This allows you to keep track of the entries and stay informed about the feedback received through your form or quiz.
If you no longer wish to receive email notifications, you can easily turn them off by following the same steps mentioned above and toggling the “Email notifications” option to “Off”.
It is important to note that email notifications will only be sent to the creator of the form or quiz, and not to any anonymous respondents. If you want to send email notifications to a specific group of people, such as a class or a team, you can consider using Microsoft Groups or creating a distribution list in your email client.
Additionally, it’s worth mentioning that email notifications will be sent to the email address associated with your Microsoft account. So make sure you have a valid email address linked to your account to ensure you receive the notifications.
Lastly, email notifications are a great way to stay informed about the responses received through your form or quiz, but they are not the only option available. Microsoft Forms also offers other ways to view and analyze responses, such as in the form of a summary or an Excel workbook. You can preview and delete responses, check for problem entries, highlight entries, and even have an overview of the responses in a visual format.
In summary, by enabling email notifications, you can receive timely updates about the entries and responses received through your Microsoft Forms or quizzes. It provides a convenient way to stay informed and keep track of the feedback received. So go ahead and make use of this feature to enhance your form or quiz experience!
PROBLEM WITH THIS WEBPAGE
When creating forms or surveys using Microsoft Forms, you may encounter some issues with the webpage. One common problem users face is the restriction on the number of characters in certain fields. For example, in the “Name” field, you may be limited to a certain number of characters and unable to enter more.
Another issue is that when you start a new form, it does not automatically save your work. If you accidentally close the webpage or refresh it, your progress will be lost. It’s important to regularly save your work by clicking the “Save” button or using the shortcut keys.
If you are unable to find a specific feature or option in the webpage, it could be because Microsoft Forms has updated and relocated certain functions. Make sure to check the “Help” section or visit the Microsoft Office website for the most up-to-date information on how to navigate the webpage.
Sometimes, users may experience problems with the formatting of their forms. For example, the text in the questions or answer choices may appear in a different font, color, or formatting than what they originally selected. This can be frustrating and may require adjusting the formatting manually.
Another issue that users face is when they try to preview or submit a form, they receive an error message stating that the form cannot be accessed or that there is a problem with the webpage. In this case, it is recommended to check your internet connection, clear your browser cache, or try using a different browser.
If you are working with Microsoft Forms for education purposes, there may be additional restrictions or limitations imposed by your school or organization. These restrictions could include restrictions on certain question types or the ability to access and view survey responses.
It’s worth noting that Microsoft Forms is constantly being updated and improved, so some of these problems may be resolved in future updates. If you encounter a problem with the webpage that persists or affects your ability to use Microsoft Forms effectively, it is recommended to provide feedback to Microsoft through their official channels.