

Creating forms is an essential part of our digital lives. Whether you need to collect data, conduct a survey, or organize an event, Google Forms is a powerful tool that can help you achieve your goals. In this article, we will walk you through the process of creating a Google Form, step by step.
First, let’s start with the basics. Google Forms allow you to create various types of forms, such as surveys, quizzes, evaluations, and more. You can add different question types like multiple-choice, checkboxes, and short answer questions. With Google Forms, you have the flexibility to customize your form according to your specific needs.
To get started with Google Forms, simply go to the formsgoogle.com website. If you have a Google account, you can sign in with your credentials. If not, you can still create and share forms without an account, but keep in mind that you won’t have access to certain features.
Once you’re on the Google Forms homepage, you can either choose to start with a blank form or use one of the pre-made templates provided by Google. Templates are a great way to save time and ensure that you’re using a well-designed form. You can also customize the colors and background of your form to match the theme or branding of your event or organization.
After selecting a template or starting with a blank form, you’ll be taken to the form builder workspace. Here, you can add questions, sections, and even quizzes to your form. The toolbar on the right side of the screen gives you access to various tools and options, allowing you to format your form, add images, and include other media elements.
Once you’ve finished creating your form, it’s time to share it with your audience. Google Forms makes it easy to share your form in multiple ways. You can send the form link via email, share it on social media platforms, or embed it on your website. You can also turn on the “Allow respondents to edit responses” option if you want your participants to be able to edit their answers after submitting the form.
When people submit responses to your form, Google Forms automatically collects and organizes the data for you. You can view all the responses in real-time or export them to a Google Sheets spreadsheet for further analysis. This makes it easy to track and analyze the results of your form.
In conclusion, creating a Google Form is easy and convenient. Whether you’re conducting a survey, collecting feedback, or organizing an event, Google Forms provides you with all the tools you need to create a professional-looking form. So go ahead, give it a try, and see how Google Forms can revolutionize your data collection process!
- Google Forms: A guide for how to create Google Form surveys
- How to Create a New Google Form
- Step 1: Go to forms.google.com or Google Drive
- Step 2: Select a template
- Step 3 Change the title of your form
- Step 4: Adjust Questions and Answers
- Step 5: Customize the Google Form theme
- Step 6 Preview your form
- Step 7: How to Create a Google Form Link or Share it through Email
- Analyzing Responses and Generating Automated Summaries
- Collaborate at every stage of your project
- Take Advantage of Answer Validation
- Share the form via email, embed it on a website, or send a link
- How to Create a Google Form
- How To Make A Google Form Quiz
- How to Design Google Forms Header Image and Colors
- How to Use Google Forms Create Template
- Step 1: Choose a Template
- Step 2: Create a New Form
- Step 3: Customize the Form
- Step 4: Add Questions
- Step 5: Store Responses
- Step 6: Share the Form
- Step 7: Review Responses
- How to Add Sections when Creating a Google Form
- How to Store Google Forms Responses in Google Sheets
- How to Ensure That Each User Only Submits One Entry
- How to Make a Google Form Link
- Wrapping Up
- Video:
- Don’t Use Google Forms Without These FREE Add-Ons!
Google Forms: A guide for how to create Google Form surveys
If you want to create a survey or collect data for a project, Google Forms is an easy and efficient tool to use. With Google Forms, you can easily create surveys and collect responses in one place. Here is a step-by-step guide on how to create Google Form surveys:
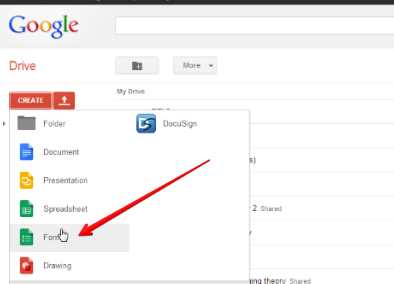
- Go to your Google Drive workspace and click on the “+ New” button in the top left corner.
- Select “Google Forms” from the drop-down menu that appears.
- Title your form to make it easy for people to understand what it is about.
- Customize the theme of your form by choosing from one of the default options or by wrapping everything in a background image.
- Move on to creating the questions for your form. You can adjust the question type, such as multiple choice, short answer, or paragraph, to ensure that respondents provide the right kind of answers.
- Add as many questions as you want by clicking on the “+ Add question” button.
- Once you have finished creating the questions, click on the “Send” button in the top right corner.
- You have a few options for sending your form to respondents. You can choose to share the form as a link, embed it on your website, or send it via email.
- If you select the option to share the form as a link, you can copy the link and share it with anyone you want to respond to your survey.
- Alternatively, you can select the option to embed the form on your website. This allows people to respond to the survey directly on your site.
- If you choose to send the form via email, Google Forms provides a template that you can use to send the form to your desired recipients.
- Before sending the form, you can make any final adjustments or changes by clicking on the “Preview” button.
- Once you are ready to send the form, click on the “Send” button again.
- Google Forms will keep track of all the responses you receive in a spreadsheet. You can access this spreadsheet by clicking on the “Responses” tab.
- If you want to analyze the data from your form, you can use Google Sheets. Simply click on the “Create spreadsheet” option in the “Responses” tab to turn the responses into a spreadsheet.
Creating surveys with Google Forms is a quick and efficient process that allows you to collect and analyze data easily. Whether you are using Google Forms for personal or professional purposes, this guide will help you create effective surveys to gather the information you need.
How to Create a New Google Form
Google Forms is a powerful tool that allows users to create custom forms for various purposes, such as surveys, quizzes, or collecting information. In this guide, we will walk you through the steps to create a new Google Form.
Step 1: Go to Google Forms
To create a new Google Form, go to the Google Forms website or open the Google Forms app on your device.
Step 2: Select a Template (Optional)
If you want to use a pre-designed template for your form, click on the “Template Gallery” button in the toolbar at the top. From there, you can choose from a variety of templates for different purposes.
Step 3: Customize the Form
Once you have selected a template or decided to create a blank form, you can start customizing it to fit your needs. Change the title of the form by clicking on the existing title and entering a new one.
Step 4: Add Questions
To add questions to your form, click on the “+” icon in the toolbar on the right. Select the type of question you want to add, such as multiple-choice, short answer, or checkbox. Enter the question and provide answer options if necessary.
Step 5: Customize Question Options
For each question, you can customize various options, such as making it a required question, adding a description or help text, and enabling data validation or logic checks.
Step 6: Add Sections
If you want to organize your form into sections, go to the toolbar on the right and click on the “Section” icon. You can add multiple sections and move them around by clicking on the three dots in the corner and selecting “Move section up” or “Move section down”.
Step 7: Customize the Form Design
To change the design of your form, click on the “Themes” icon in the toolbar. You can choose from a variety of colors and background options to match your preferences or branding.
Step 8: Preview and Test
Before sharing your form, it’s a good idea to preview and test it. Click on the “eye” icon in the toolbar to see how your form will look to users. Fill out the form and make sure everything is working as expected.
Step 9: Share and Collaborate
Once you are satisfied with your form, you can share it with others by clicking on the “Send” button in the top right corner. You can either copy the link and share it directly or use the built-in sharing options to send the form via email or social media.
Step 10: Collect Responses
As respondents submit the form, you can view and analyze their responses. Google Forms automatically stores the responses in a Google Sheets spreadsheet, making it easy to review and analyze the data.
Congratulations! You have successfully created a new Google Form. Start using it for surveys, quizzes, or collecting information for your projects.
Step 1: Go to forms.google.com or Google Drive
To create a Google Form, the first step is to visit the website forms.google.com or go to your Google Drive and select “Forms” from the “New” menu. Google Forms is a powerful tool that allows you to easily create surveys, quizzes, or feedback forms.
When you arrive at forms.google.com or open Google Drive, you will see the Forms icon in the top toolbar. Click on it to start creating your new form.
Google Forms provides a variety of templates to choose from, including basic forms, surveys, quizzes, and more. You can also start with a blank form and customize it according to your needs.
Once you’ve chosen the type of form you want to create, you can give it a title and add questions using the options provided. Google Forms allows you to add different types of questions, such as multiple-choice, text, or even file upload questions.
If you want to add a touch of style to your form, you can choose from a wide range of themes and adjust the background colors. Google Forms also allows you to customize the look of your form by wrapping it up with your own branding or choosing a default theme.
Google Forms makes it easy to share your form with others. You can share it via email, social media, or by generating a link that you can send or embed on a website. Google Forms also provides options for collaboration, allowing you to work on forms together with other users in real-time.
As people start responding to your form, Google Forms automatically collects and stores the responses for you. You can view the responses in real-time or analyze them later using the data analysis tools provided.
Google Forms also provides some great features to enhance your forms, such as logic and branching, which allow you to customize the form based on the user’s answers. You can also turn your form into a quiz and automatically grade the answers.
With Google Forms, creating a form is not only easy but also saves you time. It’s a powerful tool that is packed with features and allows you to create professional-looking forms and surveys in no time.
So, if you’re looking for a quick and easy way to create forms, surveys, or quizzes, head over to forms.google.com or Google Drive and start creating your form today!
Step 2: Select a template
Once you’re ready to create your Google Form, the next step is to select a template for your form. Templates are pre-designed forms that you can use as a starting point for your own form. They can save you time and provide a professional look to your form.
To select a template, follow these steps:
- Go to forms.google.com and click on the “Blank” form option to start creating a new form.
- On the right side of the screen, you’ll see a panel with different template options. Browse through the various templates available and choose one that suits your needs. Each template has a different layout, color scheme, and design.
- When you find a template you like, simply click on it to select it. You can preview how the template will look by clicking on the “Preview” icon.
- Once you’ve selected a template, it will automatically be applied to your form. You can further customize the template by adjusting the colors, theme, header image, and other settings to match your preferences.
Using a template can make it easy to create a form with a professional look and feel, without having to start from scratch. It ensures that you’re presenting your questions and information in a clear and organized way.
Remember to choose a template that aligns with the purpose and style of your form. Whether you’re creating a short survey, a feedback form, or a registration form, there are templates available for all types of forms.
By selecting a template, you can save time and make the process of creating your form much smoother. It’s always a good idea to preview your form before sending it out to ensure that everything looks right and to make any necessary adjustments.
Once you’re happy with the template and have customized it to your liking, you can move on to the next step of adding questions and sections to your form.
Step 3 Change the title of your form
Once you have selected a template or started with a basic theme, it’s time to customize your Google Form and give it a title that accurately represents its content. The title is the first thing people will see when they open your form, so make sure it’s clear and concise.
To change the title of your form, follow these steps:
- Select the form by clicking on its title in your workspace. If you are in the process of creating a new form, click on the “Untitled form” text in the top left corner.
- In the top right corner, click on the “Preview” icon (it looks like an eye). This will allow you to see how your form will look like to respondents.
- In the preview window, click on the “Untitled form” text in the header. A text box will appear, allowing you to type a new title.
- Type your new title into the text box. You can use a short and descriptive title that captures the essence of your form.
- Click anywhere outside the text box or hit the Enter key to save the changes.
- Preview your form again to see how the new title appears.
By changing the title of your form, you can create a more engaging and relevant user experience. A descriptive title will also help you when you store and analyze the responses from your form, as it will be easier to identify each form based on its title.
Next, you can choose to customize other aspects of your form, like the background color, theme, or the color of the response link. Google Forms provides a user-friendly interface that makes it easy to turn your form into a unique and visually appealing masterpiece.
Once you’re satisfied with the changes you’ve made, you can share your form with others by sending them the link or embedding it into a website or social media post. Google Forms automatically stores all the responses you receive, making it convenient for you to review and analyze the data at any time.
Take a moment now to change the title of your form and proceed to the next step in this guide. Remember, with Google Forms, each step in the process is designed to make the form creation and sharing process as easy as possible!
Step 4: Adjust Questions and Answers
- Adjust the questions and answers according to your requirements. This is an important step in creating a Google Form.
- Start by selecting the question type from the toolbar in the workspace. You can choose from multiple-choice questions, short answer, or even create a quiz.
- For each question, you can customize the title, add options for respondents to choose from, and even make certain questions required. This way, you can gather the specific information you need.
- Make use of the templates provided by Google Forms for basic question design. You can also turn on the automatic question suggestions, which will provide you with relevant question ideas based on the title of your form.
- Preview the form to see how it will look to respondents. You can adjust the layout and design by wrapping the questions in logic. For example, you could show or hide certain questions based on a previous response.
- Take advantage of the media option to include images or videos in your form. You can add a link to a video or insert an image directly into the question.
- Once you are satisfied with the questions and answers, you can go to the “Settings” tab to adjust the form’s title, description, and other options. You can also turn on the “Respondent can edit after submit” option if you want respondents to be able to make changes to their responses after submitting the form.
- When everything is set up as you want it, simply click on the “Send” button in the top right corner of the workspace. You will be given options for sending the form via email, social media, or by generating a link that you can share.
- If you want to embed the form directly into your website, click on the “Send” button and then select the “Embed” tab. You will be provided with a code snippet that you can use to embed the form on your website.
Learn more about the automatic responses and checking the answers of your form with the help of the “Formbot”.
Step 5: Customize the Google Form theme
Once you have created your Google Form, it’s time to make it visually appealing by customizing the theme. This step allows you to adjust the colors, background, header image, and title of the form to match your preferences or suit the purpose of the form.
To start customizing the theme of your Google Form, follow these steps:
- Go to formsgoogle.com and click on the form you want to customize. If you are creating a new form, start by clicking on the “+ New” button to get started.
- In the form editor, go to the top toolbar and click on the “Customize theme” icon, which looks like a palette. This will open up the theme customization options.
- You will see a preview of your form on the right side. On the left side, you will find the customization options. Adjust the colors, background, and header image by choosing from the available options or adding your own.
- Click on the “Customize” button next to the “Theme” section to change the default theme. This will allow you to select from various templates that Google provides.
- Move through the options on the left sidebar to make further adjustments, like changing the font, adding a logo, or wrapping the form in a custom background image.
- When you’re done customizing, click on the “Preview” button to see how your form looks. Ensure that all the information is presented clearly and that the theme matches your desired style.
- After previewing, you can go back and make any necessary changes by repeating the customization process.
- Once you are happy with the design of your form, click on the “Next” button to move on to the next step of the form creation process.
- If you want to allow people to share the form with others, turn on the “Allow others to email people with this form” option. This enables the sharing feature, where people can easily send the form to others via email or embed it on a website.
- Finally, remember to give your form a title that accurately reflects its purpose. This title will be displayed in the top left corner of the form.
By following this guide, you can easily customize the theme of your Google Form and ensure that it represents your desired style or matches your branding. These customization options allow you to create visually appealing forms, surveys, quizzes, or any other type of electronic form that best suits your needs.
Step 6 Preview your form
Now that you have designed your form using Google Form Maker, it’s time to preview it and make any necessary adjustments. Previewing your form before sending it out allows you to see how it will look to respondents and ensure everything is set up correctly.
To preview your form, simply click on the “Preview” icon in the toolbar. This will open a new tab or window where you can see exactly how your form will appear to the people filling it out.
In the preview, you can go through each question and response choice, ensuring that your multiple-choice options or survey sections are set up correctly. If you have incorporated any logic into your form, such as branching questions based on previous responses, you can test these out in the preview as well.
Additionally, you can adjust the design and appearance of your form in the preview. If you want to change the background color or add an image, you can do so by clicking on the “Change theme” icon in the toolbar.
Previewing your form also allows you to see how it will look when embedded on a website or shared through email or social media. This way, you can ensure that it fits seamlessly into the overall design of your website or email template.
Once you are satisfied with the preview and have made any necessary changes, you can proceed to the next step of the form creation process.
Step 7: How to Create a Google Form Link or Share it through Email
Once you have finished creating your Google Form, the next step is to share it with others. There are two main ways you can do this: by creating a link to the form or by sending it through email. Below, we will explain how to do both.
To Create a Google Form Link:
- Go to your Google Forms dashboard and click on the form you want to share.
- In the top right corner, click on the “Send” button, which looks like a white paper airplane.
- A toolbar will appear. Click on the link icon, which looks like a chain link.
- A window will pop up with a link to your form. You can copy this link and share it with others.
To Share a Google Form through Email:
- Follow steps 1-3 from above.
- In the toolbar, click on the email icon, which looks like an envelope.
- A window will appear where you can enter the email addresses of the recipients.
- Customize the subject and email body if desired.
- Click on the “Send” button to send the email with the form link.
When someone receives the form link, they can click on it to access your Google Form and submit their responses.
Remember, you can always go back and make changes to your form by clicking on the “Edit” button in the top right corner of the Google Forms dashboard. You can also customize the design of your form by clicking on “Theme” in the toolbar, which will allow you to change the colors, background image, and header. Additionally, you can add logic to your form by clicking on the “Settings” icon, which looks like a gear, in the top right corner of each question. This will allow you to turn your form into a quiz or add conditional logic to your questions.
Now that you know how to create a Google Form link or share it through email, you can easily distribute your form to gather the information you need. Whether you want to use it for personal or professional purposes, Google Forms provides a user-friendly and efficient way to collect and store data.
Analyzing Responses and Generating Automated Summaries
When it comes to analyzing responses and generating automated summaries, Google Forms offers a range of powerful features. These features can help you streamline the process of collecting and analyzing data, allowing you to gain valuable insights quickly and easily.
Once users submit their answers through the form, you can start the analysis. With Google Forms, you have the option to view the responses in a summary format, which provides an overview of the data collected. This summary view allows you to get a quick understanding of the patterns and trends within the responses.
If you want to further analyze the data, you can export the responses to Google Sheets. This integration allows for more in-depth analysis and data manipulation. Google Sheets provides various tools that enable you to perform calculations, create charts, and apply filters to the collected data.
Additionally, Google Forms offers built-in features that make it easy to analyze and interpret responses. For example, you can add logic to your form questions, creating a customized path for users based on their previous answers. This feature allows you to tailor the form experience and gather specific data from each respondent.
Furthermore, Google Forms provides the option to create quizzes. When creating a quiz, you can assign correct answers to questions, and Google Forms will automatically grade the responses. This feature is useful for educational or assessment purposes, saving you time and effort in manually grading quizzes.
To ensure accurate data collection, Google Forms allows you to set up validation rules for certain types of questions. These rules can be used to check for required fields, correct formatting, or specific answer ranges. By setting up validation rules, you can prevent users from submitting incomplete or incorrect data.
In terms of design and customization, Google Forms offers several options to make your form visually appealing. You can choose from various pre-designed templates or customize the layout and colors to match your website or project. Additionally, you can add images and media to your questions, giving them a more interactive and engaging feel.
If you want to share your form with others, you can simply click on the “Send” button and choose how you want to distribute the form. Google Forms provides options to send the form via email, generate a link, or embed it on a website. This flexibility allows you to reach your target audience and collect responses easily.
Google Forms also makes collaboration a breeze. Multiple users can work on the same form simultaneously, making it ideal for team projects or group surveys. Each user can see real-time changes and updates, ensuring everyone is on the same page during the form creation process.
Overall, Google Forms provides a user-friendly and powerful platform for creating, analyzing, and summarizing form responses. Whether you’re conducting a survey, collecting feedback, or organizing an event, Google Forms has the tools you need to make the process efficient and effective.
Collaborate at every stage of your project
When it comes to working on a project with multiple parties involved, it’s essential to have effective collaboration tools in place. Google Forms is a powerful tool that allows you to work together seamlessly, whether you’re gathering feedback, conducting a quiz, or collecting data for analysis.
One of the advantages of using Google Forms is how easy it is to create a form. With just a few simple steps, you can customize everything from the header and colors to the questions and logic. You can choose from different question types, like multiple-choice, short answer, or dropdown, to ensure you’re gathering the information you need.
Once your form is ready, you can preview it to ensure everything looks and functions as intended. If you’re happy with the form, you can go ahead and share it with your respondents. Google Forms provides you with a link that you can send via email, share on your website, or choose other ways to distribute it.
As people start responding to your form, all the answers will automatically be stored in a Google Sheets spreadsheet. This makes it easy to analyze the data and generate summaries or reports. You can also set up notifications to be sent to your email whenever a new entry is submitted.
If you want to collaborate with others on the form creation process, you can easily share the form with them. They can make edits, add questions, or change the logic of the form, all in real time. This ensures that everyone is on the same page and working towards a common goal.
In addition to working together on the form itself, you can also collaborate on analyzing the data. Google Sheets allows for real-time collaboration, so multiple users can work on the same spreadsheet simultaneously. This makes it easy to spot trends, make calculations, and perform other data analysis tasks.
Google Forms also provides a variety of features to enhance the user experience. For example, you can add images or videos to your form to make it more engaging. You can also enable the “formbot” feature, which provides automated responses based on user inputs.
Overall, Google Forms is a powerful tool for collaborative work. Whether you’re creating a survey, collecting feedback, or conducting a quiz, it offers a simple and efficient way to gather and analyze data. By working together at every stage of your project, you can ensure that your form is effective and meets your goals.
Take Advantage of Answer Validation
When creating a Google Form, one of the key benefits is the ability to validate the answers provided. This feature allows you to ensure that respondents provide accurate and reliable information, making the data gathered more meaningful and useful.
By adding question validation, you can specify the format or type of response you’re looking for. For example, you can require a specific answer, like a number within a certain range, or you can set a character limit for text responses. This helps you gather the information you need in a standardized format.
To utilize answer validation, follow these steps:
- Start by creating a new Google Form or opening an existing one.
- Select the question you’d like to add validation to or create a new question.
- In the question settings, click on the “Answer validation” option.
- Choose from different validation options such as “Number,” “Text length,” or “Regular expression.”
- Customize the validation criteria based on your requirements.
- Save the settings and move on to the next question or continue customizing other elements of your form.
By implementing answer validation, you can ensure that respondents provide accurate and reliable information, making it easier to analyze the data collected. This feature is especially useful when conducting surveys or collecting user feedback, as it helps maintain data integrity and consistency.
Additionally, Google Forms provide convenient ways to share your form with others. You can simply send a link via email or share it on social media platforms. You can also embed the form into your website or blog. Google Forms make it easy to reach a wide audience and collect responses from anyone, anywhere.
Once respondents start filling out your form, their answers are automatically collected and stored in a Google Sheets document. This allows for easy analysis of the responses, with the ability to filter, sort, and manipulate the data as needed. You can also view response summaries and charts, providing valuable insights from the data collected.
So take advantage of the benefits of answer validation in Google Forms and start creating effective and efficient surveys or questionnaires. Ensure reliable data collection and streamline the analysis process, all through the easy-to-use interface of Google Forms.
Share the form via email, embed it on a website, or send a link
Once you have created your form, you can easily share it with others. There are several ways to do this to ensure maximum accessibility and convenience for your respondents.
Share via email:
You can send your form to specific individuals by sharing it through email. This method is particularly useful if you want to target a specific group of people or if you want to control who can access and fill out your form. Simply click on the “Send” button in the top-right corner of the Google Forms workspace, and then select the email icon. You can add multiple email addresses and even customize the email subject and message for a more personal touch. When your emails are ready, click “Send” to distribute the form.
Embed on a website:
If you have a website, you can easily embed your form directly on a page. This allows visitors to fill out your form without leaving your website. To do this, go to the “Send” button in the top-right corner of the workspace, and click on the “Embed” tab. You will be provided with an HTML code snippet that you can copy and paste into your website’s code. Simply follow the provided instructions to ensure successful integration. By embedding your form on your website, you can make it easily accessible to your website visitors and encourage more responses.
Send a link:
If you want to share your form more broadly or want to give respondents the option to access it from various platforms, you can simply send them a link. To do this, go to the “Send” button in the top-right corner of the workspace, and click on the “Link” tab. You will be provided with a unique URL for your form. You can copy this link and share it through various channels such as social media, messaging apps, or any other methods you prefer. This allows anyone with the link to access and respond to your form, making it a convenient option for reaching a wider audience.
By using these methods to share your form, you can ensure that it reaches your intended audience and that they can easily provide their answers. Whether you choose to share via email, embed on a website, or send a link, Google Forms make it easy to collect responses and analyze the data you receive. So go ahead and spread the word about your form to gather valuable insights and feedback!
How to Create a Google Form
Creating a Google Form is a simple and effective way to collect information from respondents. With Google Forms, you can easily design and customize your own forms, choose from different question types, add sections and logic, and analyze the responses all in one place. Follow these steps to create your own Google Form:
- Step 1: Access Google Forms
- Step 2: Choose a Template or start from scratch
- Step 3: Design your Form
- Step 4: Add Sections and Logic
- Step 5: Make Adjustments and Preview
- Step 6: Share or Embed the Form
- Step 7: Collect and Analyze Responses
To create a Google Form, first, go to forms.google.com or through your Google Drive. If you are using Google Drive, click on the “New” button in the top left corner and select “Google Forms” from the dropdown menu.
Google Forms provides various templates to choose from if you want a head start. Selecting a template will give you a pre-designed form with default questions and settings that you can adjust to suit your needs. If you prefer to create a form from scratch, simply click on the blank form option.
Customize your form by adding a title, headers, and descriptions. You can also change the colors, fonts, and overall design to match your preferences. Use the toolbar on the right to add different question types such as multiple-choice, short answer, or checkboxes.
If your form requires different sections or logic to guide respondents based on their answers, you can easily add them. Use the “Add section” button to divide your form into different parts. The “Logic” feature allows you to create rules and conditions that determine which questions appear based on the respondent’s previous answer.
Before sending out your form, it’s important to go through the different stages of the creation process. Make any necessary adjustments, preview the form, and ensure that everything is in order. You can always go back and edit the form later if needed.
Once you are happy with your form, it’s time to share it with respondents. You can send the form through email, share the link directly, or embed it on a website. Google Forms also provides a “Send” button that you can use to easily send the form via email.
As respondents start filling out your form, the responses will automatically be stored in a Google Sheets spreadsheet. You can view and analyze the responses by going to the “Responses” tab. Google Forms also offers a “Summary” tab that provides a summary of all the responses, making it easy to get an overview of the data.
By following these steps, you can create a Google Form in no time and start collecting valuable information from your respondents. Use the built-in tools and features to customize and analyze the form, and make the most out of the advantages that Google Forms has to offer.
How To Make A Google Form Quiz
If you are in the process of creating a project or a survey, Google Forms can be a powerful tool. With Google Forms, you can easily create quizzes and collect data from respondents. In this guide, we will walk you through the steps to create a Google Form quiz.
Step 1: Go to https://forms.google.com and click on “Blank” to start creating a new form.
Step 2: Customize the form by adding a title and a description. You can also change the theme, color, and background image of the form to match your project.
Step 3: Choose the type of question you want to add to your quiz. You can add multiple-choice, checkbox, or short answer questions, among others. You can also add logic to your questions to allow for conditional responses.
Step 4: Add the questions to your form. You can add as many questions as you like and customize them to fit your needs. You can also add images or videos to your questions to make them more engaging.
Step 5: Turn your form into a quiz by clicking on the three-dot menu in the top-right corner and selecting “Quizzes”. Here, you can change the settings for the quiz, such as the number of points per question and the passing grade.
Step 6: Customize the response page, where respondents will see a summary of their answers after submitting the form. You can add a header, change the color and icon, and customize the message.
Step 7: Preview your form to see how it looks and make any necessary adjustments. You can also send a test submission to see how the form works and make sure everything is set up correctly.
Step 8: Once you are satisfied with your form, click on the “Send” button to get the link to your form. You can share the link via email, social media, or embed it on your website.
Step 9: Start collecting responses. Google Forms will automatically store the responses in a Google Sheets spreadsheet. You can also turn on the option to receive email notifications whenever someone submits a response.
That’s it! Now you know how to create a Google Form quiz. With these easy steps, you can create quizzes for surveys, assessments, or any other project you have in mind. Good luck!
How to Design Google Forms Header Image and Colors
When creating a Google Form, one of the ways you can customize its appearance is by adding a header image and choosing colors for the form. This helps make your form more visually appealing and gives it a unique look that aligns with your project or website.
To start, click on the “Customize theme” button at the top right corner of the form builder. This will open up the theme designer panel where you can make changes to the form’s design.
When it comes to the header image, you have two options: you can choose from a default set of images provided by Google, or you can upload your own image. If you choose to use a default image, simply select one from the library and it will be added to the top of your form. If you want to use your own image, click on the “Upload photo” button and select an image from your computer or Google Drive.
Next, you can choose the colors for your form. Click on the “Palette” button to see the available color options. You can select one of the predefined color palettes or create your own custom color palette by selecting individual colors for the form’s background, header, text, and answer fields.
Once you have customized the header image and colors, you can preview how your form will look by clicking on the “Preview” button. This allows you to see the changes you’ve made in real-time.
When you’re satisfied with the design, click on the “Done” button to save your changes. From here, you can continue working on other aspects of your form such as adding questions, sections, or logic to create a quiz or survey that suits your needs.
After you’ve completed the design process, you can store and analyze the responses from your form in Google Sheets or view summary data directly in the form’s response tab. Google Forms also provides ways to send the form to respondents through email or by embedding it on your website or other online platforms.
With the ability to customize the header image and colors, Google Forms gives you the flexibility to make your forms stand out and match your brand or project. So, take some time to design your form and make it visually appealing to the people who will be responding to it.
How to Use Google Forms Create Template
When it comes to creating a template using Google Forms, there are always easy and convenient ways to do it. In this guide, we will learn how to use Google Forms to create a template that suits your needs.
Step 1: Choose a Template
The first step is to go to the website forms.google.com and select the “Template Gallery” option. There you will find a variety of pre-designed templates that you can use for your project.
Step 2: Create a New Form
Once you select a template, click on it to create a new form. You can also start with a basic default form and add your desired questions and information later.
Step 3: Customize the Form
Next, you can customize the form by changing the title, theme, colors, and header. You can also add logic to the form to create a more interactive experience for respondents.
Step 4: Add Questions
Now it’s time to add questions to your form. You can choose from various types of questions such as multiple-choice, text, or quiz. Simply click on the “+” icon in the toolbar to add a new question.
Step 5: Store Responses
Google Forms automatically stores all the responses in a spreadsheet in your Google Drive. This makes it easy to analyze the data and turn it into useful insights.
Step 6: Share the Form
Once you have created the form, you can share it by sending the link via email or by embedding it on your website. You can also allow others to collaborate on the form by clicking on the “Share” button and selecting the appropriate options.
Step 7: Review Responses
As responses start coming in, you can review and analyze them in the Responses tab. Google Forms provides a summary of responses, making it easy to see the overall trends and patterns.
Creating a template using Google Forms is a simple and efficient process. With the options to customize, add questions, and review responses, it becomes a valuable tool for gathering information and conducting surveys. Make sure to utilize the features to maximize the benefits of using Google Forms.
How to Add Sections when Creating a Google Form
Creating a Google Form is very easy and straightforward, but sometimes you may want to add sections to organize your form better. Adding sections can help you separate different parts of your form, like questions with a similar theme or about the same topic. In this guide, we will show you how you can add sections to your Google Form.
1. Start by going to forms.google.com, which is the official website for creating Google Forms. If you want, you can also use a direct link, like www.forms.google.com.
2. Click on the “Blank” template to start creating a new form from scratch, or select a template from the available options if you prefer to customize one.
3. When you are in the form editor, you will see a default section at the top labeled “Untitled Section”.
4. To add a new section, you can simply click on the “+” button that comes after the “Untitled Section”. Alternatively, you can click on the three-dot menu icon on the right of the section and select “Add section”.
5. Once you have added a section, you can customize its title, description, and theme by clicking on the section header. You can also adjust the color and layout of the section to make it stand out or match the overall theme of your form.
6. If you want to move a section to a different position, you can click on the three-dot menu icon on the right of the section and select “Move section up” or “Move section down”. This will rearrange the sections in the form preview.
7. It is also possible to add multiple sections at once to your form. To do this, go to the form editor and click on the three-dot menu icon on the right of the section. From there, select “Add section above” or “Add section below” to add a new section right above or below the current one.
Once you have added sections to your Google Form, you can start adding questions and customize them. When sharing the form with others, you can either click on the “Send” button to send it via email or simply copy the link and share it on social media or your website. You can also collaborate on the form responses by allowing others to view or edit them.
Adding sections to your Google Form is a great way to organize your questions and ensure that respondents can easily navigate through them. It also allows you to create more detailed and specific automated summaries of the responses. So, next time you create a Google Form, make sure to take advantage of these features and make your form more user-friendly.
How to Store Google Forms Responses in Google Sheets
If you’re using Google Forms to collect information from users, it’s important to have a system in place for storing and organizing those responses. Fortunately, Google provides a seamless way to store your form responses in Google Sheets. This guide will walk you through the process so you can ensure that all of your form responses are properly recorded and easily accessible.
Step 1: Create your Google Form
The first step is to create your Google Form. Go to forms.google.com and click on “Blank” or choose a template from the available options. Customize the form by adding your own title, questions, and options. You can also choose a theme and background color to make it more visually appealing.
Step 2: Preview and customize your form
Once you’ve added all the necessary questions and sections, click on the “Preview” button in the top right corner. This will allow you to see how your form will look to users. You can also customize the form by adding images or videos, and enable features like multiple choice or short answer questions.
Step 3: Share or embed your form
After you’ve finished customizing your form, you have several ways to share it with others. You can send the form through email using the provided link, or embed it on your website for users to access. Google also provides a link that you can share directly on social media.
Step 4: Store responses in Google Sheets
To ensure that all form responses are stored in Google Sheets, go to the “Responses” tab in your form editor. Click on the Google Sheets icon to link a spreadsheet to your form. A new sheet will be created in Google Sheets, and whenever someone submits a response, it will automatically be added to the spreadsheet.
Step 5: Analyze and make use of the data
With all of your form responses neatly organized in Google Sheets, you can now easily analyze and make use of the data. Google Sheets provides a range of tools for data analysis, such as creating charts or applying formulas. You can also export the data to other formats if needed.
Step 6: Ensure privacy and security
When collecting user data through forms, it’s important to ensure privacy and security. Google Forms and Sheets have built-in privacy features, but it’s always a good idea to review and customize these settings according to your needs. You can limit access to the spreadsheet to only selected users or third-party apps, and enable additional security measures like two-factor authentication.
By following this guide, you can easily create and store Google Forms responses in Google Sheets. This process not only makes it easy to keep track of form responses, but also allows you to analyze and use the data effectively. Start using Google Forms and Sheets today to streamline your data collection and analysis!
How to Ensure That Each User Only Submits One Entry
When you start the process of creating a Google Form, it’s important to consider how you can ensure that each user only submits one entry. This is especially crucial when it comes to surveys or forms that require a unique response from each person.
By default, Google Forms allows users to submit multiple responses. However, there are a few ways you can change this setting to make sure that each person can only submit one entry.
One simple way to accomplish this is by selecting the “Restrict to 1 response” option in the Form settings. This will automatically limit each user to only one submission.
Another option is to send the form to users through email or a link, and enable the “Collect email addresses” feature. This will ensure that each person can only submit one response, since each submission will be tied to their unique email address.
If you are working collaboratively with others on the form, you can also choose to share the form with specific people and allow only one response per person. This can be done by clicking on the “Send” button in the top right corner of the form editor, selecting the “Allow only one response per user” option, and entering the email addresses of the intended respondents.
Google Forms also provides an option to embed the form on a website, where you can adjust the settings to allow only one response per user. This is useful if you want to share the form on your own website or a social media platform.
Additionally, you can make use of several templates available in Google Forms to create a survey or form that restricts users to submitting only one entry. These templates come with pre-set themes, colors, and designs, making it easy for you to customize the look and feel of your form.
In order to analyze the responses, Google Forms automatically stores all the collected information in Google Sheets. This allows you to go through each response individually and ensure that no one has submitted multiple entries.
By following these easy steps and using the built-in features and settings provided by Google Forms, you can ensure that each user only submits one entry, making the process of collecting and analyzing the responses much simpler and more accurate.
How to Make a Google Form Link
Creating a Google Form link is a simple process that allows you to easily share your form with others. Whether you want to collect information, conduct surveys, or gather feedback, Google Forms is an excellent tool to use. Follow this step-by-step guide to learn how to create a link for your Google Form:
Step 1: Create the Form
First, go to your Google Drive and click on “New”. From the dropdown menu, select “Google Forms”. This will take you to the Form editor where you can start creating your form. Choose a template or start from scratch.
Step 2: Design Your Form
Next, customize the look of your form to match your theme or brand. You can adjust the background, choose a party theme, or even wrap your form in an image. Click on the “Palette” icon in the top-right corner to access these design options.
Step 3: Add Questions and Sections
Now it’s time to add questions to your form. You can choose from a variety of question types, including multiple-choice, short answer, or even automatically-scored quizzes. Add sections to organize your questions and guide respondents through the form. To add a question, click on the “+” icon in the right panel.
Step 4: Share and Send the Form
Once you’ve finished creating your form, it’s time to share it with others. Click on the “Send” button in the top-right corner of the editor. You can share the form through email, social media, or by embedding it on a website. You also have the option to choose whether respondents can submit the form multiple times or only once.
Step 5: Analyze and Respond to the Results
After people start submitting your form, the responses will be collected in a Google Sheets spreadsheet. You can access this spreadsheet by clicking on the “Responses” tab in the form editor. From there, you can analyze the data and generate summaries. Respondents can also view a summary of their own responses after submitting the form.
By following these steps, you can easily create a Google Form link and start collecting information from others. Take advantage of the various customization options and collaborate with others on your form to make it truly unique!
Wrapping Up
Creating a Google Form is a simple and easy process, but it comes with many customizable options that allow you to design your form in a way that suits your needs. Through the process, you can learn how to customize the header image, change the colors and theme, and select the question types that you want to include.
Once you have created your form, you can preview it to see how it looks and make any necessary changes. You can also customize the response destination, where all the answers will be stored. By default, Google Forms automatically sends you an email notification whenever someone fills out the form.
If you want to share your form with others, you can simply copy the link or embed the form into a website. You can also share it via email or through social media. Additionally, Google Forms comes with a built-in option for creating quizzes, where you can add answer keys and automatically analyze responses.
One of the advantages of using Google Forms is that it integrates seamlessly with Google Sheets. Each form entry is automatically stored as a new row in a Google Sheet, making it easy to keep track of all the information.
Whether you’re using Google Forms for a small party invitation or for a big survey, the possibilities are endless. You can start with a template or make one from scratch. The toolbar in the top-right corner of the form allows you to easily add new sections, customize the layout, and change the default settings.
So, don’t waste any more time. Start creating your own Google Forms now and enjoy the benefits it brings!
| Step | Action |
|---|---|
| 1 | Go to forms.google.com |
| 2 | Click on the “+” sign to create a new form |
| 3 | Title your form |
| 4 | Select a theme and customize the colors |
| 5 | Design the header image |
| 6 | Add questions and answer choices |
| 7 | Preview and customize the form |
| 8 | Save and share your form |


