

If you have a blog or a website, privacy is essential. You may want to make your blog private for various reasons, including limiting access to certain people or protecting your personal information. In this article, we will show you how to make your Blogger private and keep your content secure.
First, log in to your Blogger account and select the blog that you want to make private. Then, click on “Settings” in the left sidebar. Under the “Basic” tab, you will find the “Permissions” section. Here, you can choose who can view your blog.
In the “Blog Readers” section, select the “Only people I choose” option. This will allow you to individually add specific readers who can access your blog. You can add their email addresses or select from your contacts. If you want to password-protect your blog, you can also enable the “Blog Readers Password” option and set a password for access.
Another step you can take to ensure privacy is by using encryption. You can enable HTTPS encryption for your blog by going to the “HTTPS” section under the “Basic” tab. Click on the “Yes” option next to “HTTPS Availability” to make your blog accessible only through a secure connection.
It’s also important to review and update your privacy policy. You can add a privacy policy to your blog by going to the “Privacy” section under the “Basic” tab. Here, you can enter the URL of your privacy policy page or create a new one. A privacy policy is essential for informing your readers about the information you collect and how it is used.
When migrating from Blogger to another platform, such as WordPress.com, you should also consider the privacy features offered by the new provider. WordPress.com, for example, allows you to make your blog private by selecting the “Private” option under the “Settings” tab. This ensures that only logged-in users can view your content.
In conclusion, making your Blogger private is a good way to protect your personal information and limit access to your blog. By following the steps outlined in this article, you can create a private and secure website or blog, allowing you to have full control over who can view your content.
How to Make a WordPress Blog Private
If you want to create a WordPress blog that is private and only accessible to a select group of people, there are some simple steps you can follow to achieve this. By making your blog private, you can ensure that the content, including personal information, is only available to those with the right access.
The first step in making your WordPress blog private is to select a hosting provider. There are many hosting providers available, and it is important to choose one that offers the features you want for your private blog. Some popular hosting providers include WordPress.com, Bluehost, and SiteGround.
Once you have selected a hosting provider, the next step is to create your WordPress blog. Open your hosting provider’s website and follow the steps to create a new WordPress site. During this process, you will be asked to select a domain name for your blog. Make sure to choose a name that reflects the private nature of your blog.
After you have created your WordPress blog, you can start customizing the settings to make it private. In the WordPress admin area, click on “Settings” and then “Privacy”. In the Privacy settings, you will have the option to make your blog private or public. Select the “Private” option to ensure that only authorized users can access your blog.
In addition to making your blog private, you can also add an extra layer of protection by setting a password. This means that even if someone has the URL to your blog, they will still need a password to view the content. To set a password, go to the “Settings” menu again and click on “Reading”. Scroll down to the “Site Visibility” section and select the “Password protected” option.
When you publish a new post or page on your private blog, you should also consider the privacy of the content. In the WordPress editor, there is a “Visibility” section where you can change the visibility settings for each post or page. Select the “Private” option to ensure that only authorized readers can view the content.
Another important step in making your WordPress blog private is to take care of essential privacy tools and features. This includes enabling encryption and setting up a privacy policy for your website. Encryption helps protect your readers’ data and prevents unauthorized access, while a privacy policy informs visitors about the data you collect and how it is used. Both of these steps are essential for maintaining the privacy of your blog.
By following these steps, you can easily make your WordPress blog private and control who has access to the content. It is important to note that some search engines may still index your private blog, so it is best to regularly check the visibility settings and make sure your blog remains private.
Steps to make your blogger blog privately
If you want to create a private blog on Blogger, there are some essential steps you need to follow. By making your blog private, you can control who can view and access your content.
Step 1: Login to your Blogger account and select the blog you want to make private.
Step 2: Go to the “Settings” section in your blog’s admin panel.
Step 3: In the “Basic” settings, scroll down to the “Privacy” section.
Step 4: Under the “Privacy” section, you will see the “Blog Readers” option. Select the “Only people I choose” option.
Step 5: To allow specific people to access your blog, click on the “Add Readers” link. Enter the email addresses of the individuals you want to grant access to.
Step 6: If you want to password protect your blog, click on the “Add a password” link. Enter a password that only your selected readers should know.
Step 7: Additionally, you can customize the notification message that will be displayed to users who request access to your blog.
Step 8: Save your settings and your blog will now be private. Only the individuals you have selected or those who have the password can view your content.
It’s important to note that while setting your blog to private will protect the content, it does not encrypt it. If you have sensitive or confidential information, it is always a good idea to consider additional encryption tools or hosting providers that offer advanced privacy features.
Remember to read and understand the privacy policy of the blogging platform or hosting provider you choose, including their use of cookies and data collection practices.
Migrating your blog from Blogger to a self-hosted WordPress.com site may also be a good option if you want more control over your privacy settings.
By following these steps, you can make your Blogger blog a private and secure place for your selected readers to enjoy your content.
Blog hosting and privacy
When you create a blog, whether it’s a personal or professional one, you might want to consider the level of privacy you want to maintain. Some bloggers prefer to keep their content open and accessible to anyone who wants to read it, while others prefer a more private approach.
If you want to make your blog private, there are several steps you can take, including selecting the right blog hosting provider. Some popular platforms, such as WordPress and WordPress.com, offer features that allow you to make your blog private. When you create your site, you can choose the setting that allows only your desired readers to access your content.
| Step 1: | Develop a good privacy policy: Before making your blog private, you should develop a privacy policy that outlines how you will protect the personal information of your readers. This policy should include how their data will be collected, stored, and used. |
| Step 2: | Select a blog hosting provider with strong privacy features: When choosing a hosting provider, make sure they prioritize privacy protection. Look for providers that use encryption, protect against hacking, and have strict privacy policies. This will ensure that your blog and your readers’ data are protected. |
| Step 3: | Set up your blog privately: Once you’ve chosen a hosting provider and created your blog, navigate to the settings or admin area of your blog. Look for the option to make your blog private or password-protected. Click on that option and follow the provided steps to set up your blog as private. |
| Step 4: | Migrate your existing content: If you already have a blog that you want to make private, you can use tools provided by your new hosting provider to migrate your content from your old blog to the new private one. This way, you don’t have to start from scratch. |
| Step 5: | Make specific posts or pages private: In addition to setting your entire blog to private, you can also choose to make specific posts or pages private. This gives you the flexibility to publish some content publicly while keeping other content private. Simply edit the post or page settings and select the option to make it private. |
By following these steps, you can create a private blog where only your desired readers can access your content. Remember to regularly review your privacy settings and update your privacy policy to ensure that your blog remains protected.
Tools to create a private blog
If you want to make your blog private and only accessible to a select group of people, there are several tools and platforms you can use, including:
- Blogger: Blogger is a popular blogging platform developed by Google. It allows you to create a private blog and control who can view and access your content. You can set your blog to be password-protected or only allow specific users to view it.
- WordPress.com: WordPress.com is another popular blogging platform that offers a range of privacy features. With WordPress.com, you can make your blog private and restrict access to authorized users.
- MyPrivate: MyPrivate is a blogging provider that specializes in creating private blogs. It offers advanced privacy settings, including encryption and password protection, to ensure the security of your content.
When creating a private blog, it is essential to select a provider that offers the right privacy features and settings for your needs. Here are some steps to follow:
- Choose a blogging platform or provider that offers private blog features.
- Sign up for an account with the chosen provider.
- Follow the provider’s instructions to create a new blog.
- During the setup process, select the privacy settings that best suit your needs.
- When you are ready to publish your blog, click the “Publish” button.
- Your blog will now be private, and only authorized users or those with the password can access it.
It is important to note that even when your blog is set to private, some people may still be able to read or view your content. This can happen if they have been given access by you or someone with admin privileges, or if your blog is hosted on a platform that uses cookies to remember logged-in users.
To further enhance the privacy of your blog, you can take additional steps, such as migrating your website to a self-hosted platform or using tools like encryption to secure your content.
Remember to develop a good privacy policy and make it easily accessible to your readers. By taking these steps, you can ensure that your blog remains private and accessible only to the right people.
my private site
If you value your privacy and don’t want just anyone to have access to your blog, you should consider making it private. This can be done by adjusting the settings of your blogging platform. In this article, we will discuss how to make your Blogger site private.
Step 1: Log in to your Blogger account using your admin credentials.
Step 2: From your dashboard, go to the “Settings” tab.
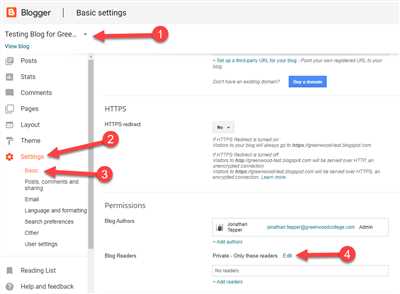
Step 3: Under the “Settings” tab, select “Basic” from the left-hand menu.
Step 4: In the “Basic” settings section, locate the “Permissions” area.
Step 5: In the “Permissions” area, you will see the option to change the blog’s visibility. Click on the “Edit” link next to “Blog Readers”.
Step 6: You will be presented with three options: “Public,” “Private – Only blog authors,” and “Private – Only these readers.” Select the “Private – Only these readers” option.
Step 7: After selecting the option, you can add people who you want to grant access to your private blog. You can add their email addresses or Blogger profiles.
Step 8: Once you have added the desired people, click on “Save changes.”
Now, only the individuals you specified will be able to view your blog. All others will be redirected to a login page or denied access altogether.
It is essential to ensure the privacy of your blog, especially when it contains personal or sensitive content. By making your blog private, you can have better control over who can see your posts and pages. This is especially useful for personal blogs or blogs with content that you only want to share with a select group of people.
Note that some features, such as public comments or sharing options, may be restricted when your blog is set to private. However, these settings can be adjusted depending on your preferences.
WordPress.com is another popular blogging platform that offers similar privacy options. If you are considering migrating from Blogger to WordPress, you can take advantage of their private site features as well.
In conclusion, making your Blogger site private is a good step to protect your content and maintain your privacy. By following the steps outlined in this article, you can easily adjust the settings of your blog and ensure that only authorized individuals can view your posts and pages.
Remember, the privacy of your blog and personal information is essential, and taking the necessary steps to protect it is always a good practice.
Password protected
If you want your blog to be more private and accessible only to selected people, you can set a password for it. This feature is available on platforms like WordPress and Blogger. Here are some simple steps to make your blog password protected:
- First, go to your blog’s settings.
- Select the option that allows you to set a password for your blog.
- Then, create a strong password that is not easily guessable by others.
- Remember to use a combination of letters, numbers, and symbols for better encryption.
- Take your time to choose a password that you can remember easily.
When you have set a password for your blog, people who want to access it will have to enter the correct password before they can view your content. This is a good step to take when you want more privacy and control over who can read your blog.
It’s essential to note that setting a password for your blog does not make it completely private. The password protection feature only restricts access to your blog’s content, and your blog could still be visible to the public to some extent. To make your blog entirely private, you may want to consider hosting it on a personal website where you have more control over privacy settings.
In addition, when migrating your blog from one platform to another, like from Blogger to WordPress, make sure to check if password protection features are available on the new hosting provider. Some hosting providers or tools may not support this feature, so it’s important to double-check before making any changes.
To ensure the privacy of your blog, you can also implement a privacy policy and use cookies only when necessary. This will show your readers that you value their privacy and are taking steps to protect their data.
In conclusion, password protecting your blog is a useful feature that allows you to limit access to certain people. However, keep in mind that it doesn’t make your blog completely private. Consider other hosting options and privacy settings to achieve a higher level of privacy for your blog.
There are various sources, including WordPress.com and Blogger, where you can find more information on how to make your blog private or password protected. Take the time to read and understand the steps required before making any changes to your blog settings.
Private content
If you want to make your blogger private and restrict access to certain people only, there are some steps you can take to protect your privacy and ensure that your content is only visible to those you select.
First, you should login to your Blogger account and click on the “Settings” menu. From there, select the “Basic” tab and find the “Permissions” section. Under the “Blog Readers” setting, click on the “Edit” button. This will open a dialog box where you can add the email addresses of the people you want to give access to. You can also choose to make your blog completely private, requiring a password for anyone to view it.
If you want to make only certain posts or pages private, you can do this by editing the individual post/page settings. When you create or edit a post/page, you will see a section called “Post” or “Page Settings” depending on your Blogger version. In that section, you can find a “Visibility” option where you can select “Private” to make the post/page not visible to the public.
Alternatively, if you want to migrate your blog to a different platform like WordPress.com, you can take advantage of their built-in privacy features. During the migration process, you can choose to make your entire blog private, requiring a password for anyone to access it. You can also set the visibility of individual posts/pages within WordPress.com.
Another option is to publish your content on a password-protected site. There are many hosting providers that offer this feature, where you can develop your own website and ensure that only people with the password can view your content. This can be a good option if you want complete control over your content and privacy.
In addition to these steps, it is also essential to consider the privacy policy and encryption tools provided by your blogging platform or hosting provider. This will help ensure that your personal information and content are protected.
Overall, making your blogger private involves a combination of settings, including permissions, password protection, and visibility options. By following these steps and utilizing the privacy features offered by your platform or hosting provider, you can ensure that your content is only accessible to those you want to share it with.
Sources
If you want to make your Blogger private and allow only certain people to access your blog, there are a few steps you can take. Here are some sources that provide good information on how to achieve this:
-Visit the official Blogger website for step-by-step instructions on how to change your blog’s privacy settings and make it private.
-WordPress is another popular blogging platform that offers more advanced privacy features. Their website provides tutorials and guides on how to make your WordPress blog private.
-This article on How-To Geek explains in detail how to make your Blogger blog private or password-protected. It covers the necessary steps and settings you should select to ensure your blog is only visible to authorized readers.
-This source provides information on how to develop a privacy policy for your blog. It explains what should be included in the policy and why it is essential to protect your readers’ personal information.
-When making your blog private, it’s important to understand how cookies work and how they can affect your readers’ privacy. This website explains what cookies are, how they are used, and how to develop a cookie policy for your blog.
By reading these sources and following their instructions, you can make your Blogger or WordPress blog private, ensuring only authorized people can access your content.


