Are you looking to create a stunning slideshow presentation? Setting up a slideshow has never been easier! In this article, we will walk you through the process of creating a slideshow using various modes and options.
Before we begin, please note that the steps for setting up a slideshow may vary depending on the software or device you are using. However, the general outline will remain the same. Furthermore, we will provide instructions for both Windows and Mac users, so no worries if you are on a different operating system!
- Step 1: Open the Slideshow Software
- Step 2: Select Slides and Change Options
- Step 3: Set Timings and Music
- Step 4: Further Customizations
- Step 5: Preview and Start the Slideshow
- Create slide shows in Photos on Mac
- Open Smart Movie
- Show Taskbar
- Presentation Modes
- Related Articles
- Video:
- How To Create Canva Slideshow Video For Beginners (2023)
Step 1: Open the Slideshow Software
If you are using Microsoft PowerPoint, open the software and select the “New Slide” button on the taskbar. For Mac users, open the “Photos” app and click on the “Create” button. From here, you can choose “Slideshow” or “SmartMovie” to start building your presentation.
Step 2: Select Slides and Change Options
Once you have your blank slideshow window open, it’s time to select the slides you want to include. You can simply drag and drop them into the window or use the “Add Slides” option. If you want to change the position of the selected slides, press the necessary buttons or check the related options.
Step 3: Set Timings and Music
To make your slideshow even more captivating, you can set timings for each slide and add background music. Depending on the software you are using, you will find these options under different menus. Look for “Timings” or “Music” tabs and follow the instructions provided.
Step 4: Further Customizations
Now that your slides are in place and timings and music are set, it’s time to add further customizations. This may include inserting subtitles, narrating your presentation, or creating a smart slideshow that automatically adjusts to the content. Explore the options available and unleash your creativity!
Step 5: Preview and Start the Slideshow
Before you dive into the full presentation, it’s a good idea to preview your slideshow. This will allow you to make any necessary changes or adjustments. Once you are satisfied, press the “Start” button to begin your slideshow and wow your audience!
That’s it! Now you know how to set up a slideshow like a pro. If you need further information or want to explore advanced features, be sure to check out related articles or online resources. Happy slideshow creating!
Create slide shows in Photos on Mac
If you’re a Mac user, you can easily create slide shows in the Photos app. Whether you want to showcase your favorite pictures or create a professional presentation, Photos has all the tools you need to make it happen. Here are the steps to get you started:
-
Open the Photos app on your Mac.
-
Select the photos you want to include in your slide show. You can press the Command key and click on multiple photos to select them.
-
Click on the “+” button in the taskbar to create a new slide show.
-
A new window will open with options regarding timings and other settings. You can change the display duration for each slide, select different transition options, and even add background music to your slide show.
-
Once you have selected your desired options, click on the “Create” button to start creating your slide show.
-
In the slide show window, you can drag and drop the photos to rearrange their position. You can also record a narration or add subtitles to individual slides if needed.
-
To play the slide show, click on the “Play” button in the bottom toolbar. The slide show will start from the beginning and play the slides in the selected order.
-
If you want to further customize your slide show, you can click on the “Options” button in the toolbar. Here, you can select different display modes, change the default transition, and adjust other settings.
Creating slide shows in Photos on your Mac is a great way to showcase your photos or create professional presentations. Whether it’s for personal use or business purposes, Photos has everything you need to bring your ideas to life. So why wait? Start creating slide shows with Photos on your Mac today!
Open Smart Movie
If you want to create a slideshow with slides and timings, you can use SmartMovie to accomplish this task. SmartMovie is a feature in Microsoft PowerPoint that allows you to easily turn your slide shows into a movie show. In addition, you can add music, narration, and even subtitles to enhance the presentation.
To open SmartMovie, first select the slides you want to include in your movie. You can do this by clicking and dragging your mouse to create a selection box around the slides, or you can hold down the Ctrl key and click on each slide individually.
Once you have selected the slides, click on “SmartMovie” in the taskbar at the top of the screen. This will open the SmartMovie window, where you can see an outline of your selected slides on the left and options for creating your movie on the right.
From here, you can change the order and position of your slides, add music or narration, and select different play modes for your movie. If you want to record narration, there is a button here that will allow you to do so. You can also change the timings of your slides and add subtitles if necessary.
When you are ready to create your movie, click on the “Create” button in the SmartMovie window. This will start the process of turning your slides into a movie. You can choose to save the movie to your computer or share it with others.
It is important to note that SmartMovie is only available on a Windows computer. If you are using a Mac, you will need to use a different program to accomplish this task. There are many articles and tutorials available online that can provide further information on this topic.
Show Taskbar
To create a slideshow in Microsoft PowerPoint, you typically start by selecting the photos or slides that you want to include. However, there may be times when you want to show your presentation in an online format where you don’t have control over the entire screen. In these cases, it can be helpful to show the taskbar so that your audience can see other open windows or access other programs while your slideshow is playing.
To show the taskbar, there are a few different options you can choose from:
Option 1: Start the slideshow by pressing the F5 key on your keyboard. This will launch the slideshow in full-screen mode with the taskbar hidden. To show the taskbar, move your mouse to the bottom of the screen, and it will appear.
Option 2: From the Slideshow tab in the PowerPoint ribbon, click on the “From Beginning” button. This will start the slideshow from the beginning and display it in full-screen mode. To show the taskbar, move your mouse to the bottom of the screen, and it will appear.
Option 3: In PowerPoint 2013 and later versions, there is a “Show Taskbar” button on the slide show controls at the bottom-right corner of the window. Clicking this button will show the taskbar while the slideshow is playing.
In addition to showing the taskbar during a slideshow, there are also other smart options you can explore:
– Use the Presenter View to have your presentation notes and timings visible on one screen, while your audience sees only the slides on the main screen.
– Add narration or music to your slideshow to further enhance the experience.
– Use the Record Slide Show feature to record your presentation, including your voice and any annotations you make on the slides.
– Change the position of the taskbar to the top, left, or right of the screen, depending on your preferences.
– Select different play modes, such as looping or advancing slides manually.
– Add subtitles or captions to your slides to make them more accessible to a wider audience.
When it comes to showing the taskbar during a slideshow, remember that each version of PowerPoint may have slightly different options and features. For further information and help regarding this topic, you can refer to the Microsoft Office support articles or consult the related documentation specific to your version of PowerPoint.
Presentation Modes
In Microsoft PowerPoint, there are several different modes that you can use to present your slideshow. Each mode has its own unique features and options to enhance your presentation experience.
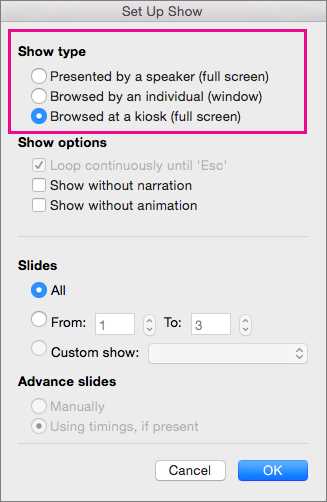
When you click on the “Slide Show” button on the taskbar, you can select from three different presentation modes:
1. Slide Show
This is the default mode and will play your slideshow in full screen. You can navigate between slides by clicking on them or by using the arrow keys. You can also use the spacebar or the “N” key to go to the next slide, and the “P” key to go to the previous slide.
2. Presenter View
If you have two monitors or are using a projector, you can select the Presenter View mode. In this mode, you’ll see your current slide, the next slide, and any notes you have regarding the slide. You can also record your presentation and play it back later. This mode is useful if you want to see your notes or record your presentation.
3. Browsed by an Individual (Window)
If you want to view your slideshow in a window rather than full screen, you can select this mode. This is useful if you want to have multiple windows open at the same time, or if you want to view your slideshow and other documents side by side.
There are also additional options you can use to customize your presentation modes. For example, you can change the position of the slides, add music or subtitles, set timings for each slide, and more. You can find these options under the “Slide Show” tab in the ribbon.
Knowing the different presentation modes in Microsoft PowerPoint will help you create more engaging and dynamic slideshows. Whether you’re presenting in person, online, or recording a presentation, there’s a mode that suits your needs.
Related Articles
If you’re playing a slideshow and want to add related music, you can do it in a few simple steps. First, open Microsoft PowerPoint and select the presentation where you want to add music. Then, click on the “Slide Show” tab on the taskbar and select “Set Up Slide Show”. In the Set Up Show window, you will see different options regarding playing the slideshow. Here, select the “Play Narrations, ink, and laser pointer with the slide show” and “Use Timings, if present” checkboxes.
Then, press the “OK” button to save the changes. Now, go back to the slide where you want to add music. Click on the “Insert” tab on the taskbar and select “Audio” from the drop-down menu. You can then select audio files from your computer or online to add them to your slideshow. After adding the music, you can further customize the options by right-clicking on the audio icon and selecting “Edit Sound Object”.
In the Edit Sound Object window, you can change the start and end timings of the music, position them on the slide, and select different play modes. You can also add subtitles to the music, if needed. Once you have made all the desired changes, close the Edit Sound Object window by clicking on the “X” button in the top right corner.
Now, when you start the slideshow, the music will play automatically along with the slides. If you want to record a narration for your slideshow, you can do it by clicking on the “Slide Show” tab on the taskbar and selecting “Record Slide Show”. From there, you can choose to record the narration from the beginning or from the currently selected slide.
When you are ready to show your slideshow, click on the “Slide Show” tab on the taskbar and select “From Beginning” or “From Current Slide”. The slideshow will open in full-screen mode and the music and narration, if recorded, will play according to the set timings.
There are also further options you can explore regarding slideshows, such as creating a SmartMovie with your photos, changing the slide transitions, and more. You can find more articles and tutorials on this topic in the Pinnacle and Microsoft support pages.