

If you’re a Mac user, you might already be familiar with the Apple Photos app for managing your photo albums and videos. But did you know that you can also create stunning slideshows with this powerful tool? In this article, we’ll guide you through the steps of creating an apple slideshow that will showcase your photographs and videos in a unique and creative way.
Before we dive into the steps of creating a slideshow, let’s first talk about the tools you’ll need. The Apple Photos app, included with macOS, offers a range of features that make it easy to create professional-looking slideshows. With this app, you can add music, apply filters and themes, and even include videos in your slideshow.
So, how do you get started? First, open the Apple Photos app on your Mac. Then, locate the specific album or events inside the app that contains the photos you want to include in your slideshow. If you don’t have an album or events set up yet, you can create one by going to the sidebar, right-clicking on “Albums” or “Events,” and selecting the “Create New Album” or “Create New Event” option.
Once you have your photos selected, click on the “Add Photos” button on the toolbar. This will open a new window where you can navigate to the location where your desired photos are stored. To select multiple photos at once, hold down the Command key on your keyboard while clicking on each photo. When you’re done selecting photos, click on the “Add” button.
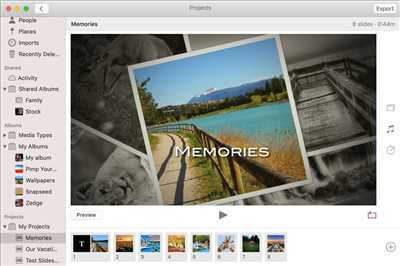
Now that you have your photos added, it’s time to start making your slideshow. Click on the “Create Slideshow” button in the toolbar, and a new window will appear with a list of themes and templates for your slideshow. Choose the theme that best fits the style and mood you want for your slideshow. You can always change the theme later if you’re not satisfied with your initial choice.
After selecting the theme, you’ll see a preview of your slideshow with some blank slides. To start adding photos, simply drag and drop them from the sidebar or the thumbnails view onto the slides. You can also rearrange the order of the photos by clicking and dragging them to the desired location.
Now that your slideshow is taking shape, it’s time to add music to enhance the experience. Click on the “Music” tab in the toolbar, and you’ll have the option to choose from pre-selected songs or upload your own. Select the song you want from the list, or click on the “+” button to upload your own music file. You can adjust the volume and set when the music starts in the “Music” tab as well.
With your photos and music in place, you can further customize your slideshow by adding text, filters, and other elements. Click on the “Text” tab to add captions or titles to your slides. Explore the “Filters” tab to apply various visual effects to your photos. Feel free to experiment with different options to achieve the desired look and feel of your slideshow.
When you’re finalizing your slideshow, don’t forget to give it a name. Click on the “Slideshow” menu, then select the “Rename Slideshow” option and choose a name that best describes the content or theme of your slideshow. This will help you easily locate and access your slideshow in the future.
Once you’re satisfied with your slideshow, you can click on the “Play” button to view it in full-screen mode. You can also click on the “Share” button to share it with friends and family via email, social media, or even burn it onto a DVD. The options are endless!
So, there you have it – a step-by-step guide on how to make an apple slideshow using the Apple Photos app. Whether you’re creating a slideshow to showcase your travel photos, commemorate a special event, or simply have fun with your photos, this powerful app has all the tools you need to create a stunning and memorable slideshow.
- iPhoto Alternative: Make Photo Slideshow on macOS
- Create a slideshow
- Photos toolbar while in Albums
- Photos Sidebar
- FAQs
- What are the uses of composition templates
- What are the four types of Final Cut Pro templates?
- How do I create a template for Final Cut Pro
- How can I flag a template as having a 4K resolution
- Video:
- How to Create A Slideshow with Music (free slideshow maker)
iPhoto Alternative: Make Photo Slideshow on macOS
If you’re a macOS user and looking for an alternative to iPhoto for creating photo slideshows, there are several options available to you. One popular choice is using a slideshow maker tool that offers a comprehensive set of features and is easy to use. This article will explore some of the alternatives and how you can make a photo slideshow on macOS.
One great alternative to iPhoto is a slideshow maker like AquaSoft Stages. This software provides a user-friendly toolbar that allows you to access all the features you need. From the main window, you can create, edit, and publish your slideshows with ease.
AquaSoft Stages uses a timeline view, which allows you to manage all elements of your slideshow efficiently. You can add photos, videos, and text to your composition, rearrange their order, apply filters, and much more directly on the timeline. You can also access a range of powerful templates and themes that are included in the software, making it easy to create professional-looking slideshows.
To start creating a slideshow, you first need to import your photos into the software. You can do this by clicking on the “Import” button and selecting the desired photos from your Mac’s location. Once imported, you can view the thumbnails of your photos and easily drag and drop them onto the timeline.
Next, you can customize the order of your photos by dragging them to different layers on the timeline. You can also add placeholders, text, and other elements to enhance your slideshow. To add text, simply select the “Text” option from the toolbar and click on the desired location on the timeline.
When you’re happy with the layout of your slideshow, you can apply filters, rename the slides, or add effects to individual photos. AquaSoft Stages also offers a range of music options, so you can add background music to your slideshow. You can choose from the included music library or import your own songs.
If you’re creating a slideshow for a specific event or occasion, you can use the calendar view to organize your photos by date. This view allows you to easily access photos by their date and names, making it convenient for viewing and editing purposes.
Once you’ve finished creating your slideshow, you can publish it in various formats. AquaSoft Stages allows you to export your slideshow as a video file, which you can then share with others or upload to platforms like YouTube or Vimeo. You can also choose to export your slideshow as a PDF file, perfect for sharing or printing.
In conclusion, if you’re looking for an alternative to iPhoto for creating photo slideshows on macOS, AquaSoft Stages is a powerful and user-friendly option. With its range of templates, music options, and editing features, you can create stunning slideshows that are sure to impress. Give it a try and see what other creative possibilities it offers!
If you have any questions or need further assistance, be sure to check out the FAQs page on AquaSoft’s website. They provide helpful information and resources to guide you through the slideshow creation process.
Create a slideshow
To create a slideshow with Apple, you can use the built-in tools of the macOS Photos app. Follow these steps to make a stunning slideshow with your photos:
Step 1: Open the Photos app
First, open the Photos app on your Mac.
Step 2: Select your photos
Click on the Photos tab in the sidebar, then select the photos you want to include in your slideshow. You can also use the filters and search bar to find specific photos.
Step 3: Create a new slideshow
With your photos selected, go to the File menu and choose the option “Create Slideshow”.
Step 4: Customize your slideshow
In the slideshow editor, you can add or remove photos, rearrange their order, and rename them. You can also choose a template for your slideshow and adjust the duration of each slide.
Additionally, you can include videos in your slideshow by checking the “Include videos” checkbox.
Step 5: Add music and transitions
To make your slideshow more engaging, you can add music and transitions. Click on the “Music” or “Transitions” tabs in the toolbar to access the available options. You can choose from the built-in music tracks and various transition effects.
Step 6: Preview and export
Once you’re satisfied with the composition of your slideshow, click the “Preview” button to see how it will look. You can make any final adjustments if needed.
When you’re ready to export your slideshow, go to the File menu and choose the “Export” option. You can save it in various formats, such as a video file or a PDF.
That’s it! You’ve successfully created a slideshow with Apple Photos. Now you can view, play, and share your slideshow with others.
Note: If you’re using macOS Catalina or later, the iPhoto app functions have been integrated into the Photos app.
Photos toolbar while in Albums
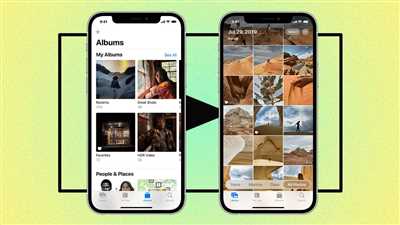
When you are in the Albums section of the Photos app on your Mac or iPad, you will see a toolbar at the top of the window that gives you access to various features and options. These elements can help you with creating and editing your slideshow:
1. Selection
The selection checkbox allows you to select multiple photos with a single click. You can then perform actions on the selected photos, such as editing or deleting them.
2. Date & Location Filters
You can use the date and location filters to narrow down the photos shown in the album. For example, you can filter the album to show only photos taken on a specific date or at a specific location.
3. View Options
The view options drop-down menu allows you to choose different ways to display your photos in the album. You can choose between different thumbnail sizes, list view, or a larger preview.
4. Slideshow
The Slideshow button allows you to play a slideshow of the selected photos. You can choose from several alternative themes and also customize the slideshow with music and effects.
5. Share
The Share button gives you options for sharing your photos. You can share them via email, AirDrop, or through various social media platforms.
6. Edit
The Edit button opens the photos in the built-in photo editor. You can crop, adjust the brightness and colors, apply filters, and make other edits to enhance your photos.
Having access to these features and options from the toolbar makes it easier to organize and showcase your photographs in albums. Whether you’re a casual user or a professional photographer, the Photos app on macOS provides a powerful yet user-friendly way to manage, edit, and share your photos.
Photos Sidebar
The Photos app on macOS offers a powerful slideshow maker that allows you to create stunning slideshows with your photographs and videos. One of the useful features of the app is the Photos Sidebar, which provides easy access to various elements and options while you’re creating a slideshow.
When you open the Photos app and start creating a slideshow, the sidebar will be located on the left side of the screen. It is a panel that contains different tabs and tools that you can use to enhance and customize your slideshow.
The first tab in the sidebar is “Photos.” Here, you can browse through your photo library and select the images and videos you want to include in your slideshow. You can use the thumbnail view to see all your photos with other smart views such as Moments, Years, and Collections. The sidebar also provides filtering options to help you find specific photos based on their location, date, or other criteria.
Below the Photos tab, you will find the “Themes” tab. This tab offers a variety of pre-designed templates and themes that you can apply to your slideshow. Each theme has its own unique composition, transitions, and music. By clicking on a theme, you can see a preview of how your slideshow will look with that particular theme.
The next tab in the sidebar is “Music.” Here, you can add music to your slideshow. You can choose from the available music options or import your own music files. The sidebar also includes tools for editing the music, such as adjusting the volume or trimming the length.
The “Photos Sidebar” also contains tabs for “Filters” and “Adjust.” These tabs allow you to enhance the appearance of your photos by applying filters and adjusting various parameters such as brightness, contrast, and saturation.
Other useful tools in the sidebar include the “Templates” tab, which provides alternative slideshow templates, and the “Events” tab, which allows you to organize your photos and videos based on specific events or occasions.
Additionally, the sidebar provides options to rename your slideshow, export it, or share it via email, messages, or social media platforms. You can also access the “Edit” mode, where you can fine-tune your slideshow by rearranging the order of photos, adding text layers, and applying other editing techniques.
The Photos Sidebar is a handy feature in the Photos app that helps you efficiently navigate through the different steps involved in creating a slideshow. By utilizing the various tools and options available in the sidebar, you can easily customize your slideshow to your liking and create a final composition that showcases your photos and videos in the best possible way.
FAQs About Photos Sidebar:
| Question | Answer |
|---|---|
| Can I access the sidebar using a keyboard shortcut? | Yes, you can hide or show the sidebar by pressing Command + Option + S. |
| What is the purpose of the checkbox next to each photo in the sidebar? | The checkbox allows you to select multiple photos at once for bulk actions such as deletion or sharing. |
| Can I customize the names of the photos in the sidebar? | No, the names of the photos in the sidebar are automatically generated based on their original file names. |
FAQs
Frequently asked questions about creating a slideshow with Apple:
| 1. How do I create a slideshow in Apple Photos? |
| To create a slideshow in Apple Photos, follow these steps: |
| – Open Apple Photos on your Mac. |
| – Select the photos you want to include in the slideshow by clicking on their thumbnails. |
| – Click on the “+” button in the sidebar and choose the “Slideshow” option. |
| – A slideshow window will appear with various themes, templates, and options. Select the desired theme. |
| – Customize the slideshow by adding music, adjusting the duration and transition effects, and adding titles or filters if desired. |
| – Click “Play” to preview the slideshow and make any necessary adjustments. |
| – When you are satisfied with your slideshow, click “Export” to save or share it with others. |
| 2. Can I create a slideshow in iPhoto? |
| No, iPhoto is no longer available as it has been replaced by Apple Photos in macOS. You can only create slideshows using Apple Photos. |
| 3. How can I add music to my slideshow? |
| To add music to your slideshow, follow these steps: |
| – Click on the “Music” tab in the slideshow window. |
| – Choose a music option from the list of available songs or click “Edit” to add your own music. |
| – Adjust the volume level and select whether you want the music to start playing automatically or on click. |
| 4. How do I change the order of photos in a slideshow? |
| To change the order of photos in a slideshow, follow these steps: |
| – Click on the “Photos” tab in the slideshow window. |
| – Drag and drop the photos to rearrange them in the desired order. |
| 5. Can I include videos in my slideshow? |
| Yes, you can include videos in your slideshow. Simply select the videos along with the photos when creating or editing the slideshow. |
| 6. How can I hide or show the sidebar in the slideshow editor? |
| To hide or show the sidebar in the slideshow editor, click on the “View” menu and check or uncheck the “Show Sidebar” option. |
| 7. What resolution are the photos in the slideshow? |
| The resolution of the photos in the slideshow depends on the original resolution of the photos you imported into Apple Photos. The slideshow uses your photos with their original resolution. |
| 8. Can I print my slideshow or create a photo book? |
| Yes, you can print your slideshow or create a photo book by clicking on the “Print” option in the slideshow window. You can choose various options and templates to create customized prints or photo books. |
| 9. Are there any alternative slideshow makers for Mac? |
| Yes, there are alternative slideshow makers for Mac. One popular option is Filmora Video Editor, which offers a powerful set of tools and templates to create professional-looking slideshows. You can also use third-party software or online services to create slideshows. |
These are some of the frequently asked questions when it comes to creating a slideshow with Apple. If you have any other questions or need further assistance, feel free to contact Apple Support or consult the user guide for Apple Photos.
What are the uses of composition templates
Composition templates can be highly useful in creating apple slideshows for various purposes. Whether you are using an iPad, Mac, or other Apple devices, these templates provide a powerful tool for designing and customizing your slideshows.
One of the main uses of composition templates is for creating slideshows for events such as weddings, birthdays, or vacations. These templates come with pre-designed layouts and placeholders, allowing you to easily insert your photos and customize the text according to the event. It saves you time and effort, as you don’t have to design each slide from scratch.
With composition templates, you can also create photo books and print them out to keep as a physical memory. There are templates for various photo book sizes, including square and landscape. The templates include placeholders for your photographs and text, allowing you to easily arrange your photos and add captions or descriptions.
Another use of composition templates is for creating slideshows with music. You can select a template that includes a music placeholder, and then add your desired audio track. This allows you to create dynamic slideshows that are synchronized with the music, enhancing the overall viewing experience.
The composition templates also offer various tools for enhancing your photos. You can apply filters and effects to your photos, such as adjusting the brightness, contrast, and saturation. Additionally, you can add text overlays, such as titles or captions, to provide context or information about the photos.
For those who are more advanced in creating slideshows, the composition templates offer options for adding and manipulating layers. You can have multiple layers of photos or text, allowing you to create complex compositions with different elements. This flexibility gives you more control and creative options in designing your slideshow.
Once you have created your slideshow using the composition templates, you can easily publish and share it with others. You have the option to export the slideshow as a video file, which can be played on various devices and platforms. You can also share the slideshow directly to social media platforms or send it via email.
Overall, the composition templates are a powerful and convenient tool for creating apple slideshows. They provide a range of features and customization options, making it easy to design stunning slideshows for any occasion. Whether you are a beginner or an experienced user, these templates can help you create professional-looking slideshows with minimal effort.
What are the four types of Final Cut Pro templates?
Final Cut Pro is a powerful video editing tool that allows users to create stunning slideshows and videos. One of the key features of Final Cut Pro is the ability to use templates, which can greatly simplify the process of creating a slideshow. There are four types of templates that you can use in Final Cut Pro:
- Themes: Themes are pre-designed templates that come with their own unique styles, transitions, and animations. You can simply drop your photos or videos into the placeholders and Final Cut Pro will take care of the rest. Themes are a great choice if you want a quick and easy way to create a slideshow with a professional look.
- Generators: Generators are templates that allow you to create slideshows with dynamic elements. They are often used to create motion graphics or to add special effects to your slideshow. With generators, you can create unique and eye-catching slideshows that stand out from the rest.
- Titles: Titles are templates that allow you to add text to your slideshow. You can choose from a variety of pre-designed text styles and customize them to fit your needs. Titles can be used to introduce different sections of your slideshow or to display captions and descriptions for your photos or videos.
- Transitions: Transitions are templates that allow you to create smooth and seamless transitions between your photos or videos. They can be used to add a professional touch to your slideshow and make it more visually appealing. Final Cut Pro offers a variety of transition templates, including fades, wipes, and dissolves.
By utilizing these four types of templates, you can easily create impressive slideshows with Final Cut Pro. Whether you’re showcasing your photos with beautiful themes, adding dynamic elements with generators, adding text with titles, or creating smooth transitions with transition templates, Final Cut Pro has the tools you need to make your slideshow stand out.
How do I create a template for Final Cut Pro
If you’re wondering how to create a template for Final Cut Pro, you’re in luck! Templates are a powerful tool that can save you time and effort when editing videos on your Mac. In this guide, we’ll walk you through the steps to create a template using iPhoto on macOS.
First, open iPhoto and click on the “Events” or “Albums” tab, depending on where your desired photos are located. If you’re using iPhoto for the first time, you may need to import your photos from your camera or other sources.
Next, select the photos you want to include in your template by clicking on them. You can use the Shift key to select multiple photos at once.
Once you’ve selected the photos, click on the “Create” button on the toolbar and select “Slideshow” from the dropdown menu. A new window will appear with your selected photos showcased in thumbnails.
You can now customize your slideshow by adding text, music, and other elements. To add text, click on the “Text” button on the toolbar and type in the desired text. You can also choose from different text styles and adjust the position and appearance of the text.
To add music, click on the “Music” button on the toolbar and select the desired music file from your Mac. You can also adjust the volume and set the music to play throughout the slideshow or for a specific duration.
If you want to create a template with multiple layers or filters, you can use video editing software such as Final Cut Pro or Filmora. These tools have more advanced features for creating complex templates.
Once you’re satisfied with your slideshow template, click on the “Export” button on the toolbar to save it in your desired location. You can then access and use your template in Final Cut Pro or any other video editing software that supports the format.
With the ability to create templates in iPhoto, you can easily make professional-looking slideshows for various purposes, such as showcasing your photos, creating personalized greeting cards, or even making calendar templates.
In conclusion, creating a template for Final Cut Pro is a straightforward process. By following these steps, you can create a powerful template that uses your photos, music, and other elements to enhance your videos and make them stand out.
How can I flag a template as having a 4K resolution
Flagging a template as having a 4K resolution can be useful when creating Apple slideshows. By indicating that a template is optimized for 4K resolution, you ensure that your slideshow will display in high definition on devices that support it.
To flag a template as having a 4K resolution in the Apple Slideshow editor, follow these steps:
- Open the Apple Slideshow editor on your Mac.
- Select the template you want to flag as 4K by clicking on it in the sidebar.
- In the toolbar, click on the “Edit” option to enter the editing mode for the selected template.
- In the editing window, click on the “Settings” icon (it looks like a gear).
- A sidebar will appear on the right side of the window. Look for the “Resolution” section.
- Check the checkbox next to the “4K” option to indicate that this template is optimized for 4K resolution.
- If desired, you can also rename the template by clicking on the placeholder name and entering a new name.
- Click on the “Done” button to save your changes.
Once you have flagged a template as having a 4K resolution, it will be labeled as such in the templates list. You can then use this template to create your slideshow with high-resolution images and videos.
Remember, not all devices support 4K resolution, so make sure that you publish or share your slideshow in a format that is compatible with your intended audience. Apple Slideshow provides options for sharing your slideshow as a video file or burning it to a DVD or Blu-ray.
By flagging a template as having a 4K resolution, you can ensure that your slideshow showcases your photographs and videos in the best possible quality!


